
Popular categories
Looking for a yarn?


Comments / Questions (26)
![]() Hanna wrote:
Hanna wrote:
Hey, will this sweater be suitable for beginners as a first knitted sweater? (I only knitted a hat before)
22.11.2025 - 13:17DROPS Design answered:
Hi Hanna, The easiest jumpers are with a round yoke, where all increases are evenly spaced on each increase round. This pattern includes raglan which is slightly more difficult. Here is a link to jumpers with round yokes: https://www.garnstudio.com/search.php?action=search&w=jumper+with+round+yoke&lang=en Regards, Drops Team.
24.11.2025 - 07:30
![]() Tina wrote:
Tina wrote:
Hej! Sista okökningen stämmer inte med nummerna. För xl, står det öka fram- och bakstycke 27 ggr, från 76m men sen står det att det ska vara 84m men i nästa stycke - utan att det ska ökas - står det 90m. Även ärmens maskantal stämmer inte. Vilka siffror stämmer och vilka är fel?
16.10.2025 - 11:17DROPS Design answered:
Hej Tina. Några av maskorna flyttas nu från ärmar till fram och bakstycke (för att undvika att ärmarna blir för breda), men dela bara upp det som det står så ska det bli rätt. Mvh DROPS Design
16.10.2025 - 12:33
![]() Anna wrote:
Anna wrote:
Ahh meine vorherige Frage hat sich geklärt, nachdem ich mir in den Lektionen die Skizze Punkt 7) angeschaut habe. Es wird jetzt nicht auf beiden Seiten der Markierung zugenommen, sondern nur auf den Seiten des Rumpfteils.
21.04.2025 - 12:55
![]() Anna wrote:
Anna wrote:
Liebes Drops Team, beim Passé heißt es: "Nun die Zunahmen am Rumpfteil weiterarbeiten, jedoch nicht an den Ärmeln, bis insgesamt 21-23-24-27-29-30 x an jedem Markierungsfaden des Rumpfteils zugenommen wurde (d.h. 5-5-4-4-4-3 Zunahme-Runden, die nur am Rumpfteil gemacht werden)". Alle vier Markierungsfäden gelten doch sowohl für den Rumpfteil als auch für die Ärmel. Soll ich also weiterhin an allen vier Stellen zunehmen? Ich hoffe Sie können mir helfen. LG Anna
21.04.2025 - 11:19DROPS Design answered:
Liebe Anna, die Markierungsfäden gelten für Raglan, aber Rückenteil ist zwischen 4. und 1. Markierungsfäden und Vorderteil zwischen 2. und 3. Markierungsfäden, so werden Sie beim Rückenteil vor 1. Mark + nach 4. Mark. und beim Vorderteil nach 2. Mark. und vor 3. Mark. zunehmen - für die Ärmel nimmt man nach 1. und vor 2. + nach 3. + vor 4. Mark zu. Viel Spaß beim Stricken!
22.04.2025 - 15:55
![]() Björg Björnsdóttir wrote:
Björg Björnsdóttir wrote:
Þegar ég fer bara að auka út i laskalínu á fram og bakstykki á ég þá líka að gera það í annari hverri umferð?
27.03.2025 - 14:50DROPS Design answered:
Blessuð Björg. Útaukningin er alltaf frá réttu. Gangi þér vel.
31.03.2025 - 10:45
![]() Anastasia wrote:
Anastasia wrote:
Hi there! First it says that we're having 236-256-272-300-320-336 stitches (52-56-60-66-70-74 stitches on each sleeve and 66-72-76-84-90-94 stitches on the front/back pieces). However, after we divide stitches for body and sleeves, the numbers provided don't match eg. 46-50-54-60-62-62 stitches on a thread for the sleeve when it is supposed to be 52-56-60-66-70-74. Please explain what to do. Thank you!
19.03.2025 - 09:30DROPS Design answered:
Dear Anastasia, if you have the correct number of stitches for your size, just divide piece as explained, the first/last stitches on sleeves will now belong to back/front piece to avoid sleeves to be too wide. Happy knitting!
19.03.2025 - 15:59
![]() Kinou wrote:
Kinou wrote:
Bonjour, je viens de finir le col et commence l’encolure. Je fais la taille M. je suis désolée mais je ne comprends pas : tricoter en jersey en augmentant pour le raglan jusqu’à 3 mailles après le marqueur. Jusqu’à ?? Désolée. J’augmente tous les 2 rangs, 3 fois c’est ça ? Merci merci. Me tarde continuer !
17.02.2025 - 09:24DROPS Design answered:
Bonjour Kinou, dans cette vidéo, nous montrons comment tricoter ce type de rangs raccourcis pour une encolure tout en augmentant pour le raglan - notez juste que les augmentations sont faites de façon différentes dans la vidéo, mais le principe sera le même: on coupe le fil , et on commence les rangs 3 m avant le 3ème marqueur jusqu'à 3 mailles après le 2ème marqueur et on augmente ainsi 3 tous les rangs sur l'endroit (= tous les 2 rangs). Bon tricot!
17.02.2025 - 14:09
![]() Anastasiia wrote:
Anastasiia wrote:
Hello, What size was knitted that is on the model on the pictures? I just want to understand if it’s made as an oversized knit or it’s just size M-L that was knitted and that’s why it looks loose on a model. Thank you.
10.02.2025 - 17:23DROPS Design answered:
Dear Anastasiia, our models usually wear an M size and this is an oversized jumper (as you can see in the tags after the Materials section). If you want to know if a garment is oversize you can always compare your usual size's measurements to those of the garment for that size (as indicated in the size chart at the bottom of the pattern) and check if they are bigger than usual. Happy knitting!
16.02.2025 - 20:07
![]() Agnes Kloppenborg wrote:
Agnes Kloppenborg wrote:
Dank! Ik snap het inmiddels.
14.01.2025 - 17:03
![]() Agnes Kloppenborg wrote:
Agnes Kloppenborg wrote:
“plaats de volgende 46-50-54-60-62-62 steken op een hulpdraad voor de mouw, zet 8-8-10-10-12-14 steken op (in de zijkant onder de mouw)” . Ik brei de kleinste maat en heb dus voor de mouw 52 steken. Wat gebeurt er met de overig 6 steken?
13.01.2025 - 19:13DROPS Design answered:
Dag Agnes,
Als het goed is heb je 236 steken op naald. Je verdeelt nu de steken in 46 steken voor beide mouwen, 72 steken voor het voorpand en 2 x 36 steken voor het achterpand. Wat bedoel je met de overige 6 steken?
13.01.2025 - 20:29
|
|
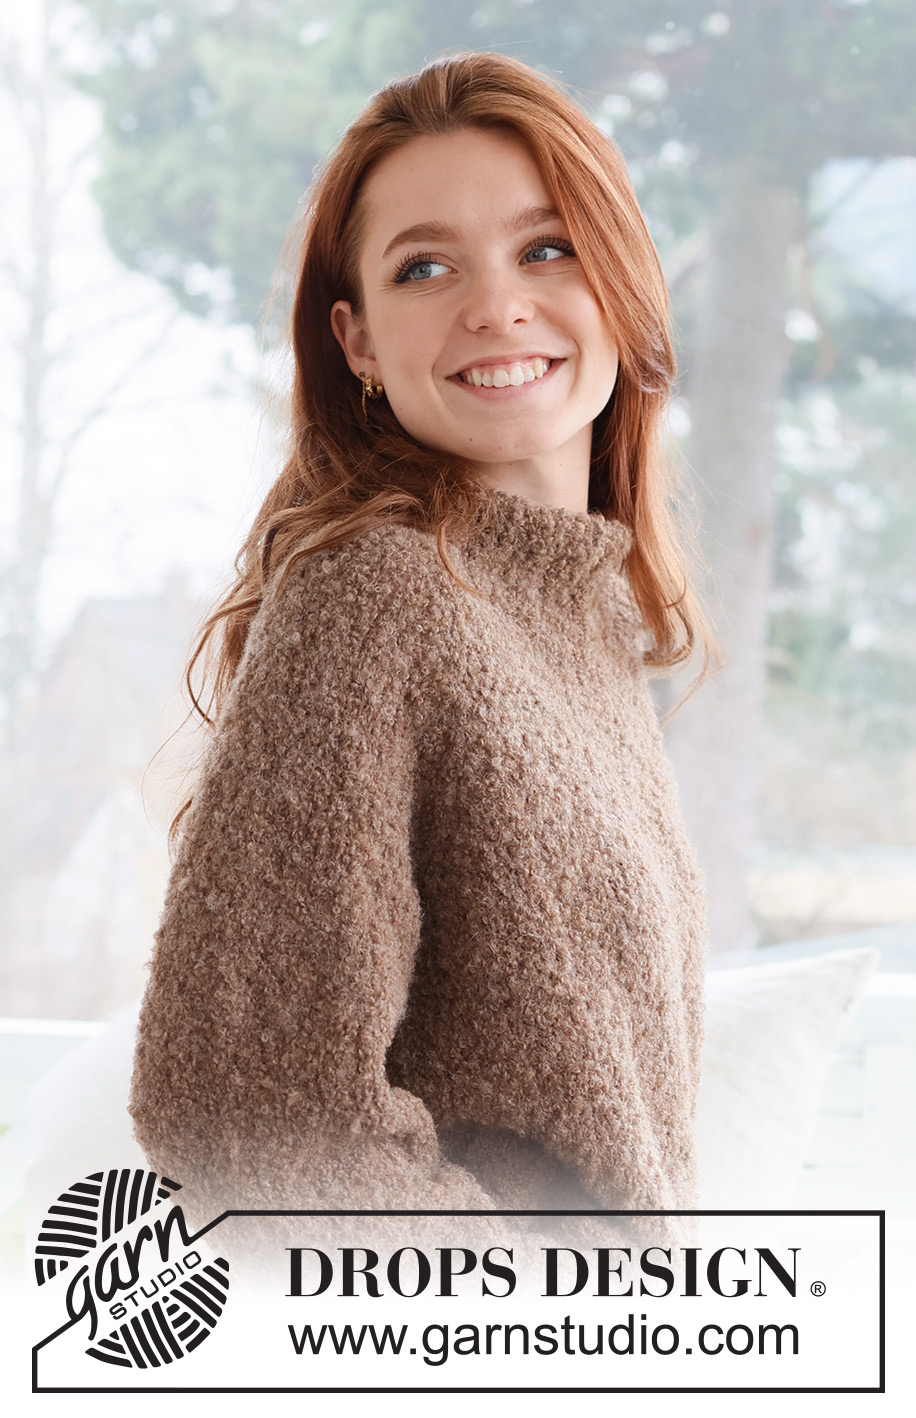
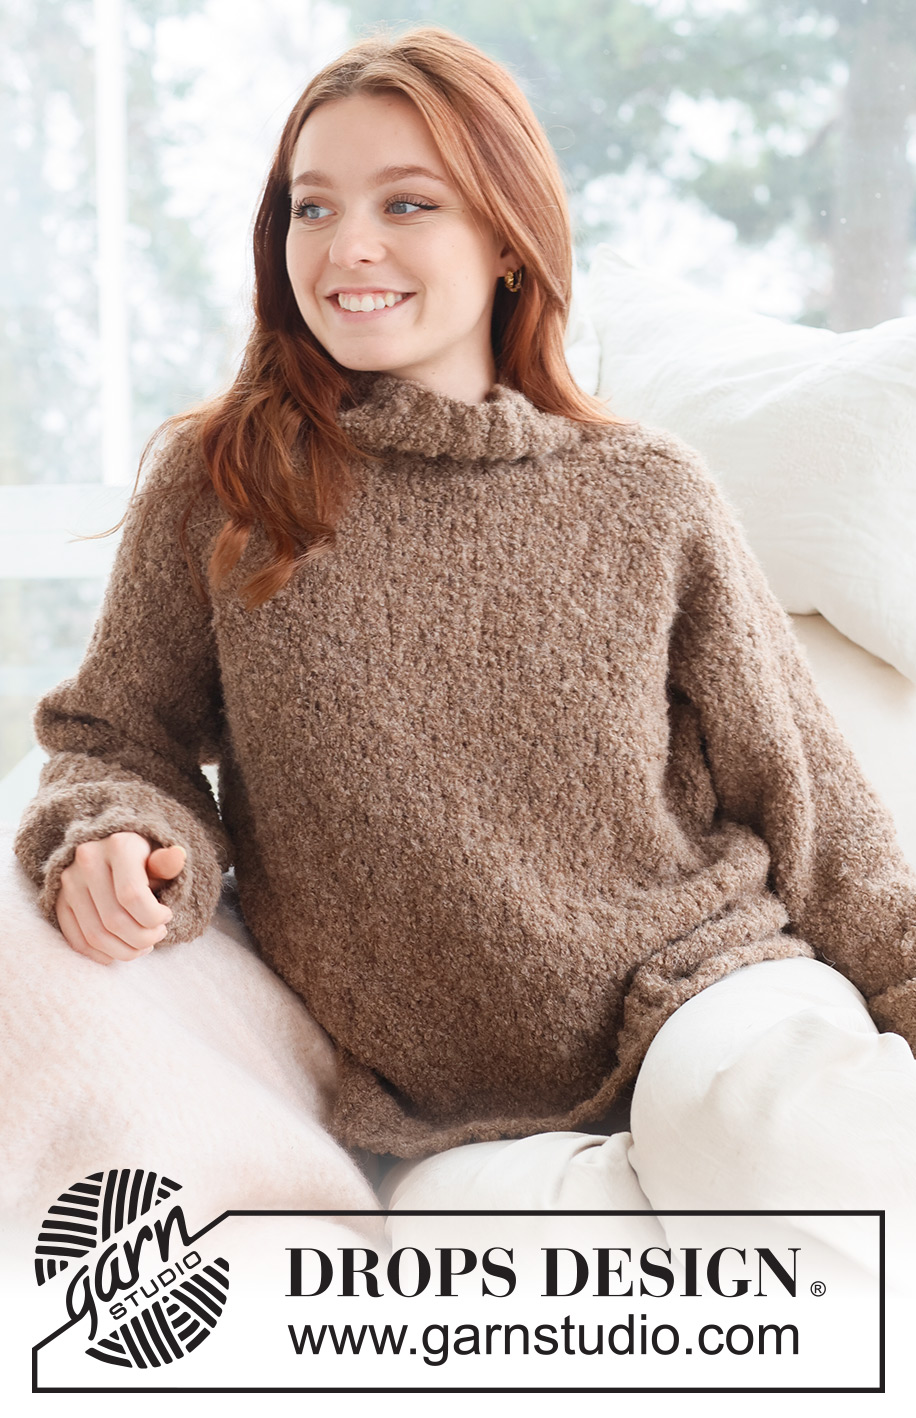
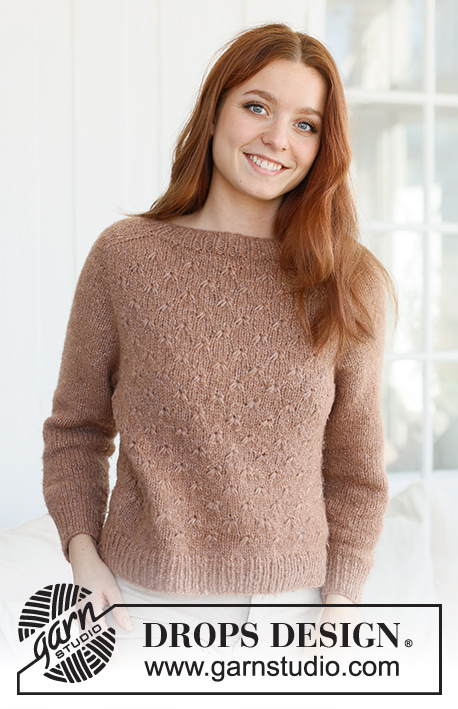
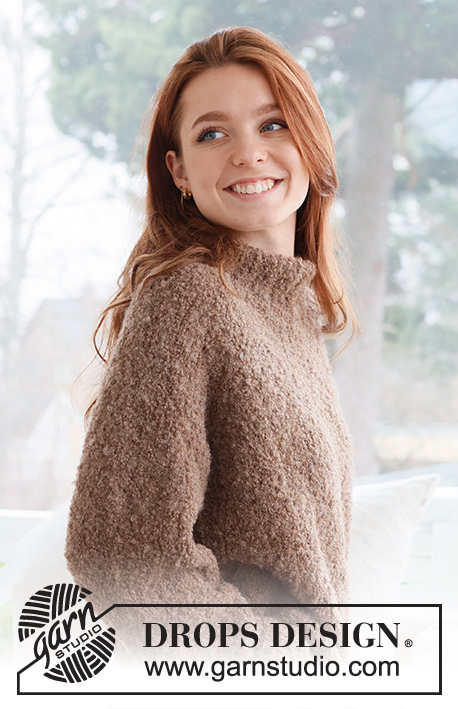
Walnut Wonder |
|
 |
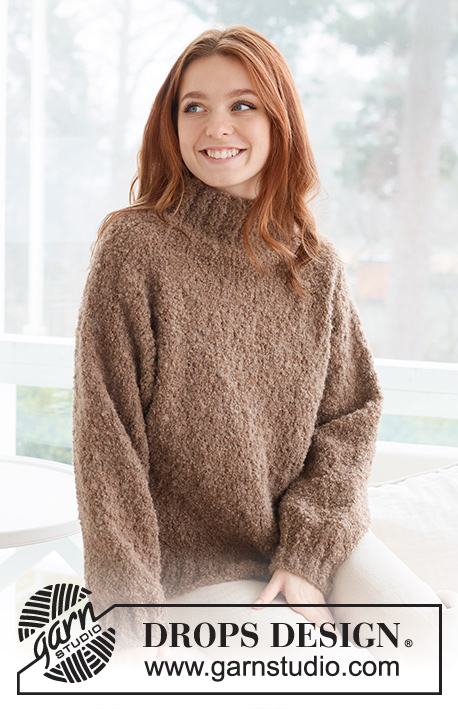 |
Knitted jumper in DROPS Alpaca Bouclé. The piece is worked top down with raglan, stocking stitch and high neck. Sizes S - XXXL.
DROPS 237-41 |
|
|
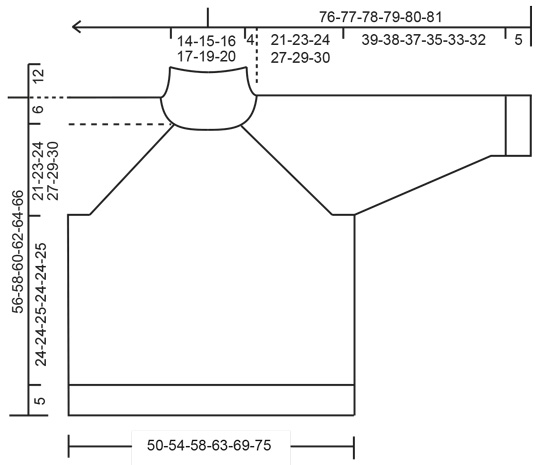
------------------------------------------------------- EXPLANATIONS FOR THE PATTERN: ------------------------------------------------------- RAGLAN: Increase 1 stitch on both sides of 2 stocking stitches in each transition between the body and sleeves (8 stitches increased). Increase 1 stitch by making 1 yarn over. On the next row (wrong side) purl the yarn overs twisted to avoid holes. When working in the round, knit the yarn overs twisted to avoid holes. Then work the new stitches in stocking stitch. Increase from the right side, on the body increase before markers 3 and 1 and after markers 2 and 4. On the sleeves increase after markers 3 and 1 and before markers 4 and 2. DECREASE TIP: Decrease 1 stitch on either side of the marker as follows: Work until there are 3 stitches left before the marker, knit 2 together, knit 2 (marker sits between these 2 stitches), slip 1 stitch as if to knit, knit 1 and pass the slipped stitch over the knitted stitch. CASTING-OFF TIP: To avoid the cast-off edge being tight you can cast off with a larger size needle. If the edge is still tight, make 1 yarn over after approx. each 4th stitch at the same time as casting off; the yarn overs are cast off as normal stitches. ------------------------------------------------------- START THE PIECE HERE: ------------------------------------------------------- JUMPER – SHORT OVERVIEW OF THE PIECE: The neck and yoke are worked in the round with circular needle, from mid back and top down. The yoke is divided for body and sleeves and the body is continued in the round with circular needle. The sleeves are worked in the round with short circular needle/double pointed needles, top down. NECK: Cast on 88-92-96-100-104-108 stitches with short circular needle size 4 mm and DROPS Alpaca Bouclé. Work rib in the round (knit 2, purl 2) for 12 cm. Insert 4 markers without working the stitches; these are used when increasing to raglan: Count 12-13-14-15-16-17 stitches (half back piece) insert marker 1, count 20 stitches (sleeve) insert marker 2, count 24-26-28-30-32-34 stitches (front piece), insert marker 3, count 20 stitches (sleeve) insert marker 4. There are 12-13-14-15-16-17 stitches left on the round (half back piece). Cut the strand. NECK-LINE: Now work a neckline with short rows (described below) AT THE SAME TIME as you increase to RAGLAN every 2nd row – read description above. Change to circular needle size 5.5 mm. Start 3 stitches before marker 3 (left side of neck), work stocking stitch and increase to raglan until you have worked 3 stitches past marker 2 (right side of neck). Turn, tighten the strand and purl until you have worked 2 stitches further than where you started the first short row after marker 3. Turn, tighten the strand and knit to 2 stitches further than the previous turn after marker 2 – remember to increase to raglan. Turn, tighten the strand and purl to 2 stitches further than the previous row after marker 3. Turn, tighten the strand and knit to 2 stitches further than the previous row after marker 2 - remember to increase to raglan. Turn, tighten the strand and purl to 2 stitches further than the previous row after marker 3. Cut the strand. You have increased to raglan 3 times and there are 112-116-120-124-128-132 stitches on the round. YOKE: Start mid-back and continue with stocking stitch, increasing to raglan every 2nd round 13-15-17-20-22-24 times (a total of 16-18-20-23-25-27 times at the back of the neck) = 216-236-256-284-304-324 stitches. REMEMBER THE KNITTING TENSION! Continue to increase on the body but not on the sleeves until you have increased 5-5-4-4-4-3 more times on the body = 236-256-272-300-320-336 stitches (52-56-60-66-70-74 stitches on each sleeve and 66-72-76-84-90-94 stitches on the front/back pieces). Continue working without further increases until the yoke measures 21-23-24-27-29-30 cm mid-front (measured after the neck). Now divide for the body and sleeves: Work the first 36-39-41-45-49-53 stitches (half back piece), place the next 46-50-54-60-62-62 stitches on a thread for the sleeve, cast on 8-8-10-10-12-14 stitches (in side under sleeve), work 72-78-82-90-98-106 stitches (front piece), place the next 46-50-54-60-62-62 stitches on a thread for the sleeve, cast on 8-8-10-10-12-14 stitches (in side under sleeve), work the last 36-39-41-45-49-53 stitches (half back piece). BODY: = 160-172-184-200-220-240 stitches. Continue working stocking stitch in the round for a further 24-24-25-24-24-25 cm. Change to circular needle size 4 mm. Knit 1 round and increase 12-12-12-12-16-16 stitches evenly spaced = 172-184-196-212-236-256 stitches. Work rib (knit 2, purl 2) for 5 cm. Cast off with knit over knit and purl over purl. The jumper measures approx. 56-58-60-62-64-66 cm from the shoulder down. SLEEVES: Place the 46-50-54-60-62-62 stitches from the thread on the one side of the piece on short circular needle/double pointed needles size 5.5 mm and knit up 1 stitch in each of the 8-8-10-10-12-14 stitches cast on under the sleeve = 54-58-64-70-74-76 stitches. Insert a marker in the middle of the new stitches under the sleeve. Continue in the round with stocking stitch for 4 cm. Now decrease 2 stitches under the sleeve – read DECREASE TIP. Decrease like this every 14-9-5-4-2½-2½ cm a total of 3-4-6-8-9-9 times = 48-50-52-54-56-58 stitches. Continue working until the sleeve measures 39-38-37-35-33-32 cm from the division (there is 5 cm left; try the jumper on and work to desired length). Change to double pointed needles size 4 mm and knit 1 round where you increase 4-6-4-6-4-6 stitches evenly spaced = 52-56-56-60-60-64 stitches. Work rib (knit 2, purl 2) for 5 cm. Cast off with knit over knit and purl over purl. The sleeve measures approx. 44-43-42-40-38-37 cm from the division. Work the other sleeve in the same way. |
|
 |
|
Have you finished this pattern?Tag your pictures with #dropspattern or submit them to the #dropsfan gallery. Do you need help with this pattern?You'll find 32 tutorial videos, a Comments/Questions area and more by visiting the pattern on garnstudio.com. © 1982-2026 DROPS Design A/S. We reserve all rights. This document, including all its sub-sections, has copyrights. Read more about what you can do with our patterns at the bottom of each pattern on our site. |
|


With over 40 years in knitting and crochet design, DROPS Design offers one of the most extensive collections of free patterns on the internet - translated to 17 languages. As of today we count 324 catalogues and 12290 patterns translated into English (UK/cm). 12290
We work hard to bring you the best knitting and crochet have to offer, inspiration and advice as well as great quality yarns at incredible prices! Would you like to use our patterns for other than personal use? You can read what you are allowed to do in the Copyright text at the bottom of all our patterns. Happy crafting!
Post a comment to pattern DROPS 237-41
We would love to hear what you have to say about this pattern!
If you want to leave a question, please make sure you select the correct category in the form below, to speed up the answering process. Required fields are marked *.