
Popular categories
Looking for a yarn?


Comments / Questions (16)
![]() Fionuala wrote:
Fionuala wrote:
Hi, I'm making the medium size of this sweater and I wonder if there's a typo in the Sleeve Increase section? The pattern says to increase 1 stitch at each end of the sleeve 13 times. This should result in an additional 26 stitches which, when added to the original 16 stitches, comes to 42 stitches. However, in the next section, Yoke Increase, the pattern states that there should be 46 stitches for the sleeve before any further shaping is worked. Can you advise, please?
26.08.2023 - 11:30DROPS Design answered:
Dear Fionuala, after the shoulder you should have 16 stitches. After that, you increase every 2nd round 2 stitches on each sleeve 13 times and 2 stitches every round twice. So you will increase 30 stitches. 30 + 16 = 46 stitches. Happy knitting!
28.08.2023 - 00:35
![]() Renate wrote:
Renate wrote:
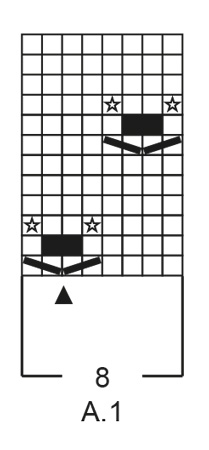
Ich verstehe das Muster nicht. Woher kommen in der 3. Reihe die beiden rechten Maschen zwischen den tiefer gestochenen Stern-Maschen? In der 2. Reihe sind die darunterlegen Maschen als nicht vorhanden markiert, da sie ja durch die beiden Abnahmen verschwunden sind. Aber wo muss ich einstechen, um dann daraus wieder 2 rechte Maschen zu holen? Vielen Dank im Voraus für Ihre Hilfe!
16.11.2022 - 22:05DROPS Design answered:
Liebe Renate, vielleicht kann Ihnen dieses Video helfen? Es zeigt, wie man so ein Muster strickt (beachten Sie aber, das Diagram wie im Pullover zu stricken, Video ist nur die Technikk). Viel Spaß beim stricken!
17.11.2022 - 10:07
![]() Melanie wrote:
Melanie wrote:
Hi, I think the pattern is incorrect. The increase stitches for the saddle shoulder, on the right side, after marker, says pick up from the back, your video clip, shows the front!!!!
25.10.2022 - 21:08
![]() Karen Beard wrote:
Karen Beard wrote:
I am an experienced knitter but this pattern ( and another Drops pattern I tried) are completely incomprehensible. I see it is translated into English from Norwegian. With respect, the translation has resulted in complete confusion on my part. Thank you for trying but I won’t be attempting any more of your patterns.
11.10.2022 - 21:22
![]() Katarzyna wrote:
Katarzyna wrote:
Super 🥰
06.08.2022 - 11:17
![]() Bente wrote:
Bente wrote:
Flot sweet shirt
04.08.2022 - 18:15
|
|||||||||||||||||||||||||||||||
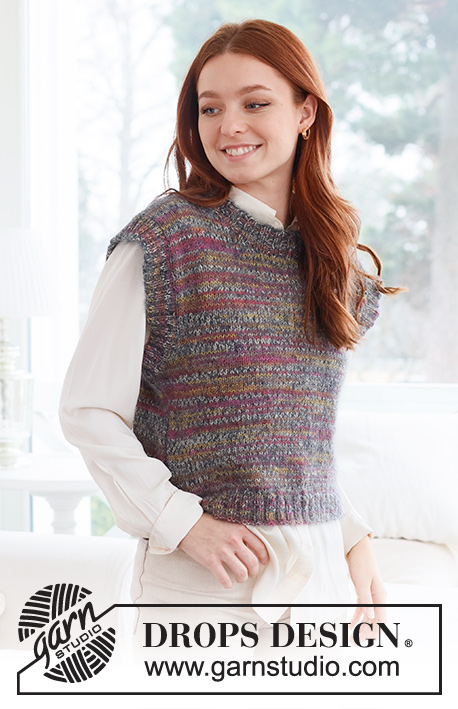
Country Spice#countryspicesweater |
|||||||||||||||||||||||||||||||
 |
 |
||||||||||||||||||||||||||||||
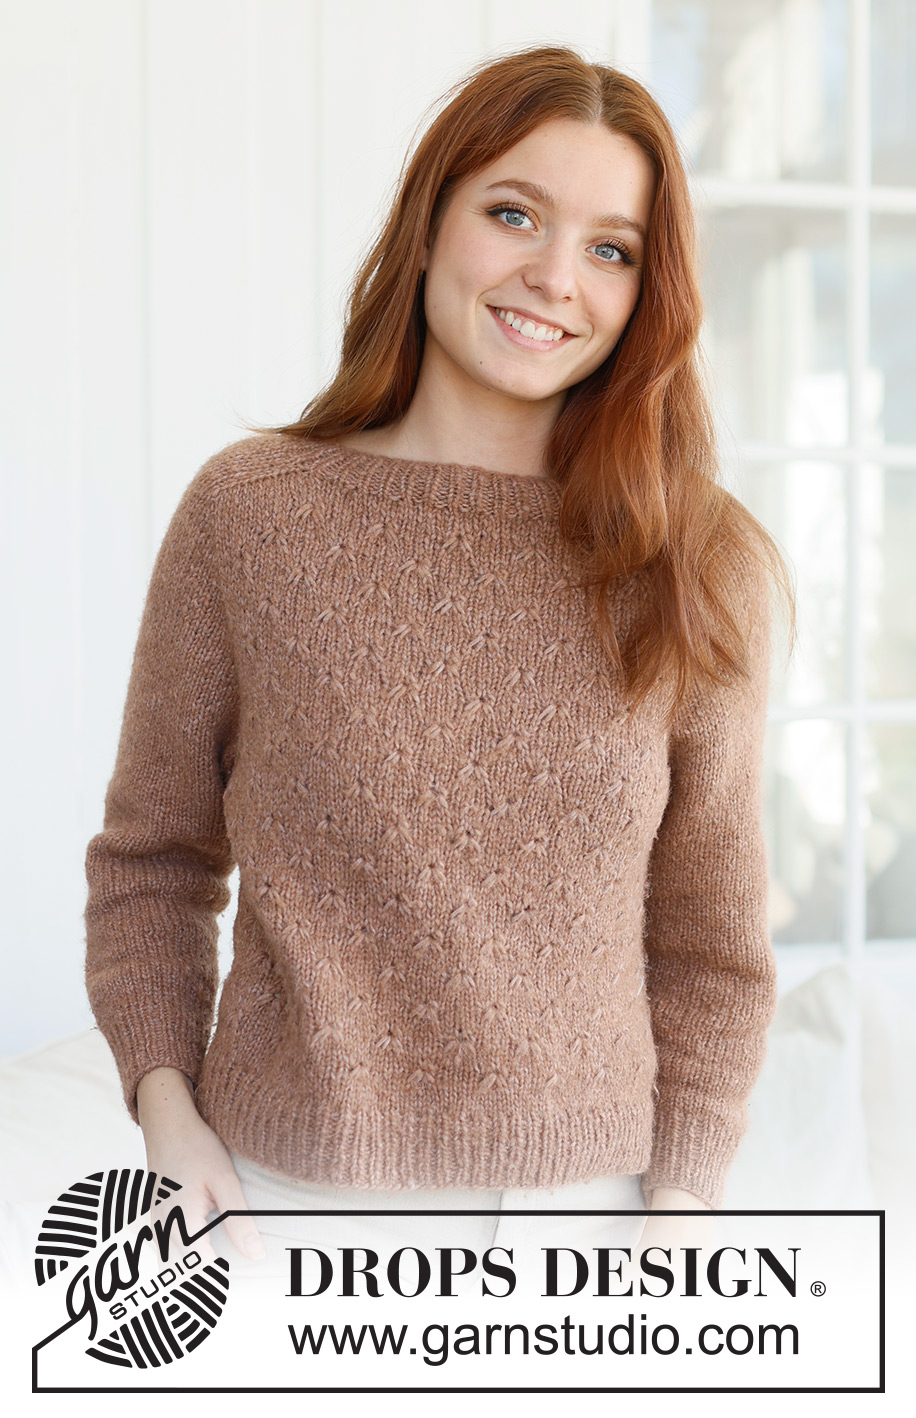
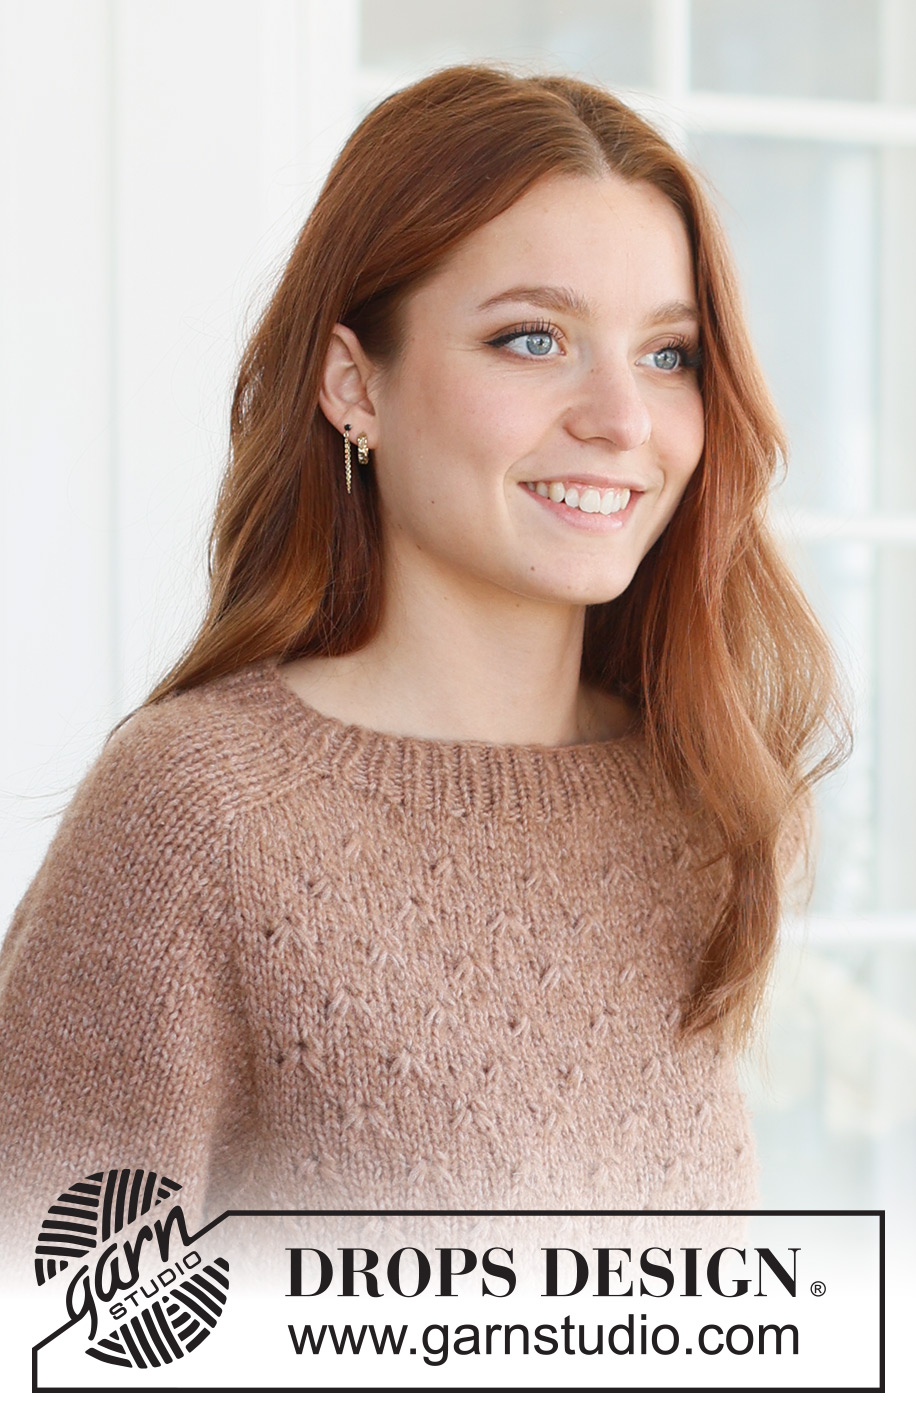
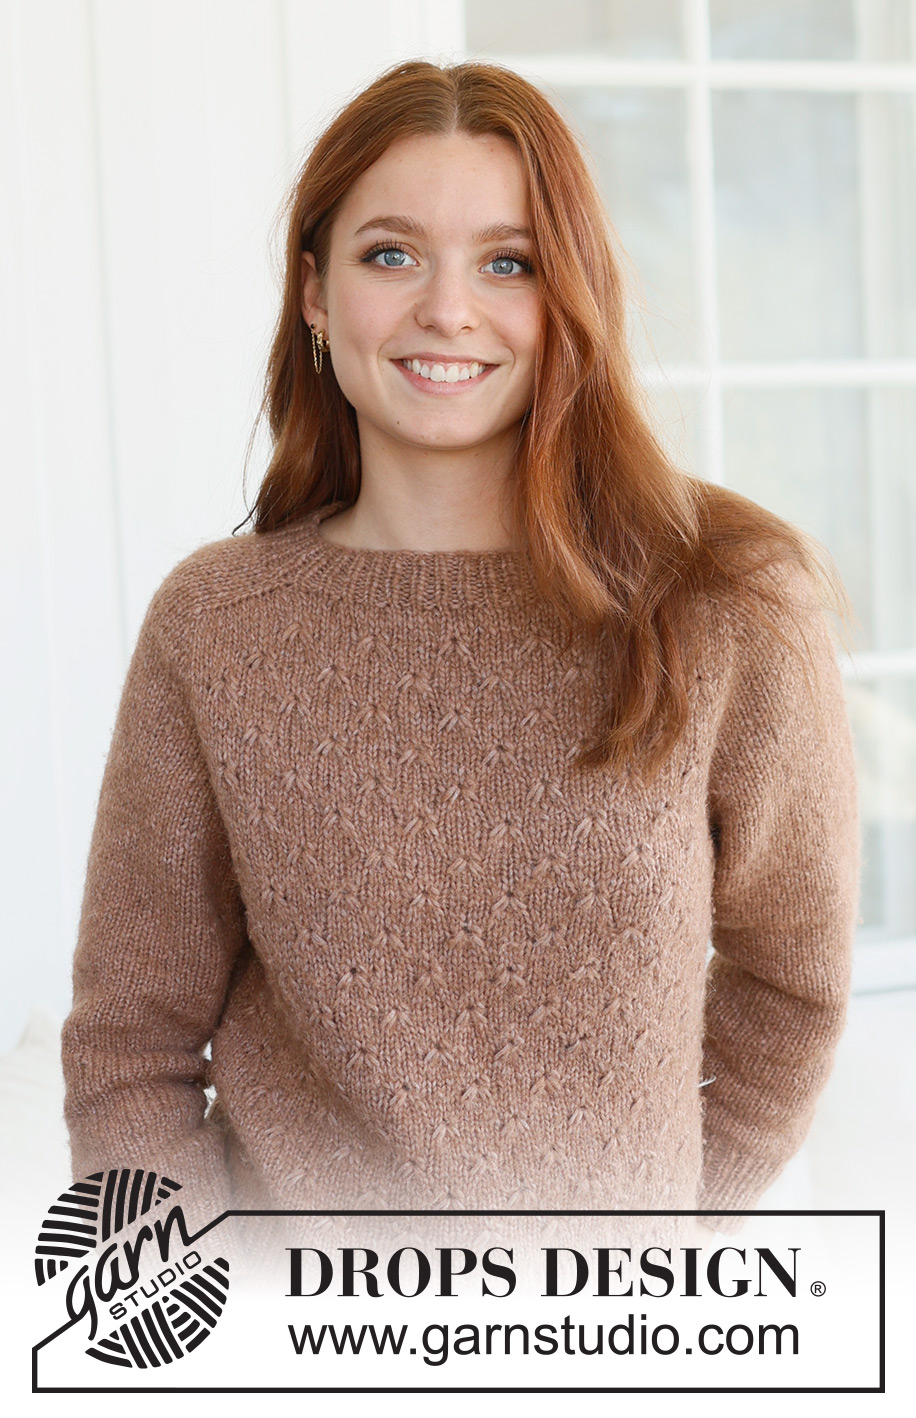
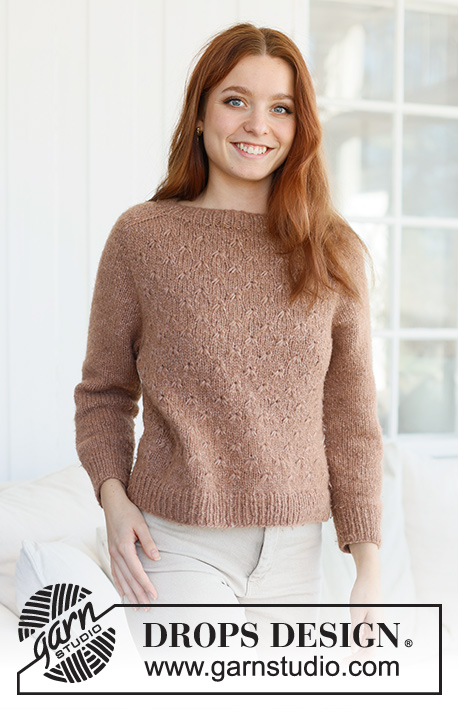
Knitted jumper in DROPS Air. Piece is knitted top down with saddle shoulders and relief pattern. Size: S - XXXL
DROPS 237-19 |
|||||||||||||||||||||||||||||||
|
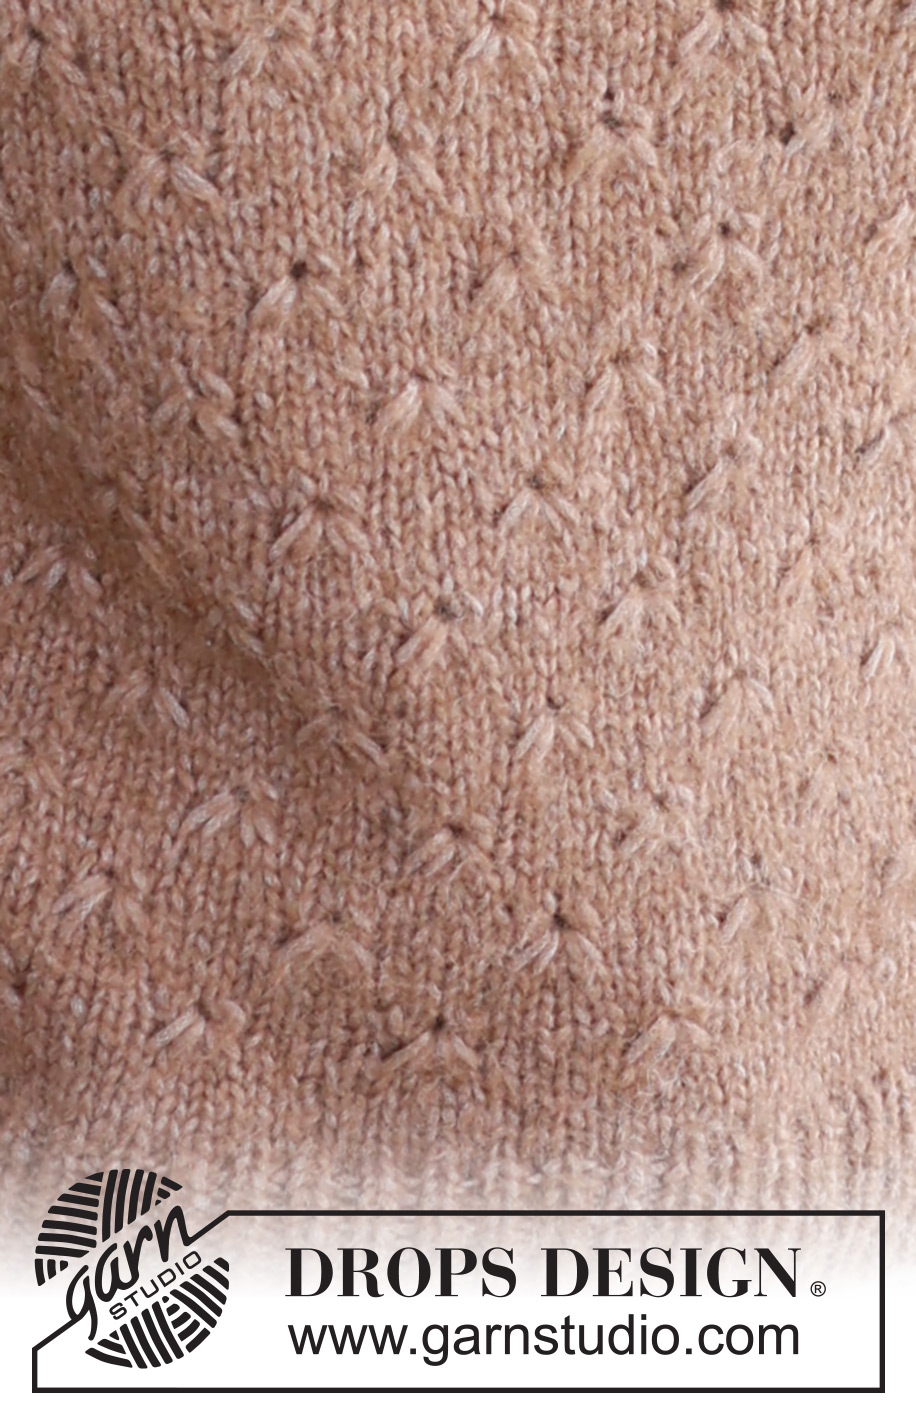
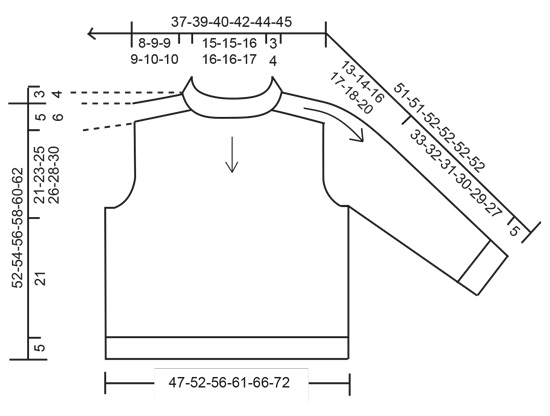
---------------------------------------------------------- EXPLANATION FOR THE PATTERN: ---------------------------------------------------------- PATTERN: See diagram A.1. INCREASE TIP FROM RIGHT SIDE: BEFORE MARKER: The new stitch is twisted towards the right. Use left needle to pick up yarn between 2 stitches from round below, pick up yarn from the back and knit stitch in front loop of stitch. AFTER MARKER: The new stitch is twisted towards the left. Use left needle to pick up yarn between 2 stitches from round below, pick up yarn from the front and knit stitch in back loop of stitch. INCREASE TIP FROM WRONG SIDE: BEFORE MARKER: The new stitch is twisted towards the right. Use left needle to pick up yarn between 2 stitches from round below, pick up yarn from the front and purl stitch in back loop of stitch. AFTER MARKER: The new stitch is twisted towards the left. Use left needle to pick up yarn between 2 stitches from round below, pick up yarn from the back and purl stitch in front loop of stitch. DECREASE TIP (applies to mid under sleeves): Decrease 1 stitch on each side of marker thread as follows: Work until 3 stitches remain before marker thread, knit 2 together, knit 2 (marker thread is between these 2 stitches), slip 1 stitch knitwise, knit 1, pass slipped stitch over stitch worked. ---------------------------------------------------------- START THE PIECE HERE: ---------------------------------------------------------- JUMPER - SHORT OVERVIEW OF THE PIECE: Work neck edge in the round on a short circular needle, top down. Then work an elevation in back of neck, back and forth on circular needle. Work the yoke in the round on circular needle top down. Now divide yoke for body and sleeves. Work the body in the round on circular needle. Work sleeves in the round on double pointed needles/a short circular needle. NECK EDGE: Cast on 84-86-90-94-96-100 stitches on short circular needle size 4 mm with DROPS Air. Knit 1 round. Then work rib (knit 1 / purl 1) for 3-3-3-4-4-4 cm. Knit 1 round while increasing 20-18-18-22-24-20 stitches evenly = 104-104-108-116-120-120 stitches. Insert 1 marker thread at beginning of round = mid back and 1 marker thread after 52-52-54-58-60-60 stitches = mid front. Work yoke as explained below - measure yoke from where marker thread was inserted mid front. Also use marker threads to count out towards the side where pattern should begin. YOKE: Switch to circular needle size 5 mm. Insert 4 markers in the piece as explained below - this is done without working the stitches, and each of these 4 markers are inserted between 2 stitches. Use markers when increasing for saddle shoulder. 1st marker: Begin mid back, count 18-18-19-19-20-20 stitches (½ back piece), insert 1st marker before next stitch. 2nd marker: Count 16-16-16-20-20-20 stitches from 1st marker (shoulder stitches), insert 2nd marker before next stitch. 3rd marker: Count 36-36-38-38-40-40 stitches from 2nd marker (front piece), insert 3rd marker before next stitch. 4th marker: Count 16-16-16-20-20-20 stitches from 3rd marker (shoulder stitches), insert 4th marker before next stitch. 18-18-19-19-20-20 stitches remain on back piece after 4th marker. Move the 4 markers upwards when working, increase at each of these markers later. Now work an elevation in the back of neck as explained below. ELEVATION: Work the entire elevation in stocking stitch. Begin mid back, knit 8-8-9-9-10-10 stitches, turn piece, tighten yarn and purl 16-16-18-18-20-20. Turn piece, tighten yarn and knit 24-24-27-27-30-30, turn piece, tighten yarn and purl 32-32-36-36-40-40. Turn piece, tighten yarn and knit 40-40-45-45-50-50 – in addition increase 1 stitch BEFORE 1st marker - read INCREASE TIP FROM RIGHT SIDE, turn piece, tighten yarn and purl 48-48-54-54-60-60 – in addition increase 1 stitch AFTER 1st marker and 1 stitch BEFORE 4th marker – read INCREASE TIP FROM WRONG SIDE (the increased stitches are in addition to number of stitches in elevation), turn piece, tighten yarn and work until mid back – in addition increase 1 stitch AFTER 4th marker, cut the yarn. 2 stitches have been increased before 1st and 2 stitches after 4th marker (seen from right side), i.e. there are 4 stitches more on back piece than front piece. OVERVIEW OF NEXT SECTION: On next round begin increase for saddle shoulder. AT THE SAME TIME increase for saddle shoulder, work pattern on front piece and back piece. Read the sections SADDLE SHOULDER INCREASE and PATTERN as explained below before continuing! SADDLE SHOULDER INCREASE: Work piece in the round on circular needle - begin round after 1st marker. On first round increase 4 stitches for saddle shoulder as follows: Increase AFTER 2nd and 4th marker and increase BEFORE 1st and 3rd marker – remember INCREASE TIP FROM RIGHT SIDE. Increase only on front piece and back piece, and number of shoulder stitches stays the same. Continue in the round like this and increase the same way on every round 16-18-18-18-20-20 times in total. Then work 2 rounds where you increase only in each side on front piece, i.e. increase AFTER 2nd marker and BEFORE 3rd marker = 176-184-188-196-208-208 stitches on needle (16-16-16-20-20-20 stitches on each shoulder and 72-76-78-78-84-84 stitches on front piece/back piece). REMEMBER THE KNITTING TENSION! After last increase piece measures approx. 8-9-9-9-10-10 cm from where marker thread was inserted. Then increase for sleeves as explained below. PATTERN: When 4 rounds in stocking stitch have been worked after neck edge and elevation, pattern begins. A.1 is only worked on front and back piece. Work sleeves in stocking stitch. I.e. work in stocking stitch over shoulder stitches, on front piece count the beginning of pattern out from marker thread mid front - see symbol in A.1 which marks mid front/mid back, count out towards the side as far as you can towards saddle shoulder increase, and begin pattern. NOTE! It is best to avoid a knot pattern up to saddle shoulder increase, replace this stitches with stocking stitch if needed, work A.1 as far as you can towards saddle shoulder increase in the other side, and work the last stitches in stocking stitch so that pattern begins and ends the same in each side, work stocking stitch over shoulder stitches, and work pattern on back piece the same way as on front piece. Continue like this. The increase stitches from saddle shoulder increase, and later the yoke increase is worked in pattern but adjust to avoid a knot pattern up to increases. SLEEVE INCREASE: When increase for saddle shoulder is done, increase 4 stitches for sleeves on next round as follows: Increase AFTER 1st and 3rd marker and increase BEFORE 2nd and 4th marker – remember INCREASE TIP FROM RIGHT SIDE! Increase now only on sleeves and number of stitches on front pieces and back piece is the same. Work the increased stitches in stocking stitch. Increase like this every other round 12-13-15-13-13-10 times in total, and then on every round 3-2-0-0-0-0 times in total = 236-244-248-248-260-248 stitches (given that you count on a round in A.1 where no stitches have been decreased, and this applies onwards where all number is given as long as A.1 is worked). Piece measures approx. 20-22-23-21-22-19 cm from where marker thread was inserted on front piece. Then increase for yoke as explained below. YOKE INCREASE: Move the 4 markers from sleeve increase so that each of the 4 markers is in the outermost stitch in each side on front piece and back piece. There are 72-76-78-78-84-84 stitches on front piece/back piece including stitches with markers, and 46-46-46-46-46-40 stitches on each sleeve. On next round increase 8 stitches for yoke by increasing both before and after each of the 4 stitches with marker. Now increase stitches on front piece, back piece and on both sleeves - work the increased stitches in A.1 on front piece/back piece and in stocking stitch on sleeves. Increase like this every other round 0-0-1-3-5-12 times in total, and then every round 1-2-3-5-3-0 times in total. After last increase there are 244-260-280-312-324-344 stitches on needle. When all increases are done, the piece measures approx. 21-23-25-26-28-30 cm from where marker thread was inserted on front piece, and approx. 26-28-30-32-34-36 cm from shoulder. On next round divide piece for body and sleeves as follows: Slip the first 48-50-54-62-62-64 stitches on a thread for sleeve (all stitches between 1st and 2nd marker), cast on 6-8-10-10-12-14 new stitches on needle (in the side under sleeve), work pattern as before over the next 74-80-86-94-100-108 stitches (front piece), slip the next 48-50-54-62-62-64 stitches on a thread for sleeve (all stitches between 3rd and 4th marker), cast on 6-8-10-10-12-14 new stitches on needle (in the side under sleeve), work pattern as before over the last 74-80-86-94-100-108 stitches (back piece). Finish body and sleeves separately. Now measure piece from here! BODY: = 160-176-192-208-224-244 stitches. Insert 1 marker in the middle of the 6-8-10-10-12-14 stitches that were cast on at beginning of round. Work in stocking stitch until marker – round begins here now. Continue pattern in the round as before. NOTE! The 4-4-4-4-4-6 stitches that do not fit the pattern under each sleeve as worked in stocking stitch. Work until piece measures approx. 21 cm from division in all sizes - finish after 6th or 12th round in A.1. Switch to circular needle size 4 mm. Work rib (knit 1/purl 1) for 5 cm. Loosely cast off. Jumper measures approx. 52-54-56-58-60-62 cm from shoulder and down. SLEEVES: Slip the 48-50-54-62-62-64 stitches from stitch holder in one side of piece on double pointed needles or a short circular needle size 5 mm and pick in addition up 1 stitch in each of the 6-8-10-10-12-14 new stitches cast on under sleeve = 54-58-64-72-74-78 stitches. Insert 1 marker thread in the middle of the 6-8-10-10-12-14 stitches. Move the marker thread upwards when working - marker thread should be used for decrease mid under sleeve. Begin round at the marker thread and work stocking stitch in the round. When piece measures 4-4-4-3-3-3 cm from division, decrease 2 stitches mid under sleeve - read DECREASE TIP. Decrease like this every 8-6-4-2½-2½-2 cm 4-5-7-10-11-12 times in total = 46-48-50-52-52-54 stitches. Work until sleeve measures 33-32-31-30-29-27 cm from division. 5 cm remain until finished measurements. Try the jumper and work to desired length before rib. Switch to double pointed needles size 4 mm. Work rib (knit 1/purl 1) for 5 cm. Loosely cast off. Sleeve measures approx. 38-37-36-35-34-32 cm from division. Work the other sleeve the same way. |
|||||||||||||||||||||||||||||||
Diagram explanations |
|||||||||||||||||||||||||||||||
|
|||||||||||||||||||||||||||||||
 |
|||||||||||||||||||||||||||||||
 |
|||||||||||||||||||||||||||||||
 |
|||||||||||||||||||||||||||||||
Have you finished this pattern?Tag your pictures with #dropspattern #countryspicesweater or submit them to the #dropsfan gallery. Do you need help with this pattern?You'll find 35 tutorial videos, a Comments/Questions area and more by visiting the pattern on garnstudio.com. © 1982-2026 DROPS Design A/S. We reserve all rights. This document, including all its sub-sections, has copyrights. Read more about what you can do with our patterns at the bottom of each pattern on our site. |
|||||||||||||||||||||||||||||||


With over 40 years in knitting and crochet design, DROPS Design offers one of the most extensive collections of free patterns on the internet - translated to 17 languages. As of today we count 324 catalogues and 12290 patterns translated into English (UK/cm). 12290
We work hard to bring you the best knitting and crochet have to offer, inspiration and advice as well as great quality yarns at incredible prices! Would you like to use our patterns for other than personal use? You can read what you are allowed to do in the Copyright text at the bottom of all our patterns. Happy crafting!
Post a comment to pattern DROPS 237-19
We would love to hear what you have to say about this pattern!
If you want to leave a question, please make sure you select the correct category in the form below, to speed up the answering process. Required fields are marked *.