
Popular categories
Looking for a yarn?


Comments / Questions (16)
![]() Anne-marie wrote:
Anne-marie wrote:
Hva mener dere her : « 1 maske FØR og 4.merke»(står under forhøyning, når en skal strikke 54 m vrang)
10.01.2026 - 16:17DROPS Design answered:
Hei Anne-Marie, Det burde stå FØR 4. merke (uten og). Hilsen Drops Team.
12.01.2026 - 07:13
![]() Catherine wrote:
Catherine wrote:
I am trying to figure out the stitch for the design on this pattern. I get the knit two together and the knit one with the loop over that's going to decrease by two stitches so I get that they'll be a gap in the next row because there's no stitches there, but how did the two stitches reappear on the fourth row? I'm assuming it's super simple. I just can't think of how it's done. Thank you for your help. Got it saw the video thank you
26.06.2025 - 01:18
![]() Catherine wrote:
Catherine wrote:
I am trying to figure out the stitch for the design on this pattern. I get the knit two together and the knit one with the loop over that's going to decrease by two stitches so I get that they'll be a gap in the next row because there's no stitches there, but how did the two stitches reappear on the fourth row? I'm assuming it's super simple. I just can't think of how it's done. Thank you for your help.
26.06.2025 - 01:13DROPS Design answered:
Dear Catherine, we show how to work such a diagram in this video; in the video we show the diagram worked in rows, but it might help you even if you work here in the round. Hope it can help. Happy knitting!
26.06.2025 - 16:18
![]() Eve wrote:
Eve wrote:
Les instructions pour les augmentations sur l'endroit ne sont-elles pas erronées ? Vous indiquez "relever le fil de l’arrière vers l’avant" pour les 2 types (avant et après le marqueur). Mélanie (25/10/2022) semblait avoir aussi remarqué cette erreur, mais vous ne lui avez pas répondu...
24.03.2025 - 16:20DROPS Design answered:
Bonjour Eve et merci pour votre retour, cette erreur a été corrigée. Bon tricot!
25.03.2025 - 09:35
![]() McKenna Considine wrote:
McKenna Considine wrote:
If I'm switching to a different yarn than air, should I purchase the same amount in weight or length?
19.11.2024 - 01:53DROPS Design answered:
Dear Mrs McKenna, use the yarn converter or read more here to get the new amount of yarn when using an alternative. Happy knitting!
19.11.2024 - 08:49
![]() Jules wrote:
Jules wrote:
Thank you. Also: possible to do the back in stock. stitch? I.E: would gauge be affected? thx for your patience 😊.
29.02.2024 - 23:55DROPS Design answered:
Dear Jules, just check first that your gauge would be the same in pattern and in stocking stitch by knitting a swatch. Happy knitting!
01.03.2024 - 08:23
![]() Jeannie Fairfax wrote:
Jeannie Fairfax wrote:
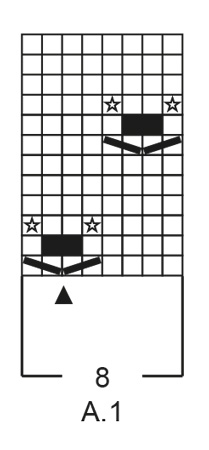
Please, EXPLAIN: "NOTE! It is best to avoid a knot pattern up to saddle shoulder increase, replace this stitches with stocking stitch if needed, work A.1 as far as you can towards saddle shoulder increase in the other side, and work the last stitches in stocking stitch so that pattern begins and ends the same in each side, work stocking stitch over shoulder stitches, and work pattern on back piece the same way as on front piece. Continue like this."
29.02.2024 - 19:53DROPS Design answered:
Dear Jeannie, the knot pattern (A.1) may become more irregular or difficult to manage once you start increasing for the saddle shoulders. Therefore, at that point, instead of working A.1 over the saddle shoulder stitches you work in stocking stitch. In the meantime, continue working A.1 over the back piece as before. Happy knitting!
29.02.2024 - 22:37
![]() Ling wrote:
Ling wrote:
Ich verstehe das Muster nicht. Wie kann ich das Muster von beiden Seiten symmetrisch stricken, wenn die vordere Mitte in dem Muster gar nicht in dem Mitte des Musters ist? Ich werde immer bei der rechten Seite der Mitte 6+ 8x *während bei der linken Seite der Mitte immer 2+8x *
14.02.2024 - 00:42DROPS Design answered:
Liebe Frau Ling, in diese Lektion wird erklärt, wie man ein Muster in der Mitte platziert; hier soll die Masche mit dem Dreieck in A.1 die mittlere Masche am Vorder- sowie am Rückenteil sein. Viel Spaß beim stricken!
14.02.2024 - 08:23
![]() Maria Vigano' wrote:
Maria Vigano' wrote:
Buonasera. E' possibile aggiungere in questo modello il rialzo sul dietro del collo per migliorare la vestibilità? e in caso positivo, seguendo quale schema? Grazie per l'attenzione
17.11.2023 - 21:55DROPS Design answered:
Buonasera Maria, può apportare le modifiche che vuole e può rivolgersi al suo rivenditore DROPS di fiducia. Buon lavoro!
19.11.2023 - 19:14
![]() Diana Stampe wrote:
Diana Stampe wrote:
Hej med jer 🙂 Jeg er blevet færdig med denne trøje og syntes, at den er rigtig fin. Desværre er der kommet "riller" i ærmerne - jeg gætter på, at det er pga strømpepindene. Kan jeg må nogen måder redde trøjen, så den kan bruges? På forhånd tak og ha en dejlig dag, Diana
17.09.2023 - 16:34DROPS Design answered:
Hei Diana. Tenker du "riller" nedover ermene der hvor man bytter fra den ene pinnen til den andre? Disse vil forsvinne etter en stund/ved bruk. Evnt kan du strekke og dra litt forsiktig i ermene eller vaske genseren (etter vaskeanvisningen). mvh DROPS Design
26.09.2023 - 11:44
|
|||||||||||||||||||||||||||||||
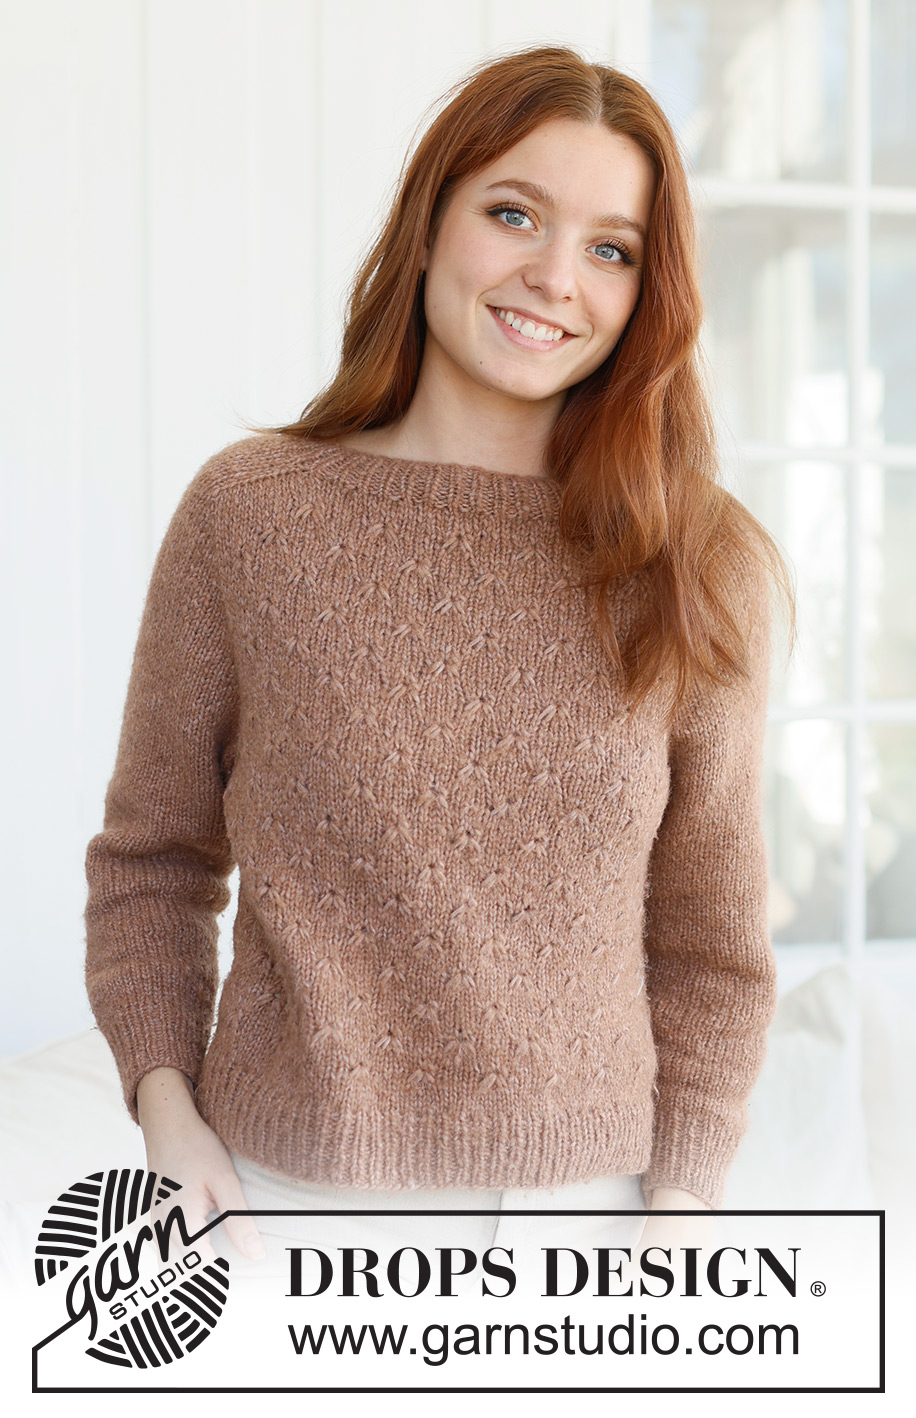
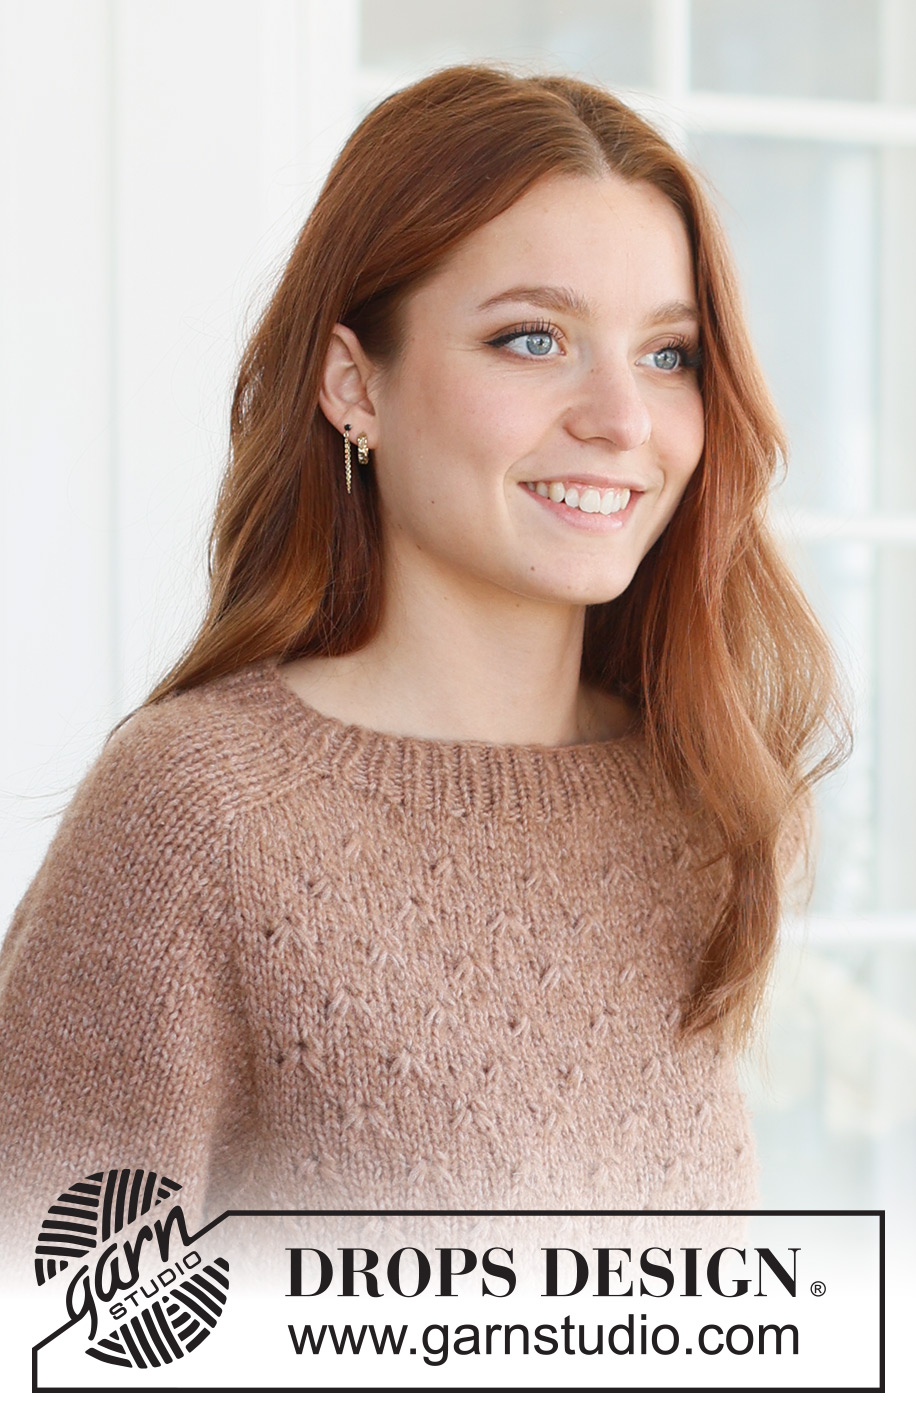
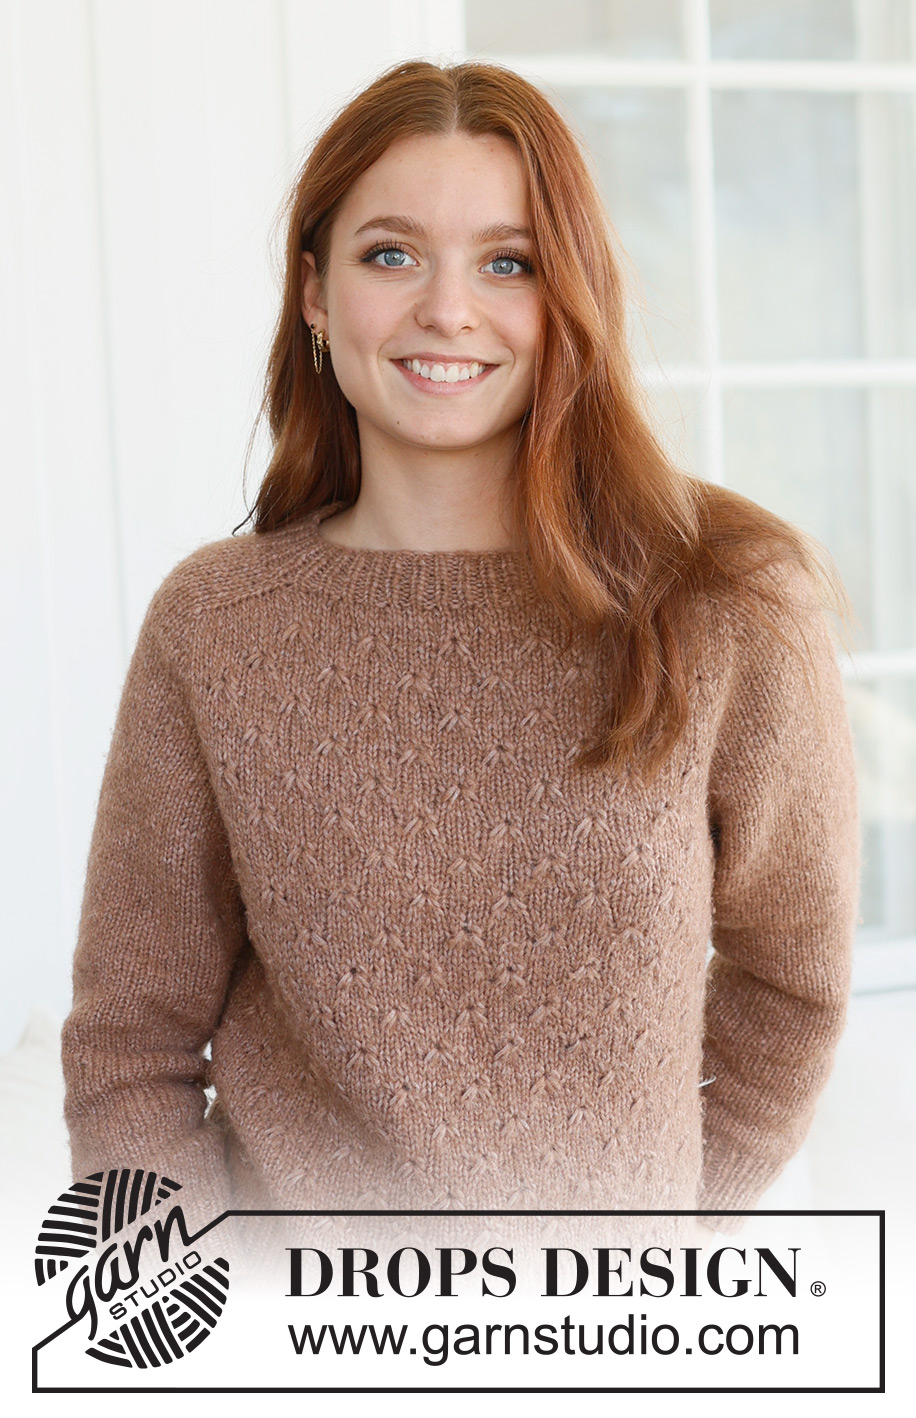
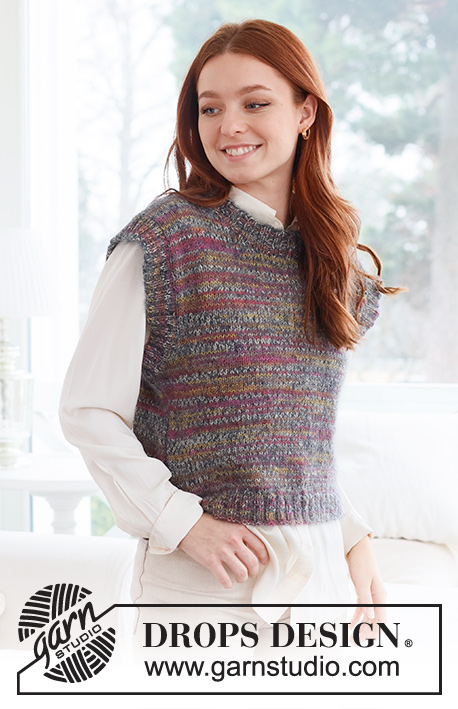
Country Spice#countryspicesweater |
|||||||||||||||||||||||||||||||
 |
 |
||||||||||||||||||||||||||||||
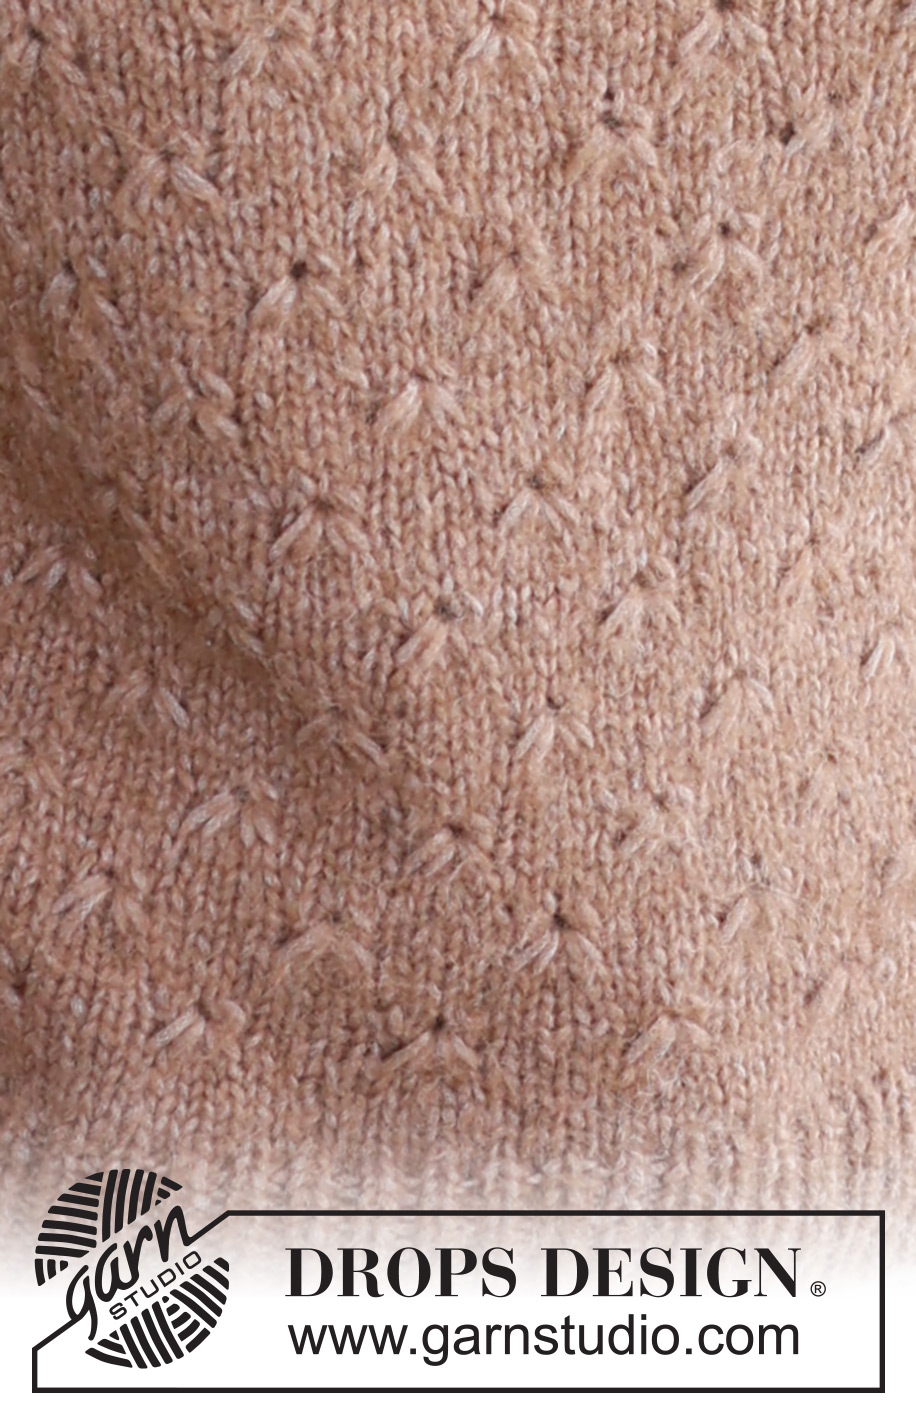
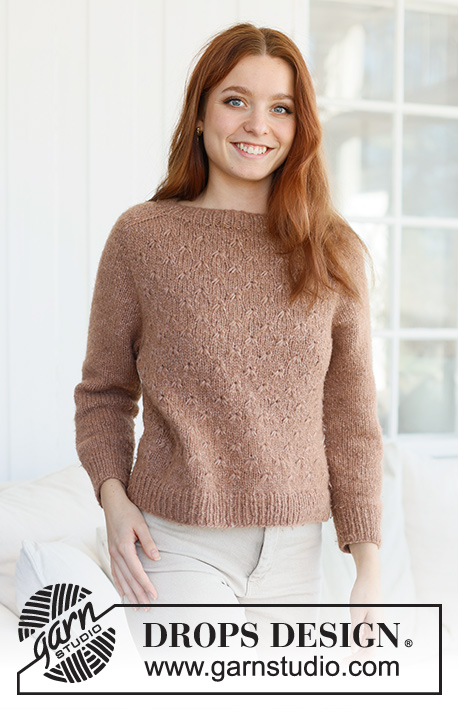
Knitted jumper in DROPS Air. Piece is knitted top down with saddle shoulders and relief pattern. Size: S - XXXL
DROPS 237-19 |
|||||||||||||||||||||||||||||||
|
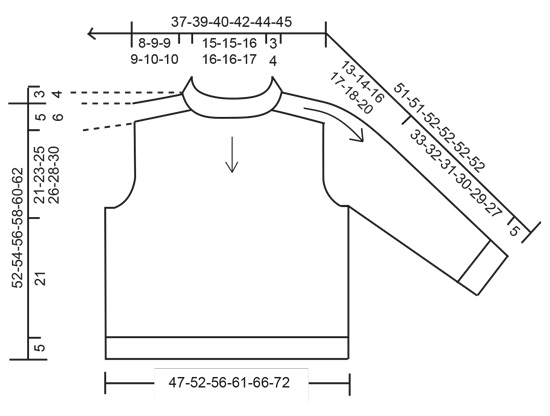
---------------------------------------------------------- EXPLANATION FOR THE PATTERN: ---------------------------------------------------------- PATTERN: See diagram A.1. INCREASE TIP FROM RIGHT SIDE: BEFORE MARKER: The new stitch is twisted towards the right. Use left needle to pick up yarn between 2 stitches from round below, pick up yarn from the back and knit stitch in front loop of stitch. AFTER MARKER: The new stitch is twisted towards the left. Use left needle to pick up yarn between 2 stitches from round below, pick up yarn from the front and knit stitch in back loop of stitch. INCREASE TIP FROM WRONG SIDE: BEFORE MARKER: The new stitch is twisted towards the right. Use left needle to pick up yarn between 2 stitches from round below, pick up yarn from the front and purl stitch in back loop of stitch. AFTER MARKER: The new stitch is twisted towards the left. Use left needle to pick up yarn between 2 stitches from round below, pick up yarn from the back and purl stitch in front loop of stitch. DECREASE TIP (applies to mid under sleeves): Decrease 1 stitch on each side of marker thread as follows: Work until 3 stitches remain before marker thread, knit 2 together, knit 2 (marker thread is between these 2 stitches), slip 1 stitch knitwise, knit 1, pass slipped stitch over stitch worked. ---------------------------------------------------------- START THE PIECE HERE: ---------------------------------------------------------- JUMPER - SHORT OVERVIEW OF THE PIECE: Work neck edge in the round on a short circular needle, top down. Then work an elevation in back of neck, back and forth on circular needle. Work the yoke in the round on circular needle top down. Now divide yoke for body and sleeves. Work the body in the round on circular needle. Work sleeves in the round on double pointed needles/a short circular needle. NECK EDGE: Cast on 84-86-90-94-96-100 stitches on short circular needle size 4 mm with DROPS Air. Knit 1 round. Then work rib (knit 1 / purl 1) for 3-3-3-4-4-4 cm. Knit 1 round while increasing 20-18-18-22-24-20 stitches evenly = 104-104-108-116-120-120 stitches. Insert 1 marker thread at beginning of round = mid back and 1 marker thread after 52-52-54-58-60-60 stitches = mid front. Work yoke as explained below - measure yoke from where marker thread was inserted mid front. Also use marker threads to count out towards the side where pattern should begin. YOKE: Switch to circular needle size 5 mm. Insert 4 markers in the piece as explained below - this is done without working the stitches, and each of these 4 markers are inserted between 2 stitches. Use markers when increasing for saddle shoulder. 1st marker: Begin mid back, count 18-18-19-19-20-20 stitches (½ back piece), insert 1st marker before next stitch. 2nd marker: Count 16-16-16-20-20-20 stitches from 1st marker (shoulder stitches), insert 2nd marker before next stitch. 3rd marker: Count 36-36-38-38-40-40 stitches from 2nd marker (front piece), insert 3rd marker before next stitch. 4th marker: Count 16-16-16-20-20-20 stitches from 3rd marker (shoulder stitches), insert 4th marker before next stitch. 18-18-19-19-20-20 stitches remain on back piece after 4th marker. Move the 4 markers upwards when working, increase at each of these markers later. Now work an elevation in the back of neck as explained below. ELEVATION: Work the entire elevation in stocking stitch. Begin mid back, knit 8-8-9-9-10-10 stitches, turn piece, tighten yarn and purl 16-16-18-18-20-20. Turn piece, tighten yarn and knit 24-24-27-27-30-30, turn piece, tighten yarn and purl 32-32-36-36-40-40. Turn piece, tighten yarn and knit 40-40-45-45-50-50 – in addition increase 1 stitch BEFORE 1st marker - read INCREASE TIP FROM RIGHT SIDE, turn piece, tighten yarn and purl 48-48-54-54-60-60 – in addition increase 1 stitch AFTER 1st marker and 1 stitch BEFORE 4th marker – read INCREASE TIP FROM WRONG SIDE (the increased stitches are in addition to number of stitches in elevation), turn piece, tighten yarn and work until mid back – in addition increase 1 stitch AFTER 4th marker, cut the yarn. 2 stitches have been increased before 1st and 2 stitches after 4th marker (seen from right side), i.e. there are 4 stitches more on back piece than front piece. OVERVIEW OF NEXT SECTION: On next round begin increase for saddle shoulder. AT THE SAME TIME increase for saddle shoulder, work pattern on front piece and back piece. Read the sections SADDLE SHOULDER INCREASE and PATTERN as explained below before continuing! SADDLE SHOULDER INCREASE: Work piece in the round on circular needle - begin round after 1st marker. On first round increase 4 stitches for saddle shoulder as follows: Increase AFTER 2nd and 4th marker and increase BEFORE 1st and 3rd marker – remember INCREASE TIP FROM RIGHT SIDE. Increase only on front piece and back piece, and number of shoulder stitches stays the same. Continue in the round like this and increase the same way on every round 16-18-18-18-20-20 times in total. Then work 2 rounds where you increase only in each side on front piece, i.e. increase AFTER 2nd marker and BEFORE 3rd marker = 176-184-188-196-208-208 stitches on needle (16-16-16-20-20-20 stitches on each shoulder and 72-76-78-78-84-84 stitches on front piece/back piece). REMEMBER THE KNITTING TENSION! After last increase piece measures approx. 8-9-9-9-10-10 cm from where marker thread was inserted. Then increase for sleeves as explained below. PATTERN: When 4 rounds in stocking stitch have been worked after neck edge and elevation, pattern begins. A.1 is only worked on front and back piece. Work sleeves in stocking stitch. I.e. work in stocking stitch over shoulder stitches, on front piece count the beginning of pattern out from marker thread mid front - see symbol in A.1 which marks mid front/mid back, count out towards the side as far as you can towards saddle shoulder increase, and begin pattern. NOTE! It is best to avoid a knot pattern up to saddle shoulder increase, replace this stitches with stocking stitch if needed, work A.1 as far as you can towards saddle shoulder increase in the other side, and work the last stitches in stocking stitch so that pattern begins and ends the same in each side, work stocking stitch over shoulder stitches, and work pattern on back piece the same way as on front piece. Continue like this. The increase stitches from saddle shoulder increase, and later the yoke increase is worked in pattern but adjust to avoid a knot pattern up to increases. SLEEVE INCREASE: When increase for saddle shoulder is done, increase 4 stitches for sleeves on next round as follows: Increase AFTER 1st and 3rd marker and increase BEFORE 2nd and 4th marker – remember INCREASE TIP FROM RIGHT SIDE! Increase now only on sleeves and number of stitches on front pieces and back piece is the same. Work the increased stitches in stocking stitch. Increase like this every other round 12-13-15-13-13-10 times in total, and then on every round 3-2-0-0-0-0 times in total = 236-244-248-248-260-248 stitches (given that you count on a round in A.1 where no stitches have been decreased, and this applies onwards where all number is given as long as A.1 is worked). Piece measures approx. 20-22-23-21-22-19 cm from where marker thread was inserted on front piece. Then increase for yoke as explained below. YOKE INCREASE: Move the 4 markers from sleeve increase so that each of the 4 markers is in the outermost stitch in each side on front piece and back piece. There are 72-76-78-78-84-84 stitches on front piece/back piece including stitches with markers, and 46-46-46-46-46-40 stitches on each sleeve. On next round increase 8 stitches for yoke by increasing both before and after each of the 4 stitches with marker. Now increase stitches on front piece, back piece and on both sleeves - work the increased stitches in A.1 on front piece/back piece and in stocking stitch on sleeves. Increase like this every other round 0-0-1-3-5-12 times in total, and then every round 1-2-3-5-3-0 times in total. After last increase there are 244-260-280-312-324-344 stitches on needle. When all increases are done, the piece measures approx. 21-23-25-26-28-30 cm from where marker thread was inserted on front piece, and approx. 26-28-30-32-34-36 cm from shoulder. On next round divide piece for body and sleeves as follows: Slip the first 48-50-54-62-62-64 stitches on a thread for sleeve (all stitches between 1st and 2nd marker), cast on 6-8-10-10-12-14 new stitches on needle (in the side under sleeve), work pattern as before over the next 74-80-86-94-100-108 stitches (front piece), slip the next 48-50-54-62-62-64 stitches on a thread for sleeve (all stitches between 3rd and 4th marker), cast on 6-8-10-10-12-14 new stitches on needle (in the side under sleeve), work pattern as before over the last 74-80-86-94-100-108 stitches (back piece). Finish body and sleeves separately. Now measure piece from here! BODY: = 160-176-192-208-224-244 stitches. Insert 1 marker in the middle of the 6-8-10-10-12-14 stitches that were cast on at beginning of round. Work in stocking stitch until marker – round begins here now. Continue pattern in the round as before. NOTE! The 4-4-4-4-4-6 stitches that do not fit the pattern under each sleeve as worked in stocking stitch. Work until piece measures approx. 21 cm from division in all sizes - finish after 6th or 12th round in A.1. Switch to circular needle size 4 mm. Work rib (knit 1/purl 1) for 5 cm. Loosely cast off. Jumper measures approx. 52-54-56-58-60-62 cm from shoulder and down. SLEEVES: Slip the 48-50-54-62-62-64 stitches from stitch holder in one side of piece on double pointed needles or a short circular needle size 5 mm and pick in addition up 1 stitch in each of the 6-8-10-10-12-14 new stitches cast on under sleeve = 54-58-64-72-74-78 stitches. Insert 1 marker thread in the middle of the 6-8-10-10-12-14 stitches. Move the marker thread upwards when working - marker thread should be used for decrease mid under sleeve. Begin round at the marker thread and work stocking stitch in the round. When piece measures 4-4-4-3-3-3 cm from division, decrease 2 stitches mid under sleeve - read DECREASE TIP. Decrease like this every 8-6-4-2½-2½-2 cm 4-5-7-10-11-12 times in total = 46-48-50-52-52-54 stitches. Work until sleeve measures 33-32-31-30-29-27 cm from division. 5 cm remain until finished measurements. Try the jumper and work to desired length before rib. Switch to double pointed needles size 4 mm. Work rib (knit 1/purl 1) for 5 cm. Loosely cast off. Sleeve measures approx. 38-37-36-35-34-32 cm from division. Work the other sleeve the same way. |
|||||||||||||||||||||||||||||||
Diagram explanations |
|||||||||||||||||||||||||||||||
|
|||||||||||||||||||||||||||||||
 |
|||||||||||||||||||||||||||||||
 |
|||||||||||||||||||||||||||||||
 |
|||||||||||||||||||||||||||||||
Have you finished this pattern?Tag your pictures with #dropspattern #countryspicesweater or submit them to the #dropsfan gallery. Do you need help with this pattern?You'll find 35 tutorial videos, a Comments/Questions area and more by visiting the pattern on garnstudio.com. © 1982-2026 DROPS Design A/S. We reserve all rights. This document, including all its sub-sections, has copyrights. Read more about what you can do with our patterns at the bottom of each pattern on our site. |
|||||||||||||||||||||||||||||||


With over 40 years in knitting and crochet design, DROPS Design offers one of the most extensive collections of free patterns on the internet - translated to 17 languages. As of today we count 324 catalogues and 12290 patterns translated into English (UK/cm). 12290
We work hard to bring you the best knitting and crochet have to offer, inspiration and advice as well as great quality yarns at incredible prices! Would you like to use our patterns for other than personal use? You can read what you are allowed to do in the Copyright text at the bottom of all our patterns. Happy crafting!
Post a comment to pattern DROPS 237-19
We would love to hear what you have to say about this pattern!
If you want to leave a question, please make sure you select the correct category in the form below, to speed up the answering process. Required fields are marked *.