
Popular categories
Looking for a yarn?


Comments / Questions (61)
![]() Dede wrote:
Dede wrote:
Bonjour, Il est indiqué de tricoter A8 une fois puis A8a jusqu'à la fin Mais vu le nombre de rang entre la fin de A7 et le col sur le modèle en photo, A8 ne semble pas avoir ete tricoter 1 fois en entier sur toute la largeur ?
10.04.2026 - 23:40DROPS Design answered:
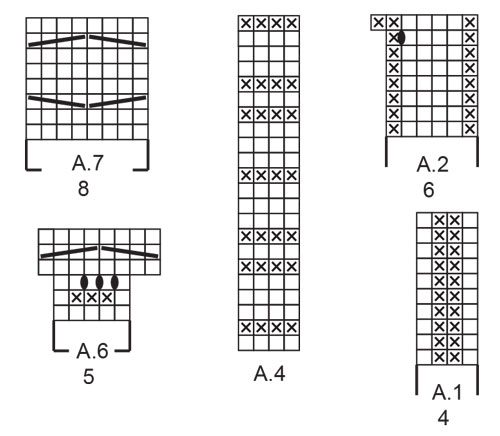
Bonjour Dede, notez qu'en même temps que vous tricotez A.8/A.8a vous allez rabattre les mailles centrales de l'encolure (dos) ou les mettre en attente (devant), vous terminerez chaque épaule en suivant le diagramme A.8 a (point de blé). Bon tricot!
13.04.2026 - 07:59
![]() Rosita wrote:
Rosita wrote:
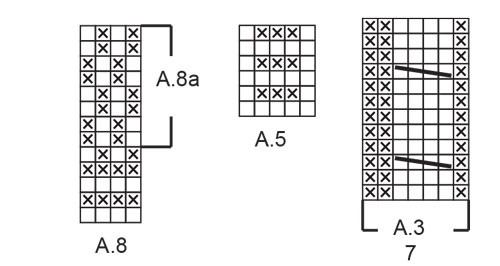
I’m a bit confused with A.3. Is it supposed to be simple cable 4 front? Why the knit stitches on RW do not align e.g row 3 is 1 purl, 4 knits, 2 purls, however, the 1st of the 4 knits is purl in the previous row while it should be knit in cable 4 front. Thank you.
07.01.2026 - 07:42DROPS Design answered:
Dear Rosita, first row of diagrams are worked from RS, so that the cable in A.3 will be worked from RS as follows: P1, slip 2 in front of piece, knit 2, knit 2 from cable needle, P2. Happy knitting!
08.01.2026 - 08:45
![]() Kathandrée wrote:
Kathandrée wrote:
Bonsoir, Lorsque qu'A3 a été tricoté en hauteur pendant 21 cm. On tricote alors A4 et on diminue à intervalles réguliers. Les 44 diminutions se font elles sur le même rang ? Ou dois-je les répartir régulièrement en montant dans le tricot, soit 2 diminutions tous les 2 rangs ? Merci
29.04.2025 - 02:00DROPS Design answered:
Bonjour Kathandrée, les 44 diminutions se font sur le 1er rang des diagrammes A.4, ils permettent de bien conserver la bonne largeur car il faut plus de mailles pour tricoter des torsades que le point fantaisie A.4 (jersey/point mousse). Bon tricot!
29.04.2025 - 09:00
![]() MURIEL COUSIN wrote:
MURIEL COUSIN wrote:
Bonjour Quand on clique sur une vidéo on ne tombe pas sur la vidéo mais sur des explications Je voulais regarder la vidéo sur l i cord. Cordialement
25.01.2025 - 11:02DROPS Design answered:
Bonjour Mme Cousin, nous avons eu un souci avec les vidéos ce week-end, mais tout est rentré en ordre, en cliquant sur la vidéo, vous pourrez désormais la voir. Bon tricot!
27.01.2025 - 09:03
![]() Christine T wrote:
Christine T wrote:
Bonjour, Pourquoi terminer les épaules -dos et devant- en E-corde ? Les coutures d'épaules vont certainement cacher cette finition fantaisie. A vous lire à ce sujet : les coutures " épaule" cachent-elle bien l'E-corde ? Cordialement
26.10.2024 - 23:33DROPS Design answered:
Bonjour Christine, la couture ne va pas cacher la bordure I-cord, dans cette vidéo, nous montrons comment coudre 2 pièces rabattues avec un I-cord (ici en jersey, mais dans ce modèle, en point fantaisie auparavant). Bon tricot!
28.10.2024 - 09:17
![]() Gaetane wrote:
Gaetane wrote:
Bonjour ! Une fois mes manches cousus après le pull, je remarque que j ai des démarcations comparer à votre photo , pourtant j ai fait une couture invisible ! Pourquoi alors ? Merci 🙏
21.08.2024 - 14:08DROPS Design answered:
Bonjour Gaetane, il est un peu compliqué d'émettre un quelconque diagnostic à distance, montrez votre pull à votre magasin ou montrez des photos sur notre DROPS Workshop où d'autres tricoteuses pourront vous aider. Bonne continuation!
21.08.2024 - 16:02
![]() Gaetane wrote:
Gaetane wrote:
Bonjour ! Y a t il un vidéo pour voir comment coudre la manche ? Sur le tricot , mes côtés étant cousu ! Merci 🙏
11.08.2024 - 13:15DROPS Design answered:
Bonjour Gaetane, vous pouvez procéder comme indiqué dans cette vidéo. Bon tricot!
12.08.2024 - 08:20
![]() Gaetane wrote:
Gaetane wrote:
Bonjour! Encore moi désolé 😐 ,je comprends la thecnique du I-cord, mais sur la vidéo elle laisse des mailles sur un fil en attente côté encolure ou quoi ? Et on les tricote quand ces mailles en attente ? C est ça que je comprends pas ! Merci 🙏
10.08.2024 - 11:31DROPS Design answered:
Bonjour Gaetane, dans la vidéo, les mailles point mousse sont mises en attente (pour un devant de gilet par exemple), ici, vous n'avez pas de mailles à mettre côté encolure, quand le biais de l'épaule est terminé, rabattes les mailles en I-cord (sautez l'étape de la vidéo des mailles point mousse mises en attente). Bon tricot!
12.08.2024 - 07:49
![]() Gaetane wrote:
Gaetane wrote:
Bonjour ! Quand vous dites ceci laissez ces 7 mailles sur l'aiguille gauche (ou glissez les en attente), tournez et tricotez le rang suivant, tricotez ces 2 rangs encore 2 fois = vous avez 3 fois 7 mailles en attente côté emmanchure. ? Quand est-ce qu on tricote ces mailles en attente ? Merci 🙏
09.08.2024 - 15:00DROPS Design answered:
Bonjour Gaetane, en fin de rang vers l'emmanchure (autrement dit un rang qui commence par le côté encolure), tricotez jusqu'à ce qu'il reste 7 mailles, tournez et tricotez le rang retour; répétez ces 2 rangs encore 2 fois; dans cette vidéo, nous montrons comment tricoter ces rangs raccourcis (sur un nombre de mailles différent, mais la technique est la même). Bon tricot!
09.08.2024 - 15:42
![]() Gaetane wrote:
Gaetane wrote:
Bonjour ! Vous dites que je n aurez probablement pas assez de mailles pour ajouter une torsade de A3 , mais il n y a pas de A3 pour la manche? 🙄🙄 j ai terminé ma manche alors j en conclut que A8A c est le point de riz ? Exact ? Merci 🙏
08.08.2024 - 12:17DROPS Design answered:
Bonjour Gaetane, le point fantaisie de la manche se tricote ainsi: 1 x A.1 en hauteur, puis 1 x A.2 en hauteur, puis 2 x A.3 en hauteur puis A.8 jusqu'à la fin. A.8 correspond effectivement au point de blé (double point de riz en hauteur). Bon tricot!
08.08.2024 - 13:04
|
||||||||||||||||
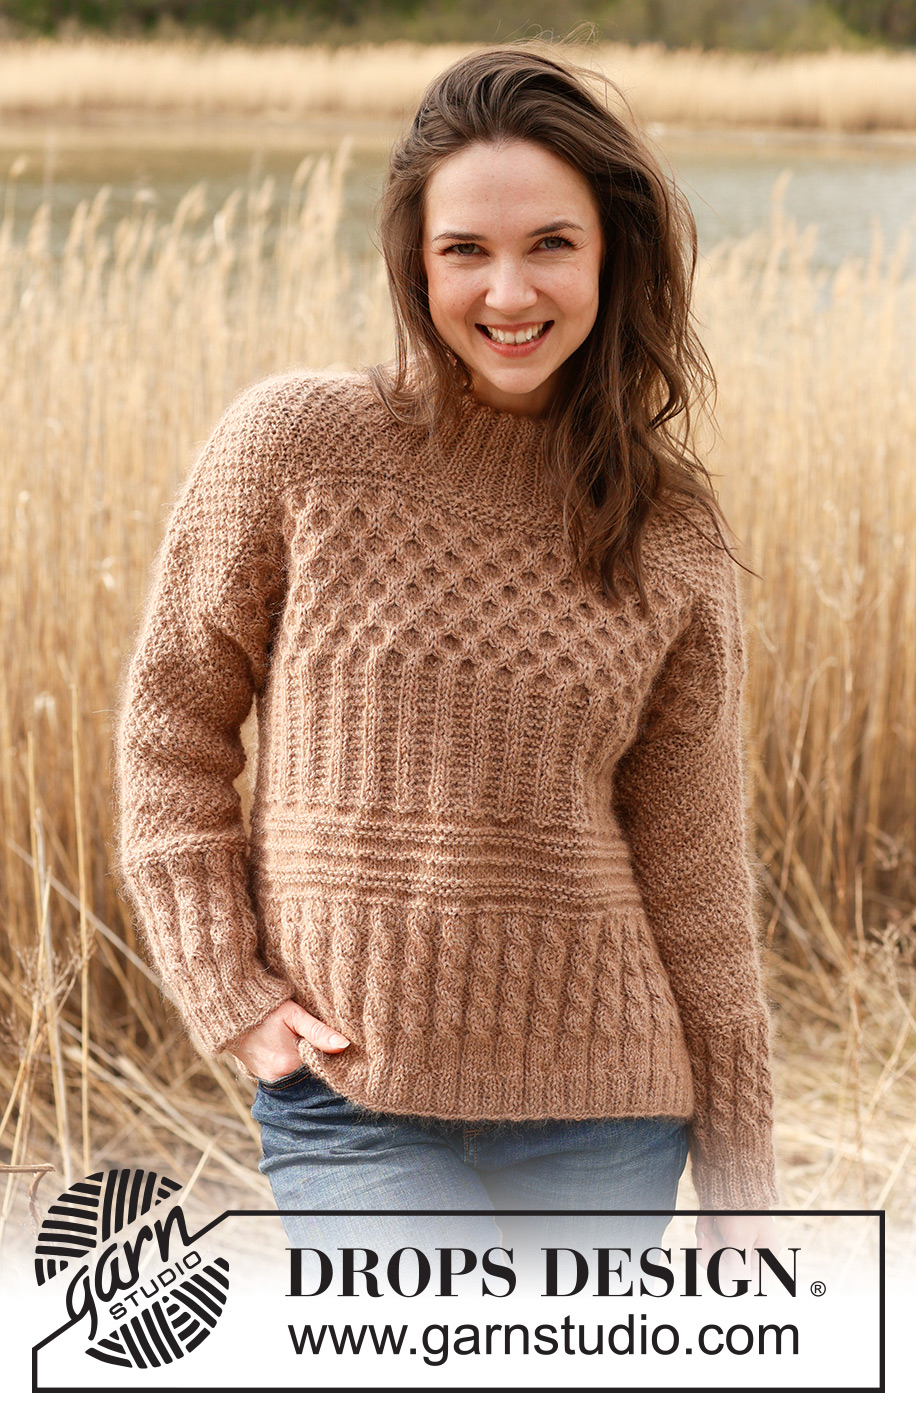
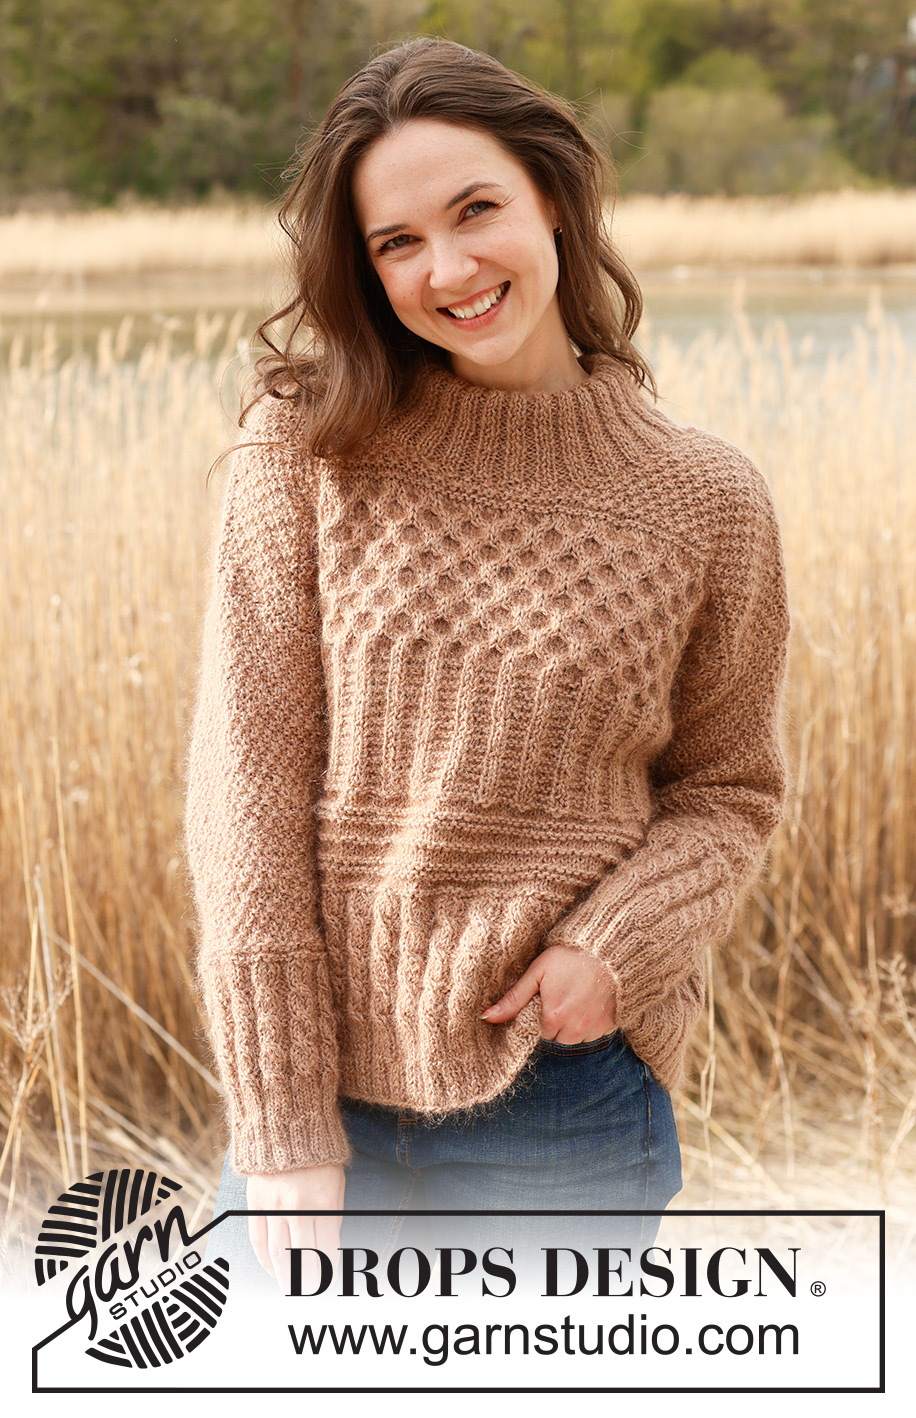
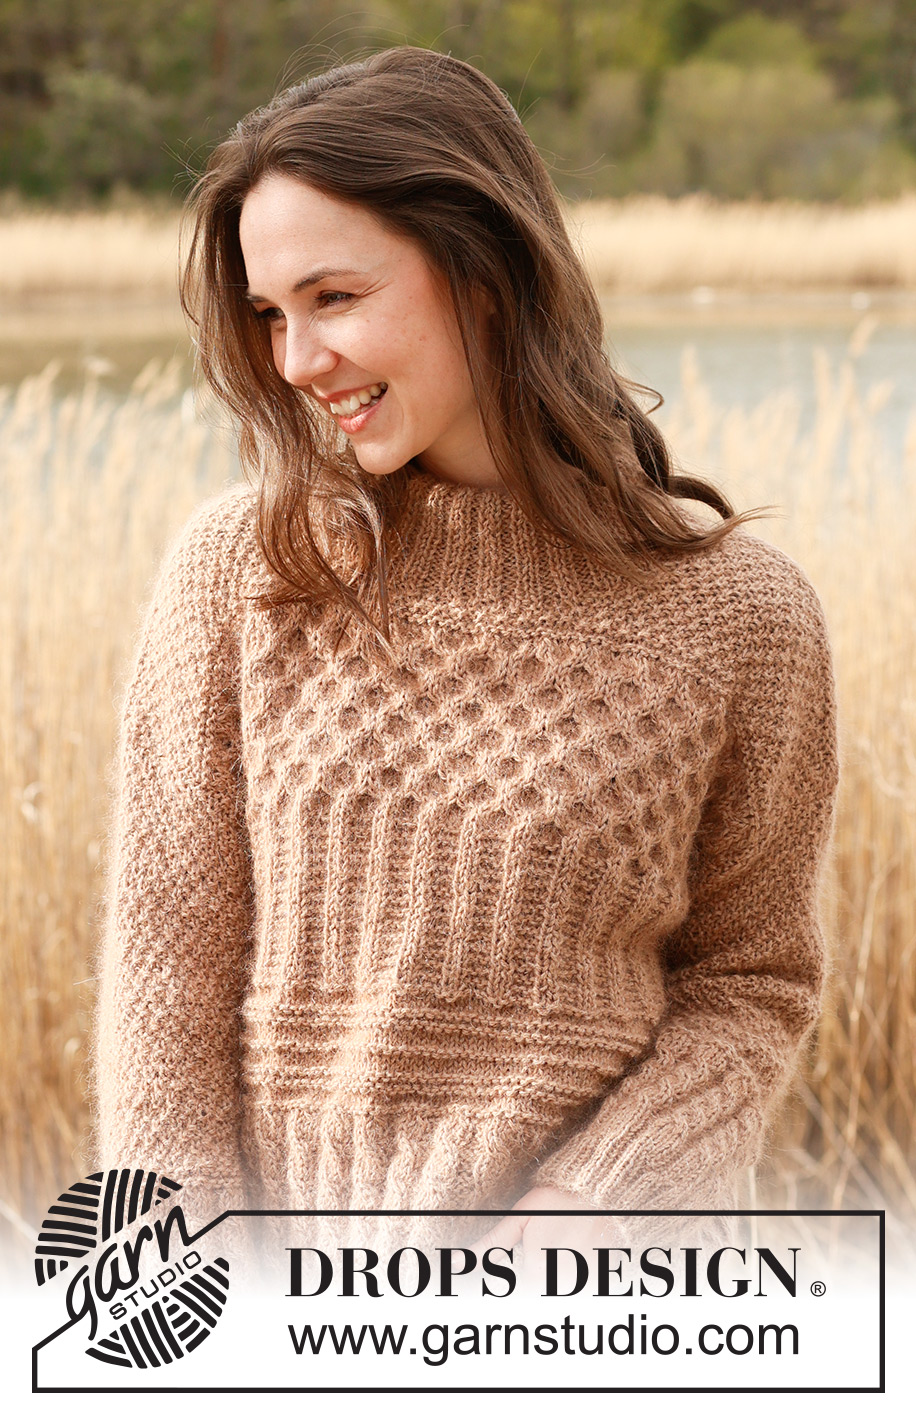
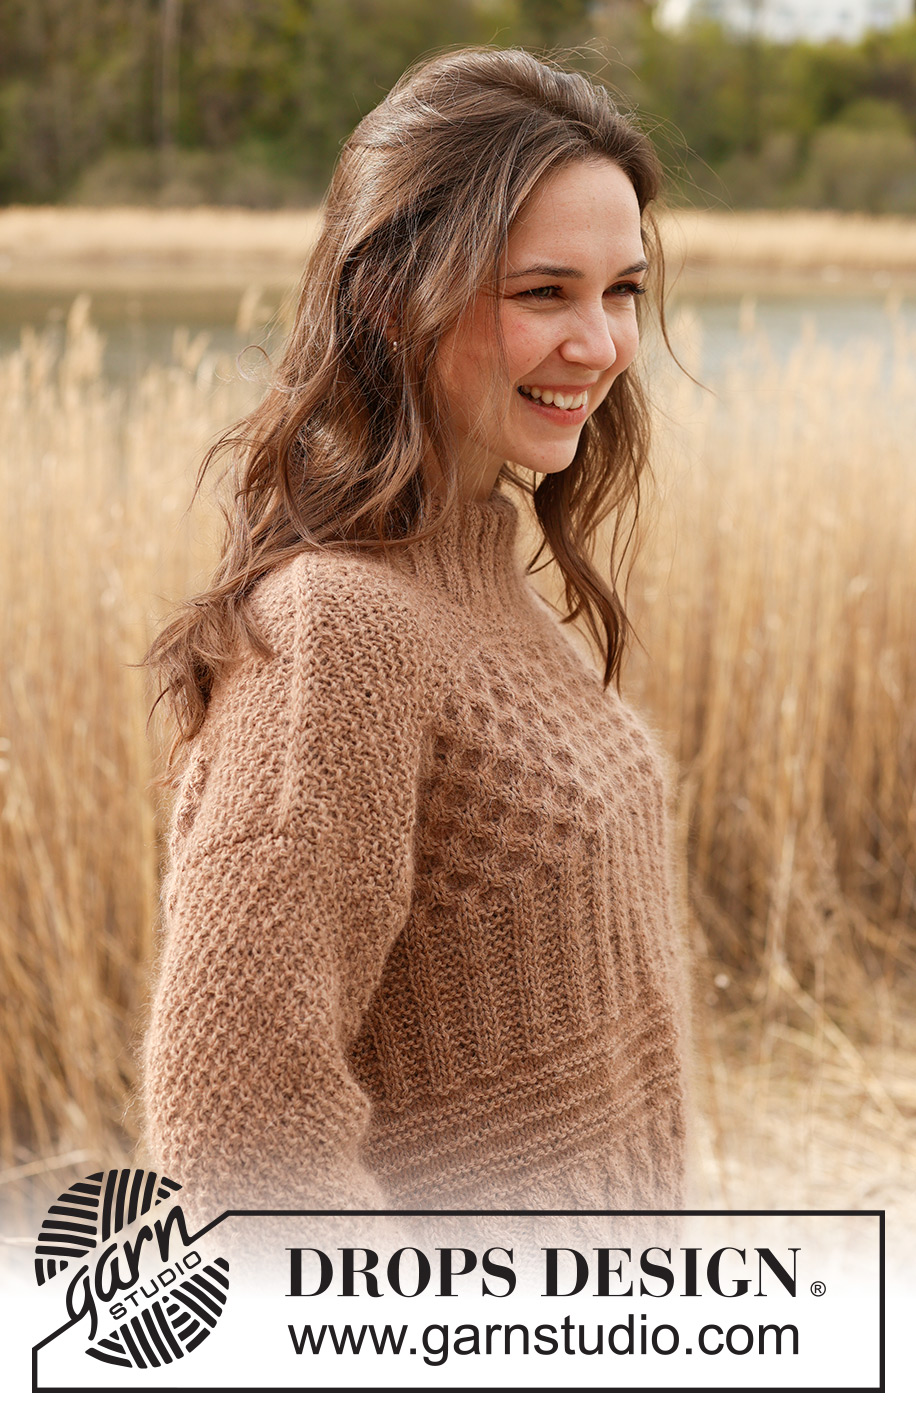
Cracked Walnuts Sweater#crackedwalnutssweater |
||||||||||||||||
 |
 |
|||||||||||||||
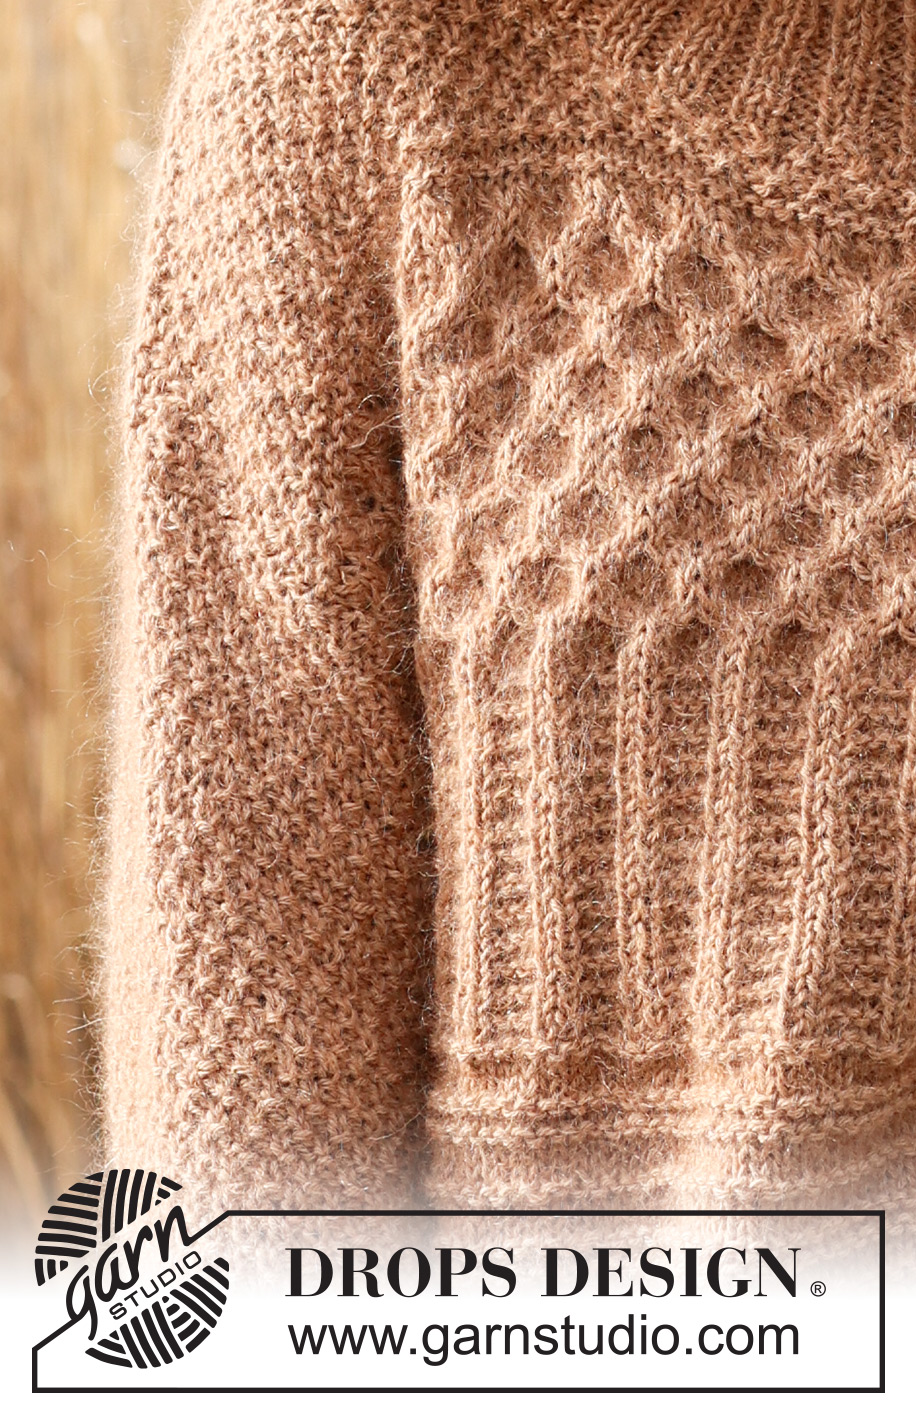
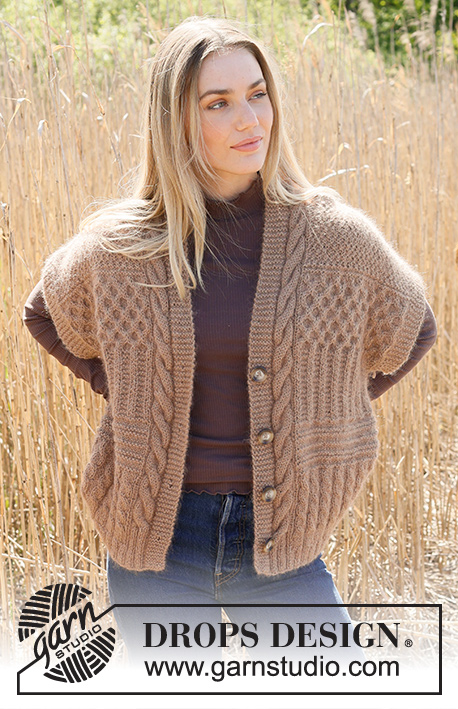
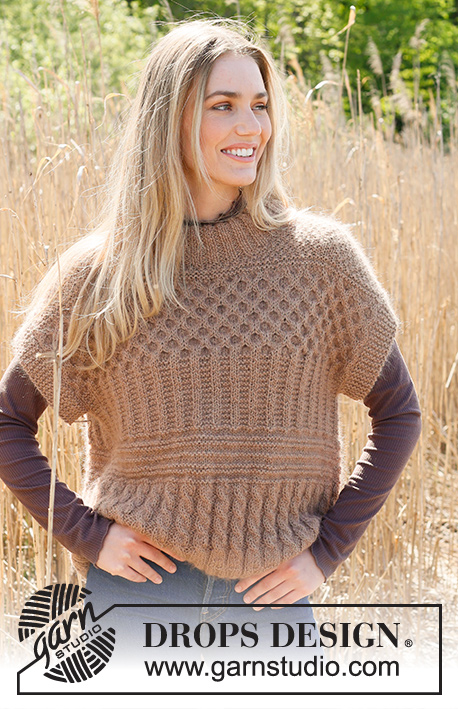
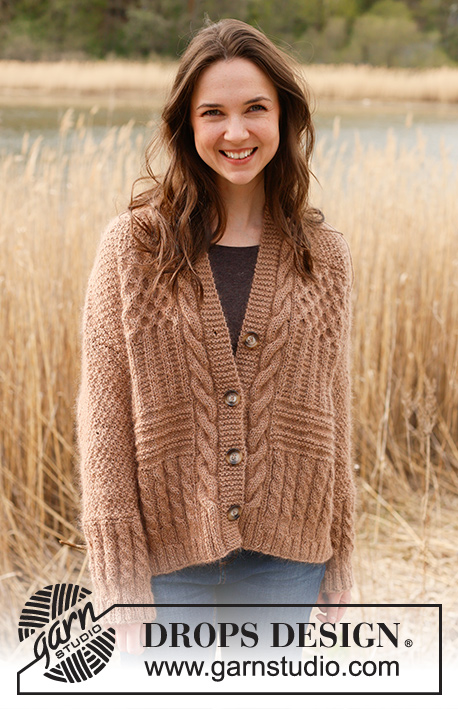
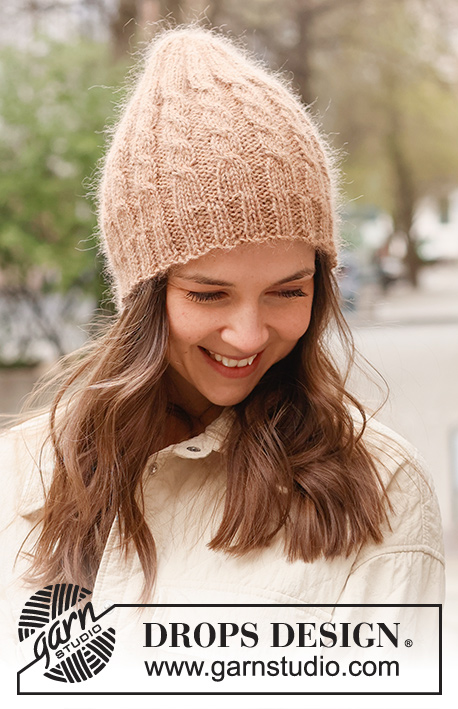
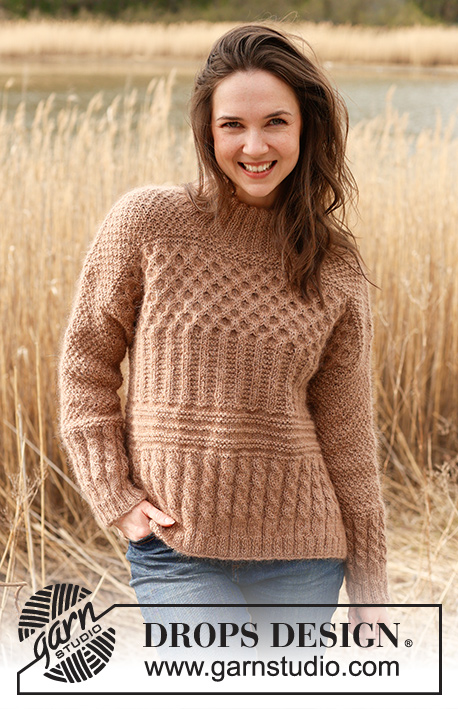
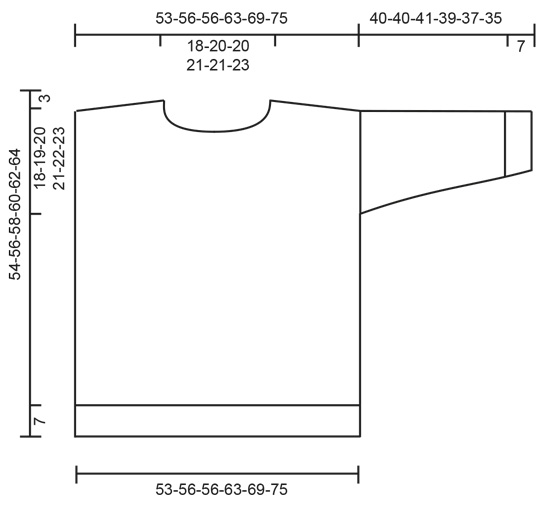
Knitted jumper in DROPS Kid-Silk and DROPS Puna / DROPS Merino Extra Fine. Piece is knitted bottom up with textured pattern, ridges, cables, double neck and rib. Size XS – XXL.
DROPS 235-1 |
||||||||||||||||
|
---------------------------------------------------------- EXPLANATION FOR THE PATTERN: ---------------------------------------------------------- GARTER STITCH (back and forth): Knit all rows. 1 ridge vertically = knit 2 rows. PATTERN: See diagrams A.1 to A.8. Diagrams show all rows in pattern seen from the right side. KNIT TOGETHER: FROM RIGHT SIDE: Slip 1 stitch knitwise, knit 1, pass slipped stitch over stitch worked. FROM WRONG SIDE: Purl 2 together. STOCKING STITCH: When working from wrong side, purl and when working from right side, knit. INCREASE TIP (applies to sleeves): Work 1 past marker, make 1 yarn over, work as before until 2 stitches remain before marker at the end of round, make 1 yarn over. On next round work yarn overs twisted. When working A.2, purl the increase, when working A.7, work increase in pattern. ---------------------------------------------------------- START THE PIECE HERE: ---------------------------------------------------------- JUMPER - SHORT OVERVIEW OF THE PIECE: Work front and back piece back and forth separately. Work sleeves bottom up, in the round on double pointed needles/a short circular needle. Finish with a double neck. BACK PIECE: Cast on 98-110-110-122-134-146 stitches on circular needle size 4 mm with 1 strand of each quality (2 strands). Purl 1 row from wrong side. Work next row as follows from right side: 1 edge stitch in GARTER STITCH – read explanation above, work A.1 until 1 stitch remain, 1 stitch in garter stitch. When A.1 has been worked 1 time vertically, work pattern as follows: 1 edge stitch in garter stitch, work A.2 until 1 stitch remains, 1 edge stitch in garter stitch. When A.2 has been worked 1 time vertically, there are 114-128-128-142-156-170 stitches on needle. Switch to circular needle size 5.5 mm. Work pattern as follows: 1 edge stitch in garter stitch, work A.3 until 1 stitch remains, 1 edge stitch in garter stitch. REMEMBER THE KNITTING TENSION! Repeat A.3 vertically until piece measures 16-17-19-19-21-22 cm. Work pattern, begin from right side as follows: 1 edge stitch in garter stitch, work A.4 until 1 stitch remains and decrease at the same time 27-36-36-40-44-48 stitches evenly, 1 edge stitch in garter stitch = 87-92-92-102-112-122 stitches. When A.4 has been worked 1 time vertically, work pattern as follows: 1 edge stitch in garter stitch, work A.5 until 1 stitch remains, 1 edge stitch in garter stitch. Repeat A.5 vertically. Continue pattern like this until piece measures 33-35-36-38-39-41 cm. Work pattern, begin from right side as follows: 1 edge stitch in garter stitch, work A.6 until 1 stitch remains, 1 edge stitch in garter stitch. When A.6 has been worked 1 time vertically, there are 138-146-146-162-178-194 stitches on needle. Work pattern as follows: 1 edge stitch in garter stitch, work A.7 until 1 stitch remains, 1 edge stitch in garter stitch. Work A.7 3 times in total vertically. Piece measures approx. 45-47-48-50-51-53 cm. Work pattern as follows: 1 edge stitch in garter stitch, work A.8 until 1 stitch remains and decrease at the same time 51-54-54-60-66-72 stitches evenly, 1 edge stitch in garter stitch = 87-92-92-102-112-122 stitches. When A.8 has been worked 1 time vertically, work A.8a vertically until finished measurements. When piece measures 50-52-54-56-58-60 cm, cast off the middle 27-30-30-32-32-34 stitches for neck and finish each shoulder (30-31-31-35-40-44 stitches) separately. On next row from neck cast off 1 stitch at the beginning of row = 29-30-30-34-39-43 stitches. When piece measures 51-53-55-57-59-61 cm, work diagonal shoulder, begin on next row from the neck as follows: * Work pattern as before until 7-7-7-8-9-10 stitches remain, turn and work back *, work from *-* 3 times in total. I.e. work 7-7-7-8-9-10 stitches less on every row from the neck. On last row towards neck, cast on 2 new stitches at the end of row = 31-32-32-36-41-45 stitches. Now work and cast off with an edge over shoulder stitches. Work stitches cast on with shoulder stitches as follows: Work * 1 stitch in STOCKING STITCH – read explanation above, work next stitch together with first/next stitch from shoulder – read KNIT TOGETHER, pass the 2 stitches back on the needle they came from with strand on wrong side of piece, make sure not to tighten yarn too much *, work from *-* until all stitches from shoulder have been worked together with the 2 new stitches that were cast on. Cast off the 2 stitches. Work the other shoulder the same way. FRONT PIECE: Cast on and work as back piece until piece measures 46-48-49-51-52-54 cm = 87-92-92-102-112-122 stitches. Now slip the middle 15-18-18-20-20-22 stitches on a thread for neck and finish each shoulder (36-37-37-41-46-50 stitches) separately. Cast off stitches for neck on every row from neck as follows: Cast off 2 stitches 2 times in total and 1 stitch 3 times in total = 29-30-30-34-39-43 stitches remain on shoulder. Then work each shoulder as on back piece. SLEEVES: Cast on 60-60-60-72-72-72 stitches on double pointed needles size 4 mm with 1 strand of each quality. Knit 1 round. Insert 1 marker at beginning of round. Work A.1 in the round. When A.1 has been worked 1 time vertically, work A.2 over all stitches. When A.2 has been worked 1 time vertically, there are 70-70-70-84-84-84 stitches on row. Switch to double pointed needles size 5.5 mm. Work A.3 over all stitches. Work A.3 2 times in total vertically. Work A.8 over all stitches, on first round decrease 22-22-22-26-26-26 stitches evenly = 48-48-48-58-58-58 stitches. Repeat A.8a vertically until finished measurements. AT THE SAME TIME when piece measures 20 cm, increase 1 stitch on each side of marker - read INCREASE TIP! Increase like this every 3½-3½-2½-3-3-2 cm 6-6-8-6-6-8 times in total = 60-60-64-70-70-74 stitches. Work the increased stitches in the pattern. Cast off when sleeve measures 40-40-41-39-37-35 cm. Knit another sleeve the same way. ASSEMBLY: Sew shoulder seams inside 1 stitch on edge. Sew in sleeves. Sew side seams inside 1 edge stitch. DOUBLE COLLAR: Begin in one shoulder seam, pick up approx. 76 to 104 stitches around the neck (including stitches on thread) from right side, on a short circular needle size 4 mm with 1 strand in each quality. Number of stitches must be divisible by 4. Work rib (purl 2/knit 2) over all stitches. When neck measures 14 cm, cast off with knit over knit and purl over purl with circular needle size 5.5 mm (make sure to avoid a tight cast neck-off edge). Fold the rib down on inside of garment. Fasten rib to get a double neck edge. To avoid a tight neck edge that sticks out it is important to keep the seam elastic. |
||||||||||||||||
Diagram explanations |
||||||||||||||||
|
||||||||||||||||
 |
||||||||||||||||
 |
||||||||||||||||
 |
||||||||||||||||
Have you finished this pattern?Tag your pictures with #dropspattern #crackedwalnutssweater or submit them to the #dropsfan gallery. Do you need help with this pattern?You'll find 35 tutorial videos, a Comments/Questions area and more by visiting the pattern on garnstudio.com. © 1982-2026 DROPS Design A/S. We reserve all rights. This document, including all its sub-sections, has copyrights. Read more about what you can do with our patterns at the bottom of each pattern on our site. |
||||||||||||||||


With over 40 years in knitting and crochet design, DROPS Design offers one of the most extensive collections of free patterns on the internet - translated to 17 languages. As of today we count 324 catalogues and 12290 patterns translated into English (UK/cm). 12290
We work hard to bring you the best knitting and crochet have to offer, inspiration and advice as well as great quality yarns at incredible prices! Would you like to use our patterns for other than personal use? You can read what you are allowed to do in the Copyright text at the bottom of all our patterns. Happy crafting!
Post a comment to pattern DROPS 235-1
We would love to hear what you have to say about this pattern!
If you want to leave a question, please make sure you select the correct category in the form below, to speed up the answering process. Required fields are marked *.