
Popular categories
Looking for a yarn?


Comments / Questions (59)
![]() Josette Charret wrote:
Josette Charret wrote:
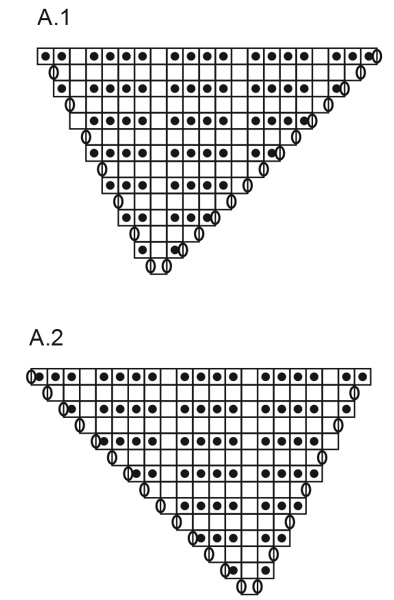
Je ne comprends pas du tout les explications du bavoir ! Du haut vers le bas? 7 mailles au départ ? Sur les grilles où est la ligne centrale ??? Pas d'indication du haut et du bas !!!
22.04.2026 - 10:30DROPS Design answered:
Bonjour Mme Charret, tout à fait, on tricote de haut en bas en augmentant à la fois sur les côtés et au milieu pour former ainsi un triangle. La maille centrale ne figure pas dans les diagrammes mais dans les explications écrites (notez que les diagrammes se lisent quand même de bas en haut). Bon tricot!
22.04.2026 - 16:37
![]() Beverley wrote:
Beverley wrote:
Is there a tutorial video for the bib
26.02.2026 - 00:20DROPS Design answered:
Hi Beverley, Sadly, we do not have a tutorial for this pattern at the moment. Regards, Drops Team.
26.02.2026 - 05:57
![]() Danièle DESSONS wrote:
Danièle DESSONS wrote:
Je ne comprends pas les explications des augmentations du bavoir en français - s'il vous plait - Merci
29.10.2025 - 14:21DROPS Design answered:
Bonjour Mme Dessons, les augmentations figurent dans les diagrammes A.1 et A.2 (cf 3ème symbole de la légende); ainsi, vous allez augmenter tous les rangs sur l'endroit: 1 m après la 1ère maille (début de A.1) + 1 m avant la m centrale (fin de A.1) + 1 m après la m centrale (début de A.2) et 1 m avant la dernière m (fin de A.2); Sur l'envers, vous augmentez seulement après la 1ère maille (début A.2) et avant la dernière maille (fin de A.1). Bon tricot!
30.10.2025 - 18:40
![]() Kerstin wrote:
Kerstin wrote:
Wie ist A1 und A2 zu lesen? Jede Reihe von rechts nach links?
07.09.2025 - 14:04DROPS Design answered:
Hi Kerstin, on the right side you read the diagrams from right to left. On the left side you read the diagram from left to right. Please see the lesson ICI. Grüße
20.09.2025 - 22:46
![]() Kerstin wrote:
Kerstin wrote:
Wie ist A1 und A2 zu lesen? Jede Reihe von rechts nach links?
07.09.2025 - 13:35DROPS Design answered:
Liebe Kerstin, wenn in Runden gestrickt wird, lesen Sie jede Zeile des Diagramms von rechts nach links, wenn in Hin- und Rück-Reihen gestrickt wird, lesen Sie abwechselnd von rechts nach links (Hin-Reihen) und von links nach rechts (Rück-Reihen). Viel Spaß beim Stricken!
15.09.2025 - 10:15
![]() Lili wrote:
Lili wrote:
Diese Anleitung ist Müll.Stricke seit 25Jahren.Hier wird nicht erklärt,wie die Umschläge abgestrickt werden. Außerdem wird nicht gesagt, wie man die Rückreihen strickt. Das Diagram ist Blödsinn und Unbrauchbar. Habe mich Tage lang damit befasst und gebe auf. Sie sollten die Anleitung verständlicher schreiben bzw überarbeiten. Keiner kann es so nachstricken. Schade,da es ein schönes Lätzchen ist.
02.09.2025 - 11:14
![]() Ulrike Müller wrote:
Ulrike Müller wrote:
Ist im Musterdiagramm jede (also Hin-und Rück-) Reihe dargestellt? Ist die Fehlerkorrektur bereits eingearbeitet? Sie ist nicht mehr aufrufbar.
15.06.2025 - 17:34DROPS Design answered:
Liebe Frau Müller, ja genau - für beide Fragen; bei den Hin- sowie bei den Rückreihen stricken Sie die Maschen wie unter die Beschreibung mit "In Hin-Reihen" und "in Rück-Reihen" erklärt. Viel Spaß beim Stricken!
16.06.2025 - 08:42
![]() Aline wrote:
Aline wrote:
Hei, ser det er mange som sliter med å forstå oppskriften til smekken, så foreslår at dere fyller på med litt mer info fra kommentarene så den blir lettere å forstå- f.eks. at den strikkes fra toppen og ned, osv... Har nå strikket mønsteret én gang i høyden, og sliter med å skjønne hvordan jeg skal gå videre (selv med svaret på den ene kommentaren). Regner med man beholder kanten (1 maske rille, 1maske rett/vrang)- Skal man da øke før man begynner på mønsteret igjen?
11.06.2025 - 09:58
![]() Joy wrote:
Joy wrote:
Cast on 7 sts, knit 1 row. Row 1: Knit first 2, *inc 1, k1, Inc 1*, knit middle stitch. Repeat * * once more and knit last 2 stitches. Row 2: purl? Row 3: Knit 2, inc 1, p1, k1, p1, knit middle stitch, blah blah blah. Why can't it be this simple, I can't even look at the charts or the example given. It is too confusing even for someone like me who is advanced, can't read a pattern.
07.06.2025 - 00:46
![]() Live wrote:
Live wrote:
Hi, Are you able to use Drops Merino Extra Fine (yarn group B) for this pattern?
02.05.2025 - 11:45DROPS Design answered:
Dear Live, probably but note that the tension would be different so the result might also look different - and you might have to make some adjustements for bib - hat would have to be completely re-calculated with the new tension. Happy knitting!
02.05.2025 - 13:34
|
||||||||||
Baby Business Set#babybusinessset |
||||||||||
 |
 |
|||||||||
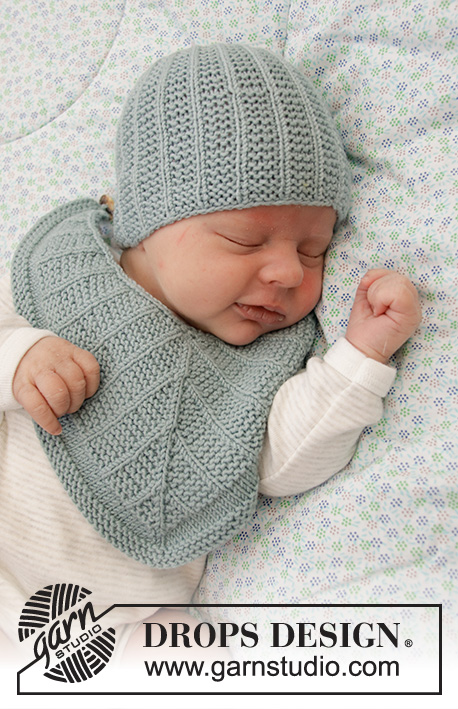
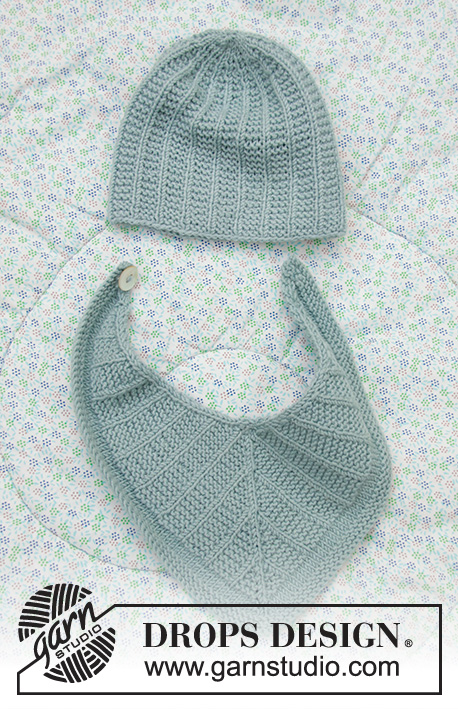
Knitted hat and bib for babies in DROPS BabyMerino with stocking stitch and garter stitch. Size premature to 4 year.
DROPS Baby 33-20 |
||||||||||
|
------------------------------------------------------- EXPLANATIONS FOR THE PATTERN: ------------------------------------------------------- RIDGE/GARTER STITCH (worked in the round): 1 ridge in height = 2 rounds; Knit 1 round and purl 1 round. RIDGE/GARTER STITCH (worked back and forth): Knit all rows. 1 ridge in height = Knit 2 rows. PATTERN: See diagrams A.1 and A.2. ------------------------------------------------------- START THE PIECE HERE: ------------------------------------------------------- HAT – SHORT OVERVIEW OF THE PIECE: The piece is worked in the round with double pointed needles, bottom up. HAT: Cast on (60) 72-84-88-96 (104-108) stitches with double pointed needles size 3 mm and Baby Merino. *Knit 1, work 3 stitches in garter stitch *, continue this pattern in the round (= (15)-18-21-22-24 (26-27) repeats). Continue until the piece measures approx. (10) 11-12-13-14 (14-15) cm. Then decrease each cm as follows: DECREASE 1: Knit together the first 2 stitches in each garter stitch section = (45) 54-63-66-72 (78-81) stitches. Continue with knit 1, 2 stitches in garter stitch over all stitches. DECREASE 2: Knit together the last 2 stitches in each garter stitch section = (30) 36-42-44-48 (52-54) stitches. Continue with knit 1, 1 stitch in garter stitch over all stitches. DECREASE 3: Knit all stitches together 2 and 2 = (15) 18-21-22-24 (26-27) stitches DECREASE 4: Knit all stitches together 2 and 2 = (8) 9-11-11-12 (13-14) stitches. ALL SIZES: Pull a double strand through the remaining stitches, tighten and fasten the strands well. The hat measures approx. (14) 15-16-17-18 (19-20) cm. ------------------------------------------------------- BIB – SHORT OVERVIEW OF THE PIECE: The piece is worked back and forth with circular needle, top down. BIB: Cast on 7 stitches with circular needle size 3 mm and Baby Merino. Insert 1 marker in the 4th stitch (= mid-stitch); allow the marker to follow your work onwards. Work as follows – from the right side: 1 stitch in GARTER STITCH – read description above, knit 1, A.1 (= 1 stitch), knit 1 (= mid-stitch), A.2 (= 1 stitch), knit 1, 1 stitch in garter stitch = 11 stitches. Continue this pattern onwards; 4 stitches are increased on each row from the right side and 2 stitches on each row from the wrong side. When A.1 and A.2 have been worked 1 time in height continue the pattern, as well as increasing on each side and towards the mid-stitch. When the piece measures 14-17 cm (measured along the mid-stitch), work stocking stitch over all stitches and continue to increase on each side and towards the mid-stitch as before. Work stocking stitch for 1 cm, then work 3 ridges over all stitches without further increases. Cast off. The bib measures approx. 16-19 cm. Fasten a button to one end of the bib (the button is buttoned between the 1 stitch in garter stitch and 1 knitted stitch at the other end). |
||||||||||
Diagram explanations |
||||||||||
|
||||||||||
 |
||||||||||
Have you finished this pattern?Tag your pictures with #dropspattern #babybusinessset or submit them to the #dropsfan gallery. Do you need help with this pattern?You'll find 19 tutorial videos, a Comments/Questions area and more by visiting the pattern on garnstudio.com. © 1982-2026 DROPS Design A/S. We reserve all rights. This document, including all its sub-sections, has copyrights. Read more about what you can do with our patterns at the bottom of each pattern on our site. |
||||||||||


With over 40 years in knitting and crochet design, DROPS Design offers one of the most extensive collections of free patterns on the internet - translated to 17 languages. As of today we count 324 catalogues and 12290 patterns translated into English (UK/cm). 12290
We work hard to bring you the best knitting and crochet have to offer, inspiration and advice as well as great quality yarns at incredible prices! Would you like to use our patterns for other than personal use? You can read what you are allowed to do in the Copyright text at the bottom of all our patterns. Happy crafting!
Post a comment to pattern DROPS Baby 33-20
We would love to hear what you have to say about this pattern!
If you want to leave a question, please make sure you select the correct category in the form below, to speed up the answering process. Required fields are marked *.