


Komentáře / Otázky (53)
![]() Ulrike Müller napsala:
Ulrike Müller napsala:
Ist im Musterdiagramm jede (also Hin-und Rück-) Reihe dargestellt? Ist die Fehlerkorrektur bereits eingearbeitet? Sie ist nicht mehr aufrufbar.
15.06.2025 - 17:34Odpověď DROPS Design :
Liebe Frau Müller, ja genau - für beide Fragen; bei den Hin- sowie bei den Rückreihen stricken Sie die Maschen wie unter die Beschreibung mit "In Hin-Reihen" und "in Rück-Reihen" erklärt. Viel Spaß beim Stricken!
16.06.2025 - 08:42
![]() Aline napsala:
Aline napsala:
Hei, ser det er mange som sliter med å forstå oppskriften til smekken, så foreslår at dere fyller på med litt mer info fra kommentarene så den blir lettere å forstå- f.eks. at den strikkes fra toppen og ned, osv... Har nå strikket mønsteret én gang i høyden, og sliter med å skjønne hvordan jeg skal gå videre (selv med svaret på den ene kommentaren). Regner med man beholder kanten (1 maske rille, 1maske rett/vrang)- Skal man da øke før man begynner på mønsteret igjen?
11.06.2025 - 09:58
![]() Joy napsala:
Joy napsala:
Cast on 7 sts, knit 1 row. Row 1: Knit first 2, *inc 1, k1, Inc 1*, knit middle stitch. Repeat * * once more and knit last 2 stitches. Row 2: purl? Row 3: Knit 2, inc 1, p1, k1, p1, knit middle stitch, blah blah blah. Why can't it be this simple, I can't even look at the charts or the example given. It is too confusing even for someone like me who is advanced, can't read a pattern.
07.06.2025 - 00:46
![]() Live napsala:
Live napsala:
Hi, Are you able to use Drops Merino Extra Fine (yarn group B) for this pattern?
02.05.2025 - 11:45Odpověď DROPS Design :
Dear Live, probably but note that the tension would be different so the result might also look different - and you might have to make some adjustements for bib - hat would have to be completely re-calculated with the new tension. Happy knitting!
02.05.2025 - 13:34
![]() Barbara napsala:
Barbara napsala:
Wie viele Andere bin ich verzweifelt, zu versuchen das Lätzchen zu stricken.Ich bin geübte Strickerin und habe schon viele Strickschriften gelesen. Aber sowas ist mir noch nie in die Finger gekommen. Sie müssen doch aus den vielen Kommentaren gemerkt haben, dass kaum jemand damit zurecht kommt. Dann geben sie unzureichende Antworten und schreiben noch darunter : Viel Spass beim Stricken. Als ob so was noch Spaß machen würde ! Fertigen sie doch einfach eine verständliche Anleitung an
23.02.2025 - 18:58
![]() Helga napsala:
Helga napsala:
Ich bin eine wie ich dachte geübte Strickerin aber bei dieser Anleitung blickt man wirklich nicht durch. Das Diagramm beinhaltet nicht die ganze Strickschrift, Randmaschen sind auch nicht erwähnt.Schade um die Zeit
23.02.2025 - 16:32
![]() Matilda napsala:
Matilda napsala:
På förklaring till beskrivningen står det: Rätstickning (stickas runt): Sticka *1varv rätt och 1 varv avigt*, upprepa *_* Rätstickning (stickas fram och tillbaka): Alla varv stickas räta. Båda står det rätstickning på. Vad/När är skillnaden?
16.11.2024 - 18:12Odpověď DROPS Design :
Hej Matilda. Du stickar rätstickning olika beroende på om du stickar arbetet runt eller fram och tillbaka. RÄTSTICKNING (stickas runt): Sticka *1 varv rätt och 1 varv avigt*, upprepa *-*. RÄTSTICKNING (stickas fram och tillbaka): Alla varv stickas räta. Mvh DROPS Design
20.11.2024 - 14:26
![]() Hecquet Claire napsala:
Hecquet Claire napsala:
Bonjour comment faire quand on ne sait pas se servir d aiguille circulaire presque tous les modéles sont ainsi Je voulais vous dire que je suis trés contente de l ouverture d un magasin Drops à dunkerque pour acheter la laine merçi
17.09.2024 - 09:56Odpověď DROPS Design :
Bonjour Mme Hecquet, retrouvez en vidéo comment tricoter en rond ou en allers et retours sur aiguille circulaire (voir aussi onglet "vidéos"); et dans cette leçon comment adapter un modèle sur aiguilles droites. Bon tricot!
17.09.2024 - 16:08
![]() Kathrin napsala:
Kathrin napsala:
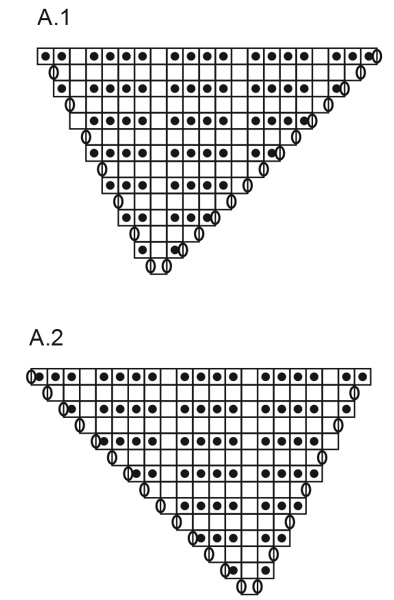
Ich fange mit dem Lätzchen an und soll 7 Maschen aufnehmen, 1 Reihe kraus rechts, ist klar, dann A1= 1 Masche, ich habe aber 3, dann die Mittelmasche und für A2= 1 Masche habe ich eigentlich auch schon 3 Maschen? wie ist das gemeint? Vielen Dank
30.08.2024 - 22:45Odpověď DROPS Design :
Liebe Kathrin, so stricken Sie die 7 Maschen: 1 Masche Krausrechts, 1 Masche rechts, A.1 (= 1 Masche), 1 Masche rechts (= Mittelmasche), A.2 (= 1 Masche), 1 Masche rechts, 1 Masche kraus rechts = so haben Sie 1+1+1+1+1+1+1=7 Maschen gestrickt, und gleichzeitig in A.1 und A.2 je 2 Maschen zugenommen (= 1 Umschlag, 1 Masche rechts, 1 Umschlag) so sind es jetzt 11 Maschen. Viel Spaß beim Stricken!
02.09.2024 - 07:52
![]() Ana Ramirez napsala:
Ana Ramirez napsala:
Thank you for your answer. The stitch in the middel is not Even. Any suggestiom on What to do? About how many stitches at the end?
15.07.2024 - 22:22Odpověď DROPS Design :
Dear Ana, you start with an uneven number (7) and increase simmetrically on bot sides of this stitch, so you should have an uneven number. Happy Knitting!
18.07.2024 - 04:21
|
||||||||||
Baby Business Set#babybusinessset |
||||||||||
 |
 |
|||||||||
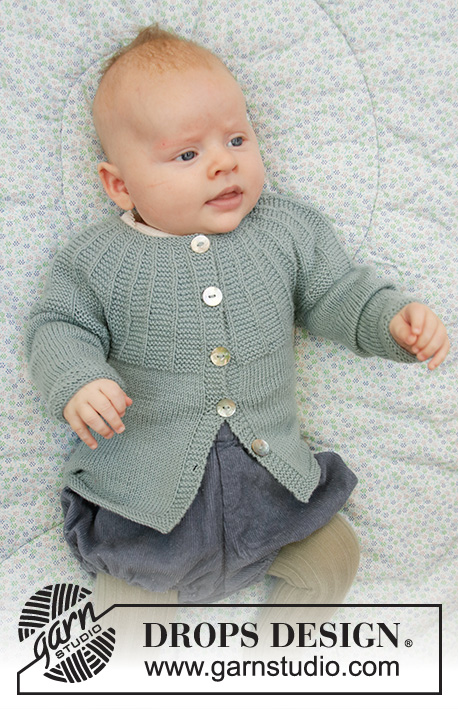
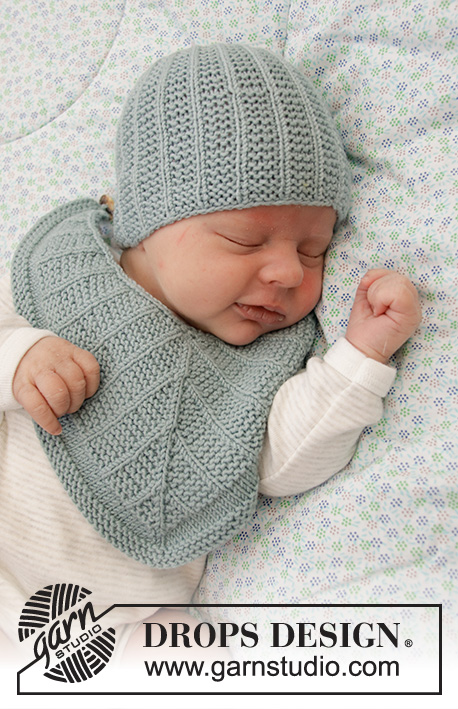
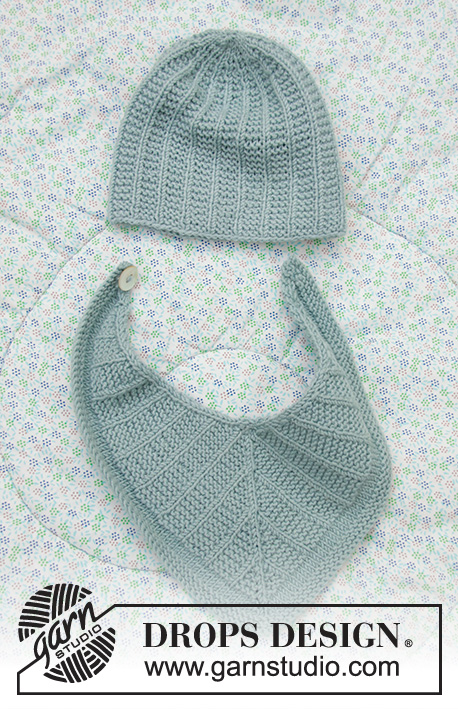
Dětská baby čepice a bryndák pletené lícovým žerzejem a vroubkovým vzorem z příze DROPS BabyMerino. Velikost: nedonošená – 4 roky.
DROPS Baby 33-20 |
||||||||||
|
------------------------------------------------------- VYSVĚTLIVKY: ------------------------------------------------------- VROUBKOVÝ VZOR: V kruhových řadách (čepice): pleteme střídavě 1 kruhovou řadu hladce, 1 obrace. 1 vroubek = 2 kruhové řady. V řadách: pleteme stále hladce, lícové i rubové řady. 1 vroubek = 2 řady hladce. VZOR: Viz schémata A.1 a A.2. ---------------------------------------------------------- POPIS PRÁCE: ---------------------------------------------------------- ČEPIČKA - JAK BUDEME POSTUPOVAT: Čepici pleteme v kruhových řadách na ponožkových jehlicích zdola nahoru. ČEPIČKA: Na ponožkové jehlice č.3 nahodíme přízí Baby Merino (60) 72-84-88-96 (104-108) ok a pleteme takto: *1 oko hladce, 3 oka vroubkovým vzorem*, *-* opakujeme v průběhu celé kruhové řady (= (15)-18-21-22-24 (26-27)x). Takto pleteme až do výše asi (10) 11-12-13-14 (14-15) cm. Pak ujmeme vždy po 1 cm výšky, takto: 1. UJÍMÁNÍ: první 2 oka v každé skupině obrace pletených ok spleteme hladce = (45) 54-63-66-72 (78-81) ok. Pak pleteme střídavě 1 oko hladce, 2 oka vroubkovým vzorem – opakujeme v průběhu celé kruhové řady. 2. UJÍMÁNÍ: poslední 2 oka v každé skupině obrace pletených ok spleteme hladce = (30) 36-42-44-48 (52-54) ok. Pak pleteme střídavě 1 oko hladce, 1 oko vroubkovým vzorem – opakujeme v průběhu celé kruhové řady. 3. UJÍMÁNÍ: každá 2 oka spleteme hladce = (15) 18-21-22-24 (26-27) ok 4. UJÍMÁNÍ: každá 2 oka spleteme hladce = (8) 9-11-11-12 (13-14) ok. DOKONČENÍ: Zbylými oky protáhneme dvojitou přízi, stáhneme a zapošijeme. Čepička měří asi (14) 15-16-17-18 (19-20) cm. ------------------------------------------------------- BRYNDÁČEK - JAK BUDEME POSTUPOVAT: Pleteme v řadách na kruhové jehlici, shora dolů. BRYNDÁČEK: Na kruhovou jehlici č.3 nahodíme Baby Merino 7 ok a 4. oko si označíme (= středové); značku během práce snímáme vždy do aktuálně pletené řady. Pleteme takto – začínáme lícovou řadou: 1 oko VROUBKOVÝM VZOREM – viz výše, 1 oko hladce, vzor A.1 (= 1 oko), 1 oko hladce (= středové), vzor A.2 (= 1 oko), 1 oko hladce, 1 oko vroubkovým vzorem = 11 ok. V tomto rozvržení vzoru pokračujeme; v každé lícové řadě přidáme 4 oka a v každé rubové řadě 2 oka. Po dokončení 1 celé sekvence vzoru A.1 a A.2 (na výšku) dál pleteme vzorem a SOUČASNĚ dál přidáváme po stranách i u středového oka. Ve výši 14-17 cm (měřeno podél středového oka) pleteme všechna oka lícovým žerzejem, SOUČASNĚ pokračujeme v přidávání po stranách i u středového oka jako dosud. Lícovým žerzejem upleteme asi 1 cm výšky, pak upleteme 3 vroubky – už ale dál nepřidáváme. Poté všechna oka uzavřeme. Bryndáček měří asi 16-19 cm. Na jeden cíp přišijeme knoflík (zapínáme ho mezi 1 vroubkové oko a 1 hladké oko na protilehlém cípu). |
||||||||||
Vysvětlivky ke schématu |
||||||||||
|
||||||||||
|
||||||||||
Dokončili jste tento model?Pak označte své fotky tagem #dropspattern #babybusinessset nebo je pošlete do galerie #dropsfan. Potřebujete s tímto návodem poradit?Otevřete-li si návod na stránce garnstudio.com, najdete tam 18 výukových video-ukázek, Komentáře/Dotazy a další užitečné informace. © 1982-2025 DROPS Design A/S. Vyhrazujeme si veškerá práva. Tento dokument, včetně všech jeho dílčích částí, podléhá autorským právům. Podrobnější komentář k možnostem užití našich návodů najdete dole pod každým návodem na našich stránkách. |
||||||||||


V oblasti pletené a háčkované módy působí DROPS Design více než 40 let. Díky tomu vám můžeme nabídnout jednu z nejrozsáhlejších kolekcí modelů s bezplatnými návody dostupnými na internetu - navíc v 17 jazycích. K dnešnímu dni máme na 314 katalogů a 11822 návodů celkem - z nich je už 7048 dostupných v [češtině].
Přidejte komentář k návodu DROPS Baby 33-20
Rádi bychom věděli, co si o tomto modelu myslíte!
Pokud se chcete na něco zeptat, dbejte prosím na to, abyste ve formuláři níže vybrali správnou kategorii - díky tomu se dříve dozvíte, co potřebujete vědět. Povinná pole jsou označena *.