
Popular categories
Looking for a yarn?


Comments / Questions (58)
![]() Manuela Schwarzer wrote:
Manuela Schwarzer wrote:
Wenn ich das Diagramm für Muster M.2a und M.2b stricke ergibt das ein völlig anderes Ergebnis als auf dem Foto. Das Problem wurde schon früher kommentiert. Wie sieht denn nun das passende Diagramm aus, um ein Ergebnis wie auf dem Foto zu bekommen? Vielen Dank
19.04.2021 - 21:26DROPS Design answered:
Liebe Frau Schwarzer, stricken Sie zuerst einmal M.2a in der Breite, dann wiederholen Sie M.2b in der Breite; M.2b soll mit den ersten 9 Maschen enden, so wird das Muster symetrisch. Viel Spaß beim stricken!
20.04.2021 - 07:26
![]() Marianne Kenny wrote:
Marianne Kenny wrote:
Hi I’m unable to source the Optik buttons for this garment so please can you tell me what size they are so I can find an alternative Kind regards Marianne
27.03.2021 - 18:17DROPS Design answered:
Dear Mrs Kenny, these buttons are now discontinued, you can use 20 mm buttons. Happy knitting!
06.04.2021 - 07:47
![]() Carolyn wrote:
Carolyn wrote:
Thank you very much. So looking forward to finishing this.
11.07.2019 - 08:34
![]() Carolyn wrote:
Carolyn wrote:
I have been waiting for over a week now to finish this jearsey. Please can you let me know when you will be able to explain row 5 of M2b so I can finish. I am very keen to complete this pattern
02.07.2019 - 07:52DROPS Design answered:
Dear Carolyn, Diagram M.2 has been edited, thanks for your patience. Happy knitting!
10.07.2019 - 10:40
![]() Mary Conti wrote:
Mary Conti wrote:
So to be clear on the repeat of M.2B which starts and ends with a yarn over. This creates a double yarn over. Is it best to purl into the front and back of the double yarn over on the next row?
24.06.2019 - 21:58DROPS Design answered:
Dear Mrs Conti, our design team will check diagram M.2 to make sure how to work the row 5. Thanks in advance for your patience.
25.06.2019 - 08:30
![]() Carolyn wrote:
Carolyn wrote:
Can someone please help with the chart on this pattern. I am very new to using charts and I don't understand row 5 of m2b. If I have to repeat m2b I understand it as so.... yarn over, slip 1 knit 1 past slipped stitch over, knit 1, knit 2 together, yarn over knit 4, knit 2 together yarn over then yarn over slip 1 etc
24.06.2019 - 17:13DROPS Design answered:
Dear Carolyn, diagram M.2 and especially row 5 will be checked - thanks in advance for your patience.
25.06.2019 - 08:17
![]() Carolyn wrote:
Carolyn wrote:
So if I understand you correctly when I repeat m2b there are 2 yarn overs straight after each other. One on end and another one straight after beginning the repeat. Isn't that going to make a big hole?
24.06.2019 - 08:09
![]() Carolyn wrote:
Carolyn wrote:
I can't work out row 5 on M2b. There are only 2 yarn overs but 3 decreases. Can someone please explain m2b
23.06.2019 - 22:48DROPS Design answered:
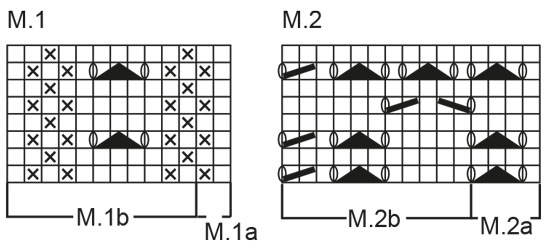
Dear Carolyn, M.2B starts with the first yarnover and ends with another one, so there are 3 yo and 3 decreases in the pattern. M.2A ends with a stockinett stitch. Happy Knitting!
23.06.2019 - 23:58
![]() Corinne B wrote:
Corinne B wrote:
Bonjour J'ai fait un échantillon pour le point fantaisie M2a et b et je n'obtiens absolument pas le même point que sur les photos du gilet Tous les rangs sont bien représentés ? On doit bien répéter les 8 rangs ?
29.05.2019 - 12:56DROPS Design answered:
Bonjour Corinne B, tout à fait, tous les rangs sont représentés, on lit le diagramme de bas en haut et de gauche à droite en tricotant 1 x M.2a et en répétant 20-22-24 fois les 11 m M.2b en largeur puis tricotez les 9 premières m de M.2B (= soit 229-251-273 m en M.2B au total). Bon tricot!
29.05.2019 - 14:02
![]() Alexandra wrote:
Alexandra wrote:
Und noch eine Frage: es heißt ganz am Anfang, drei Reihen im Perlmuster stricken. Dann würde man mit dem Muster M1a bzw. M1b auf der Rückseite anfangen, weil vorne - hinten - vorne gestrickt würde. Ist das so? Dann das Muster wie beschrieben?
10.12.2018 - 21:59DROPS Design answered:
Liebe Alexandra, Diagramme werden von der Vorderseite angefangen, dh nach der Krausrippe und die 3 Reihen im Perlmuster wird die nächste Reihe eine Hinreihe sein. Viel Spaß beim stricken!
11.12.2018 - 09:52
|
|||||||||||||||||||
Beach Love |
|||||||||||||||||||
|
|
|||||||||||||||||||
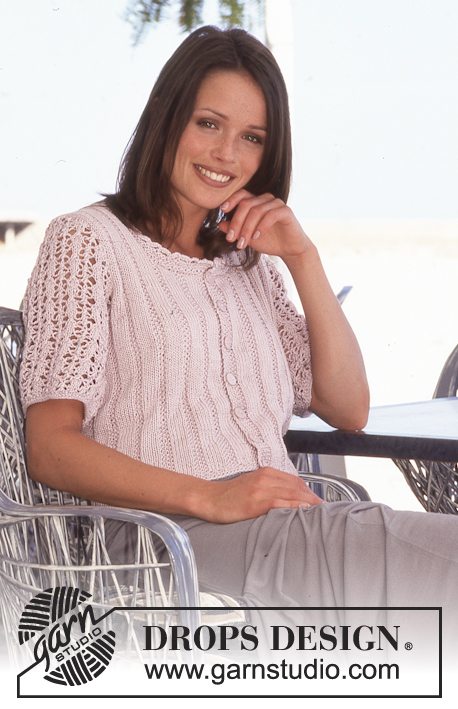
DROPS jacket in Muskat
DROPS 60-16 |
|||||||||||||||||||
|
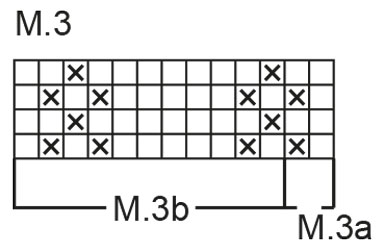
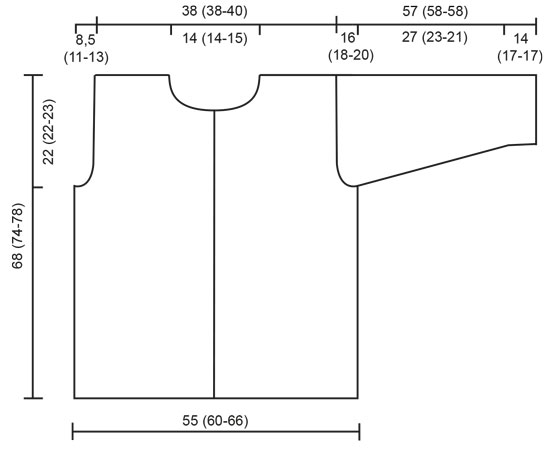
Knitting tension: 21 stitches x 28 rows with needle size 4 mm and stocking stitch = 10 x 10 cm. Remember needle size is only a guide! Ridge/Garter stitch: 1 ridge = Knit 2 rows. Pattern: See diagram (1 diagram = 1 repeat). The pattern in the diagram is seen from the right side. Moss stitch: * Row 1: K1, P1. Row 2: Knit over purl and purl over knit. * Repeat row 2 onwards. Buttonhole: When piece measures 29 (30-32) cm, 34 (34.5-37) cm, 39 (39.5-42) cm, 44 (44-47) cm, 49 (49-52) cm, 54 (53.5-57) cm and X (58-62) cm work buttonholes on right front piece as follows: Cast off the 3rd and 4th stitches and cast on 2 new stitches over the cast off stitches on next row. -------------------------------------------------------------- Body: The jacket is worked back and forth with circular needle. Cast on 243 (265-287) stitches (incl. 2 x 5 band stitches) with circular needle size 4 mm and light grey and work 1 ridge, then 3 rows moss stitch. Work the next row as follows: 5 stitches moss stitch (= band), M.1A, 231 (253-275) stitches of M.1B, 5 stitches moss stitch (= band). Continue pattern upwards. Remember the knitting tension. When piece measures 29 (30-32) cm, work next row as follows: 5 stitches moss stitch (= band), M.2A, 229 (251-273) stitches of M.2B, 5 stitches moss stitch (= band). Continue pattern upwards, - remember to work buttonholes in right band as you work upwards (see description above). When piece measures 43 (47-49) cm - adjust after pattern - work next row as follows: 5 stitches moss stitch (= band), M.3A, 231 (253-275) stitches of M.3B, 5 stitches moss stitch (= band). Continue pattern to finished length. When piece measures 46 (52-55) cm work next row as follows: 59 (65-70) stitches front piece, cast off 8 stitches for armhole, 109 (119-131) stitches back piece, cast off 8 stitches to armhole, 59 (65-70) stitches front piece. Each piece is finished separately. Front piece: = 59 (65-70) stitches. Continue to cast off for armholes every 2nd row: 3 stitches x 3 (4-4), 2 stitches x 2 (3-5), 1 stitch x 2 = 44 (45-46) stitches. On row after last buttonhole - when piece measures 54 (58-62) cm - cast off for neck every 2nd row: 10 (11-11) stitches x 1, 3 stitches x 1, 2 stitches x 2, 1 stitch x 2. Cast off when piece measures 68 (74-78) cm. Back piece: = 109 (119-131) stitches. Continue to cast off for armholes as for front piece = 79 (79-83) stitches. When piece measures 66 (72-76) cm cast off middle 25 (25-27) stitches at back for neck. Then cast off 2 stitches on next row towards neck. Cast off when piece measures 68 (74-78) cm. Sleeve: The sleeve is worked back and forth with circular needle. Cast on 59 (59-59) stitches (incl. 2 edge stitches for seam) with circular needle size 4 mm and light grey and work 1 ridge, then 3 rows moss stitch. Work next row as follows: 1 stitch garter stitch (= edge stitch), M.2A, 53 (53-53) stitches of M.2B, 1 stitch garter stitch (= edge stitch). Continue pattern upwards. When piece measures 14 (17-17) cm - adjust after pattern - work next row as follows: 1 stitch garter stitch (= edge stitch), M.3A, 55 stitches of M.3B, 1 stitch garter stitch (= edge stitch). Continue pattern upwards while at the same time you increase in each side: 1 stitch x 15 (15-16) for S: Alternately every 4th and 5th row, M: Alternately every 3rd and 4th row, L: Every 3rd row = 89 (89-91) stitches. The increased stitches are worked into pattern as you go. When piece measures 41 (40-38) cm cast off for sleeve cap in each side every 2nd row: 3 stitches x 2 (1-1), 2 stitches x 2, 1 stitch x 15 (19-22), 2 stitches x 2 (3-2), 3 stitches x 2 (1-1), cast off. Piece measures approx. 57 (58-58) cm. Assembly: Sew shoulder seams. Knit up approx. 115-125 stitches around neck with circular needle size 4 mm and light grey and work 3 rows moss stitch, then 1 ridge, cast off. Sew sleeve seams as follows: Lay edges side by side (not on top of each other) and graft neatly together. Crochet edge: Work edges along bottom of body, along bands, around neck and around bottom of sleeves. Work from right side with light grey and hook size 2 mm as follows: Row 1: 1 double crochet, * 4 chain stitches, skip approx. 1.5 cm, 1 slip stitch *, repeat *-* to end of row, Row 2: 4 double crochets around each chain-space, 1 slip stitch in slip stitch from previous row. Sew in sleeves and sew on buttons. |
|||||||||||||||||||
Diagram explanations |
|||||||||||||||||||
|
|||||||||||||||||||
 |
|||||||||||||||||||
 |
|||||||||||||||||||
 |
|||||||||||||||||||
Have you finished this pattern?Tag your pictures with #dropspattern or submit them to the #dropsfan gallery. Do you need help with this pattern?You'll find 27 tutorial videos, a Comments/Questions area and more by visiting the pattern on garnstudio.com. © 1982-2026 DROPS Design A/S. We reserve all rights. This document, including all its sub-sections, has copyrights. Read more about what you can do with our patterns at the bottom of each pattern on our site. |
|||||||||||||||||||


With over 40 years in knitting and crochet design, DROPS Design offers one of the most extensive collections of free patterns on the internet - translated to 17 languages. As of today we count 324 catalogues and 12290 patterns translated into English (UK/cm). 12290
We work hard to bring you the best knitting and crochet have to offer, inspiration and advice as well as great quality yarns at incredible prices! Would you like to use our patterns for other than personal use? You can read what you are allowed to do in the Copyright text at the bottom of all our patterns. Happy crafting!
Post a comment to pattern DROPS 60-16
We would love to hear what you have to say about this pattern!
If you want to leave a question, please make sure you select the correct category in the form below, to speed up the answering process. Required fields are marked *.