
Popular categories
Looking for a yarn?


Comments / Questions (5)
![]() Martijne wrote:
Martijne wrote:
Wat wordt weergegeven in de telpatronen? Zijn het alleen de naalden van de goede zijde(dus 1,3,5 enz) of alle naalden?
29.12.2024 - 10:52DROPS Design answered:
Dag Martijne,
In de telpatronen worden alle naalden weergegeven, dus zowel de naalden van de goede kant als van de verkeerde kant.
01.01.2025 - 16:09
![]() Henny Nielsen wrote:
Henny Nielsen wrote:
Drops 195-32 ønsker vejledning til at starte diagram str. xl er det øverst i venstre hjørne eller venstre nederste hjørne? Er ny i diagrammer strik. På forhånd tak
07.11.2023 - 16:44DROPS Design answered:
Hej Henny, du starter altid diagrammerne i nederst højre hjørne og følger hver maske efterhånden som du strikker den. Næste pind er 2.pind i diagrammet :)
10.11.2023 - 15:08
![]() Paola Pastore wrote:
Paola Pastore wrote:
Buongiorno sto imparando a lavorare a maglia e siete il sito con le migliori proposte di modelli . Il mio problema è che non lavoro con i ferri circolari ma solo con quelli dritti . C'è un modo per trasformare gli schemi da ferri circolari a ferri dritti ? grazie
11.04.2019 - 17:26DROPS Design answered:
Buongiorno Paola. Al seguente link, trova indicazioni su come lavorare con ferri dritti lavori spiegati per ferri circolari. Può inoltre chiedere aiuto qui o per aiuti più personalizzati rivolgersi al suo rivanditore Drops di fiducia. Buon lavoro!
11.04.2019 - 17:44
![]() Janna wrote:
Janna wrote:
In het patroon staat dat de pas wordt gemaakt in een halve patentsteek. Alleen de instructievideo van een halve patentsteek laat een heel ander manier van breien zien dan het telpatroon staat beschreven. Wat is nu de juiste manier?
25.08.2018 - 13:31DROPS Design answered:
Dag Janna, Je kunt gewoon het (tel)patroon volgen. Ik vermoed dat er een foutje gemaakt is in de omschrijving en dat er bedoeld wordt dat het vest voor de helft uit patentsteek bestaat (in plaats van halve patentsteek), dus ik heb het doorgegeven aan designafdeling voor eventuele aanpassing.
29.08.2018 - 12:22
![]() Monique wrote:
Monique wrote:
Die Jacke sieht so kuschelig und bequem aus, die würde ich sehr gerne stricken. Muster und Schnitt sind toll!
13.07.2018 - 09:29
|
||||||||||||||||
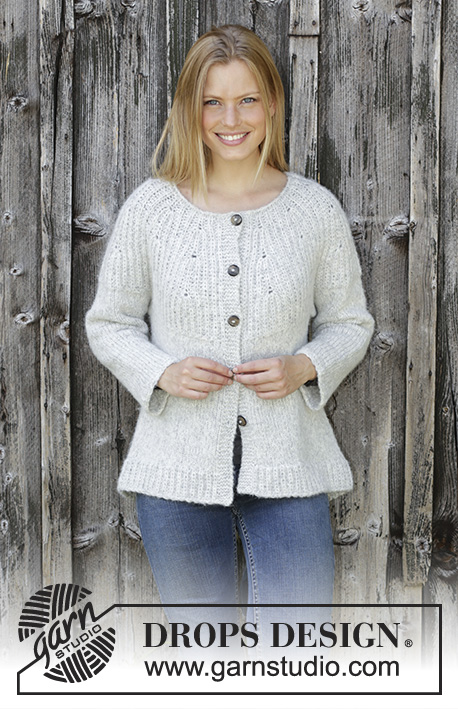
Fritid Cardigan#fritidcardigan |
||||||||||||||||
 |
 |
|||||||||||||||
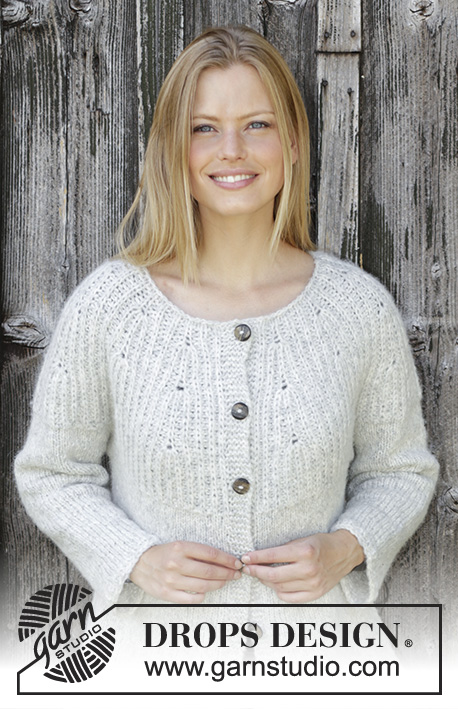
Knitted jacket with round yoke in DROPS Air. The piece is worked top down with false English rib, A-shape and Japanese short rows. Sizes S - XXXL.
DROPS 195-32 |
||||||||||||||||
|
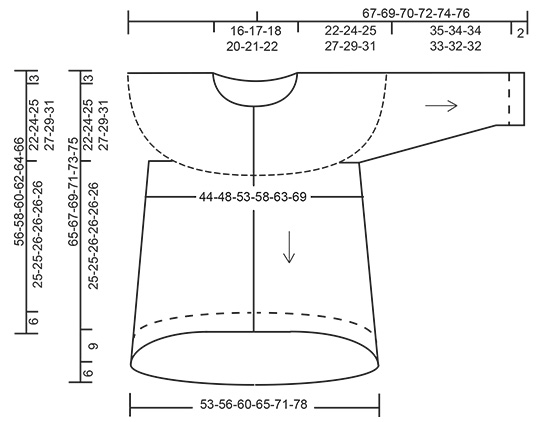
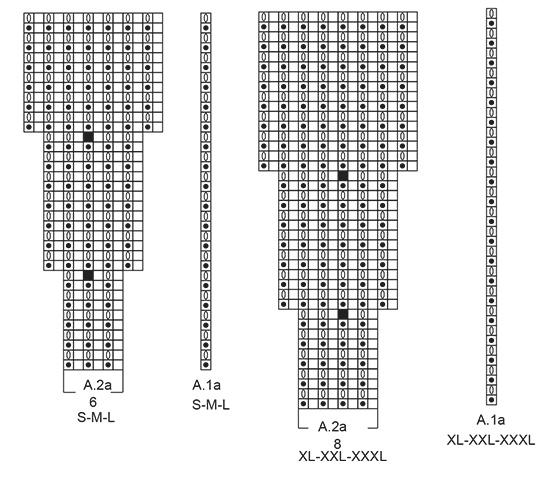
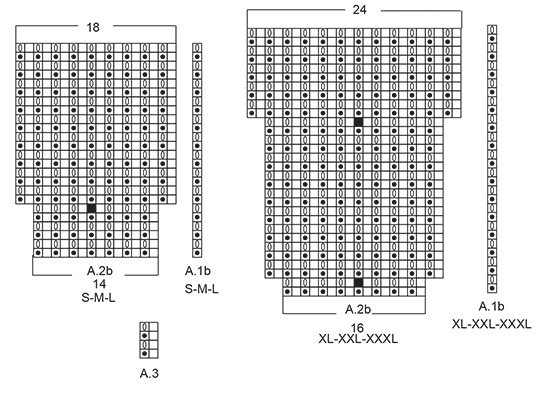
------------------------------------------------------- EXPLANATIONS FOR THE PIECE: ------------------------------------------------------- RIDGE/GARTER STITCH (worked back and forth): 1 ridge = Knit 2 rows. PATTERN: See diagrams A.1 to A.3. Choose diagram for your size. 2 rows seen from the wrong side = 1 row seen from the right side. The yarn overs in the pattern are not counted as stitches. The diagrams show all the rows in the pattern seen from the right side. INCREASE TIP-1 (evenly spaced): To work out how to increase evenly, count the total number of stitches on the needle (e.g. 92 stitches), minus the bands (= 82 stitches left) and divide the remaining stitches by the number of increases to be made (e.g. 7) = 11.7. In this example, increase 1 stitch after approx. each 12th stitch. Increase by making 1 yarn over (do not increase over the bands). On the next row work the yarn overs twisted to avoid holes. INCREASE TIP-2 (for body): All increases are made from the right side! Work until there are 2 stitches left before the marker thread, 1 yarn over (= 1 stitch increased), knit 4 (the marker thread sits in the middle of these 4 stitches), 1 yarn over (= 1 stitch increased). Work and increase by both marker threads (= 4 stitches increased in total). DECREASE TIP (for sleeves): Work until there are 3 stitches left before the marker thread, knit 2 together, knit 2 (the marker thread sits between these 2 stitches), slip 1 stitch as if to knit, knit 1, pass the slipped stitch over the knitted stitch (= 2 stitches decreased). BUTTONHOLE: Work buttonholes on the right band (when the garment is worn). From the right side and when there are 3 stitches left on the row, work as follows: Make 1 yarn over, knit together the next 2 stitches and knit the last stitch. On the next row knit the yarn over to leave a hole. The first buttonhole is worked when the piece measures approx. 1½-2 cm from the cast-on edge. Then work the next 4-4-5-5-6-6 buttonholes with approx. 9-9-8½-8½-8-8 cm between each. ------------------------------------------------------- START THE PIECE HERE: ------------------------------------------------------- JACKET - SHORT OVERVIEW OF THE PIECE: The yoke is worked back and forth with circular needle, top down in false English rib. The yoke is divided for body and sleeves. The body is continued back and forth in stocking stitch with an edge in false English rib. The sleeves are worked in the round with double pointed needles in stocking stitch and with an edge in false English rib. YOKE: Cast on 77-83-89-92-95-101 stitches (including 5 band stitches in each side of the piece) with circular needle size 5.5 mm and Air. Work 2-2-2-4-4-4 rows stocking stitch with 5 band stitches in GARTER STITCH – read description above, in each side (row 1 = wrong side) AT THE SAME TIME on row 2 increase 0-0-0-7-12-14 stitches evenly on row – read INCREASE TIP-1 = 77-83-89-99-107-115 stitches. Work pattern as follows from the wrong side (i.e. the diagrams are read from left to right): Work 5 band stitches in garter stitch, A.2a (6-6-6-8-8-8 stitches) a total of 11-12-13-11-12-13 times, A.1a (= 1 stitch) and finish with 5 band stitches in garter stitch. Continue this pattern. The bands are worked in garter stitch to finished length. Work BUTTONHOLES on right band – read description above. REMEMBER THE KNITTING TENSION! Be careful, when increasing in the diagram, that the stitch you increase in is not tightened more than absolutely necessary; there will be a small hole in this stitch. When A.1a and A.2a have been worked 1 time in height there are 165-179-193-187-203-219 stitches on the row. Now work A.1b over A.1a and A.2b over A.2a (row 1 = wrong side). When A.1b and A.2b have been completed 1 time in height there are 209-227-245-275-299-323 stitches on the row. The piece measures approx. 20-20-20-24-24-24 cm from the cast-on edge. Repeat the last 2 rows in A.1b and A.2b until the piece measures 21-23-24-26-28-30 cm from the cast-on edge; adjust so that you finish with 1 row from the wrong side. The next row is worked as follows from the right side: Work 5 band stitches in garter stitch, knit all stitches and increase 13-19-29-15-11-15 stitches evenly over these stitches and finish with 5 band stitches in garter stitch = 222-246-274-290-310-338 stitches. On the next row from the wrong side divide the piece for sleeves and body as follows: Work 5 band stitches in garter stitch, purl 31-34-38-41-45-50 (= front piece), place the next 44-50-56-58-60-64 stitches on 1 thread for sleeve and cast on 8-8-8-10-10-10 new stitches under the sleeve, purl 62-68-76-82-90-100 stitches (= back piece), place the next 44-50-56-58-60-64 stitches on 1 thread for sleeve and cast on 8-8-8-10-10-10 new stitches under the sleeve, purl 31-34-38-41-45-50 stitches and finish with 5 band stitches in garter stitch (= front piece) = 150-162-178-194-210-230 stitches. The yoke measures approx. 22-24-25-27-29-31 cm. BODY: Insert 1 marker thread in the middle of the 8-8-8-10-10-10 new stitches in each side of the piece (= 40-43-47-51-55-60 stitches on each front piece and 70-76-84-92-100-110 stitches on back piece). Continue with stocking stitch and 5 band stitches in garter stitch in each side of the piece. When the piece measures 3 cm from where the body was divided from the sleeves, increase 1 stitch on each side of the marker threads – read INCREASE TIP-2! Increase like this every 3-3-4-4-3-3 cm a total of 7-7-6-6-7-7 times = 178-190-202-218-238-258 stitches. When the piece measures 25-25-26-26-26-26 cm from where the body was divided from the sleeves, you can now work Japanese short rows, i.e. you work a rounded edge so that the back piece is approx. 9 cm longer than the front pieces; these short rows can be left out - the front and back pieces are then of equal length. Go straight to working EDGE if you do not want the longer back piece. JAPANESE SHORT ROWS: Start from the right side as follows: Knit until there are 12-18-17-25-21-31 stitches, turn the piece, insert a marker (use a plastic marker or a safety pin) on the strand close into the piece (the marker hangs on the wrong side of the piece), slip the next stitch as if to purl, purl until there are 12-18-17-25-21-31 stitches left, turn the piece, insert another marker on the strand close into the piece (the marker hangs on the wrong side of the piece), slip the next stitch as if to purl, knit until there are 19-25-24-32-28-38 stitches left, turn the piece, insert another marker on the strand close into the piece (the marker hangs on the wrong side of the piece), slip the next stitch as if to purl, purl until there are 19-25-24-32-28-38 stitches left, turn the piece, insert another marker on the strand close into the piece (the marker hangs on the wrong side of the piece), slip the next stitch as if to knit. Continue like this, i.e. work 7 less stitches in each side (= a total of 14 stitches) each time you turn until you have worked approx. 9 cm from the first marker. Cut the strand. The next row is worked as follows from the wrong side: Work 5 band stitches in garter stitch, purl up to and including the stitch with the marker, slip the stitch with the marker and place on left needle, remove the marker, purl this and the next stitch together, repeat at all markers and finish with 5 band stitches in garter stitch. EDGE: On the next row from the right side increase 11 stitches evenly on row = 189-201-213-229-249-269 stitches. The next row is worked as follows from the wrong side (i.e. the diagram is read from left to right): Work 5 band stitches in garter stitch, A.3 (= 2 stitches) over all stitches (i.e. the pattern starts and ends the same) and finish with 5 band stitches in garter stitch. When A.3 has been worked for 6 cm cast off with knit; make sure that the cast-off edge is not tight. If this is a problem, you can cast off with a larger needle size or add yarn overs between stitches which are then cast off as normal. SLEEVE: Place the 44-50-56-58-60-64 stitches from the thread on the one side of the piece on double pointed needles size 5.5 mm and knit up 1 stitch in each of the 8-8-8-10-10-10 stitches cast on under the sleeve = 52-58-64-68-70-74 stitches. Insert 1 marker thread in the middle of these 8-8-8-10-10-10 new stitches. Work stocking stitch in the round. When the sleeve measures 3 cm from where the sleeve was divided from the body, decrease 1 stitch on each side of the marker thread – read DECREASE TIP. Decrease like this every 4-3-2½-2-2-1½ cm a total of 7-9-11-13-13-14 times = 38-40-42-42-44-46 stitches. When the sleeve measures 35-34-34-33-32-32 cm from where it was divided from the body, work A.3 over all stitches. Cast off with knit when A.3 has been worked 1 time in height; make sure that the cast-off edge is not tight. You can cast off with a larger needle size if this is a problem. The sleeve measures approx. 59-60-61-62-63-65 cm from where it was divided from the body. Work the other sleeve in the same way. ASSEMBLY: Sew the buttons onto the left band. |
||||||||||||||||
Diagram explanations |
||||||||||||||||
|
||||||||||||||||
 |
||||||||||||||||
 |
||||||||||||||||
 |
||||||||||||||||
Have you finished this pattern?Tag your pictures with #dropspattern #fritidcardigan or submit them to the #dropsfan gallery. Do you need help with this pattern?You'll find 26 tutorial videos, a Comments/Questions area and more by visiting the pattern on garnstudio.com. © 1982-2026 DROPS Design A/S. We reserve all rights. This document, including all its sub-sections, has copyrights. Read more about what you can do with our patterns at the bottom of each pattern on our site. |
||||||||||||||||


With over 40 years in knitting and crochet design, DROPS Design offers one of the most extensive collections of free patterns on the internet - translated to 17 languages. As of today we count 325 catalogues and 12298 patterns translated into English (UK/cm). 12298
We work hard to bring you the best knitting and crochet have to offer, inspiration and advice as well as great quality yarns at incredible prices! Would you like to use our patterns for other than personal use? You can read what you are allowed to do in the Copyright text at the bottom of all our patterns. Happy crafting!
Post a comment to pattern DROPS 195-32
We would love to hear what you have to say about this pattern!
If you want to leave a question, please make sure you select the correct category in the form below, to speed up the answering process. Required fields are marked *.