Comments / Questions (1)
![]() Annika Johansson wrote:
Annika Johansson wrote:
Jag undrar om diagram A1B och A2B. I diagrammet ser det ut som en del avigmaskor blir rätmaskor och tvärsom på andra varvet. Men i texten står det att man ska sticka rätmaskor på rätmaskor och avigmaskor på avigmaskor. Jag blir lite förvirrad. Vilket är rätt?
28.10.2018 - 19:15DROPS Design answered:
Hei Annika. Der det strikkes etter diagram skal du følge diagrammet som anvist. Når det står i oppskriftsteksten at du skal strikke rett over rett, vrang over vrang og rille over rille gjelder dette de maskene som ikke inngår i noen av diagrammene. Når det er sagt strikkes det for det meste rett over rett og vrang over vrang 2. omgang i A.1b og A.2b - det ser ikke sånn ut pga fellingene 1. omgang. Men du begynner 2. omgang på samme måte som du alltid har gjort. Det er bare at annenhvert parti med 2 vranagmasker har blitt til 1 vrangmaske. God fornøyelse
29.10.2018 - 09:27
Green Luck Cardi#greenluckcardi |
|||||||||||||
 |
 |
||||||||||||
Knitted fitted jacket in DROPS Flora. The piece is worked with lace pattern, raglan and short sleeves. Sizes S - XXXL.
DROPS 196-12 |
|||||||||||||
|
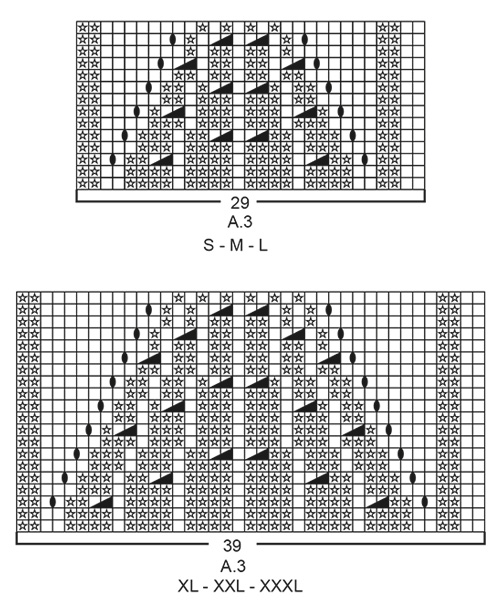
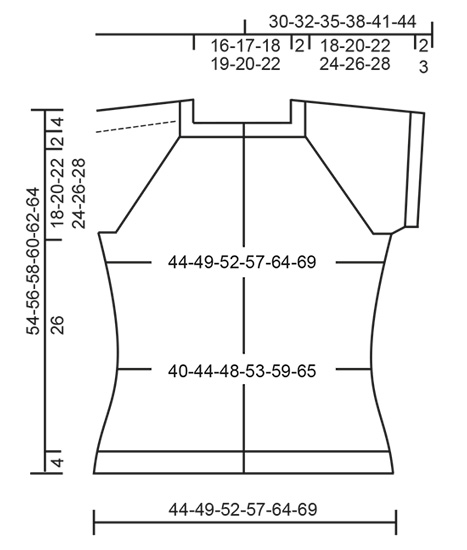
EXPLANATIONS FOR THE PATTERN: ------------------------------------------------------- RIDGE/GARTER STITCH (worked back and forth): 1 ridge = Knit 2 rows. PATTERN: See diagrams A.1 to A.5. Choose diagram for your size. The diagrams show all rows in the pattern seen from the right side. BUTTONHOLES (bottom up): Work buttonholes on right band. 1 BUTTONHOLE = Cast off third and fourth stitch from edge. On next row cast on 2 new stitches over the cast off stitches. Work buttonholes when the piece measures: S: 4, 12, 20, 28, 35, 42 and 49 cm M: 4, 12, 20, 28, 36, 44 and 51 cm L: 4, 12, 20, 28, 36, 44 and 53 cm XL: 4, 12, 20, 27, 34, 41, 48 and 55 cm XXL: 4, 12, 19, 27, 35, 43, 50 and 57 cm XXXL: 4, 12, 20, 28, 36, 44, 52 and 59 cm NOTE: The last of these 7-7-7-8-8-8 buttonholes is worked on the neck. DECREASE TIP-1 (for sides of body): All decreases are worked from the right side! Start 5 stitches before the marker thread, knit 2 together, knit 6 (the marker thread sits in the middle of these 6 stitches), slip 1 stitch as if to knit, knit 1, pass the slipped stitch over the knitted stitch (= 2 stitches decreased). DECREASE TIP-2 (evenly spaced for sleeve edges): To work out how to decrease evenly, count the total number of stitches on the needle (e.g. 84 stitches) and divide by the number of decreases to be made (e.g. 8) = 10.5. In this example, decrease by knitting together alternately every 9th and 10th stitch and every 10th and 11th stitch. DECREASE TIP-3 (evenly spaced on yoke): To work out how to decrease evenly, count the total number of stitches on the needle (e.g. 124 stitches) minus the bands (e.g. 10 stitches) and divide the remaining stitches by the number of decreases to be made (e.g. 26) = 4.4. In this example, decrease by knitting together alternately every 3rd and 4th stitch and every 4th and 5th stitch. Do not decrease over the bands. INCREASE TIP (for sides of body): All increases are worked from the right side! Work until there are 3 stitches left before the marker thread, make 1 yarn over, knit 6 (the marker thread sits in the middle of these 6 stitches), make 1 yarn over (= 2 stitches increased). On the next round purl the yarn overs twisted to avoid holes. Then work the new stitches in stocking stitch. RAGLAN: All decreases are worked from the right side! Decrease to raglan in each transition between body and sleeves (i.e. decrease on each side of A.5) = 8 stitches decreased each time. Decrease as follows before A.5: Work until there are 2 stitches left before A.5, knit 2 together (= 1 stitch decreased). Decrease as follows after A.5: Slip 1 stitch as if to knit, knit 1, pass the slipped stitch over the knitted stitch (= 1 stitch decreased). ------------------------------------------------------- START THE PIECE HERE ------------------------------------------------------- JACKET - QUICK SUMMARY OF THE WORK: The piece is worked back and forth with circular needle, bottom up as far as the armholes. The sleeve edges are worked in the round with short circular needle. Then the body and sleeves are placed on the same circular needle and the yoke is finished back and forth from mid front. BODY: Cast on 286-314-334-374-414-446 stitches with circular needle size 2.5 mm and Flora. Purl 1 row (= wrong side). The next row is worked as follows from the right side: 5 band stitches in GARTER STITCH - read description above, Work A.1A (= 33-33-33-45-45-45 stitches), * knit 2, purl 2 *, work from *-* a total of 52-59-64-68-78-86 times, knit 2, work A.2A (= 33-33-33-45-45-45 stitches) and finish with 5 band stitches in garter stitch. Continue the rib like this for 4 cm. The next row is worked as follows from the right side: Work 5 band stitches in garter stitch, but work 1 BUTTONHOLE on the band – read description above, work A.1B (= 33-33-33-45-45-45 stitches which decrease to 29-29-29-39-39-39 stitches), work stocking stitch until there are 38-38-38-50-50-50 stitches left on the row and decrease at the same time 40-46-50-54-62-68 stitches evenly over these stitches (knit together approx. every 4th and 5th stitch), work A.2B (= 33-33-33-45-45-45 stitches which decrease to 29-29-29-39-39-39 stitches) and finish with 5 band stitches in garter stitch = 238-260-276-308-340-366 stitches. Change to circular needle size 3 mm and work back from the wrong side with garter stitch over garter stitch, knit over knit and purl over purl. The next row is worked as follows from the right side: 5 band stitches in garter stitch, work A.3 (= 29-29-29-39-39-39 stitches), work stocking stitch until there are 34-34-34-44-44-44 stitches left on the row, work A.4 (= 29-29-29-39-39-39 stitches) and finish with 5 band stitches in garter stitch. Continue this pattern. REMEMBER THE KNITTING TENSION! When the piece measures 6 cm in all sizes, insert 1 marker thread 66-72-76-86-94-100 stitches in from each side (= 106-116-124-136-152-166 stitches between marker threads on the back piece). On the next row from the right side decrease 1 stitch on each side of both marker threads - read DECREASE TIP-1 = 4 stitches decreased. Decrease like this every 2 cm a total of 5 times in each side = 218-240-256-288-320-346 stitches on the row. When the piece measures 20 cm increase 1 stitch on each side of both marker threads - read INCREASE TIP = 4 stitches increased. Increase like this every 2 cm a total of 5 times in each side = 238-260-276-308-340-366 stitches. Continue until the piece measures 30 cm in all sizes. On the next row (wrong side) cast off 10-10-12-12-14-16 stitches in each side for the armholes (i.e. cast off 5-5-6-6-7-8 stitches on each side of both markers). There are now 61-67-70-80-87-92 stitches on each front piece and 96-106-112-124-138-150 stitches on the back piece. Lay the piece to one side and work the sleeve edges as described below. SLEEVE EDGE: Cast on 84-92-104-108-116-120 stitches with double pointed needles size 2.5 mm and Flora. Knit 1 round. Then work rib in the round (= knit 2 / purl 2) for 2-2-2-3-3-3 cm. Change to double pointed needles size 3 mm and knit 1 round where you decrease 8-6-8-8-10-10 stitches evenly on round - read DECREASE TIP-2 = 76-86-96-100-106-110 stitches. The next round is worked as follows: Cast off 5-5-6-6-7-8 stitches for the armhole, work 66-76-84-88-92-94 stitches stocking stitch and cast off the remaining 5-5-6-6-7-8 stitches for armhole. Cut the strand. Lay the piece to one side and work the other sleeve edge in the same way. YOKE: Place the sleeve edges on same circular needle as the body, where you cast off stitches for the armholes (do this without working the stitches) = 350-392-420-460-496-522 stitches on the needle. Insert 1 marker in each transition between body and sleeves = 4 markers. The first row is worked as follows from the right side: 5 band stitches in garter stitch, continue A.3 as before, work stocking stitch until there are 4 stitches left before the first marker, work A.5 (= 8 stitches – the marker sits in the middle of these 8 stitches), work stocking stitch over the sleeve until there are 4 stitches left before the next marker, work A.5 (= 8 stitches), work stocking stitch over the back piece until there are 4 stitches left before the next marker, work A.5 (= 8 stitches), work stocking stitch over the sleeve until there are 4 stitches left before the next marker, work A.5 (= 8 stitches), work stocking stitch as far as A.4, continue A.4 and finish with 5 band stitches in garter stitch. Continue this pattern. AT THE SAME TIME when you have worked 2 rows after the body and sleeves were combined, decrease to RAGLAN on the next row from the right side – read description above. Continue to decrease to raglan every 4th row a total of 3 times in all sizes and then every 2nd row a total of 22-26-29-33-36-38 times. After the last decrease there are 150-160-164-172-184-194 stitches left on the needle. The piece measures approx. 48-50-52-54-56-58 cm from the cast-on edge down mid front. Knit 1 row where you decrease 26-32-32-32-40-42 stitches evenly on row - read DECREASE TIP-3 = 124-128-132-140-144-152 stitches. Then work neck as described below. NECK: Change to circular needle size 2.5 mm. Knit 1 row from the wrong side. Knit 1 row from the right side and work the last buttonhole on this row. The next row is worked as follows from the wrong side: 5 band stitches in garter stitch, * purl 2, knit 2 *, work from *-* until there are 7 stitches left on the row, purl 2 and finish with 5 band stitches in garter stitch. Continue the rib like this for 2 cm. Cast off with knit over knit and purl over purl. The jacket measures approx. 54-56-58-60-62-64 cm from the shoulder down. ASSEMBLY: Sew the openings under the sleeves. Sew the buttons onto the left band. |
|||||||||||||
Diagram explanations |
|||||||||||||
|
|||||||||||||
 |
|||||||||||||
 |
|||||||||||||
 |
|||||||||||||
 |
|||||||||||||
 |
|||||||||||||
Have you finished this pattern?Tag your pictures with #dropspattern #greenluckcardi or submit them to the #dropsfan gallery. Do you need help with this pattern?You'll find 28 tutorial videos, a Comments/Questions area and more by visiting the pattern on garnstudio.com. © 1982-2026 DROPS Design A/S. We reserve all rights. This document, including all its sub-sections, has copyrights. Read more about what you can do with our patterns at the bottom of each pattern on our site. |
|||||||||||||


Post a comment to pattern DROPS 196-12
We would love to hear what you have to say about this pattern!
If you want to leave a question, please make sure you select the correct category in the form below, to speed up the answering process. Required fields are marked *.