
Popular categories
Looking for a yarn?


Comments / Questions (55)
![]() Frida wrote:
Frida wrote:
Under ryg og forstykke står der at arbejdet nu måler 36 cm, derefter skal man strikke 7 cm retstrik og derefter vil arbejdet måle 66 cm. Jeg synes ikke helt regnestykket går op
18.06.2018 - 22:08DROPS Design answered:
Hej Frida, når arbejdet måler 36 cm fra arbejdet blev delt strikker du retstrik, når du har gjort det måler det totale arbejde 66 cm (fra skulderen og ned). Du finder også alle mål i måleskitsen nederst på siden. God fornøjelse!
19.06.2018 - 08:38Pia Carr wrote:
Jeg ser ikke mønstret beskrevet?
21.04.2018 - 22:36
![]() Guertault Sylvie wrote:
Guertault Sylvie wrote:
Merci pour l'aide apportée. Cordialement.
16.03.2018 - 17:05
![]() Guertault Sylvie wrote:
Guertault Sylvie wrote:
Je vous remercie pour cette réponse, mais je n'ai toujours pas compris...je dois faire un jeté avant et après la section de pt mousse, ok. Mais je dois aussi diminuer et vous me dites "au milieu sous les manches" or c'est là que l'on doit placer les marqueurs de côté...donc on ne peut pas tricoter 2 m ensemble à cet endroit...
15.03.2018 - 21:20DROPS Design answered:
Bonjour Mme Guertault, vous allez tricoter ainsi: tricotez jusqu'à la 1ère section point mousse sous la manche, faites 1 jeté, tricotez ces mailles au point mousse mais tricotez ens les 2 dernières m de cette section, continuez jusqu'au début de la section point mousse suivante, tricotez ens les 2 premières m point mousse, et faites 1 jeté après cette section point mousse = 2 jetés compensés par 2 diminutions sous la manche. Répétez sous l'autre manche de la même façon. Bon tricot!
16.03.2018 - 09:15
![]() Guertault Sylvie wrote:
Guertault Sylvie wrote:
Bonjour, après avoir mis les m. des manches sur un fil, je ne comprend pas où on fait la diminution de la section de point mousse. Il est dit "sur le côté de chaque section" mais on doit déjà faire un jeté à cet endroit...merci de m'apporter des précisions. Bonne journée, cordialement, Sylvie
14.03.2018 - 16:26DROPS Design answered:
Bonjour Mme Guertault, on va augmenter 4 m par tour: 1 m avant + 1 m après les sections point mousse au milieu sous les manches et on diminue 4 m: 1 m après la 1ère section point mousse et 1 m avant la section point mousse suivante au milieu sous les manches (= 2 m au milieu sous la manche). On va avoir par côté, 2 augmentations et 2 diminutions seulement pour un total de 4 sur le tour (le motif point mousse va se décaler en diagonale sur le côté et disparaître progressivement). Bon tricot!
15.03.2018 - 08:14
![]() Eldbjørg Skogli wrote:
Eldbjørg Skogli wrote:
Har bestilt og fått garn til denne genseren. Bestilte etter beregning på mønstret. Dette kan ikke stemme. Siden hele genseren skal strikkes ii begge kvalitetene, må det vel til like mye av begge kvaliteten også. Ergelig, må tilleggsbestille, betale frakt en gang tll og får ikke samme innfargning.
12.03.2018 - 11:47
![]() Tove wrote:
Tove wrote:
Hei! Lurer på om det kan være feil i teksten under "Øketips 2"? Det står: "Strikk til det gjenstår 4 masker før merketråden.." For å få maskeøkningen (kastene) i samme avstand fra merketråden må man vel strikke til det gjenstår 2 masker før merketråden?
03.03.2018 - 22:05DROPS Design answered:
Hej Tove, hvis du øker ifølge Øketips-2 får du økningen på hver side af de 4 midterste masker i hver side, så det stemmer. God fornøjelse!
08.03.2018 - 16:37
![]() Marianne wrote:
Marianne wrote:
Fin genser, holder på å strikke denne i Air. Men slet med å forstå avslutningen av bærestykket, der arbeidet deles. Er det feil i mønsteret her? Første halvdel av bakstykket har 10 masker mindre enn siste halvdel - dette stemmer ikke med rillemønsteret, dersom man begynner midt bak som instruksen sier. Men ved å endre slik at disse maskeantallene blir like, går det fint. F.eks. for str. XXL blir det 50 masker i begge tilfeller, ikke 45 og 55 som oppgitt.
25.02.2018 - 18:15DROPS Design answered:
Hei Marianne. Det skal være det samme maskeantallet på første og siste halvdel av bakstykket = 36-40-42-46-50-54 masker. Vi retter oppskriften med en gang:) God strikking!
26.02.2018 - 13:17
![]() Sylvie wrote:
Sylvie wrote:
Bonjour, n'étant pas très à l'aise avec le tricot circulaire, j'ai besoin d'avoir des repères pour placer mes augmentations or dans cet ouvrage aucun marqueur n'est placé ! Si je veux mettre des marqueurs je les place quand et où ? Ensuite mes augmentations se feront avant ou après les marqueurs ? Un grand merci à vous si vous pouvez me répondre. Bonne journée. Sylvie
25.02.2018 - 12:14DROPS Design answered:
Bonjour Sylvie, on ne place pas de marqueurs pour l'empiècement car on tricote le raglan au point mousse et les autres mailles en jersey, si vous voulez en placer, vous pouvez en mettre avant et après les 4 fois 16 m à tricoter au point mousse, ainsi les 4 raglans seront mieux délimités. Augmentez ensuite avant et après chacun de ces marqueurs = avant et après les 16 m point mousse. Bon tricot!
26.02.2018 - 09:25
![]() Tineke wrote:
Tineke wrote:
Bij de verdeling van de steken 0,5 achterpand, mouw, voorpand, mouw, 0,5 achterpand zit een verschil aan steken in het linker en het rechter achterpand deel.
17.02.2018 - 23:29
|
|
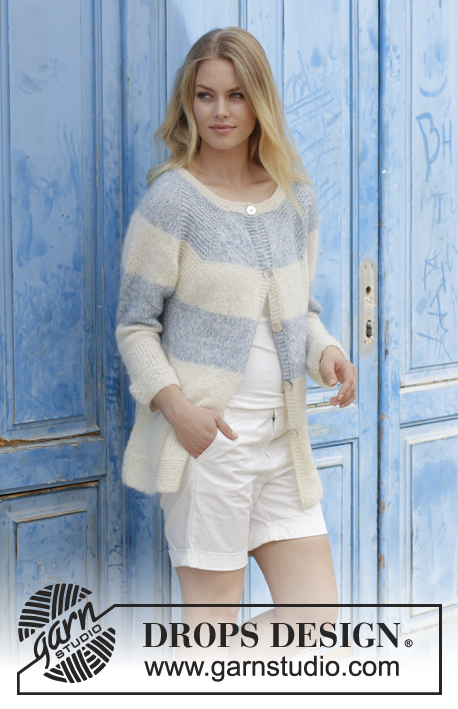
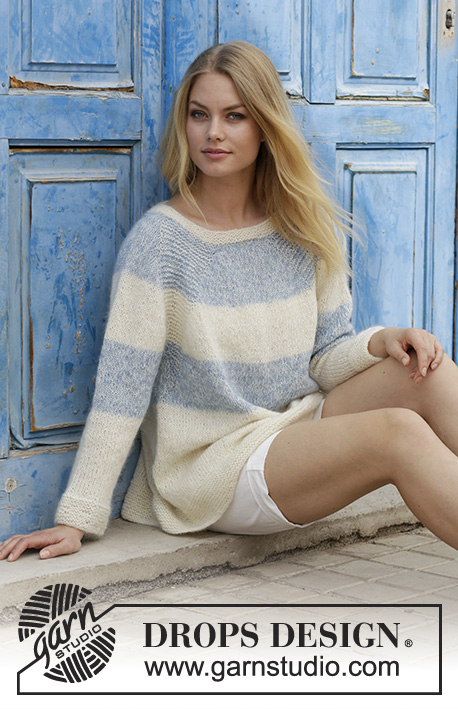
Sailor's Luck#sailorslucksweater |
|
 |
 |
Knitted jumper with raglan and stripes, worked top down. Sizes S - XXXL. The piece is worked in DROPS Alpaca and DROPS Kid-Silk.
DROPS 191-2 |
|
|
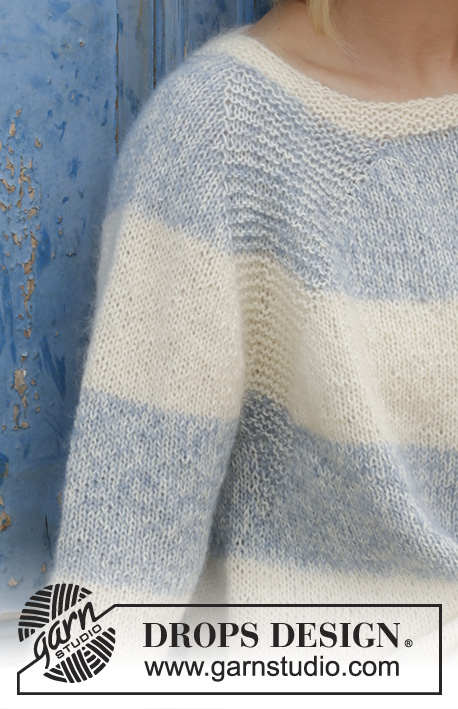
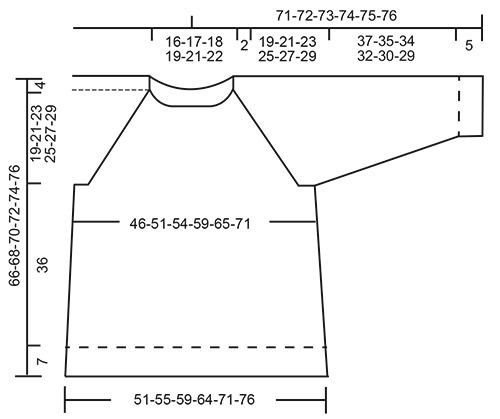
INFORMATION FOR THE PATTERN: RIDGE/GARTER STITCH (worked in the round): 1 ridge = 2 rounds. Knit 1 round and purl 1 round. INCREASE TIP-1 (evenly spaced): To work out how to increase evenly, count the total number of stitches on the needle (e.g. 82 stitches) and divide by the number of increases to be made (e.g. 4) = 20.5. In this example, increase by making 1 yarn over alternately after the 20th and 21st stitch. On the next round, knit the yarn overs twisted to avoid holes. INCREASE TIP-2 (for sides of body): Work until there are 2 stitches left before the marker thread, 1 yarn over, knit 4 stitches (the marker thread sits in the middle of these 4 stitches), 1 yarn over. On the next round knit the yarn overs twisted to avoid holes. Then work the new stitches in stocking stitch. STRIPES: 11-11-11-12-12-12 cm with 1 strand off-white Alpaca and 1 strand grey blue Kid-Silk. 11-11-11-12-12-12 cm with 1 strand off-white Alpaca and 1 strand off-white Kid-Silk. 11-11-11-12-12-12 cm with 1 strand off-white Alpaca and 1 strand grey blue Kid-Silk. Then work with 1 strand off-white Alpaca and 1 strand off-white Kid-Silk to finished length. RAGLAN: Increase 1 stitch on each side of the 16 stitches in garter stitch in each transition between body and sleeves (= 8 stitches increased on the round). Increase 1 stitch by making 1 yarn over. On the next round knit the yarn overs twisted to avoid holes. Then work the new stitches in stocking stitch. DECREASE TIP (for sleeves): Decrease 1 stitch on each side of the marker thread as follows: Work until there are 3 stitches left before the marker thread, knit 2 stitches together, knit 2 stitches (the marker thread sits in the middle of these 2 stitches), slip 1 stitch as if to knit, knit1, pass the slipped stitch over the knitted stitch --------------------------------------------------------- JUMPER: The piece is worked in the round with circular needle, top down. The sleeves are worked in the round with double pointed needles. The round starts mid back. YOKE: Cast on 82-85-88-91-97-102 stitches with circular needle size 4.5 mm and 1 strand off-white Alpaca and 1 strand off-white Kid-Silk (= 2 strands). Knit 1 round then work 3 RIDGES - see description above. Change to circular needle size 5 mm. Work 1 ridge where, on the first round, you increase 4-13-18-19-17-16 stitches evenly on round – read INCREASE TIP-1 (evenly spaced) = 86-98-106-110-114-118 stitches. Now work STRIPES – see description above, work pattern and increase to RAGLAN – see description above, as follows: Knit 5-8-10-11-12-13 stitches (= half back piece), make 1 yarn over, 16 stitches in garter stitch (= raglan line), make 1 yarn over, knit 1 (= sleeve), make 1 yarn over, 16 stitches in garter stitch (= raglan line), make 1 yarn over, knit 10-16-20-22-24-26 stitches (= front piece), make 1 yarn over, 16 stitches in garter stitch (= raglan line), make 1 yarn over, knit 1 (= sleeve), make 1 yarn over, 16 stitches in garter stitch (= raglan line), make 1 yarn over, knit 5-8-10-11-12-13 stitches (= half back piece). The first increase to raglan is now finished (= 8 stitches increased on the round). Continue in the round like this and increase to raglan every 2nd round a total of 21-23-25-27-30-32 times = 254-282-306-326-354-374 stitches. When all the increases to raglan are finished, the piece should measure 21-23-25-27-29-31 cm from the cast on edge mid front and down. If the piece is shorter than this continue with pattern as before until you have reached the correct length (without increasing any more stitches). The next round is worked as follows (continue with the pattern as before): Work 36-40-42-46-50-54 stitches (= half back piece), place the next 55-61-69-71-77-79 stitches on a thread (= sleeve), cast on 6-6-8-8-10-12 new stitches on the needle (= side under sleeve), work the next 72-80-84-92-100-108 stitches (= front piece), place the next 55-61-69-71-77-79 stitches on a thread (= sleeve), cast on 6-6-8-8-10-12 new stitches on the needle (= side under sleeve), work the remaining 36-40-42-46-50-54 stitches (= half back piece). BODY: = 156-172-184-200-220-240 stitches. THE PIECE IS NOW MEASURED FROM HERE! Insert a marker thread in each side (= in the middle of the new stitches cast on under each sleeve = 3-3-4-4-5-6 new stitches on each side of the marker thread). Continue in the round with stocking stitch and work garter stitch over the 10-9-7-8-8-9 stitches left on the front/back pieces (from the garter stitch section in the raglan line), AT THE SAME TIME on every 2nd round make 1 yarn over on the outside of each garter stitch section towards mid front and towards mid back (= a total of 4 stitches increased on round) and decrease 1 stitch in each garter stitch section by knitting the 2 outermost stitches in garter stitch section towards the side of the jumper together (= 1 stitch decreased in each garter stitch section towards the side, a total of 4 stitches decreased on round). NOTE! The number of stitches stays the same, but the stitches in garter stitch will gradually disappear and there will be more stitches in stocking stitch, (i.e.4 stitches increased and 4 stitches decreased on every 2nd round). When all the stitches in garter stitch are gone continue working in stocking stitch, AT THE SAME TIME on the first round increase 1 stitch on each side of the marker thread in each side – read INCREASE TIP-2. Increase like this every 8-8-9-9-7-7 cm a total of 4-4-4-4-5-5 times = 172-188-200-216-240-260 stitches. Continue working until the piece measures 36 cm in all sizes. Change to circular needle size 4.5 mm. Work garter stitch for 7 cm. Cast off with knit. You can use a needle 1 size larger if necessary to avoid the cast-off edge being tight. The piece measures approx. 66-68-70-72-74-76 cm from the shoulder down. SLEEVE: Place the 55-61-69-71-77-79 stitches from the thread on the one side of the piece on double pointed needles size 5 mm and, in addition, cast on 6-6-8-8-10-12 new stitches mid under the sleeve = 61-67-77-79-87-91 stitches on the needles. Insert a marker thread in the middle of the new stitches – THE PIECE IS NOW MEASURED FROM HERE! Work stocking stitch over stocking stitch and garter stitch over garter stitch, at the same time as the stitches in garter stitch are decreased in the same way as on the body (the number of stitches stays the same). When all the stitches in garter stitch have gone, continue working in stocking stitch over all stitches, at the same time on the first round decrease 2 stitches mid under sleeve – read DECREASE TIP. Decrease like this every 6th-5th-3rd-3rd-2nd-2nd round a total of 12-13-18-18-20-22 times = 37-41-41-43-47-47 stitches. Continue with stocking stitch in the round until the piece measures 36-34-34-32-30-29 cm. Change to double pointed needles size 4.5 mm. Work garter stitch for 5 cm. Cast off with knit. You can use a needle 1 size larger if necessary to avoid the cast-off edge being tight. The sleeve measures 42-40-39-37-35-34 cm. Work the other sleeve in the same way. ASSEMBLY: Sew the openings under the sleeves. |
|
 |
|
Have you finished this pattern?Tag your pictures with #dropspattern #sailorslucksweater or submit them to the #dropsfan gallery. Do you need help with this pattern?You'll find 28 tutorial videos, a Comments/Questions area and more by visiting the pattern on garnstudio.com. © 1982-2026 DROPS Design A/S. We reserve all rights. This document, including all its sub-sections, has copyrights. Read more about what you can do with our patterns at the bottom of each pattern on our site. |
|


With over 40 years in knitting and crochet design, DROPS Design offers one of the most extensive collections of free patterns on the internet - translated to 17 languages. As of today we count 324 catalogues and 12290 patterns translated into English (UK/cm). 12290
We work hard to bring you the best knitting and crochet have to offer, inspiration and advice as well as great quality yarns at incredible prices! Would you like to use our patterns for other than personal use? You can read what you are allowed to do in the Copyright text at the bottom of all our patterns. Happy crafting!
Post a comment to pattern DROPS 191-2
We would love to hear what you have to say about this pattern!
If you want to leave a question, please make sure you select the correct category in the form below, to speed up the answering process. Required fields are marked *.