
Popular categories
Looking for a yarn?


Comments / Questions (31)
![]() Maiken wrote:
Maiken wrote:
Kan dere legge ut bilder av baksiden på genseren?
30.09.2025 - 01:12DROPS Design answered:
Hei Maiken. Hat tittet igjennom vårt bilde arkiv, men kunne dessverre ikke finne noen bilder av baksiden. mvh DROPS Design
13.10.2025 - 13:16
![]() Maiken wrote:
Maiken wrote:
I starten av oppskriften står det: « Strikk 6-6-6-9-9-9 masker i rille - og fell 1-0-1-1-1-1 masker over disse» Jeg strikker den nest største og skal da ha 9 masker i siden, også felle 1? Det blir da 8 masker. Men videre i oppskriften står det jo at jeg skal fortsette med det, men at det samtidig skal være 9 masker i hver side?
12.09.2025 - 15:59DROPS Design answered:
Hei Maiken. Når du skal fortsette mønstret er det 8 masker i hver siden (ikke 9 masker), (bare første gang det skal felles). mvh DROPS Design
22.09.2025 - 13:19
![]() Eva Pap De Pesteny wrote:
Eva Pap De Pesteny wrote:
I beskrivningen står C + C vilket borde betyda att man stickar med 2 härvor garn tillsammans. Stämmer verkligen garnåtgång 300 g för stlk S, eller betyder det 600 g?
12.10.2022 - 14:30DROPS Design answered:
Hej Eva, ja hvis du strikker i DROPS Air og holder strikkefastheden på 10 masker på 10 cm, så stemmer det med 300 gr :)
16.12.2022 - 15:13
![]() Vero wrote:
Vero wrote:
Serait il possible d avoir les explications de ce modèle ou des autres(même style) afin de le réaliser avec des aiguilles "normales" et non circulaires svp ? Merci
28.04.2022 - 21:26DROPS Design answered:
Bonjour Vero, on utilise ici des aiguilles circulaire pour avoir suffisamment de place pour y loger toutes les mailles, vous pouvez par conséquent utiliser des aiguilles droites, vos mailles seront juste plus serrées (attention à votre tension). Découvrez ici - pour une prochaine fois - comment adapter un modèle sur aiguilles droites. Bon tricot!
29.04.2022 - 08:23
![]() Jenny wrote:
Jenny wrote:
Ich habe den Pulli in Größe S rund gestrickt. Trotz das die Maschenprobe stimmt habe ich mit den angegebenen 300g locker ein Knäuel zu wenig. Nun hoffe ich, dass ich keinen Farbunterschied erhalten werde beim nachbestellen.
24.03.2022 - 20:50
![]() Ejongenburger wrote:
Ejongenburger wrote:
Vraag ik wil dit patroon maken van katia alaska maat xl hoeveel heb ik nodig?
15.10.2020 - 22:05
![]() Ejongenburger wrote:
Ejongenburger wrote:
Vraag
15.10.2020 - 22:02
![]() E Jongenburger wrote:
E Jongenburger wrote:
Ik wil dit patroon maken van katia alaska hoeveel kluwen heb ik nodig
15.10.2020 - 22:01
![]() E Jongenburger wrote:
E Jongenburger wrote:
Dit patroon maken van katia alaska.Hoeveen kluwen heb ik nodig?
15.10.2020 - 21:59
![]() Katharina Faust wrote:
Katharina Faust wrote:
Um die einzelnen Teile zusammenzunähen, wird der Faden, so wie beim Stricken, doppelt genommen oder reicht es hier mit einem einfachen Faden zu arbeiten? Vielen Dank.
02.12.2019 - 11:10DROPS Design answered:
Liebe Frau Faust, es könnte etwas zu dick mit 2 Fäden zusammenzunähen, versuchen Sie mit nur 1 Faden. Viel Spaß beim fertigstellen!
02.12.2019 - 13:24
|
||||||||||
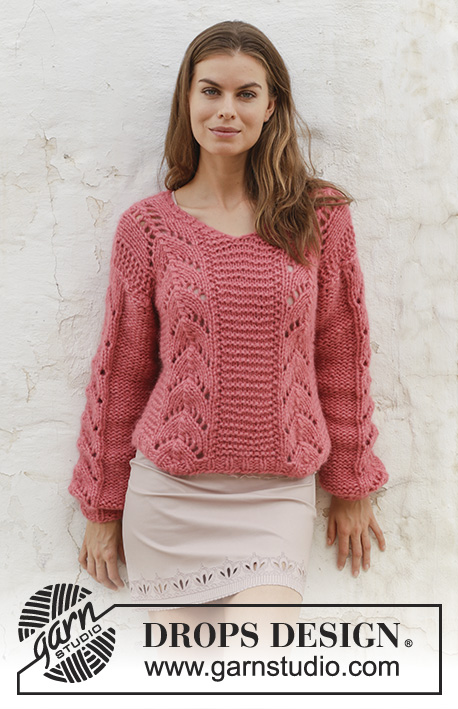
Spring Peach#springpeachsweater |
||||||||||
 |
 |
|||||||||
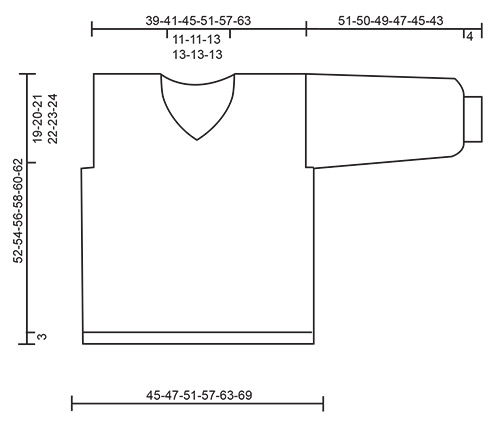
Knitted jumper with V-neck and lace pattern. Sizes S - XXXL. The piece is worked in 2 strands DROPS Air.
DROPS 186-9 |
||||||||||
|
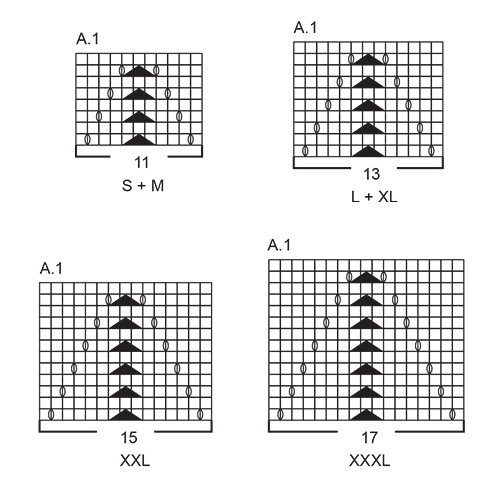
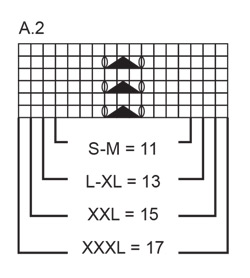
INFORMATION FOR THE PATTERN: RIDGE/GARTER STITCH (worked back and forth): 1 ridge = Knit 2 rows. PATTERN: See diagrams A.1 and A.2. Choose diagram for your size. The diagrams show all the rows in the pattern from the right side. DECREASE TIP (for neck): Decrease for neck inside the 2 edge stitches in garter stitch. All decreases are worked from the right side! Decrease as follows after the 2 edge stitches: Slip 1 stitch as if to knit, knit 1, pass the slipped stitch over the knitted stitch. Decrease as follows before the 2 edge stitches: Knit 2 together. INCREASE TIP (for sleeve): Increase 1 stitch inside 1 edge stitch in garter stitch by making 1 yarn over. On next row work the yarn over twisted to avoid a hole. ---------------------------------------------------------- JUMPER: The piece is worked back and forth with circular needle. Front and back pieces are worked separately. The sleeves are worked back and forth with circular needle. BACK PIECE: Cast on 47-47-53-59-65-71 stitches with circular needle size 8 mm and 2 strands Air. Purl 1 row from the wrong side. Then work 4 rows rib (= knit 1 / purl 2) with 1 edge stitch in GARTER STITCH - see description above, in each side. Change to circular needle size 9 mm. On next row decrease as follows - from the right side: Work 6-6-6-9-9-9 stitches in garter stitch - and decrease 1-0-1-1-1-1 stitches over these stitches, A.1 (= 11-11-13-13-15-17 stitches), purl 1 stitch from right side (purl from wrong side), 11-11-13-13-15-17 stitches in garter stitch, purl 1 stitch from right side (purl from wrong side), work A.1 (= 11-11-13-13-15-17 stitches), 6-6-6-9-9-9 stitches in garter stitch - and decrease 1-0-1-1-1-1 stitches over these stitches = 45-47-51-57-63-69 stitches. Continue the pattern like this - REMEMBER THE KNITTING TENSION! When the piece measures 34-35-36-37-38-39 cm (measure along the one stitch in garter stitch in the side of A.1) cast off 3 stitches at the beginning of the next 2 rows = 39-41-45-51-57-63 stitches. When the piece measures approx. 42-44-46-47-49-51 cm - adjust so that you have worked the last row in the diagram, work A.2 (= 11-11-13-13-15-17 stitches) over A.1 to finished length. AT THE SAME TIME when the piece measures 49-51-53-55-57-59 cm, work 2 ridges over the middle 13-13-15-15-15-15 stitches on the row; the other stitches are continued as before. On the first row from the right side after the 2 ridges, cast off the middle 9-9-11-11-11-11 stitches for neck. Place the 15-16-17-20-23-26 stitches on the right side of the needle (seen from the right side) on 1 thread or leave them un-worked on a needle. Continue back and forth over the remaining 15-16-17-20-23-26 stitches with pattern and 2 edge stitches in garter stitch towards the neck - AT THE SAME TIME on the next row from the right side decrease 1 stitch for neck - read DECREASE TIP = 14-15-16-19-22-25 stitches on needle. Continue working until the piece measures 52-54-56-58-60-62 cm. Then loosely cast off. Work the other shoulder in the same way. FRONT PIECE: Cast on and work in the same way as for the back piece until the piece measures 37-39-40-42-43-45 cm. The next row from the right side is worked as follows: Work 19-20-22-25-28-31 stitches as before, knit 2 stitches, pass stitch 1 over stitch 2 of these 2 stitches (= 1 stitch decreased mid front), work 18-19-21-24-27-30 stitches as before. Place the 19-20-22-25-28-31 stitches on the right side of the piece (seen from the right side) on 1 thread or leave them un-worked on a needle. Now decrease for V-neck and change diagram at the same time as follows: Continue back and forth with pattern over the remaining 19-20-22-25-28-31 stitches as before, with 2 stitches garter stitch towards mid front - when you have worked 1 row after the division and the next row is from the right side, decrease for V-neck from mid front - remember DECREASE TIP. Decrease in this way every 2nd row a total of 4-4-5-5-5-5 times, then every 4th row 1 time = 14-15-16-19-22-25 stitches on row - AT THE SAME TIME when the piece measures approx. 42-44-46-47-49-51 cm - adjust so that you have worked the last row in the diagram, work A.2 (= 11-11-13-13-15-17 stitches) over A.1 to finished length. Continue working until the piece measures 52-54-56-58-60-62 cm. Then loosely cast off. Continue working over the stitches on the right side of the piece in the same way as the left side, but reversed; i.e. the first row is worked as follows from the wrong side: Place the cast-off stitch mid front on the left needle and knit it together with the next stitch on the left needle (this is done to avoid a "jump" at the bottom of the V-neck), work the other stitches as before - when you have worked 1 row after the division and the next row is from the right side, decrease for V-neck as for the left side. A.1 changes to A.2 as in the left side. SLEEVE: Cast on 17-17-20-20-20-23 stitches (including edge stitch in each side) with circular needle size 8 mm and 2 strands Air. Purl 1 row from the wrong side. Then work 6 rows rib (= knit 1 / purl 2) with 1 edge stitch in garter stitch in each side. Change to circular needle size 9 mm. The next row is worked as follows - from the right side: Work 1 edge stitch in garter stitch, * knit 1, 1 yarn over *, work from *-* until there are 2 stitches left, knit 1 stitch and work 1 edge stitch in garter stitch = 31-31-37-37-37-43 stitches (on the next row, work the yarn overs twisted to avoid holes). Knit 1 row from the wrong side where you increase 2-4-0-2-4-0 stitches evenly on row = 33-35-37-39-41-43 stitches. The next row is worked as follows - from the right side: 1 edge stitch in garter stitch, purl 10-11-11-12-12-12 (knit from wrong side), A.1 (= 11-11-13-13-15-17 stitches), purl 10-11-11-12-12-12 stitches (knit from wrong side) and 1 edge stitch in garter stitch. Continue the pattern like this. When the piece measures 14 cm increase 1 stitch in each side - read INCREASE TIP (= 2 stitches increased). Increase like this every 16-16-15-14-13-12 cm a total of 3 times = 39-41-43-45-47-49 stitches. Continue working until piece measures 51-50-49-47-45-43 cm (shorter measurements in larger sizes due to broader shoulders). Then loosely cast off. Work the other sleeve in the same way. ASSEMBLY: Sew shoulder seams inside the cast-off edge – make sure the seam is not tight. Sew the side seams in the outermost loop of the outermost stitch. Sew in the sleeves – sew the 2 cm on each side of sleeve so that it fits into the armhole, then sew the sleeve seams inside the 1 edge stitch. |
||||||||||
Diagram explanations |
||||||||||
|
||||||||||
 |
||||||||||
 |
||||||||||
 |
||||||||||
Have you finished this pattern?Tag your pictures with #dropspattern #springpeachsweater or submit them to the #dropsfan gallery. Do you need help with this pattern?You'll find 26 tutorial videos, a Comments/Questions area and more by visiting the pattern on garnstudio.com. © 1982-2026 DROPS Design A/S. We reserve all rights. This document, including all its sub-sections, has copyrights. Read more about what you can do with our patterns at the bottom of each pattern on our site. |
||||||||||


With over 40 years in knitting and crochet design, DROPS Design offers one of the most extensive collections of free patterns on the internet - translated to 17 languages. As of today we count 324 catalogues and 12290 patterns translated into English (UK/cm). 12290
We work hard to bring you the best knitting and crochet have to offer, inspiration and advice as well as great quality yarns at incredible prices! Would you like to use our patterns for other than personal use? You can read what you are allowed to do in the Copyright text at the bottom of all our patterns. Happy crafting!
Post a comment to pattern DROPS 186-9
We would love to hear what you have to say about this pattern!
If you want to leave a question, please make sure you select the correct category in the form below, to speed up the answering process. Required fields are marked *.