
Popular categories
Looking for a yarn?


Comments / Questions (31)
![]() Berit Aagesen wrote:
Berit Aagesen wrote:
Åh ja nu ser jeg det. Sorry, men billedet har mange flere rækker en i opskriftens 5 rækker. Det kan man jo selv rette. Mvh Berit
31.01.2018 - 16:02
![]() Berit Aagesen wrote:
Berit Aagesen wrote:
Jeg kan altså ikke se hvor der står noget om ribkanten forneden af blusen. Billedet viser ikke noget mønster i de første 8 cm. ? Mvh Berit
31.01.2018 - 14:41DROPS Design answered:
Hei Berit. Under BAGSTYKKE, står hele forklaringe på hvordan vrangborden/de første 8 cm skal strikkes. F.esk i str S. Slå 88 masker op på rundpind 5. Strik 1 pind vrang fra vrangen. Næste pind strikkes således fra retsiden: Strik 3 masker RETSTRIK - se forklaring over i oppskriften, strik 2 ret, * 2 vrang, 2 ret *, strik fra *-* totalt 0 gange, A.1A, A.2A, A.3A, A.4A, A.5A, A.6A, A.7A, * 2 ret, 2 vrang *, strik fra *-* totalt 0 gange, strik 2 ret, 3 masker retstrik. Fortsæt dette mønster til arbejdet måler 8 cm. God Fornøyelse!
01.02.2018 - 07:50
![]() Lirzin Joanna wrote:
Lirzin Joanna wrote:
Bonjour, Dans les explications il est marqué qu'il faut rabattre 2-2-4-6-8-10 mailles de chaque côté du marqueur à 41-42-43-44-45-46 cm . Mais on commence le biais des épaules à 60-62-64-66-68-70cm. Ca veut dire qu'on doit tricoter pendant 19 cm en aller retour et on fait la couture des 2 pièces ? Et en plus sur le diagramme les manches sont à 65-67-69-71-73-75 cm.
28.01.2018 - 14:15DROPS Design answered:
Bonjour Mme Lirzin, le biais des épaules commence à 19 cm (comme dans le schéma) et les rangs raccourcis du biais des épaules se font sur 5 cm (comme indiqué dans le schéma), la hauteur totale du pull à partir du bas jusqu'au côté le plus haut de l'épaule sera donc de 65 cm en taille S. Bon tricot!
29.01.2018 - 09:50
![]() Mariska wrote:
Mariska wrote:
Hoe moet ik de tellpattonen breien? Aan de goede kant van rechts naar links en aan de verkeerde kant andersom?
19.01.2018 - 21:53DROPS Design answered:
Hoi Mariska, Ja, dat klopt. De eerste naald aan de goede kant begin je vanaf rechts onder naar links te lezen en de teruggaande naald andersom, van links naar rechts.
20.01.2018 - 12:13
![]() Pia Kokborg wrote:
Pia Kokborg wrote:
Jeg er forvirret over starten på blusen. På billedet ser det ud til de først ca 8 cm er rib 2r og 2v men når jeg læser opskriften er det med a1-7. Hvad er korrekt?
30.12.2017 - 13:59DROPS Design answered:
Hei Pia. Om du ser på diagrammene er det 2 rett og 2 vrang, men når du kommer til 6. rad er det en økning (husk å lese diagramforklaringene). Da vil det blir en fin overgang mellom vrangboden og alle flettene. God Fornøyelse!
03.01.2018 - 14:34
![]() Christina Frederiksen wrote:
Christina Frederiksen wrote:
Hej Jeg vil høre ang diagram med snoning, der er forskel på hvilken vej stregen går over de 4 masker, er det fordi at det viser om snoningen skal være foran eller bagved, jeg syntes kun at symbolerne viser den ene streg og det er foran maskerne. Det er lidt svært at forklare, håber at I forstår
20.11.2017 - 22:43DROPS Design answered:
Hej, jo men det er fordi at alle snoninger i denne opskrift vender samme vej. God fornøjelse!
22.11.2017 - 14:36
![]() Mona wrote:
Mona wrote:
Fortsatt mangel i diagram etter rettelse. Mangler beskrivelsen/tegnforklaring på flette hvor du setter masker på hj.pinne bak arbeidet.
04.11.2017 - 22:08
![]() Petra Wullinger wrote:
Petra Wullinger wrote:
Hallo Zusammen, im Rapport A.7 C, Reihe 7 ist ein Fehler. Sie muss der Reihe 3 im selben Rapport entsprechen. Herzliche Grüße
11.10.2017 - 12:14
![]() Marie wrote:
Marie wrote:
Bonjour, Je pense qu'il y a interversion dans l'explication de la liste des symboles entre "pas de maille, sauter cette case" et "placer 2 mailles sur l'aiguille auxiliaire devant l'ouvrage, tricoter 2 mailles endroit, reprendre les 2 mailles en attente et les tricoter à l'endroit ".
23.09.2017 - 21:05DROPS Design answered:
Bonjour Marie, merci pour votre retour, la légende va être vérifiée et corrigée. Bon tricot!
25.09.2017 - 11:01
![]() HUET wrote:
HUET wrote:
Je tricote en taille M donc 92 mailles, il s'agit du nombre de maille que pour le devant du pull ? les explications disent de mettre ces mailles sur un aiguille circulaire mais les côtes sont ouvertes de chaque côté. Merci d'avance de vos explications
18.09.2017 - 15:43DROPS Design answered:
Bonjour Mme Huet, vous tricotez d'abord le dos (en taille M, montez 92 m, puis vous allez augmenter et aurez ensuite 106 m et mettez ces mailles en attente à 18 cm de hauteur totale), tricotez ensuite le devant de la même façon et reprenez les 2 pièces: dos et devant sur la même aiguille circulaire = 212 m (= 2 x 10⁶ m) pour tricoter en rond jusqu'aux emmanchures. Vous aurez ainsi les fentes des côtés. Bon tricot!
18.09.2017 - 16:48
|
||||||||||||||||||||||||||||||||||
Midnight Cables#midnightcablessweater |
||||||||||||||||||||||||||||||||||
 |
 |
|||||||||||||||||||||||||||||||||
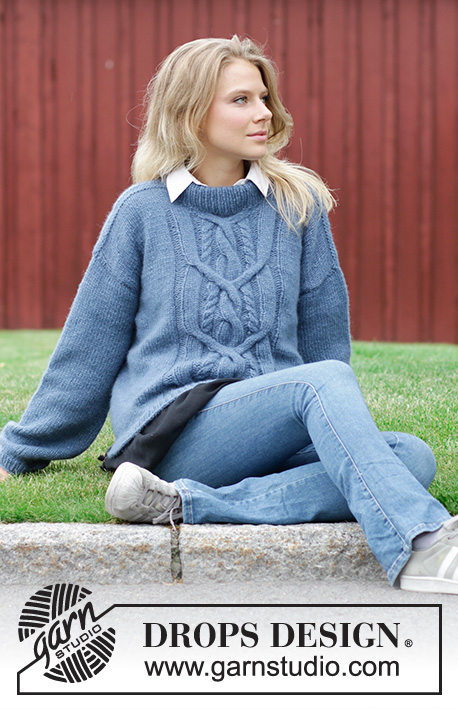
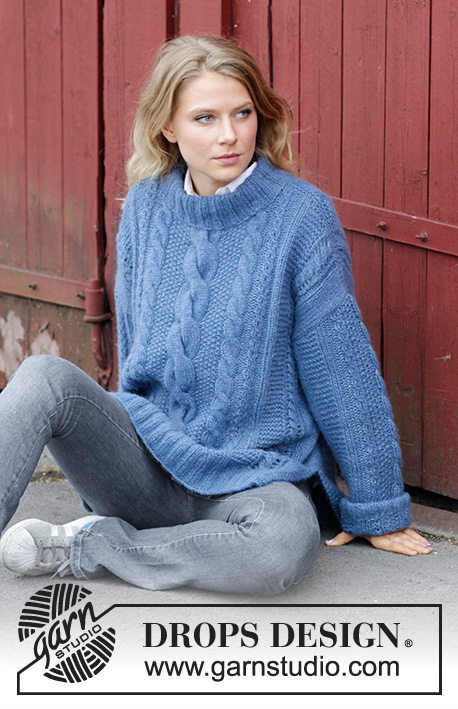
Knitted jumper with cables, lace pattern and split. Sizes S - XXXL. The piece is worked in DROPS Air.
DROPS 184-12 |
||||||||||||||||||||||||||||||||||
|
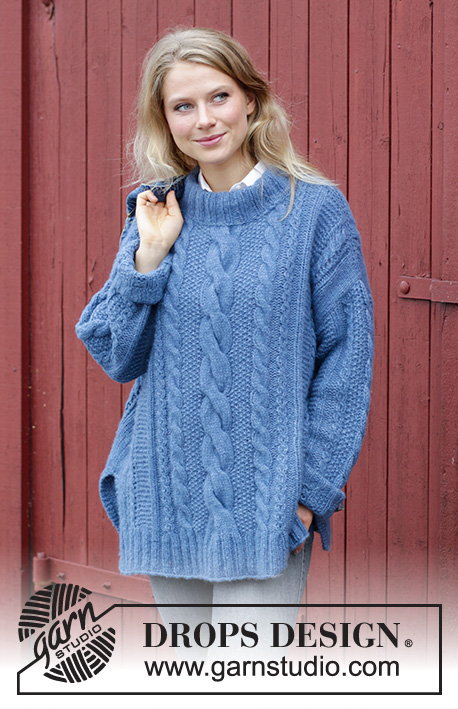
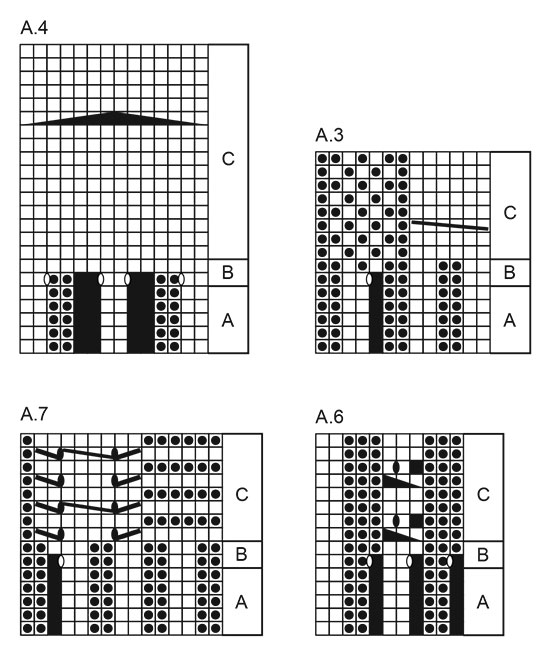
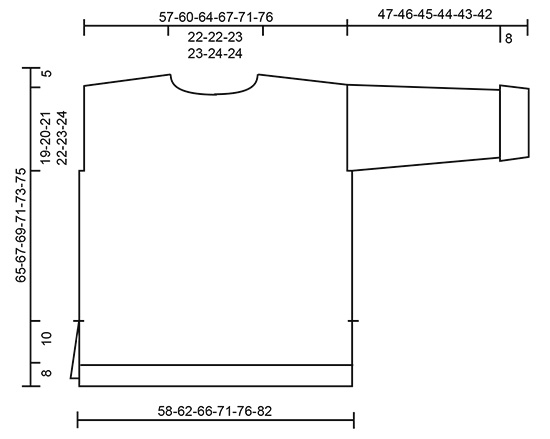
---------------------------------------------------------- INFORMATION FOR THE PATTERN: RIDGE/GARTER STITCH (worked back and forth): 1 ridge = Knit 2 rows. PATTERN: See diagrams A.1 to A.10. The diagrams show all the rows in the pattern seen from the right side. INCREASE INFORMATION (for sleeve): Increase 1 stitch by making 1 yarn over, on the next row work the yarn overs twisted to prevent holes. Sizes S, M and L: The increased stitches are worked garter stitch as you go, until there are a total of 6 stitches garter stitch before A.8 and a total of 6 stitches garter stitch after A.10, then work these stitches stocking stitch. Sizes XL, XXL and XXXL: The increased stitches are worked stocking stitch as you go. ---------------------------------------------------------- JUMPER: The front and back pieces are worked back and forth with circular needle up to the split. Then the body is worked in the round as far as the armholes, when the front and back pieces are worked back and forth separately. The sleeves are worked back and forth with circular needle. BACK PIECE: Cast on 88-92-104-112-116-124 stitches with circular needle size 5 mm. Purl 1 row from the wrong side. The next row is worked as follows from the right side: Work 3 stitches GARTER STITCH - see description above, knit 2-0-2-2-0-0, * purl 2, knit 2 *, work from *-* a total of 0-1-2-3-4-5 times, A.1A (= 14 stitches), A.2A (= 8 stitches), A.3A (= 12 stitches), A.4A (= 10 stitches), A.5A (= 12 stitches), A.6A (= 8 stitches), A.7A (= 14 stitches), * knit 2, purl 2 *, work from *-* a total of 0-1-2-3-4-5 times, knit 2-0-2-2-0-0, 3 stitches garter stitch. Continue this pattern until the piece measures 8 cm. Change to circular needle size 6 mm. REMEMBER THE KNITTING TENSION! Now work as follows in the different sizes: SIZES S-M-L-XL: The next row is worked as follows from the right side: Work 3 stitches garter stitch, 2-4-10-14 stitches rib as before and decrease 0-0-2-3 stitches over these, work A.1B over A.1A, A.2B over A.2A, A.3B over A.3A, A.4B over A.4A, A.5B over A.5A, A.6B over A.6A, A.7B over A.7A, work 2-4-10-14 stitches rib as before and decrease 0-0-2-3 stitches over these and 3 stitches garter stitch. When A.1B-A.7B have been completed there are 102-106-114-120 stitches on the needle. The next row is worked as follows from the right side: Work 3 stitches garter stitch, 2-4-8-11 stitches stocking stitch, A.1C over A.1B, A.2C over A.2B, A.3C over A.3B, A.4C over A.4B, A.5C over A.5B, A.6C over A.6B, A.7C over A.7B, work 2-4-8-11 stitches stocking stitch and 3 stitches garter stitch. There are now 102-106-114-120 stitches on the needle. Continue this pattern until the piece measures 18 cm in all these sizes. Lay the piece to one side. SIZES XXL-XXXL: The next row is worked as follows from the right side: Work 3 stitches garter stitch, work 5-9 stitches rib as before and decrease 1-0 stitches over these, work A.6C (= 11 stitches), work A.1B over A.1A, A.2B over A.2A, A.3B over A.3A, A.4B over A.4A, A.5B over A.5A, A.6B over A.6A, A.7B over A.7A, work A.2C (= 11 stitches), work 5-9 stitches rib as before and decrease 1-0 stitches over these, 3 stitches garter stitch. When A.1B-A.7B have been completed there are 128-138 stitches on the needle. The next row is worked as follows from the right side: Work 3 stitches garter stitch, work 4-9 stitches stocking stitch, continue A.6C (= 11 stitches), A.1C over A.1B, A.2C over A.2B, A.3C over A.3B, A.4C over A.4B, A.5C over A.5B, A.6C over A.6B, A.7C over A.7B, continue A.2C (= 11 stitches), work 4-9 stitches stocking stitch and 3 stitches garter stitch. There are now 128-138 stitches on the needle. Continue this pattern until the piece measures 18 cm in both sizes. Lay the piece to one side. FRONT PIECE: Cast on and work as for the back piece. BODY: Place the 2 pieces together on the same circular needle size 6 mm = 204-212-228-240-256-276 stitches. Insert 1 marker in each side and allow the markers to follow your work upwards. Continue by working in the round over all stitches as before, but the garter stitches in each side are worked in stocking stitch from here. When the piece measures 41-42-43-44-45-46 cm - adjust so that the next round is a round without yarn overs in the diagrams, decrease 2-2-4-6-8-10 stitches in each side (= 1-1-2-3-4-5 stitches on each side of each marker). Front and back pieces are now continued separately. BACK PIECE: = 100-104-110-114-120-128 stitches (including 1 edge stitch in each side). Start from the right side and continue the pattern back and forth as before but with 1 edge stitch in garter stitch in each side. When the piece measures 60-62-64-66-68-70 cm start the diagonal shoulder AT THE SAME TIME as, when the piece measures 63-65-67-69-71-73 cm, you cast off for the neck. Work as follows: DIAGONAL SHOULDERS: ROW 1 (= from right side): Work until there are 6-6-6-7-7-8 stitches left on the needle (towards shoulder), turn and tighten the strand. ROW 2 (= from wrong side): Work until there are 6-6-6-7-7-8 stitches left on the needle (towards shoulder), turn and tighten the strand. Repeat rows 1 and 2 three more times: work until 6-6-6-7-7-8 stitches more remain on the needle than on previous row from the same side, turn (= 6-8-10-8-10-10 stitches left on the shoulder). Work 1 ridge over all the 30-32-34-36-38-42 stitches, cast off. NECK: When the piece measures 62-64-66-68-70-72 cm decrease 3 stitches over each cable of 6 stitches and decrease 7 stitches over the cable of 14 stitches. When the piece measures 63-65-67-69-71-73 cm cast off the middle 25-25-27-27-29-29 stitches for neck and each shoulder is finished separately. Cast off 1 stitch on the next row from the neck = 30-32-34-36-38-42 stitches left on the shoulder. Work the other shoulder in the same way. FRONT PIECE: = 100-104-110-114-120-128 stitches. Continue in the same way as the back piece until the piece measures 59-61-63-65-67-69 cm. Now decrease 3 stitches over each cable of 6 stitches and decrease 7 stitches over the cable of 14 stitches. When the piece measures 60-62-64-66-68-70 cm place the middle 21-21-23-23-25-25 stitches on 1 thread for neck and each shoulder is finished separately AT THE SAME TIME as you work diagonal shoulders as for the back piece. Continue to cast off for the neck at the beginning of each row from the neck as follows: 2 stitches 1 time and 1 stitch 1 time = 30-32-34-36-38-42 stitches left on the shoulder. Work 1 ridge and cast off. Work the other shoulder in the same way. SLEEVE: The piece is worked back and forth with circular needle. Cast on 42-42-42-50-50-50 stitches (including 1 edge stitch in each side) with circular needle size 5 mm. Purl 1 row from the wrong side. The next row is worked as follows from the right side: Work 1 edge stitch in garter stitch, purl 1, * knit 2, purl 2 *, work from *-* a total of 1-1-1-2-2-2 times, work A.8A (= 12 stitches), A.9A (= 6 stitches), A.10A (= 12 stitches), * purl 2, knit 2 * work from *-* a total of 1-1-1-2-2-2 times, purl 1 and 1 edge stitch in garter stitch. Continue this pattern until the piece measures 8 cm. Change to circular needle size 6 mm. The next row is worked as follows from the right side: Work A.8B over A.8A, A.9B over A.9A, A.10B over A.10A, the remaining stitches are worked as before. When A.8B-A.10B have been completed there are 46-46-46-54-54-54 stitches on the needle. The next row is worked as follows from the right side: Work 1 edge stitch in garter stitch, 0-0-0-3-3-3 stitches stocking stitch, 5-5-5-6-6-6 stitches garter stitch, work A.8C over A.8B, A.9C over A.9B and A.10C over A.10B, work 5-5-5-6-6-6 stitches garter stitch, 0-0-0-3-3-3 stitches stocking stitch and 1 edge stitch in garter stitch. Continue this pattern. When the piece measures 13-15-14-12-15-13 cm increase 1 stitch in each side - read INCREASE INFORMATION above. Increase in this way every 4½-3½-2½-3-2½-2½ cm a total of 9-11-12-10-11-13 times = 64-68-70-74-76-80 stitches. Continue working until the piece measures 53-52-51-50-49-48 cm (shorter measurements in larger sizes because of broader shoulders). Now cast off for a small sleeve cap in each side as follows: Cast off 7-7-8-8-9-9 stitches 2 times and cast off 6-8-7-9-8-10 stitches 1 time - decrease 1 stitch over each cable with holes and decrease 3 stitches over the cable of 6 stitches on the last cast off row. Cast off the remaining stitches. The piece measures approx. 55-54-53-52-51-50 cm with the cuff turned up. Work another sleeve in the same way. ASSEMBLY: Sew the shoulder seams inside the cast-off edge so that you get 2 ridges on top of the shoulder. Sew in the sleeves inside the 1 edge stitch in garter stitch. Turn the cuffs up on the right side. NECKLINE: Knit up from the right side approx. 74-80 stitches around the neck (including the stitches from the thread in front) with short circular needle size 5 mm. Purl 1 round and adjust the number of stitches to 72-72-76-76-80-80 stitches. Then work rib in the round (= knit 2 / purl 2) for 10 cm, cast off with knit over knit and purl over purl. Fold the neck double in towards the wrong side and fasten with small neat stitches - make sure the seam is not tight. |
||||||||||||||||||||||||||||||||||
Diagram explanations |
||||||||||||||||||||||||||||||||||
|
||||||||||||||||||||||||||||||||||
 |
||||||||||||||||||||||||||||||||||
 |
||||||||||||||||||||||||||||||||||
 |
||||||||||||||||||||||||||||||||||
Have you finished this pattern?Tag your pictures with #dropspattern #midnightcablessweater or submit them to the #dropsfan gallery. Do you need help with this pattern?You'll find 35 tutorial videos, a Comments/Questions area and more by visiting the pattern on garnstudio.com. © 1982-2026 DROPS Design A/S. We reserve all rights. This document, including all its sub-sections, has copyrights. Read more about what you can do with our patterns at the bottom of each pattern on our site. |
||||||||||||||||||||||||||||||||||


With over 40 years in knitting and crochet design, DROPS Design offers one of the most extensive collections of free patterns on the internet - translated to 17 languages. As of today we count 324 catalogues and 12290 patterns translated into English (UK/cm). 12290
We work hard to bring you the best knitting and crochet have to offer, inspiration and advice as well as great quality yarns at incredible prices! Would you like to use our patterns for other than personal use? You can read what you are allowed to do in the Copyright text at the bottom of all our patterns. Happy crafting!
Post a comment to pattern DROPS 184-12
We would love to hear what you have to say about this pattern!
If you want to leave a question, please make sure you select the correct category in the form below, to speed up the answering process. Required fields are marked *.