
Popular categories
Looking for a yarn?


Comments / Questions (241)
![]() JK wrote:
JK wrote:
I would need a precision please. When doing the shawl collar, do I do short rows all the time or just once? thank you
19.12.2025 - 18:29DROPS Design answered:
Hi JK, all the time.you repeat *1 ridge over all sts, 1 ridge over only the outermost 18-18-18-20-20-20 sts* until collar measures approx. 9-9-9-10-10-10 cm inside on the most narrow. Happy knitting!
25.12.2025 - 22:41
![]() Sabine wrote:
Sabine wrote:
Liebe Dropse :-) Ich bin über den Kragen erstaunt. Wenn ich alle 2 R 1 M zunehmen soll, ist die Zunahme sehr steil (teilweise auch auf den Fotos zu sehen). Bei eurem Modell scheinen die Zunahmen jedoch nicht alle 2 Reihen, sondern alle 4 Reihen zu erfolgen. Euer Schalkragen ist viel gerader - was mir wirklich viel besser gefällt! Funktioniert also auch eine Zunahme beim Kragen (Blendmaschen) auch mit einer Zunahme in jeder 4. Reihe 🤔?
30.11.2025 - 11:30DROPS Design answered:
Liebe Sabine, wenn Sie nur in jeder 4. Reihe zunehmen dann brauchen Sie länger bis alle Zunahmen fertig sind, dann wird der Kragen etwas anders aussehen. Hier wird es in jeder 2. Reihe zugenommen, so werden die Zunahmen nach 9 oder 10 (siehe Größe) Krausrippen fertig sein. Viel Spaß beim Stricken!
01.12.2025 - 09:22
![]() Margareta Andersson wrote:
Margareta Andersson wrote:
Jag stickar Jackson cardigan Drops 174-1. Har stickat resår. Är på nästa varv upprepar 17 ggr. Trodde jag skulle sticka3 rm, 2 m avigt tills, 3 am, 2 avigt tills över mitt bak. Om det är så behöver jag upprepa 21 ggr. Stämmer det? Mvh Margareta Andersson
16.11.2025 - 19:53DROPS Design answered:
Hej Margareta, du stickar * 3 rm, 2 am, 2 m aviga tills * 17 ggr :)
25.11.2025 - 14:46
![]() Betty wrote:
Betty wrote:
What am I missing on the first row after p row the numbers are working out k3p4 to mid back k3p7 can’t get it even for 271sts
24.10.2025 - 20:23DROPS Design answered:
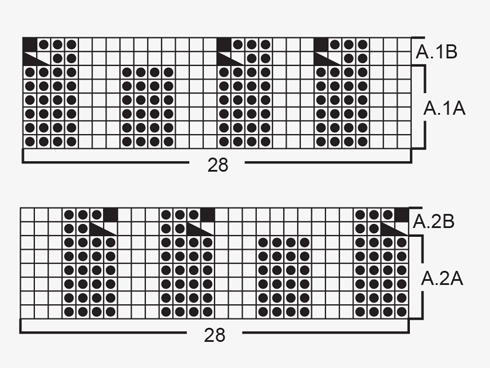
Hi Betty, 10 (band sts) + A.1.A + (*K3, P4*)x13 + 3K + 7P + (*K3, P4*)x13 + K3 + A.2A + 10 (band sts) = 10+28+91+3+7+91+3+28+10=271 sts. Happy knitting!
24.11.2025 - 10:27
![]() Lis wrote:
Lis wrote:
Mit spørgsmål bedes annulleret. Har læst opskrift forkert.
22.10.2025 - 22:42
![]() Lis wrote:
Lis wrote:
Jeg strikke str L og har 299 masker. Har strikket 10 kantmasker, herefter A1A over de næste 105 masker. (forstykke) Herefter står strik 3 ret og 7 vrang (midt bagpå)????? Efter hvad jeg kan se, er det siden - altså under det første ærme???? for herefter at fortsætte med A1A skal der ikke være 3 ret og 7 vrang efter ryg (under næste ærme) Herefter fortsættes A2A over de næste 105 masker og 10 kantmasker Håber beskrivelsen er forståelig
22.10.2025 - 16:03DROPS Design answered:
Hei Lis. Nei, du skal ikke strikke A.1A over 105 masker, du skal strikke A.1A (=28 masker) og så skal du strikke 3 rett+4 vrang 15 ganger = 105 masker. Da blir det slik: Først strikker du 10 stolpemasker, deretter A.1A (28 masker), så 3 rett, 4 vrang 15 ganger (= 105 masker), så 3 masker. Du har nå strikket over 10+28+105+3 = 146 masker. Så strikkes det 7 masker vrang, tenk deg at den 4. masken av disse 7 er midt masken bak. Så strikker du 3 rett + 4 vrang 15 ganger = 105 masker + 3 rett + A.2A (28 masker) + 10 stolpe masker = 146 masker. Da har du: 146 + 7 + 146 = 299 masker. mvh DROPS Design
03.11.2025 - 11:16
![]() Rosmarie wrote:
Rosmarie wrote:
Hallo,habe bei euch eine Anleitung für eine Herrenjacke bestellt und zwar drops 174-1 . Komme mit dem Diagramm nicht zurecht sind da nur die Hinreihen gezeichnet ,weil wenn ich die Rückreihen mache so wie im Diagramm beschrieben sind die Maschen im Bild genauso wie in der Hinreihen LG.Rosi
15.08.2025 - 20:04DROPS Design answered:
Liebe Rosmarie, alle Reihen sind in den Diagrammen gezeichnet, dh die Hin- sowie die Rückreihen, hier lesen Sie mehr. Viel Spaß beim Stricken!
18.08.2025 - 08:16
![]() Margret wrote:
Margret wrote:
Voordat de kraag begint brei je de verkorte toeren om de 10 naalden. Blijf je dit doen bij het meerderen en minderen van de kraag/hals of maak je dan verkorte toeren elke 2e naald? Deze vraag is ook gesteld op 24-12-2024 maar geen antwoord op te vinden.
01.08.2025 - 21:14DROPS Design answered:
Dag Margret,
Ja, dit blijf je doen, maar dan over alle ribbelsteken steken van de kraag en om de 10 naalden (anders wordt de kraag te wijd).
03.08.2025 - 09:52
![]() Jane Munk Vestergaard wrote:
Jane Munk Vestergaard wrote:
Kan simpelthen ikke få mønstret til at passe, efter indtagningen. Kan der være en fejl i mønstret, som ikke er rettet? Mvh. Jane
23.05.2025 - 14:01DROPS Design answered:
Hei Jane. Vi skal hjelpe deg så godt vi kan, men fint om du kan opplyse hvor i oppskriften du er (hvilken indtagning) og hvilken størrelse strikker du? mhvh DROPS Design
26.05.2025 - 11:47
![]() Abby wrote:
Abby wrote:
I'm very confused by the increase and decrease instructions for left front peice : increase 1 st for shawl collar towards mid front AT THE SAME TIME decrease 1 st for neckline towards mid front. If you have in crease and decrease in the same place, what is the point? What is the collar bit and what is the neck bit? Are they both in the banded bit?
13.05.2025 - 21:32DROPS Design answered:
Dear Abby, you will increase the number of stiches worked in garter stitch of the front band stitches to create the collar, but at the same time you will decrease the number of stitches worked in pattern (before front band stitches, seen from RS on left front piece / after front band stitches on right front piece), to shape V-neck. Increase by knitting twice the next to last stitch from RS on left front piece / the 2nd stitch from RS on right front piece; and decrease before the stitches worked in garter stitch (= front band stitches + new sts increased) on left front piece/after these stitches on right front piece. Happy knitting!
14.05.2025 - 07:48
|
|||||||||||||||||||
Jackson#jacksoncardigan |
|||||||||||||||||||
 |
 |
||||||||||||||||||
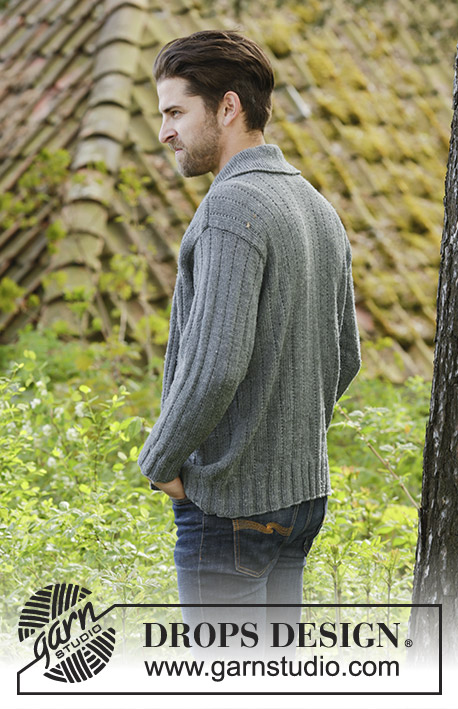
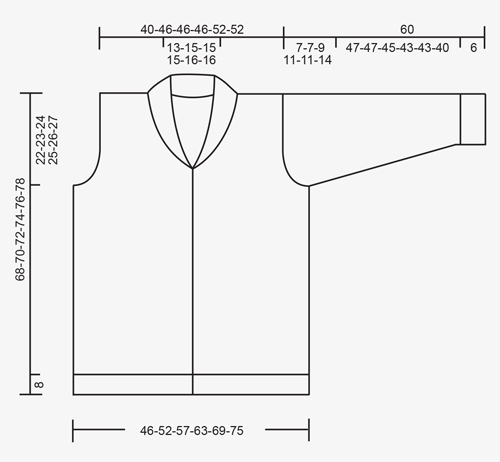
Knitted DROPS men’s jacket with simple cable, textured pattern and shawl collar in Karisma. Size: XS - XXXL.
DROPS 174-1 |
|||||||||||||||||||
|
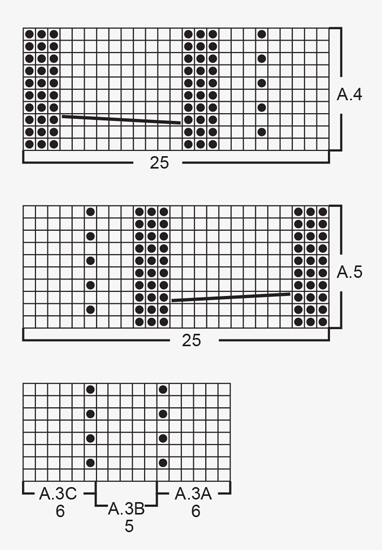
GARTER ST (back and forth): K all rows. 1 ridge = 2 rows K. PATTERN: See diagrams A.1 to A.5. The diagrams show all rows in pattern seen from RS. KNITTING TIP (applies to bands): To keep the bands from contracting vertically work short rows over bands as follows: * Beg mid front and K the outermost 10 sts (= band), turn piece, slip 1st st as if to K, tighten yarn and K the rest of row *, repeat from *-* after approx. every 10 rows in piece. INCREASE TIP-1 (applies to shawl collar): Inc 1 st in next to last st towards mid front by K in front and back loop of same st. INCREASE TIP-2 (applies to mid under sleeve): Inc 1 st on each side of st with marker mid under sleeve. Inc 1 st by making 1 YO, on next round work YO twisted to avoid holes. Work the inc sts in the pattern A.3. DECREASE TIP (applies to neckline): Dec inside 10 band sts in garter st + inc sts for shawl collar. All dec are done from RS! Dec as follows before band + collar: K 2 tog. Dec as follows after collar + band: Slip 1 st as if to K, K 1, psso. BUTTONHOLES: Dec for buttonholes from RS on left band (when garment is worn). 1 buttonhole = work 6 band sts as before, slip next to last st on right needle over outermost st on right needle, K 1, slip next to last st on right needle over outermost st on right needle (2 sts cast off), K the last 3 sts. On next row cast on 2 new sts over the cast off sts. Dec for buttonholes when piece measures: SIZE XS/S: 2, 12, 21, 31, 40 and 50 cm. SIZE M: 2, 12, 21, 31, 41 and 51 cm. Size L: 2, 12, 22, 32, 42 and 52 cm. SIZE XL: 3, 13, 23, 33, 43 and 53 cm. Size XXL: 3, 13, 23, 33, 43 and 54 cm. SIZE XXXL: 3, 13, 24, 34, 45 and 55 cm. ---------------------------------------------------------- JACKET: Worked back and forth on circular needle from mid front. BODY: Cast on 243-271-299-327-355-383 sts (incl 10 band sts in each side towards mid front) on circular needle size 3 mm with Karisma. P 1 row from WS. Work next row as follows from RS: 10 band sts in GARTER ST – see explanation above, A.1A (= 28 sts), * K 3, P 4 *, repeat from *-* 11-13-15-17-19-21 times in total, K 3, P 7 (= mid back), * K 3, P 4 *, repeat from *-* 11-13-15-17-19-21 times in total, K 3, A.2A (= 28 sts) and 10 band sts in garter st. Work back from WS with garter st over garter st, P over P, K over K. Continue rib until piece measures 8 cm, remember BUTTONHOLES on left band – see explanation above and KNITTING TIP. Work next row as follows from RS: 10 band sts as before, A.1B (= 28 sts dec to 25 sts), * K 3, P 2, P 2 tog *, repeat from *-* 11-13-15-17-19-21 times in total, K 3, P 2 tog, P 3, P 2 tog, * K 3, P 2, P 2 tog *, repeat from *-* 11-13-15-17-19-21 times in total, K 3, A.2B (= 28 sts dec to 25 sts) and 10 band sts as before = 213-237-261-285-309-333 sts. Work back from WS with garter st over garter st, P over P, K over K, (work A.1B and A.2B as shown in diagram). Switch to circular needle size 4 mm and work next row from RS as follows: 10 band sts as before, A.4 (= 25 sts), work A.3A over the next 72-84-96-108-120-132 sts (= 12-14-16-18-20-22 repetitions of 6 sts), work A.3B (= 5 sts), work A.3C over the next 66-78-90-102-114-126 sts (= 11-13-15-17-19-21 repetitions of 6 sts), work A.5 (= 25 sts) and finish with 10 band sts as before. Insert 1 marker in the 59th-65th-71st-77th-83rd-89th st in from each side (markers are in a st in garter st in the sides on body). Continue the pattern like this and move the markers upwards when working. REMEMBER THE KNITTING TENSION When piece measures 46-47-48-49-50-51 cm, cast off 7 sts in each side for armholes (i.e. cast off st with marker + 3 sts on each side of this). Then finish front and back piece separately. BACK PIECE: = 89-101-113-125-137-149 sts. Continue A.3 on back piece as before and cast off for armholes at beg of every row in each side as follows: Cast off 2 sts 0-0-2-5-5-7 times and 1 st 2-2-4-4-4-6 times = 85-97-97-97-109-109 sts. Continue to work until piece measures 66-68-70-72-74-76 cm. Now cast off the middle 23-27-27-27-29-29 sts for neck and finish each shoulder separately. Cast off 2 st on next row from neck = 29-33-33-33-38-38 sts remain on the shoulder. Continue to work until piece measures 68-70-72-74-76-78 cm and loosely cast off. Repeat on the other shoulder. LEFT FRONT PIECE: = 55-61-67-73-79-85 sts. Continue the pattern as before and cast off for armhole at beg of every row from the side as on back piece. AT THE SAME TIME when 2 rows have been worked after last buttonhole on band work 1 ridge (i.e. 2 rows K) over only the outermost 10 band sts towards mid front (do not work the other sts on row). Then work over all sts on row as before. AT THE SAME TIME inc 1 st for shawl collar towards mid front – READ INCREASE TIP-1. Inc like this every other row 18-18-18-20-20-20 times in total. AT THE SAME TIME when piece measures 52-53-54-55-56-57 cm (2 cm should now be worked after last buttonhole), dec 1 st for neckline towards mid front - READ DECREASE TIP. Dec like this every other row (i.e. every row from RS) a total of 10-12-12-12-13-13 times and then every 4th row (i.e. every other row from RS) 4 times in total in all sizes. After all inc and dec, there are 57-61-61-63-68-68 sts on needle. When piece measures 68-70-72-74-76-78 cm, cast off the outermost 29-33-33-33-38-38 sts on shoulder = 28-28-28-30-30-30 sts remain for collar. Continue back and forth in garter st over these sts as follows: * 1 ridge over all sts, 1 ridge over only the outermost 18-18-18-20-20-20 sts *, repeat from *-* until collar measures approx. 9-9-9-10-10-10 cm inside on the most narrow (collar measures approx. 18-18-18-20-20-20 cm at the edge on the widest). Cast off. RIGHT FRONT PIECE: Work as left but reversed. NOTE: Do not dec for buttonholes on right band. When working 1 ridge over only the outermost 10 sts towards mid front, adjust according to left front piece. SLEEVE: Cast on 56-56-63-63-63-70 sts on double pointed needles size 3 mm with Karisma. K 1 round. Work next round as follows: * K 3, P 4 *, repeat from *-* the entire round. When piece measures 6 cm, work next round as follows: * K 3, P 2, P 2 tog *, repeat from *-* the entire round = 48-48-54-54-54-60 sts. Switch to double pointed needles size 4 mm and work pattern in the round according to diagram A.3A. Insert 1 marker in last st on round (i.e. in st in garter st = mid under sleeve) and move the marker upwards. When piece measures 8 cm, inc 2 sts mid under sleeve - READ INCREASE TIP-2. Inc a total of 18-20-20-22-25-25 times in Size S: On every 7th round, in size M + L: On every 6th round, in size XL: On every 5th round, in size XXL: Alternately on every 4th and 5th round and size XXXL: On every 4th round = 84-88-94-98-104-110 sts. When piece measures 53-53-51-49-49-46 cm (NOTE: Shorter measurements in the larger sizes because of longer sleeve cap and wider shoulders) cast off the middle 7 sts under sleeve (cast off st with marker + 3 sts on each side of this). Now work sleeve cap back and forth on circular needle. Continue with the pattern while AT THE SAME TIME casting off at beg of every row in each side as follows: Cast off 3 sts 1 time, 2 sts 1-1-2-3-3-4 time and 1 st 2-2-3-3-3-6 times. Continue to cast off 2 sts in each side of piece until piece measures 59 cm in all sizes, cast off 3 sts 1 time in each side and cast off the remaining sts. Sleeve measures approx. 60 cm in all sizes. Knit another sleeve the same way. ASSEMBLY: Sew the shoulder seams. Sew collar tog mid back (make sure that seam is not visible when collar is folded down). Sew collar to neckline in the back of neck. Sew in sleeves. Sew the buttons on to the right band. |
|||||||||||||||||||
Diagram explanations |
|||||||||||||||||||
|
|||||||||||||||||||
 |
|||||||||||||||||||
 |
|||||||||||||||||||
 |
|||||||||||||||||||
Have you finished this pattern?Tag your pictures with #dropspattern #jacksoncardigan or submit them to the #dropsfan gallery. Do you need help with this pattern?You'll find 26 tutorial videos, a Comments/Questions area and more by visiting the pattern on garnstudio.com. © 1982-2026 DROPS Design A/S. We reserve all rights. This document, including all its sub-sections, has copyrights. Read more about what you can do with our patterns at the bottom of each pattern on our site. |
|||||||||||||||||||


With over 40 years in knitting and crochet design, DROPS Design offers one of the most extensive collections of free patterns on the internet - translated to 17 languages. As of today we count 324 catalogues and 12290 patterns translated into English (UK/cm). 12290
We work hard to bring you the best knitting and crochet have to offer, inspiration and advice as well as great quality yarns at incredible prices! Would you like to use our patterns for other than personal use? You can read what you are allowed to do in the Copyright text at the bottom of all our patterns. Happy crafting!
Post a comment to pattern DROPS 174-1
We would love to hear what you have to say about this pattern!
If you want to leave a question, please make sure you select the correct category in the form below, to speed up the answering process. Required fields are marked *.