
Popular categories
Looking for a yarn?


Comments / Questions (17)
![]() Sue wrote:
Sue wrote:
I have finally got around to trying this pattern and am a bit confused. Am I correct in thinking that what you say is the back is actually the front and vice versa. Because it seems that all the neckline shaping is on the back?
15.10.2025 - 16:01DROPS Design answered:
Hi Sue, The back piece has shaping on the neckline but less so than on the front piece. And the pieces are correctly labelled. Regards, Drops Team.
16.10.2025 - 06:44
![]() Sue wrote:
Sue wrote:
I don't understand what the sentence below means. I am using needles not circular needles. Work as follows (1st row = WS): 2 edge st in GARTER ST - see explanation above - in stocking st (i.e. P on 1st row) until 2 sts remain, 2 edge sts in garter st. Does it mean the first row is purl until you get to the end and the last 2 stitches are knit. Is edge stitch a different stitch. Why don't you just say knit and purl?
13.11.2024 - 17:32DROPS Design answered:
Hi Sue, The 2 edge stitches at the beginning and end of the row are knitted on all rows (garter stitch). The stitches in between are worked in stocking stitch (purled from the wrong side, knitted from the right side). Happy knitting!
14.11.2024 - 07:06
![]() Sue Feather wrote:
Sue Feather wrote:
I was originally going to try knitting Skipping stones but found the top down method really confusing. So looked at this one. I have already bought 9 balls of the Drops Andes yarn. I have done the tension test and it is only 8cm wide with 8cm and 11 stitches and 7cm deep with 15 rows. Usually my tension is exact - what am I doing wrong?
21.10.2024 - 18:26DROPS Design answered:
Dear Mrs Feather, you can try with needles another material, it might help, or you can also try to block your swatch to check if you get correct measurements after blocking or then try with larger needles, remember correct tension will let you get the correct finished measurements matching chart for your size. Happy knitting!
22.10.2024 - 09:00
![]() Béatrice Lassalle wrote:
Béatrice Lassalle wrote:
Bonjour Pour le montage, je ne comprends pas bien : vous dites : "monter les manches. Faire la couture sous les manches....." Je dois monter les manches alors qu'elles ne sont pas fermées ? Ensuite, je les ferme en commençant par les poignets ? Je fais comme en couture pour "monter les manches" ? je mets le devant et le dos à plat ? Merci de votre réponse qui j'espère m'aidera.
19.01.2022 - 14:03DROPS Design answered:
Bonjour Mme Lasalle, faites les coutures dans l'ordre qui vous paraît le plus simple - cette vidéo par exemple montre comment coudre une manche (tricotée en rond, donc déjà assemblée par exemple) le long des emmanchures. Pour coudre les manches, vous pouvez effectivement commencer à partir des poignets; si vos manches sont déjà montées le long des emmanchures, prolongez la couture le long du côté jusqu'à la fente du bas. Bon assemblage!
19.01.2022 - 17:09
![]() Vinciane wrote:
Vinciane wrote:
Bonjour, je ne comprends pas pourquoi il faut tricoter avec des aiguilles circulaires alors qu'on ne tricote pas en rond... quelqu'un peut-il m'éclairer ? Merci.
04.11.2020 - 21:20DROPS Design answered:
Bonjour Vinciane, bien volontiers: on utilise des aiguilles circulaires pour avoir suffisamment de place pour y loger toutes les mailles, vous pouvez utiliser dans ces cas là des aiguilles droites, mais pensez à toujours bien vérifier votre tension, car les mailles seront plus serrées - vous trouverez plus d'infos ici. Bon tricot!
05.11.2020 - 11:12
![]() Michelle wrote:
Michelle wrote:
I love this! I have never knitted a sweater. Can this be made without the side slits? If yes, what adjustments would need to be made? Is this a good pattern for my first sweater? Thank you!
04.11.2020 - 17:27DROPS Design answered:
Hi Michelle! The pattern is easy, give it a try:) This can be made without the side slits, sew underarm seam and side seam, to the end (without 14 cm vent). Happy knitting!
04.11.2020 - 18:46
![]() Gabrielle wrote:
Gabrielle wrote:
I prefer patterns that are worked back and forth (not in the round). How can I search for / find these patterns? Would it be possible to have a separate category for patterns worked back and forth?
24.04.2018 - 10:25DROPS Design answered:
Dear Gabrielle, there is no search for patterns worked back and forth, this one eg is worked back and forth in several parts sewn tog at the end. And you'll find here how to adapt a pattern into straight needles. Happy knitting!
24.04.2018 - 14:24
![]() Pia Neergaard wrote:
Pia Neergaard wrote:
Spørgsmål har noget garn der har 70% alpaca 20 % uld og 10 % acrylic og vil gerne strikke denne opskrift , garnet hedder bbb alpaka 70
16.04.2018 - 22:26DROPS Design answered:
Hei Pia. For å finne ut om garnet kan byttes i det du har må du sjekke strikkefastheten. Denne oppskriften strikkes med garn fra garngruppe E, evt 2 tråder med garngruppe C, og strikkefasthet 11 m x 15 p glstrikk på 10 x 10 cm. Du kan lese mer om garngruppene våre her: link Innholdet i garnet kan påvirke plaggets egenskaper (hvordan det kjennes ut, hvordan det vaskes osv), så det blir opp til deg. God fornøyelse
17.04.2018 - 10:12
![]() Els-Marie Edelfeldt wrote:
Els-Marie Edelfeldt wrote:
Stickar tröja mönster 171/19 "Juniper"... när ärmen beskrivs står det: Öka vart 6:e varv 5 ggr (min stl. M) OCH vart 4:e varv 7 går. Hur skall jag tolka det????? Växlar jag eller tar jag det efter varandra? Otydlig beskrivning tycker jag....Mvh Els-Marie
23.11.2017 - 13:49DROPS Design answered:
Du ska först öka 5 gånger på vart 6:e varv och därefter öka 7 gånger på vart 4:e varv.
23.11.2017 - 14:25
![]() Trisha Cochrane wrote:
Trisha Cochrane wrote:
Hi there - I have just started knitting the Juniper with Drops Andes wool. But the bottom edge is already rolling up - and since there is no ribbing I am not clear how it will stay straight as in the photo? Could you help? Thank you :)
24.02.2017 - 09:05DROPS Design answered:
Dear Mrs Cochrane, you can block the jumper before wearing it. Happy knitting!
24.02.2017 - 09:54
|
|
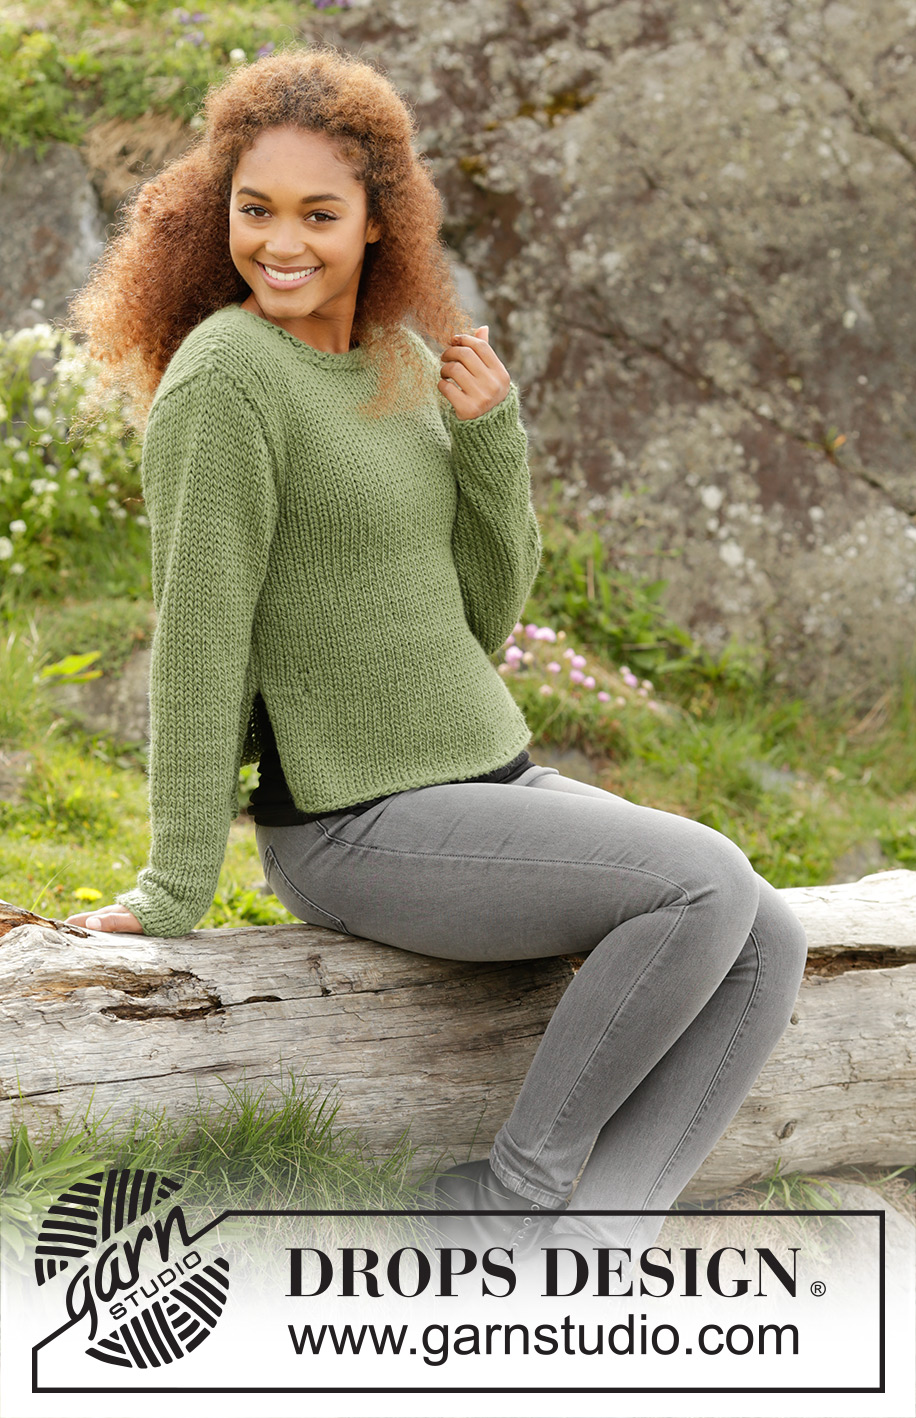
Juniper#junipersweater |
|
|
|
|
Knitted DROPS jumper with vents in the side and roll edge in ”Andes”. Size: S - XXXL.
DROPS 171-19 |
|
|
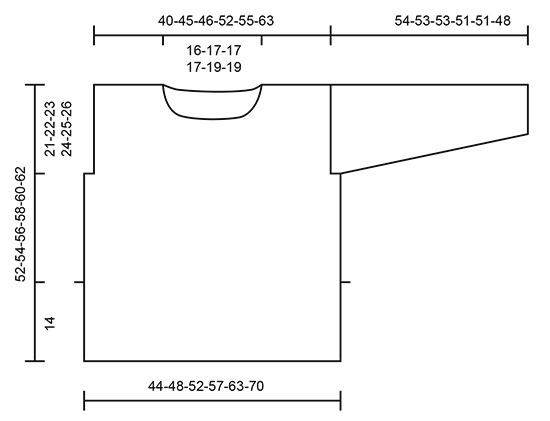
GARTER ST (worked in the round): 1 ridge = 2 rounds. * K 1 round and P 1 round *, repeat from *-*. GARTER ST (back and forth): K all rows. 1 ridge = 2 rows K. INCREASE TIP: Inc 1 st by making a YO. On next row K YO twisted to avoid holes. ---------------------------------------------------------- BACK PIECE: Worked back and forth on circular needle. Cast on 48-53-57-63-69-77 sts on circular needle size 8 mm with Andes. Work as follows (1st row = WS): 2 edge st in GARTER ST - see explanation above - in stocking st (i.e. P on 1st row) until 2 sts remain, 2 edge sts in garter st. Continue back and forth like this until piece measures 14 cm. At the end of the next 2 rows cast on 1 new st in each side = 50-55-59-65-71-79 sts. Now continue in stocking st and 1 edge st in garter st in each side. REMEMBER THE KNITTING TENSION When piece measures 31-32-33-34-35-36 cm, cast off 2-2-3-3-4-4 sts in each side for armhole = 46-51-53-59-63-71 sts. When piece measures 50-52-54-56-58-60 cm, cast off the middle 16-17-17-17-19-19 sts for neck and finish each shoulder separately. Continue cast off 1 sts on the next row from the neckline =14-16-17-20-21-25 sts for shoulder. Cast off when piece measures 52-54-56-58-60-62 cm. Work the other shoulder the same way. FRONT PIECE: Cast on and work as back piece. When piece measures 45-46-48-49-51-52 cm, slip the middle 8-9-9-9-11-11 sts on a stitch holder for neck and finish each shoulder separately. Continue to cast off for neck on every row from neck as follows: Cast off 2 sts 2 times and 1 st 1 time = 14-16-17-20-21-25 sts remain for shoulder. Cast off when piece measures 52-54-56-58-60-62 cm. Work the other shoulder the same way. SLEEVE: Worked back and forth on circular needle. Cast on 26-27-28-30-31-32 sts (incl 1 edge st in each side) on circular needle size 8 mm with Andes. Work as follows (1st row = WS): 1 edge st in garter st, in stocking st (i.e. P on 1st row) until 1 st remains, 1 edge st in garter st. When piece measures 10-10-10-12-12-9 cm, inc 1 st in each side of piece - READ INCREASE TIP! Inc like this every 6th row 11-5-5-5-3-0 times, then every 4th row 0-7-7-7-10-14 times (= 11-12-12-12-13-14 times in total) = 48-51-52-54-57-60 sts. Cast off when piece measures 54-53-53-51-51-48 cm (shorter measurements in the larger sizes because of wider shoulders). Knit another sleeve the same way. ASSEMBLY: Sew the shoulder seams tog. Sew sleeves in body. Sew underarm seam and side seam, start at the cuff and work down to sts cast on in the side on body (= 14 cm vent). Sew inside 1 edge st in garter st in each side. Repeat in the other side. NECK EDGE: Worked in the round on circular needle. Pick up from RS approx. 50-60 sts (incl sts on stitch holder) on circular needle size 7 mm with Andes. Work 2 ridges. Cast off. |
|
 |
|
Have you finished this pattern?Tag your pictures with #dropspattern #junipersweater or submit them to the #dropsfan gallery. Do you need help with this pattern?You'll find 25 tutorial videos, a Comments/Questions area and more by visiting the pattern on garnstudio.com. © 1982-2026 DROPS Design A/S. We reserve all rights. This document, including all its sub-sections, has copyrights. Read more about what you can do with our patterns at the bottom of each pattern on our site. |


With over 40 years in knitting and crochet design, DROPS Design offers one of the most extensive collections of free patterns on the internet - translated to 17 languages. As of today we count 324 catalogues and 12290 patterns translated into English (UK/cm). 12290
We work hard to bring you the best knitting and crochet have to offer, inspiration and advice as well as great quality yarns at incredible prices! Would you like to use our patterns for other than personal use? You can read what you are allowed to do in the Copyright text at the bottom of all our patterns. Happy crafting!
Post a comment to pattern DROPS 171-19
We would love to hear what you have to say about this pattern!
If you want to leave a question, please make sure you select the correct category in the form below, to speed up the answering process. Required fields are marked *.