
Popular categories
Looking for a yarn?


Comments / Questions (110)
![]() Sarang wrote:
Sarang wrote:
Oh my god!!I did the short rows!!When someone asks me if I understand drops pattern,I always say,I read the steps over and over multiple times because I learned How to knit by myself just watching tutorials so I have to pay attention to any detail and this is what I have been doing going on a year or so since I found Garnstudio , and YES I do understand drops pattern😍Gracias por tan lindos patrones😘
27.08.2021 - 09:04
![]() Sarang wrote:
Sarang wrote:
Hi!!I am knitting this pattern and I have to say that I am doing well up to now, in fact I have already finished the lace part I just still continue reading the short rows part I do not feel confidence at all but as always I love drops pattern...thank you so much❤️❤️
27.08.2021 - 01:19
![]() Helle wrote:
Helle wrote:
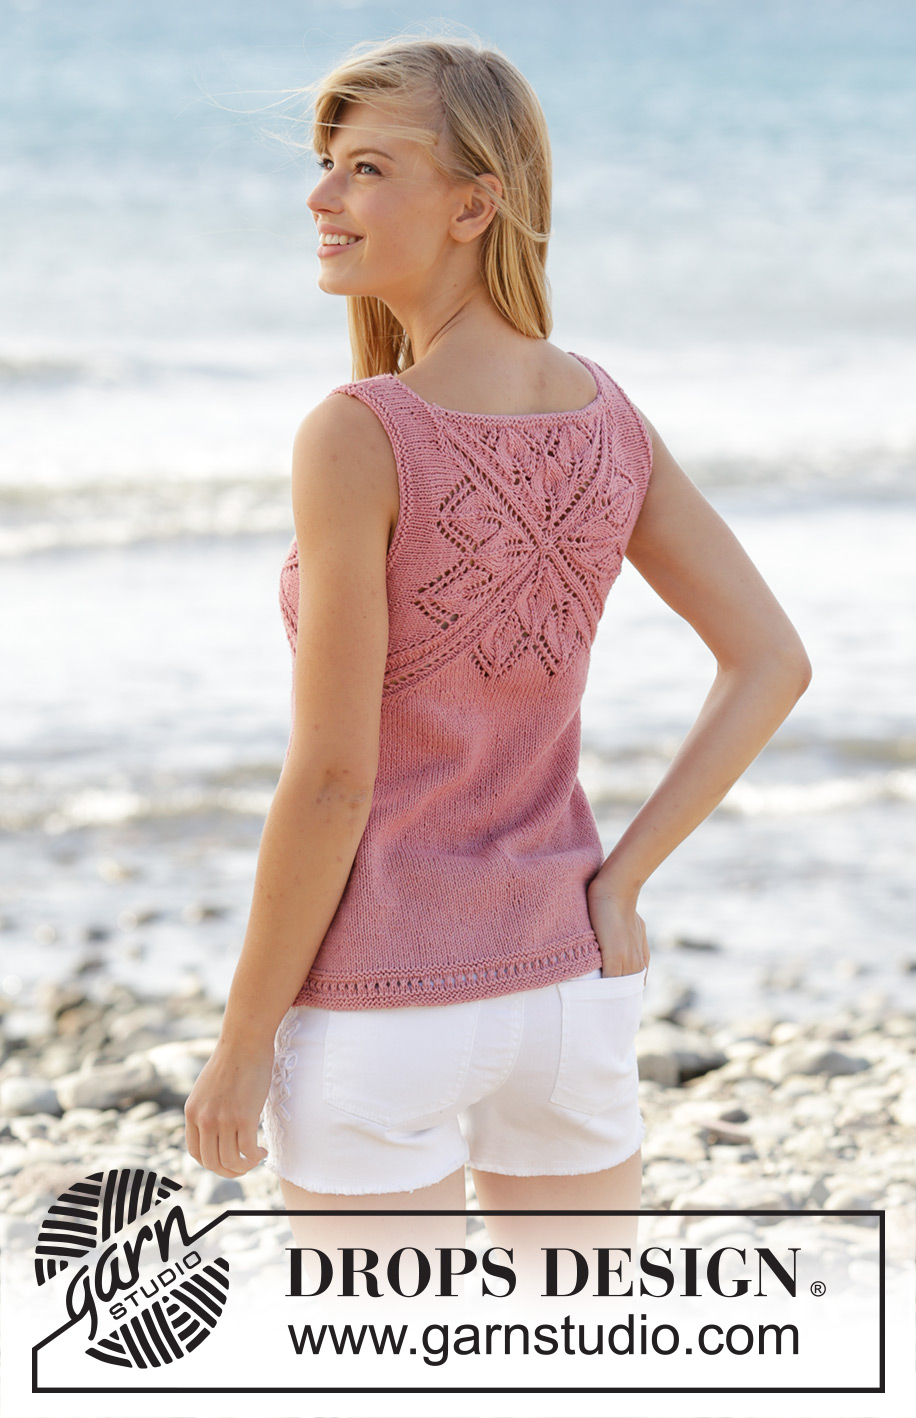
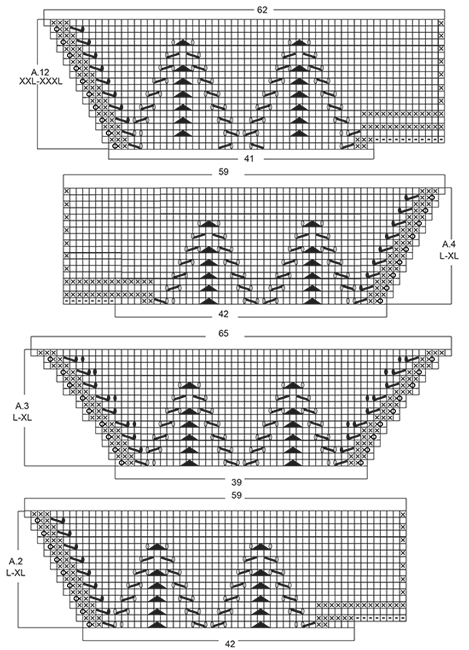
Jeg er ved at strikke model Belle og er kommet til ryggen, hvor der skal strikkes i 3 mønstre sammen.Der er i alt 156 masker på pinden. Strik 39 A12 og 39 A3 og 39 A13 og de sidste 39 masker sættes på en tråd til hals, samtidig med at der tages 11 masker op efter A13. Jeg forstår godt de 11 masker i hver side til skulder men ikke de 13 masker til hals. Jeg kan simpelthen ikke se for mig hvordan de kan komme til at danne hals.
05.07.2021 - 07:38DROPS Design answered:
Hej Helle, du kan se det midterste billede hvordan det kommer til at se ud bagpå. God fornøjelse!
12.07.2021 - 15:00
![]() Nelly Diette wrote:
Nelly Diette wrote:
Merci beaucoup. Juste une autre précision : on laisse les 26 mailles des rangs raccourcis en attente jusqu'à ce qu'on ait tricoté 2 fois A5-A8 ?
20.05.2021 - 16:08DROPS Design answered:
Bonjour Mme Diette, non vous tricotez d'abord 2 rangs de A.5 à A.8 puis tricotez les rangs raccourcis en laissant 26 m de chaque côté, puis, à la fin du rang suivant, tricotez toutes les mailles jusqu'à la fin du rang, tournez et tricotez toutes les mailles jusqu'à la fin du rang, votre rang suivant commence à partir de l'épaule tricotez la suite sous TOUTES LES TAILLES (= 3 rangs avec 42 m point mousse de chaque côté et les autres mailles comme avant). Bon tricot!
21.05.2021 - 07:27
![]() Diette Nelly wrote:
Diette Nelly wrote:
Pour la taille S et le devant : on continue à tricoter en rangs raccourcis jusqu'à ce que A5 à A8 aient été tricotés 2 fois en hauteur en tournant toujours au bout de 26 mailles? On arrête les rangs raccourcis à ce moment là et on tricote ensuite le dernier rang sur l'envers pour que le rang suivant commence à partir de l'épaule. Merci de votre réponse
20.05.2021 - 08:20DROPS Design answered:
Bonjour Mme Diette, en S on ne doit tricoter que 2 rangs raccourcis = jusqu'à ce qu'il reste 26 mailles de chaque côté, après avoir tricoté 2 rangs de A.5 -A.8. Passez ensuite au paragraphe TOUTES LES TAILLES. Bon tricot!
20.05.2021 - 08:22
![]() Brenda wrote:
Brenda wrote:
I'm knitting size M. I do the short rows while I do the A5 to A8, but when I'm finished the short rows I still have one more time to do A5 to A8. Is that correct? The setup is 26 less each side and that happens on the last two rows of A7 and A8 right? Love the pattern but am finding it complicated.
10.07.2020 - 20:21DROPS Design answered:
Dear Brenda, work first until 26 sts remain on each side, then 6 sts more 2 times (in size M), ie work until 32 sts remain on each side then work until 38 sts remain on each side (= 6 short rows in total, 3 on each side, and 38 sts remain on each side), then work 1 row from RS over all sts (to the end of the row), turn and work next row from WS to the end of the row (on the other side, all sts are now worked) - at the same time, continue diagrams as before. Happy knitting!
13.07.2020 - 08:38
![]() J J wrote:
J J wrote:
Thanks for answering my question. SO I do the short row on thrid row of the Charts A5-8... In size small It sounds like I do the charts A5-A8 twice.... But only do the short row on the first round of these charts. Is that correct. I ask becuase after this step the pattern reads for all sizes: "After the short rows have been worked, work last row from WS, so that next row beg from shoulder." What bind off do you recommend?
25.06.2020 - 20:29DROPS Design answered:
Dear JJ, after the short rows you continue working as before + garter stitch over the first/last 42 sts and work 3 ridges over these stitches then cast off the first/last stitch - make just sure cast off stitches are not too tight. Happy knitting!
26.06.2020 - 07:29
![]() JJ wrote:
JJ wrote:
I am making the size small tank top. When creating the short rows, are the short rows done on each round of A5-A8 or just the first time through the chart? Upon completion are there two short rows on each side or just one?
25.06.2020 - 10:42DROPS Design answered:
Dear JJ, in size S you work only the short rows on each side: on 3rd row wiht A.5/A.8 work as before until 26 stts remain, turn and work until 26 sts remain. turn and work next row from RS as before to the end of row, turn and work next row as before tothe end of row. Happy knitting!
25.06.2020 - 17:02
![]() Sandra Armand wrote:
Sandra Armand wrote:
Bonjour. Pour le dos qd on a tricoté A1 1× on a 156m. Puis vs ns demandez de continuer A12 39m, A3 39m, A13 39m . Il reste 39 m on les tricote comment ?
13.06.2020 - 11:04DROPS Design answered:
Bonjour Mme Armand, les 39 dernières mailles sont glissées en attente pour la bordure d'encolure (comme pour le pull). On tricote ensuite 2 côtes mousse sur ces mailles - cf BORDURE D'ENCOLURE. Bon tricot!
15.06.2020 - 08:32
![]() Anne Sofie Frydensberg Mouret wrote:
Anne Sofie Frydensberg Mouret wrote:
"Gentag A.5 til A.8 over de 6 m på hver side af hvert mærke totalt 2-3-2-3-4-5 gange, derefter repeteres de første 0-0-6-4-4-4 p af A.5 til A.8 1 gang til." Betyder det, at jeg skal strikke diagram 5-8 I alt to gange i højden (strikker s)? Og kun forkortede pinde 1 gang frem og 1 gang tilbage? På forhånd tak
13.03.2020 - 16:31DROPS Design answered:
Hej Anne Sofie, Ja det stemmer som du skriver her :)
19.03.2020 - 13:31
|
|||||||||||||||||||||||||||||||
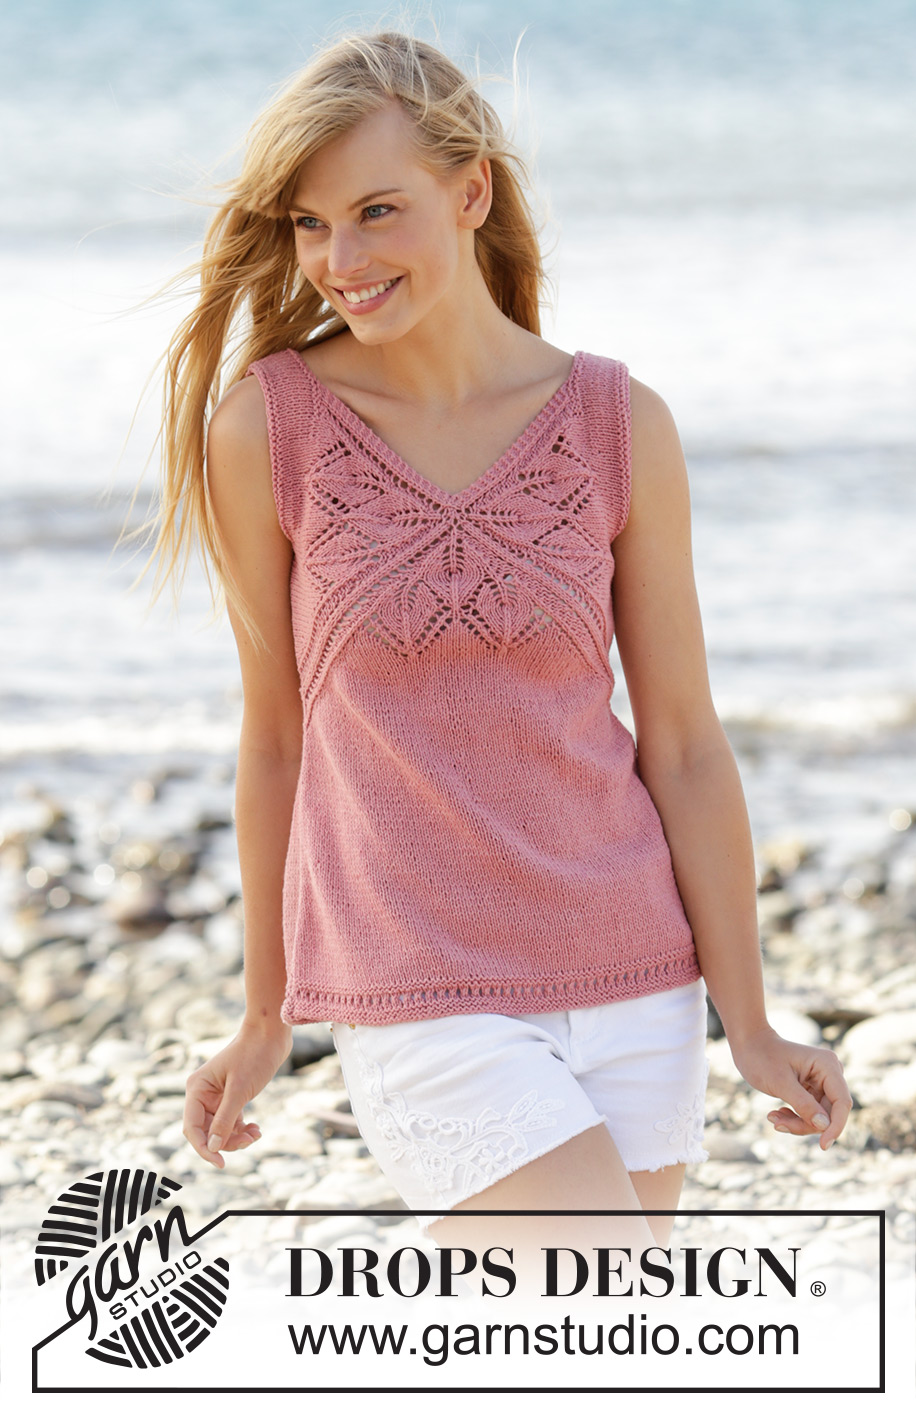
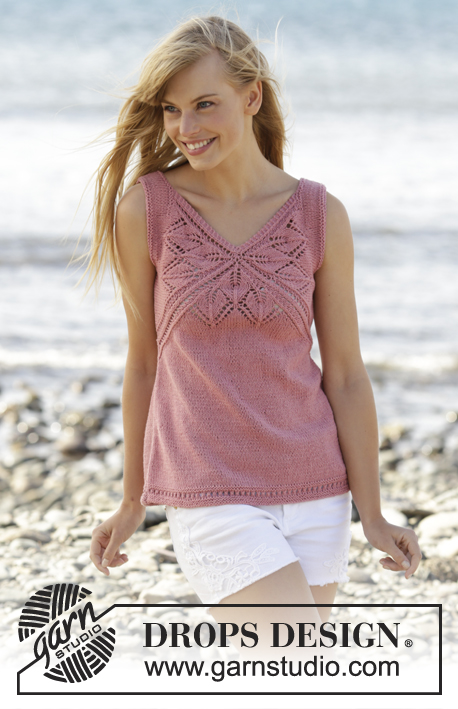
Butterfly Heart Top#butterflyhearttop |
|||||||||||||||||||||||||||||||
 |
 |
||||||||||||||||||||||||||||||
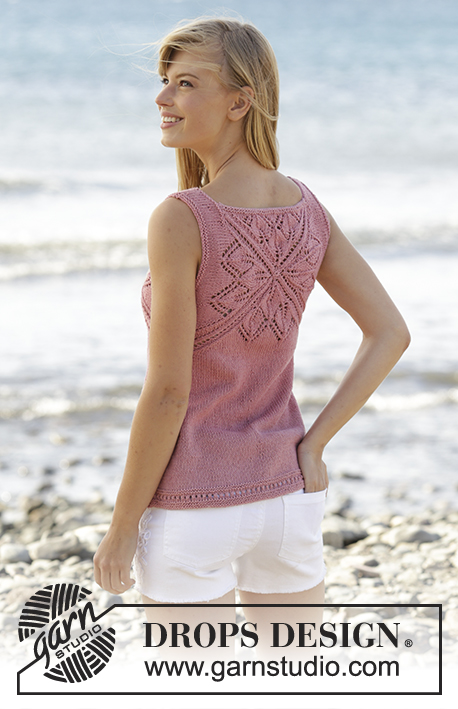
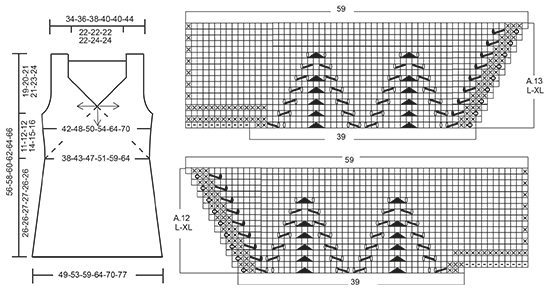
Knitted DROPS top with lace pattern and V-neck in ”Belle”. Worked top down. Size: S - XXXL.
DROPS 170-4 |
|||||||||||||||||||||||||||||||
|
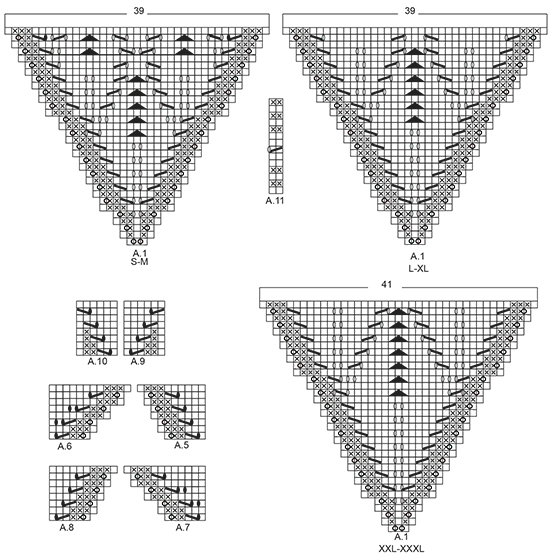
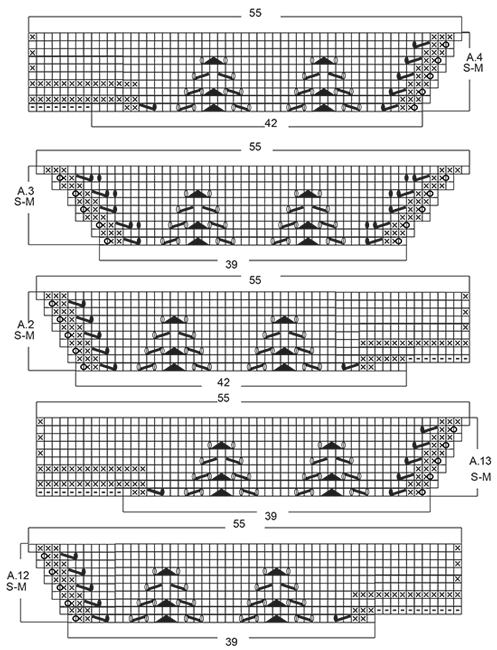
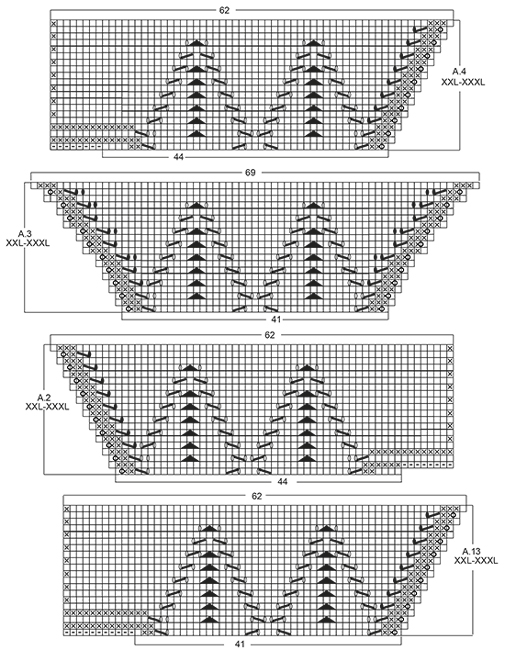
GARTER ST (back and forth): K all rows. 1 ridge = 2 rows K. PATTERN: See diagrams A.1 to A.13. The diagrams show all rows in pattern seen from RS. See diagram for correct size. SHORT ROWS: When turning in short rows, slip first st as if to K. Tighten thread and make sure to avoid big holes. INCREASE TIP: All inc are done from RS. Inc 1 st by making 1 YO, on next row P YO twisted to avoid holes. ---------------------------------------------------------- TOP: Work from the middle of V-neck and out in 3 triangles on front piece and 4 triangles on back piece, then work downwards. FRONT PIECE: Work back and forth from neck and down. Cast on 8 sts on circular needle size 4 mm with Belle. K 1 row. On next row inc as follows: * K 1, 1 YO *, repeat from *-* until 1 st remains and finish with K 1 = 15 sts on needle. Work next row as follows (from RS): Work YOs from previous row twisted, they should not make holes. Work 3 sts in GARTER ST - see explanation above, A.1, insert 1st marker, A.1, insert 2nd marker, A.1 (= repeat A.1 3 times in total on row), finish with 3 sts in garter st. REMEMBER THE KNITTING TENSION When A.1 has been worked 1 time vertically, there are 123-123-123-123-129-129 sts on needle. Piece measures approx. 11-11-11-11-12-12 cm from cast-on edge. Work next row as follows from RS: Work A.2 over the first 42-42-42-42-44-44 sts, A.3 over the next 39-39-39-39-41-41 sts and A.4 over the last 42-42-42-42-44-44 sts, after A.4 cast on 8 sts at the end of row for shoulder (see diagram). Work A.4 to A.2 on next row, after A.2 cast on 8 sts at the end of row for shoulder (see diagram). When A.2 to A.4 have been worked 1 time vertically, there are 165-165-183-183-193-193 sts on needle. Piece measures approx. 15-15-17-17-19-19 cm from cast-on edge. READ ALL OF THE FOLLOWING SECTION BEFORE CONTINUING! WORK PATTERN AS BEFORE WHILE AT THE SAME TIME WORKING SHORT ROWS IN EACH SIDE OF PIECE. PATTERN: Work next row as follows from RS: Work 1 st in garter st, 48-48-52-52-55-55 sts in stocking st, work A.5 over the next 6 sts, (marker), A.6 over the next 6 sts, 43-43-53-53-57-57 sts in stocking st, A.7 over the next 6 sts, (marker), A.8 over the next 6 sts, 48-48-52-52-55-55 sts in stocking st, finish with 1 st in garter st. Repeat A.5 to A.8 over the 6 sts on each side of each marker 2-3-2-3-4-5 times in total, then repeat the first 0-0-6-4-4-4 rows of A.5 to A.8 1 more times. SHORT ROWS: AT THE SAME TIME when 2-6-0-2-0-6 rows of A.5 to A.8 have been worked, work SHORT ROWS - see explanation above - in each side of piece as follows: Work until 26-26-24-23-18-18 sts remain on row (work A.5 to A.8 as before), turn and work until 26-26-24-23-18-18 sts remain, turn piece. Then work short rows in the different sizes as follows: SIZE M: Work 6 sts less for every turn 2 times in each side of piece. SIZE L-XL: Work 6 sts less for every turn 1-2 times in each side of piece, then work 4 sts less on every turn 3-2 times in each side of piece. SIZE XXL-XXXL: Work 6 sts less for every turn 1-1 time in each side of piece, then work 4 sts less for every turn 4-4 times in each side of piece, then work 2 sts less on every turn 4-5 times in each side of piece. ALL SIZES: When the short rows have been worked, work last row from WS, so that next row beg from shoulder. Then work over all sts from RS as follows: Work in garter st over the first 42-44-46-48-50-52 sts AT THE SAME TIME inc 0-2-4-4-6-6 sts evenly, work as before (i.e. A.5 to A.8 and stocking st) until 42-44-46-48-50-52 sts remain, work in garter st over the last sts AT THE SAME TIME inc 0-2-4-4-6-6 sts evenly (= 42-46-50-52-56-58 sts in garter st in each side of piece). Work 3 rows in garter st over the outermost 42-46-50-52-56-58 sts in garter st in each side of piece, pattern and stocking st over the remaining sts. On next row from WS work as follows: Cast off with K over the first 40-44-48-50-54-56 sts for armhole, work 2 sts in garter st, work in stocking st and pattern as before until 42-46-50-52-56-58 sts remain, 2 sts in garter st, cast off with K over the last 40-44-48-50-54-56 sts for armhole. Cut the yarn. 8-8-8-12-12-12 rows of A.5 to A.8 remain. Beg next row from RS. Continue to work in garter st over the first and last 2 sts in each side of piece. When A.5 to A.8 have been worked, there are 23-25-26-27-32-34 sts before 1st marker, 79-91-99-107-123-135 sts between 1st and 2nd marker and 23-25-26-27-32-34 sts after 2nd marker = 125-141-151-161-187-203 sts in total on row. Piece measures approx. 21-24-25-27-32-35 cm on the widest measured from cast-on edge. Insert 1 marker in piece, NOW MEASURE PIECE FROM HERE. On next row from RS loosely cast off the first 22-24-25-26-31-33 sts with K, work 1 edge st in garter st, (marker), work A.9 over the first 6 sts after marker, stocking st over the next 67-79-87-95-111-123 sts, A.10 over the last 6 sts before second marker, (marker), 1 edge st in garter st, loosely cast off the last 22-24-25-26-31-33 sts = 81-93-101-109-125-137 sts remain on needle. Cut the yarn. Work next row from WS over the remaining sts as follows: 1 edge st in garter st, A.10 as before, stocking st over the next 67-79-87-95-111-123 sts, A.9 as before, 1 edge st in garter st. When A.9 and A.10 have been worked 1 time vertically, continue in stocking st with 1 edge st in garter st in each side of piece. When piece measures 3 cm from marker, inc 1 st in each side of piece inside 1 edge st (= 2 sts inc) - READ INCREASE TIP. Repeat inc every 1½-1½-1½-1-1-1 cm 12-10-12-14-12-13 times in total = 105-113-125-137-149-163 sts on needle. When piece measures 23-23-24-24-23-23 cm from marker (piece measures 53-55-57-59-61-63 cm in total from shoulder), adjust so that next row is from RS, switch to circular needle size 3.5 mm. Work next row from RS as follows: Work 1 edge st in garter st, work A.11 (= 2 sts) until 2 sts remain, work first st in A.11, finish with 1 edge st in garter st. On row with holes (i.e. 7th row) work next to last st K. Cast off when A.11 has been worked 1 time vertically. Piece measures 56-58-60-62-64-66 cm in total from shoulder. BACK PIECE: Piece is first worked in the round, then worked as front piece. Cast on 6 sts on double pointed needles size 4 mm with Belle, switch to circular needle when needed. K 1 row. On next row inc as follows: * K 1, 1 YO *, repeat from *-* = 12 sts on row, K YOs twisted on next row, they should not make holes. Work A.1 4 times in total, insert 1 marker between each A.1 (= 4 markers). When A.1 has been worked 1 time vertically, there are 156-156-156-156-164-164 sts on needle. Continue as follows: A.12 over the first 39-39-39-39-41-41 sts, work A.3 over the next 39-39-39-39-41-41 sts and A.13 over the last 39-39-39-39-41-41 sts, slip the remaining sts on a stitch holder for neck edge (= 39-39-39-39-41-41 sts), after A.13 cast on 11 sts at the end of row for shoulder (see diagram). Then work back and forth on needle. Work A.13/A.3/A.12 on next row, after A.12 cast on 11 sts at the end of row for shoulder (see diagram). When A.12/A.3/A.13 have been worked 1 time vertically, there are 165-165-183-183-193-193 sts on needle. Piece measures approx. 15-15-17-17-19-19 cm from cast-on edge. Now continue back piece as front piece. NECK EDGE: Worked back and forth on needle. Slip sts from stitch holder for neck edge on back piece back on circular needle size 3.5 mm. Work 2 ridges. Fasten ridges where sts were cast on for shoulder. Fasten off. ASSEMBLY: Sew the side seams inside 1 edge st in garter st. Sew shoulder seams inside 1 edge st in garter st. Tighten tog the middle (i.e. cast-on edge) on both front and back piece. |
|||||||||||||||||||||||||||||||
Diagram explanations |
|||||||||||||||||||||||||||||||
|
|||||||||||||||||||||||||||||||
 |
|||||||||||||||||||||||||||||||
 |
|||||||||||||||||||||||||||||||
 |
|||||||||||||||||||||||||||||||
 |
|||||||||||||||||||||||||||||||
 |
|||||||||||||||||||||||||||||||
Have you finished this pattern?Tag your pictures with #dropspattern #butterflyhearttop or submit them to the #dropsfan gallery. Do you need help with this pattern?You'll find 23 tutorial videos, a Comments/Questions area and more by visiting the pattern on garnstudio.com. © 1982-2026 DROPS Design A/S. We reserve all rights. This document, including all its sub-sections, has copyrights. Read more about what you can do with our patterns at the bottom of each pattern on our site. |
|||||||||||||||||||||||||||||||


With over 40 years in knitting and crochet design, DROPS Design offers one of the most extensive collections of free patterns on the internet - translated to 17 languages. As of today we count 324 catalogues and 12291 patterns translated into English (UK/cm). 12291
We work hard to bring you the best knitting and crochet have to offer, inspiration and advice as well as great quality yarns at incredible prices! Would you like to use our patterns for other than personal use? You can read what you are allowed to do in the Copyright text at the bottom of all our patterns. Happy crafting!
Post a comment to pattern DROPS 170-4
We would love to hear what you have to say about this pattern!
If you want to leave a question, please make sure you select the correct category in the form below, to speed up the answering process. Required fields are marked *.