
Popular categories
Looking for a yarn?


Comments / Questions (35)
![]() Birgit wrote:
Birgit wrote:
Ich verstehe die Korrektur am Rückenteil nicht!?
23.07.2018 - 09:27DROPS Design answered:
Liebe Birgit, die Korrektur ist jetzt (seit 22.05.2015) im Text enthalten, dh einige Informationen für Rückenteil fehlten, aber jetzt ist alles in Ordnung. Viel Spaß beim stricken!
23.07.2018 - 12:45
![]() Anna wrote:
Anna wrote:
Grazie. Siete gentili e bravi!
20.07.2018 - 21:27
![]() Chantal wrote:
Chantal wrote:
Bonjour, Ma taille française est 40. Quelle taille dois-je tricoter pour que le rendu soit comme sur la photo: médium ou large ? Merci d'avance pour votre réponse.
24.11.2016 - 10:42DROPS Design answered:
Bonjour Chantal, vous trouverez dans le schéma toutes les mesures pour chaque taille, prises à plat, d'un côté à l'autre. Comparez-les à un vêtement similaire dont vous aimez la forme pour trouver la taille à suivre. Plus d'infos ici. Bon tricot!
24.11.2016 - 11:52
![]() Nathalie wrote:
Nathalie wrote:
Bonjour, Je souhaite faire ce modèle avec la laine DROPS Bomull-Lin ou Paris (groupe de fils C). Dois-je additionner les quantités de laine du modèle pour avoir le nombre de g qu'il me faut (à savoir 300 + 125 g - pour une taille M soit 425 g). J'attend votre réponse pour passer ma commande... Merci d'avance Cordialement
01.10.2016 - 00:10DROPS Design answered:
Bonjour Nathalie, vous pouvez effectivement utiliser un fil du groupe C en alternative, cliquez ici pour savoir comment calculer la quantité totale de fil dont vous aurez ainsi besoin dans votre taille. Bon tricot!
03.10.2016 - 08:48
![]() Angela wrote:
Angela wrote:
Buonasera, avrei bisogno dl vostro aiuto: il simbolo losanga = 1 m gettata tra 2 m cosa significa: 1 m. nuova + 1 gettata + 1 m. ? E quando ci sono due losanghe, significa: 1m. nuova + 1 gettata + 1m. + 1 gettata + 1 m. ? Quindi : 1 losanga = 2 m. piu' una gettata 2 losanghe = 3 m. + 1 gettata ? Grazie infinitamente.
01.02.2016 - 16:20DROPS Design answered:
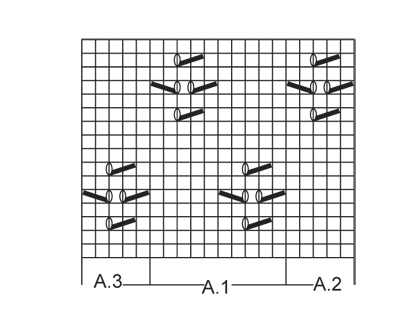
Buonasera Angela, il simbolo con il pallino tra 2 quadratini è semplicemente un gettato: non ci sono nuove m da avviare, deve semplicemente lavorare il motivo così com'è: ad esempio il 3° ferro del motivo verrà lavorato come 6 m dir, 2 m insieme a dir, 1 gettato, 8 m dir, 2 m insieme a dir, 1 gettato, 2 m dir. Ci riscriva se ha altri dubbi. Buon lavoro!
01.02.2016 - 22:17
![]() Angela wrote:
Angela wrote:
Scusatemi per le mie domande ma mi è venuto un dubbio: questo modello richiede i ferri circolari ma se usassi i ferri normali, invece, dato che non devo lavorare in tondo ? Grazie ancora per la vostra disponibilità.
01.02.2016 - 00:31DROPS Design answered:
Buongiorno Angela. Il capo viene lavorato avanti e indietro sui ferri. Può usare i ferri dritti al posto dei ferri circolari senza dover modificare le spiegazioni date. Buon lavoro!
01.02.2016 - 09:00
![]() Angela Biagi wrote:
Angela Biagi wrote:
Buongiorno gentilissimi, dopo 8 cm. di lavoro (dietro) devo avviare 1 m. vivagno e da 90 maglie diventano 92. Quindi dovrei crescere 1 m. all'inizio e 1 alla fine ? Non è specificato. Grazie molte e buona giornata. Angela
29.01.2016 - 11:24DROPS Design answered:
Buongiorno Angela, si, dopo 8 cm deve avviare una nuova m di vivagno per lato come indicato, le m passano da 90 a 92 e le m di vivagno da 5 a 6. Ci riscriva se ha altri dubbi. Buon lavoro!
29.01.2016 - 11:32
![]() Angela Biagi wrote:
Angela Biagi wrote:
Gentile staff, non riesco a capire questa fase del lavoro: "sul diritto del lavoro: 5 m a punto legaccio, 2-0-4-3-3-3 m a maglia rasata": Potete aiutarmi ? Molte grazie.
29.12.2015 - 10:40DROPS Design answered:
Buongiorno Angela. Dopo le coste a legaccio, con il diritto del lavoro rivolto verso di lei, deve lavorare 5 m a legaccio (quindi a dir sia sul diritto del lavoro che sul rovescio), poi, a seconda della taglia: 2-0-4-3-3-3 m a maglia rasata (quindi a dir sul diritto del lavoro e a rov sul rovescio del lavoro). Ci riscriva se ancora in difficoltà. Buon lavoro!
29.12.2015 - 16:13
![]() Angela Biagi wrote:
Angela Biagi wrote:
Gentile staff, ho acquistato il materiale per realizzare questa maglia ma ho un problema con le dimensioni. La tg. 48/50 a cosa corrisponderebbe ad una L o ad una XL ? Molte grazie.
18.11.2015 - 00:40DROPS Design answered:
Buongiorno Angela. Alla fine delle spiegazioni, trova il grafico con le misure espresse in cm. Confrontando queste misure con un suo capo analogo riesce ad individuare la taglia corretta da lavorare. Buon lavoro!
18.11.2015 - 09:16
![]() DROPS Design wrote:
DROPS Design wrote:
Hej Maja. Vi har lavet en rettelse, saa det passer.
22.05.2015 - 11:33
|
|||||||||||||
Sweet Bliss#sweetblisssweater |
|||||||||||||
 |
 |
||||||||||||
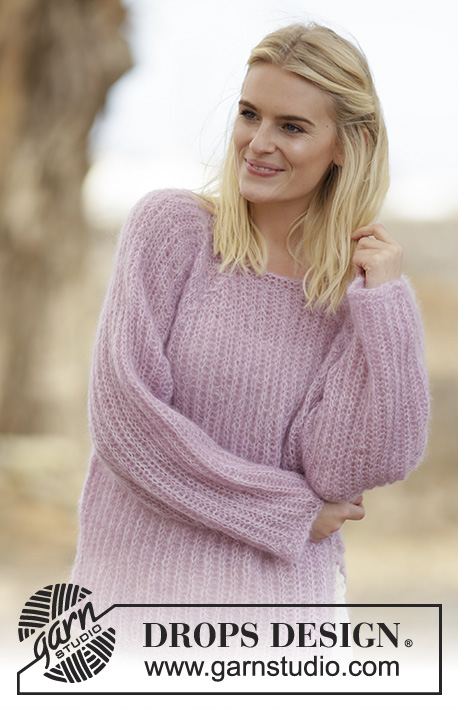
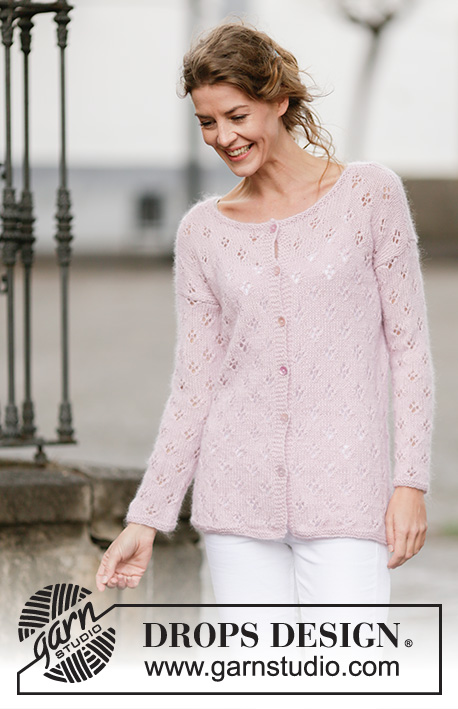
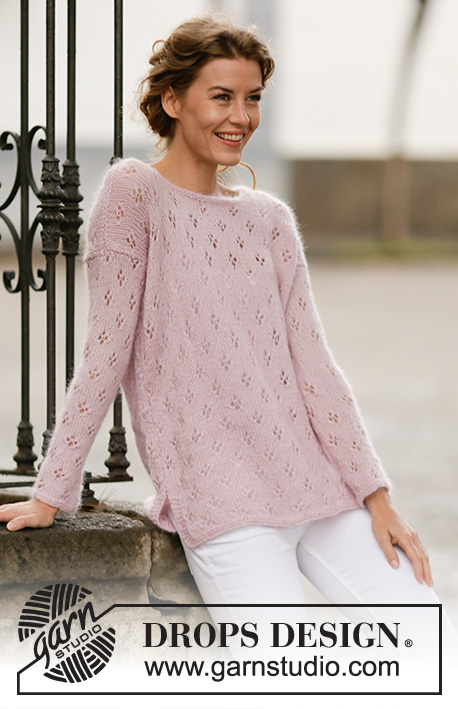
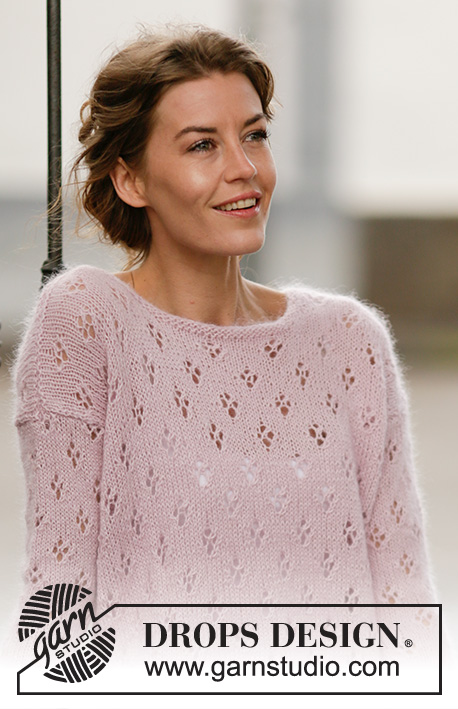
Knitted DROPS jumper with lace pattern and vent in ”Alpaca” and ”Kid-Silk”. Size: S - XXXL.
DROPS 160-12 |
|||||||||||||
|
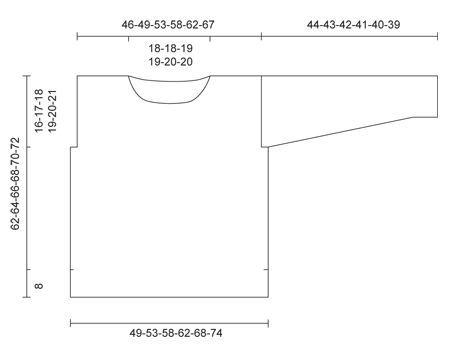
GARTER ST (back and forth): K all rows. 1 ridge = 2 rows K. GARTER ST (in the round on circular needle): 1 ridge = 2 rounds. K 1 round and P 1 round. PATTERN: See diagrams A.1 to A.3. The diagrams show all rows in pattern seen from RS. ---------------------------------------------------------- BACK PIECE: Worked back and forth on circular needle. Cast on 84-90-98-106-116-126 sts on circular needle size 4.5 mm with 1 strand of each yarn (= 2 strands). Work 2 ridges in GARTER ST - see explanation above. Switch to circular needle size 5 mm. Work as follows from RS: 5 sts in garter st, 2-0-4-3-3-3 sts in stocking st, A.1 (= 10 sts) 7-8-8-9-10-11 times in total, 2-0-4-3-3-3 sts in stocking st, 5 sts in garter st. Continue the pattern like this. When piece measures 8 cm, cast on 1 edge st in each side of piece at the end of the next 2 rows = 86-92-100-108-118-128 sts. Work edge sts in garter st until finished measurements. REMEMBER THE KNITTING TENSION Work 1 more ridge over the 6 sts in garter st (incl edge st) in each side of piece, work the remaining sts as before. Then work as follows from RS: 1 edge st in garter st, 2-0-4-3-3-3 sts in stocking st, A.2 (= 5 sts), A.1 as before until 8-6-10-9-9-9 sts remain, A.3 (= 5 sts), 2-0-4-3-3-3 sts in stocking st and 1 edge st in garter st. NOTE: Adjust A.2 and A.3 according to A.1. Continue pattern like this. When piece measures 46-47-48-49-50-51 cm, cast off 4-4-5-5-6-7 sts for armhole at beg of the next 2 rows = 78-84-90-98-106-114 sts on needle. Continue with pattern over the remaining sts, work the sts that do not fit A.1-A.3 in stocking st. When piece measures 58-60-62-64-66-68 cm, cast off for neck as follows: Cast off the middle 30-30-32-32-34-34 sts (= 24-27-29-33-36-40 sts on each side) and finish each shoulder separately. Continue to cast off 1 st on next row from neck = 23-26-28-32-35-39 sts remain on the shoulder. Work A.1 and in stocking st over the sts that do not fit A.1 until piece measures 61-63-65-67-69-71 cm, adjust to finish nicely with lace pattern. Work 1 ridge in garter st over all sts. Cast off. Work the other shoulder the same way. FRONT PIECE: Cast on and work as back piece. When piece measures 50-52-54-54-56-58 cm, dec for neck as follows: Cast off the middle 20 sts (= 29-32-35-39-43-47 sts on each side) and finish each shoulder separately. Then cast off 2 sts on every row from neck 1 time, then 1 st on every row from neck 4-4-5-5-6-6 times in total = 23-26-28-32-35-39 sts remain on shoulder. Work A.1 and in stocking st over the sts that do not fit A.1 until piece measures 61-63-65-67-69-71 cm, adjust to finish nicely with lace pattern. Work 1 ridge in garter st over all sts. Cast off. Work the other shoulder the same way. SLEEVE: Worked back and forth on circular needle. Cast on 42-42-46-46-48-48 sts (incl 1 edge st in each side of piece) on circular needle size 4.5 mm with 1 strand of each yarn (= 2 strands). Work 2 ridges. Switch to circular needle size 5 mm. Then work as follows from RS: 1 edge st in garter st, 0-0-2-2-3-3 sts in stocking st, A.1 until 1-1-3-3-4-4 sts remain (= 4 times in total), 0-0-2-2-3-3 sts in stocking st, 1 edge st in garter st. Work edge sts in garter st until finished measurements. Continue pattern like this. When piece measures 8 cm, inc 1 st inside 1 edge st in each side of piece, repeat inc every 5½-4-4-3½-3-2½ cm 6-8-8-9-10-12 more times = 56-60-64-66-70-74 sts. Work the inc sts in the pattern. Continue with pattern until piece measures 44-43-42-41-40-39 cm (shorter measurements in the larger sizes because of longer sleeve cap and wider shoulders). Loosely cast off. Work the other sleeve the same way. ASSEMBLY: Sew shoulder seams inside cast-off edges. Sew in sleeves and sew sleeve seams. Sew side seam from armhole down to where 1 edge st was cast on in each side of piece (= approx. 8 cm vent) inside 1 edge st. NECK EDGE: Worked in the round on circular needle. Pick up from RS approx. 80-92 sts along the neck on circular needle size 4.5 mm with 1 strand of each yarn (= 2 strands). Work 4 rounds in GARTER ST - see explanation above. Cast off. |
|||||||||||||
Diagram explanations |
|||||||||||||
|
|||||||||||||
 |
|||||||||||||
 |
|||||||||||||
Have you finished this pattern?Tag your pictures with #dropspattern #sweetblisssweater or submit them to the #dropsfan gallery. Do you need help with this pattern?You'll find 26 tutorial videos, a Comments/Questions area and more by visiting the pattern on garnstudio.com. © 1982-2026 DROPS Design A/S. We reserve all rights. This document, including all its sub-sections, has copyrights. Read more about what you can do with our patterns at the bottom of each pattern on our site. |
|||||||||||||


With over 40 years in knitting and crochet design, DROPS Design offers one of the most extensive collections of free patterns on the internet - translated to 17 languages. As of today we count 324 catalogues and 12290 patterns translated into English (UK/cm). 12290
We work hard to bring you the best knitting and crochet have to offer, inspiration and advice as well as great quality yarns at incredible prices! Would you like to use our patterns for other than personal use? You can read what you are allowed to do in the Copyright text at the bottom of all our patterns. Happy crafting!
Post a comment to pattern DROPS 160-12
We would love to hear what you have to say about this pattern!
If you want to leave a question, please make sure you select the correct category in the form below, to speed up the answering process. Required fields are marked *.