
Popular categories
Looking for a yarn?


Comments / Questions (286)
![]() Hellingrath wrote:
Hellingrath wrote:
Habe eine Frage zum Diagramm vom Vorderteil(M2).Ist das nur die Vorderseite und die Rückreihen werden gestrickt wie sie erscheinen?
04.06.2012 - 16:39DROPS Design answered:
Im Diagramm sind alle Reihen dargestellt.
05.06.2012 - 11:15
![]() Hellingrath wrote:
Hellingrath wrote:
Hallo,habe eine Frage zum Rückenteil.Ist es richtig,daß zwischen den Zöpfen linke Maschen sind?
03.06.2012 - 20:11DROPS Design answered:
Ja, siehe Diagramm: li. auf der Vorderseite und re. auf der Rückseite
05.06.2012 - 11:13
![]() Elli wrote:
Elli wrote:
Aivan ihana! Selkakappale ja hihat valmiina ja juuri aloitan etukappaletta. Beautiful! I've got the back and the sleeves finished and am now starting the front.
17.05.2012 - 18:37
![]() Hanneke wrote:
Hanneke wrote:
Vest in oranjerood gebreid: prachtig patroon. Heeft mij na de kleine projectjes van onze 4 kinderen weer aan het breien voor mezelf gekregen. Wel drie houtje-touwtje knopen en aangehaakte lussen op gezet. Een speld trekt zo door de wol heen.
06.05.2012 - 19:38
![]() Lisbeth wrote:
Lisbeth wrote:
Når man skal tage ud til krave er det så efter retmaskerne og før mønster M2 eller skal det gøres i begge sider? også i kravesiden midt for?
04.05.2012 - 10:21DROPS Design answered:
Hej, du tager ud idenfor M.2 hvilket da er mellem retmaskerne og M.2. De nye masker strikkes i retstrik. God fornøjelse!
04.05.2012 - 15:14
![]() Lisbeth wrote:
Lisbeth wrote:
Nu er jeg igang med højre forstykke/kantstykke. Læses diagrammet altid fra højre mod venstre eller læses det skiftevis fra venstre og højre? Der står tydeligt beskrevet 1.pind ret fra vrangen og næste pind med 8r, 2vr, osv Så skal jeg igang med 3 pind og dermed mønster som beskrevet i M.2, men det passer slet ikke med mine ret og vrang masker. Hvad gør jeg forkert?
19.04.2012 - 09:25DROPS Design answered:
Jo, første pind i diagrammet strikker du fra vrangen og du starter nederst i venstre hjørne. Det bliver da fra vrangen således: 1.p vrangen: 2vr, 6r, 2vr, 2r, 6vr, 10r Næste p strikkes fra retsiden fra højre hjørne således: 10vr, 6r, 2vr, 2r, 6vr, 2r. 3.pind strikker du som første og 4.p strikkes således: 8r, 2vr, 6r med snoning, 2vr, 2r, 6vr, 2 r. Tænk på at du skal have diagrammet helt ind mod midt foran. God fornøjelse!
19.04.2012 - 09:39
![]() Hella wrote:
Hella wrote:
Leider muß ich nochmal nachfragen, diesmal beim Vorderteil, verstehe ich es so richtig: ich stricke das Muster bis zu den angegebenen 23 cm, dann beginne ich von der Musterseite her mit den verkürzten Reihen und wiederhole diese dann 5 Mal. (richtig??) Die Zunahme für für den Kragen ab 23 cm (Umschlag nach M2), ist das ab Beginn der gesamten Arbeit, oder ab Beendigung der verkürzten Reihen gemeint?? Auf dem Foto kann ich überhaupt keine verkürzten Reihen sehen...
09.04.2012 - 22:59DROPS Design answered:
Nach den verkürzten Reihen wird eine Markierung eingezogen. Von dort wird die Arbeit weitergemmesen (die M. für den Kragen werden 23 cm nach der Markierung angefangen).
10.04.2012 - 08:57
![]() Hella wrote:
Hella wrote:
Ok prima, danke für die Antwort. Ich habe immer in der Mitte beim Zopfmuster gemessen, ist das richtig, oder hätte ich an den schmaleren Seiten bei den Krausrippen messen müssen? Danke!
05.03.2012 - 22:46DROPS Design answered:
Nein, in der Mitte der Arbeit messen ist schon richtig.
07.03.2012 - 09:37
![]() Hella wrote:
Hella wrote:
Hallo, ich stricke die Jacke mit Drops Alaska und Nadeln Nr. 5, nach beenden des großen Zopfmusters habe ich aber nur 30 cm Länge, lt. Anleitung sollen es aber über 40 cm sein. Stricke ich nun einfach mit den 3 Zopfsträngen weiter? Einen Fehler habe ich nicht gefunden. Wo wird die Länge gemessen, am Rand oder in der Mitte, da die Ränder durch die Krausrippen noch kürzer sind... Danke!
03.03.2012 - 00:51DROPS Design answered:
M1 C (die letzten 8 R.) werden bis zur fertigen Länge wiederholt.
05.03.2012 - 10:45
![]() Simone wrote:
Simone wrote:
Besten Dank für die schnelle Antwort.
09.02.2012 - 09:24
|
|||||||||||||||||||||||||
Chocolate Passion#chocolatepassioncardigan |
|||||||||||||||||||||||||
 |
 |
||||||||||||||||||||||||
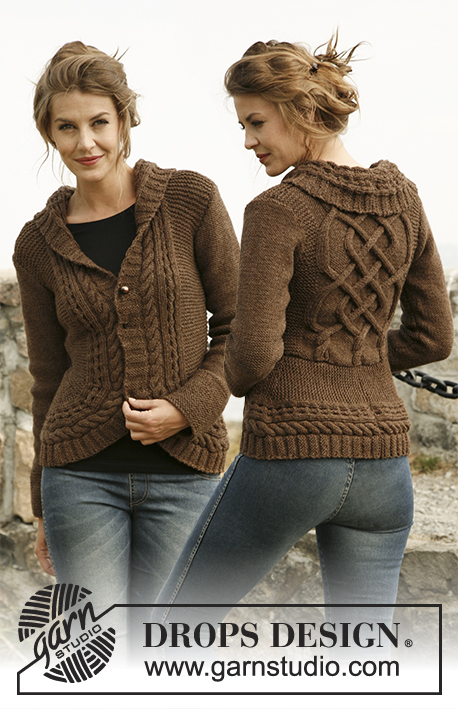
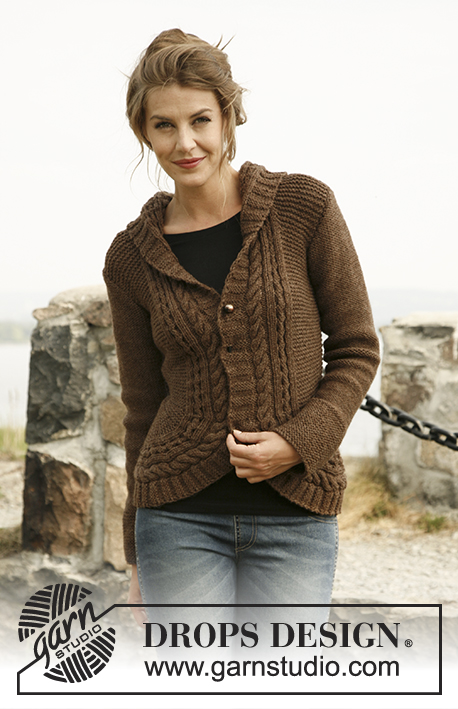
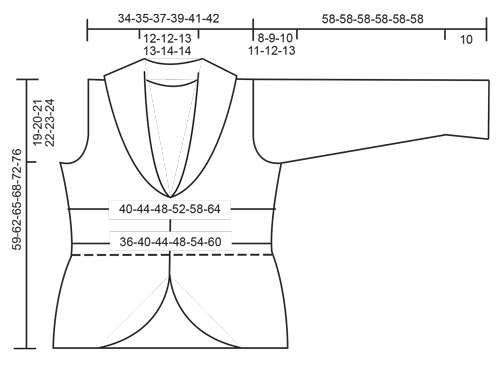
Knitted DROPS jacket with rounded front pieces and cables in ”Alaska”. Size: S to XXXL.
DROPS 134-55 |
|||||||||||||||||||||||||
|
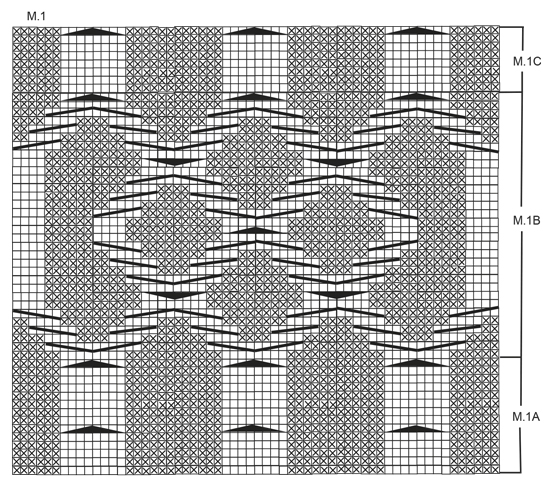
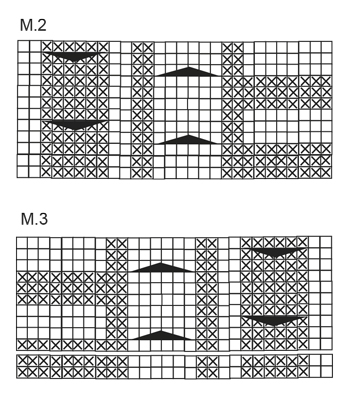
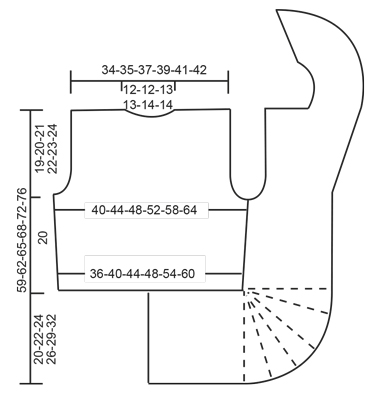
GARTER ST (back and forth on needle): K all rows. PATTERN: See diagrams M.1, M.2 and M.3 – diagrams show pattern from RS. 1st row in diagrams is worked from WS. DECREASE TIP (applies to armhole): Dec from RS inside 3 sts. Dec AFTER 3 sts as follows: K 2 tog. Dec BEFORE 3 sts as follows: K 2 twisted tog. SHORT ROWS: Work short rows on front piece to get a rounded edge on the piece. Also work short rows between the cables in the pattern. This can make it difficult to read the diagram - make sure to work 5 rows between every cable. Work short rows as follows: Row 1 and 2: Work 10 sts in all sizes, turn and work back. Row 3 and 4: Work 16 sts in all sizes, turn and work back. Row 5 and 6: Work 20 sts in all sizes, turn and work back. Row 7 and 8: Work 26 sts in all sizes, turn and work back. Row 9 and 10: Work 28-28-29-29-31-30 sts, turn and work back. Row 11 and 12: Work 31-31-32-32-34-33 sts, turn and work back. Continue to work 3 sts more on every turn until all sts have been worked. 18-20-22-24-26-30 rows in garter st have been worked at the outer side and 2 rows in garter st have been worked on the inside. Repeat from 1st row a total of 5 times. The rounded edge now measures approx. 28-31-34-37-41-46 cm on the outer side and 3 cm on the inside. -------------------------------------------------------- -------------------------------------------------------- BACK PIECE: Worked back and forth on needle. Cast on 68-74-80-88-98-108 sts on needle size 5 mm with Alaska. K 1 row from WS. Work next row from RS as follows: 10-13-16-20-25-30 sts in GARTER ST – see explanation above, * P 6, K 2 sts in each of the next 4 sts (= K 8), P 6 *, repeat from *-* a total of 3 times, 10-13-16-20-25-30 sts in garter st. There are now 80-86-92-100-110-120 sts on needle. Then work as follows (1st row = WS): 10-13-16-20-25-30 sts in garter st, diagram M.1A (= 60 sts) and 10-13-16-20-25-30 sts in garter st. After M.1A continue with M.1B 2 times vertically, then repeat M.1C until finished measurements. REMEMBER THE KNITTING TENSION! When piece measures 7 cm, inc 1 st in each side by working 1 YO inside outermost st – on next row K YO twisted (i.e. work in back loop of st instead of front) to avoid holes. Repeat inc every 5 cm a total of 3 times = 86-92-98-106-116-126 sts. When piece measures 20 cm in all sizes, cast off 3-4-5-6-7-8 sts at beg of the next 2 rows for armholes. Then dec on every row from RS: 1 st 2-3-4-5-7-10 times in each side – SEE DECREASE TIP! There are now 76-78-80-84-88-90 sts on needle. When piece measures 37-38-39-41-42-43 cm, work the 8 sts over the middle cable tog 2 by 2. On next row cast off the middle 20-20-22-22-24-24 sts for neck = 26-27-27-29-30-31 sts remaining on each shoulder. Then work 3 rows over these as before, on next row work the 8 sts over the cable tog 2 by 2 = 22-23-23-25-26-27 sts. Then cast off all sts on next row. Piece measures approx. 39-40-41-42-43-44 cm vertically. RIGHT EDGE PIECE/FRONT PIECE: All measurements should be done on the shorter side! Cast on 34-37-41-44-49-54 sts on needle size 5 mm with Alaska. K 1 row from WS. Work next row from RS as follows: K 8, P 2, K 2 sts in each of the next 3 sts (= K 6), P 2, K 2, P 2 sts in each of the next 3 sts (= P 6), K 2, 12-15-19-22-27-32 sts in garter st. There are now 40-43-47-50-55-60 sts on needle. Continue like this: 12-15-19-22-27-32 sts in garter st and diagram M.2 (= 28 sts) – 1st row = WS. When piece measures 17-19-21-23-26-29 cm, work SHORT ROWS - see explanation above – 1st row is worked from RS! When all short rows have been worked, insert a marker. NOW MEASURE PIECE FROM HERE! Continue to work over all sts as before. When piece measures 7 cm, beg to inc in the side as on back piece (i.e. the shorter side). After all inc, there are 43-46-50-53-58-63 sts on needle. When piece measures 20 cm, cast off and dec for armhole in the side as on back piece (cast off and dec in same side as inc). At the same time when piece measures 23 cm, beg to inc for collar. Inc inside diagram M.2 by making 1 YO, on next row K YO twisted (i.e. work in back loop of st instead of front) to avoid holes. Repeat inc every other row a total of 10-10-12-13-14-14 times - work inc sts in garter st. After all cast offs and dec for armhole and inc for collar, there are 48-49-53-55-58-59 sts on needle. When piece measures approx. 39-40-41-42-43-44 cm, adjust so that next row is worked from WS, cast off the first 22-23-23-25-26-27 sts in garter st = 26-26-30-30-32-32 sts remain on needle for collar. Continue to work as follows: * Work 2 rows over all sts, work 2 row only over the outermost 18-18-20-20-26-26 sts *, repeat from *-* until collar measures approx. 7-7-7½-7½-8-8 cm on the inside (it will then be twice as long at the outer side). On next row work all 6 sts over both cables tog 2 by 2 = 20-20-24-24-26-26 sts. Cast off. LEFT EDGE PIECE/FRONT PIECE: Cast on and work as right front piece but reversed. I.e. work 2nd row as follows: 12-15-19-22-27-32 sts in garter st, K 2, P 2 sts in each of the next 3 sts (= P 6), K 2, P 2, K 2 sts in each of the next 3 sts (= K 6), P 2 and K 8. There are now 40-43-47-50-55-60 sts on needle. Continue as follows (1st row = WS): Diagram M.3 (= 28 sts), 12-15-19-22-27-32 sts in garter st. Continue as on right front piece but when working short rows work 1st row from WS! Cast off shoulder sts from RS to avoid cutting the thread to work the collar. SLEEVE: Worked back and forth on needle. Cast on 42-42-44-44-46-48 sts (incl 1 edge st in each side) on needle size 5 mm with Alaska. Work 10 cm in garter st. Continue in stocking st. When piece measures 15 cm, inc 1 st in each side. Repeat inc every 4-3-3-2½-2-2 cm a total of 9-11-11-13-14-15 times = 60-64-66-70-74-78 sts. When piece measures 50-49-48-47-46-45 cm (shorter measurements in the larger sizes because of longer sleeve cap and broader shoulder width) cast off for sleeve cap at beg of every row in each side: 3 sts 1 time, 2 sts 3 times and 1 st 1-2-3-4-5-6 times, then cast off 2 sts in each side until sleeve measures 57 cm, then cast off 3 sts 1 time in each side, cast off remaining sts. The piece measures approx. 58 cm. ASSEMBLY: Sew cast on edge on edge pieces tog mid back - sew edge to edge to avoid a chunky seam. Then sew edge to bottom edge of back piece. Sew the shoulder seams. Sew side seam edge to edge. Sew the collar tog mid back and sew it to the neckline. Sew sleeve seams inside 1 edge st - sew so that WS is on the outside and sew sleeves on body. Close jacket with a pin or similar. |
|||||||||||||||||||||||||
Diagram explanations |
|||||||||||||||||||||||||
|
|||||||||||||||||||||||||
 |
|||||||||||||||||||||||||
 |
|||||||||||||||||||||||||
 |
|||||||||||||||||||||||||
 |
|||||||||||||||||||||||||
Have you finished this pattern?Tag your pictures with #dropspattern #chocolatepassioncardigan or submit them to the #dropsfan gallery. Do you need help with this pattern?You'll find 22 tutorial videos, a Comments/Questions area and more by visiting the pattern on garnstudio.com. © 1982-2026 DROPS Design A/S. We reserve all rights. This document, including all its sub-sections, has copyrights. Read more about what you can do with our patterns at the bottom of each pattern on our site. |
|||||||||||||||||||||||||


With over 40 years in knitting and crochet design, DROPS Design offers one of the most extensive collections of free patterns on the internet - translated to 17 languages. As of today we count 324 catalogues and 12245 patterns translated into English (UK/cm). 12245
We work hard to bring you the best knitting and crochet have to offer, inspiration and advice as well as great quality yarns at incredible prices! Would you like to use our patterns for other than personal use? You can read what you are allowed to do in the Copyright text at the bottom of all our patterns. Happy crafting!
Post a comment to pattern DROPS 134-55
We would love to hear what you have to say about this pattern!
If you want to leave a question, please make sure you select the correct category in the form below, to speed up the answering process. Required fields are marked *.