
Popular categories
Looking for a yarn?


Comments / Questions (286)
![]() Amber wrote:
Amber wrote:
I wish I was a much more advanced, and faster knitter. This is so pretty, and I'd love to have it! I will need to keep it in mind as I gain more skills.
17.10.2012 - 03:36
![]() Shaala Dancer wrote:
Shaala Dancer wrote:
Really love this & want to knit it for myself BUT I'm very small and need to make it a few inches shorter. Can anyone suggest how to shorten this jacket while keeping the width?
15.10.2012 - 18:39DROPS Design answered:
Dear Mrs Dancer, please notice that shorten the jacket would give it a totally different look. If you rather a shorter jacket, what about having a look in our database for a shorter one ? Happy Knitting!
29.11.2012 - 14:54
![]() Sandra wrote:
Sandra wrote:
Hallo, ich habe eine Frage zur Breite der Arbeit (Größe S). Ich beginne mit dem Rückenteil, habe schon einige Zentimeter mit 80 Maschen gestrickt und habe nun eine Maschenprobe gemacht. Ich komme statt auf 36cm auf 42cm beim Messen. Ich denke es ist zu breit oder? Ich benötige doch keine 3cm pro Seite zum Zusammennähen. Wenn ich die Maschenprobe (17 M. x 22 R. glatt = 10 x 10 cm) hochrechne, dann komme ich bei 36cm auch nur auf 61 Maschen, statt auf 80. Vielen Dank im Voraus für die Antwort.
16.09.2012 - 09:58DROPS Design answered:
Hallo, die Maschenprobe ist mit glatt re gestrickt und das Zopfmuster zieht stark zusammen. Mögen Sie noch ein paar cm im Zopfmuster stricken und nochmals kontrollieren?
17.09.2012 - 10:22
![]() Elena Vieth wrote:
Elena Vieth wrote:
Hallo, irgendwie hatte ich ein Übertragunsproblem, jetzt sehe ich die Antwort, bisher stand immer nur die Frage. Auf jeden Fall vielen Dank, das hat mir jetzt weitergeholfen und Sorry für die wiederholte frage, bitte einfach ignorieren :-)
13.09.2012 - 11:26
![]() Elena Vieth wrote:
Elena Vieth wrote:
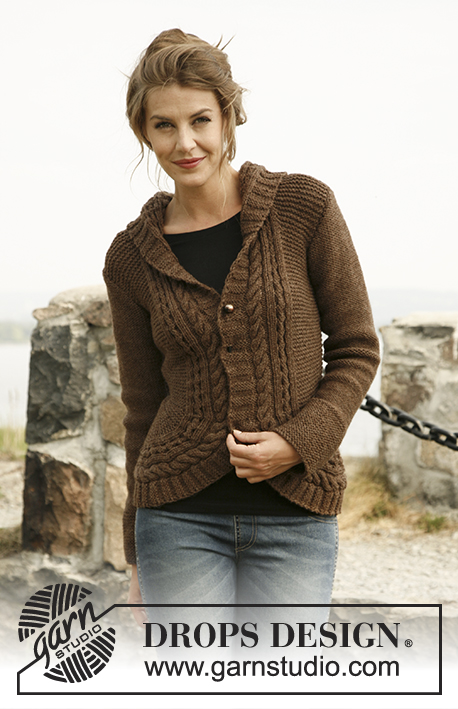
Hallo, ich habe schon mal gefragt aber leider keine Antwort erhalten, vielleicht ist es ja nicht angekommen :-( Auf dem Bild sieht es aus als hat diese Jacke knöpfe, leider kann ich ion der anleitung weder knöpfe noch knopflöcher finden. Über eine Antwort wäre ich sehr dankbar. Viele Grüße und vielen Dank Elena Vieth
13.09.2012 - 11:22
![]() Claudia wrote:
Claudia wrote:
Hola con que técnica de montaje de puntos me recomienda empezar este sueter?
11.09.2012 - 05:11DROPS Design answered:
Hola Claudia, en nuestra videotéca gratis hay videos que enseñan como montar puntos. Nosotros no hemos utilizado ninguna técnica especial.
06.12.2012 - 13:47
![]() Elena Vieth wrote:
Elena Vieth wrote:
Hallo, ich bin etwas irritiert, dass in der Anleitung werder knöpfe noch knopflöcher auftauchen oder habe ich diese übersehen. Vielen Dank für die tollen Anleitungen, mit denen ich bis jetzt immer gut klar gekommen bin und für die Mühe. Herzliche Grüße Elena Vieth
23.08.2012 - 11:20DROPS Design answered:
Vielen Dank für Ihr Feedback! Diese Jacke haben wir mit einer Nadel geschlossen, dann kann man sie auch gut offen tragen ohne dass Knöpfe und Knopflöcher stören.
23.08.2012 - 11:24
![]() Jantien wrote:
Jantien wrote:
Hallo, Ik ben bezig met het achterpand, maar nu ik 10cm gebreid heb is het achterpand niet 36cm breed, maar 40cm. De steekverhouding klopt echter wel. Wat kan ik het beste doen? Strakker breien (maar dan klopt steekverhouding niet), of wat minder steken aan de zijkant? Of iets ander?
30.07.2012 - 17:11DROPS Design answered:
Het is correct. Je hoeft verder niets te doen. Brei je met Nepal of Alaska, dan zou het goed komen. Door de kabels zal het werk wat samen gaan trekken en de juiste afmetingen krijgen.
31.07.2012 - 11:46
![]() Hellingrath wrote:
Hellingrath wrote:
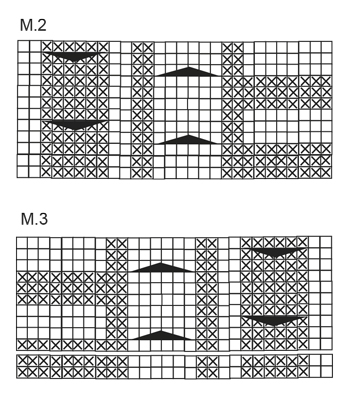
Hellingrath 04.06.2012 kl. 16:39: Habe eine Frage zum Diagramm vom Vorderteil(M2).Ist das nur die Vorderseite und die Rückreihen werden gestrickt wie sie erscheinen
04.06.2012 - 16:42DROPS Design answered:
Siehe unten
05.06.2012 - 11:18
![]() Hellingrath wrote:
Hellingrath wrote:
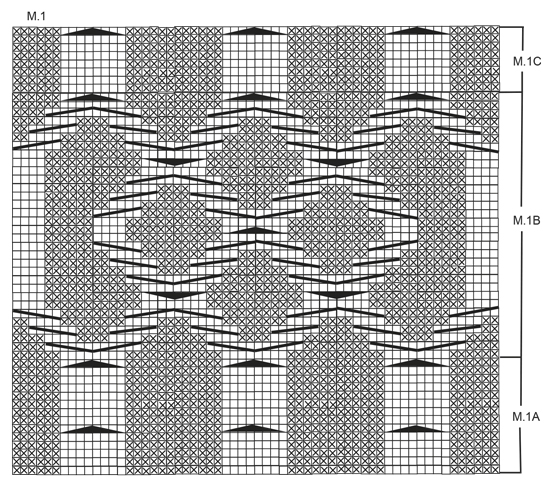
Hellingrath 03.06.2012 kl. 20:11: Hallo,habe eine Frage zum Rückenteil.Ist es richtig,daß zwischen den Zöpfen linke Maschen sind ?
04.06.2012 - 16:41DROPS Design answered:
Siehe unten
05.06.2012 - 11:18
|
|||||||||||||||||||||||||
Chocolate Passion#chocolatepassioncardigan |
|||||||||||||||||||||||||
 |
 |
||||||||||||||||||||||||
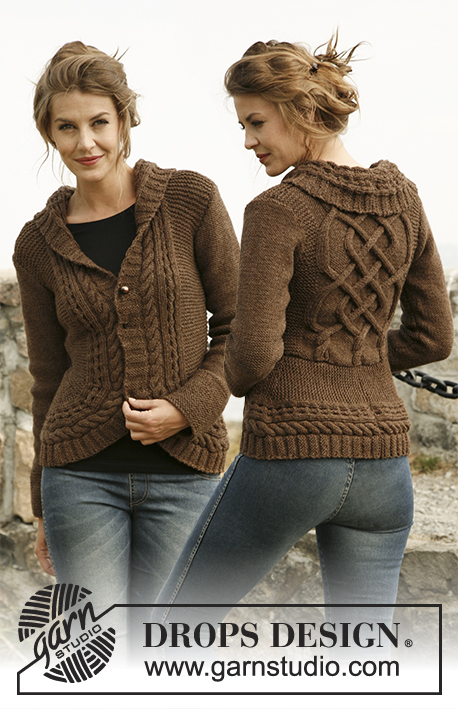
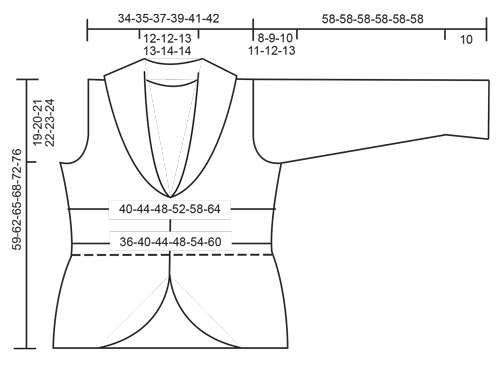
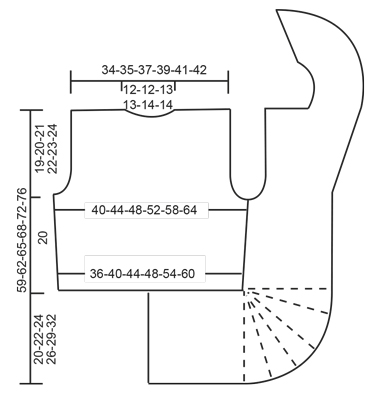
Knitted DROPS jacket with rounded front pieces and cables in ”Alaska”. Size: S to XXXL.
DROPS 134-55 |
|||||||||||||||||||||||||
|
GARTER ST (back and forth on needle): K all rows. PATTERN: See diagrams M.1, M.2 and M.3 – diagrams show pattern from RS. 1st row in diagrams is worked from WS. DECREASE TIP (applies to armhole): Dec from RS inside 3 sts. Dec AFTER 3 sts as follows: K 2 tog. Dec BEFORE 3 sts as follows: K 2 twisted tog. SHORT ROWS: Work short rows on front piece to get a rounded edge on the piece. Also work short rows between the cables in the pattern. This can make it difficult to read the diagram - make sure to work 5 rows between every cable. Work short rows as follows: Row 1 and 2: Work 10 sts in all sizes, turn and work back. Row 3 and 4: Work 16 sts in all sizes, turn and work back. Row 5 and 6: Work 20 sts in all sizes, turn and work back. Row 7 and 8: Work 26 sts in all sizes, turn and work back. Row 9 and 10: Work 28-28-29-29-31-30 sts, turn and work back. Row 11 and 12: Work 31-31-32-32-34-33 sts, turn and work back. Continue to work 3 sts more on every turn until all sts have been worked. 18-20-22-24-26-30 rows in garter st have been worked at the outer side and 2 rows in garter st have been worked on the inside. Repeat from 1st row a total of 5 times. The rounded edge now measures approx. 28-31-34-37-41-46 cm on the outer side and 3 cm on the inside. -------------------------------------------------------- -------------------------------------------------------- BACK PIECE: Worked back and forth on needle. Cast on 68-74-80-88-98-108 sts on needle size 5 mm with Alaska. K 1 row from WS. Work next row from RS as follows: 10-13-16-20-25-30 sts in GARTER ST – see explanation above, * P 6, K 2 sts in each of the next 4 sts (= K 8), P 6 *, repeat from *-* a total of 3 times, 10-13-16-20-25-30 sts in garter st. There are now 80-86-92-100-110-120 sts on needle. Then work as follows (1st row = WS): 10-13-16-20-25-30 sts in garter st, diagram M.1A (= 60 sts) and 10-13-16-20-25-30 sts in garter st. After M.1A continue with M.1B 2 times vertically, then repeat M.1C until finished measurements. REMEMBER THE KNITTING TENSION! When piece measures 7 cm, inc 1 st in each side by working 1 YO inside outermost st – on next row K YO twisted (i.e. work in back loop of st instead of front) to avoid holes. Repeat inc every 5 cm a total of 3 times = 86-92-98-106-116-126 sts. When piece measures 20 cm in all sizes, cast off 3-4-5-6-7-8 sts at beg of the next 2 rows for armholes. Then dec on every row from RS: 1 st 2-3-4-5-7-10 times in each side – SEE DECREASE TIP! There are now 76-78-80-84-88-90 sts on needle. When piece measures 37-38-39-41-42-43 cm, work the 8 sts over the middle cable tog 2 by 2. On next row cast off the middle 20-20-22-22-24-24 sts for neck = 26-27-27-29-30-31 sts remaining on each shoulder. Then work 3 rows over these as before, on next row work the 8 sts over the cable tog 2 by 2 = 22-23-23-25-26-27 sts. Then cast off all sts on next row. Piece measures approx. 39-40-41-42-43-44 cm vertically. RIGHT EDGE PIECE/FRONT PIECE: All measurements should be done on the shorter side! Cast on 34-37-41-44-49-54 sts on needle size 5 mm with Alaska. K 1 row from WS. Work next row from RS as follows: K 8, P 2, K 2 sts in each of the next 3 sts (= K 6), P 2, K 2, P 2 sts in each of the next 3 sts (= P 6), K 2, 12-15-19-22-27-32 sts in garter st. There are now 40-43-47-50-55-60 sts on needle. Continue like this: 12-15-19-22-27-32 sts in garter st and diagram M.2 (= 28 sts) – 1st row = WS. When piece measures 17-19-21-23-26-29 cm, work SHORT ROWS - see explanation above – 1st row is worked from RS! When all short rows have been worked, insert a marker. NOW MEASURE PIECE FROM HERE! Continue to work over all sts as before. When piece measures 7 cm, beg to inc in the side as on back piece (i.e. the shorter side). After all inc, there are 43-46-50-53-58-63 sts on needle. When piece measures 20 cm, cast off and dec for armhole in the side as on back piece (cast off and dec in same side as inc). At the same time when piece measures 23 cm, beg to inc for collar. Inc inside diagram M.2 by making 1 YO, on next row K YO twisted (i.e. work in back loop of st instead of front) to avoid holes. Repeat inc every other row a total of 10-10-12-13-14-14 times - work inc sts in garter st. After all cast offs and dec for armhole and inc for collar, there are 48-49-53-55-58-59 sts on needle. When piece measures approx. 39-40-41-42-43-44 cm, adjust so that next row is worked from WS, cast off the first 22-23-23-25-26-27 sts in garter st = 26-26-30-30-32-32 sts remain on needle for collar. Continue to work as follows: * Work 2 rows over all sts, work 2 row only over the outermost 18-18-20-20-26-26 sts *, repeat from *-* until collar measures approx. 7-7-7½-7½-8-8 cm on the inside (it will then be twice as long at the outer side). On next row work all 6 sts over both cables tog 2 by 2 = 20-20-24-24-26-26 sts. Cast off. LEFT EDGE PIECE/FRONT PIECE: Cast on and work as right front piece but reversed. I.e. work 2nd row as follows: 12-15-19-22-27-32 sts in garter st, K 2, P 2 sts in each of the next 3 sts (= P 6), K 2, P 2, K 2 sts in each of the next 3 sts (= K 6), P 2 and K 8. There are now 40-43-47-50-55-60 sts on needle. Continue as follows (1st row = WS): Diagram M.3 (= 28 sts), 12-15-19-22-27-32 sts in garter st. Continue as on right front piece but when working short rows work 1st row from WS! Cast off shoulder sts from RS to avoid cutting the thread to work the collar. SLEEVE: Worked back and forth on needle. Cast on 42-42-44-44-46-48 sts (incl 1 edge st in each side) on needle size 5 mm with Alaska. Work 10 cm in garter st. Continue in stocking st. When piece measures 15 cm, inc 1 st in each side. Repeat inc every 4-3-3-2½-2-2 cm a total of 9-11-11-13-14-15 times = 60-64-66-70-74-78 sts. When piece measures 50-49-48-47-46-45 cm (shorter measurements in the larger sizes because of longer sleeve cap and broader shoulder width) cast off for sleeve cap at beg of every row in each side: 3 sts 1 time, 2 sts 3 times and 1 st 1-2-3-4-5-6 times, then cast off 2 sts in each side until sleeve measures 57 cm, then cast off 3 sts 1 time in each side, cast off remaining sts. The piece measures approx. 58 cm. ASSEMBLY: Sew cast on edge on edge pieces tog mid back - sew edge to edge to avoid a chunky seam. Then sew edge to bottom edge of back piece. Sew the shoulder seams. Sew side seam edge to edge. Sew the collar tog mid back and sew it to the neckline. Sew sleeve seams inside 1 edge st - sew so that WS is on the outside and sew sleeves on body. Close jacket with a pin or similar. |
|||||||||||||||||||||||||
Diagram explanations |
|||||||||||||||||||||||||
|
|||||||||||||||||||||||||
 |
|||||||||||||||||||||||||
 |
|||||||||||||||||||||||||
 |
|||||||||||||||||||||||||
 |
|||||||||||||||||||||||||
Have you finished this pattern?Tag your pictures with #dropspattern #chocolatepassioncardigan or submit them to the #dropsfan gallery. Do you need help with this pattern?You'll find 22 tutorial videos, a Comments/Questions area and more by visiting the pattern on garnstudio.com. © 1982-2026 DROPS Design A/S. We reserve all rights. This document, including all its sub-sections, has copyrights. Read more about what you can do with our patterns at the bottom of each pattern on our site. |
|||||||||||||||||||||||||


With over 40 years in knitting and crochet design, DROPS Design offers one of the most extensive collections of free patterns on the internet - translated to 17 languages. As of today we count 324 catalogues and 12245 patterns translated into English (UK/cm). 12245
We work hard to bring you the best knitting and crochet have to offer, inspiration and advice as well as great quality yarns at incredible prices! Would you like to use our patterns for other than personal use? You can read what you are allowed to do in the Copyright text at the bottom of all our patterns. Happy crafting!
Post a comment to pattern DROPS 134-55
We would love to hear what you have to say about this pattern!
If you want to leave a question, please make sure you select the correct category in the form below, to speed up the answering process. Required fields are marked *.