
Popular categories
Looking for a yarn?


Comments / Questions (7)
![]() Marit wrote:
Marit wrote:
Når det er raglansfelling og skal felle foreks. 25 masker på berestykke Skal dei 8 maskene på raglanfellingene telle med?
26.09.2020 - 10:38DROPS Design answered:
Hei MArit. Litt usikker på hvor du er i oppskriften, men når du har satt ermene på sammen pinne som bolen skal det felles til raglan. Det felles 8 masker pr gang det felles til raglan, se oppsrkiften på hvor ofte og hvor mange masker det skal felles. God Fornøyelse!
28.09.2020 - 11:47
![]() Diane Scott wrote:
Diane Scott wrote:
Where do I find diagram M1
12.05.2016 - 13:45DROPS Design answered:
Hi Diane. At the bottom of the pattern (if you scroll down)
12.05.2016 - 13:56
![]() Drops Design France wrote:
Drops Design France wrote:
Bonjour J. Teboul, Il faut bien tricoter 16 rangs point mousse pour le bas des manches et 6 seulement pour le bas du gilet. Pour le diagramme 1 carré = 1 m x 1 rang. Bon tricot !
26.10.2011 - 21:28
![]() J. Teboul wrote:
J. Teboul wrote:
Pour les manches,tricoter 16 rangs au point mousse.Il semblerait que ce soit plutôt 6 rangs comme pour les dos et devants.D'autre part je pense que le diagramme du point n'est pas très explicite quant au nombre de rangs 1 ou 2 sur un petit carré? merci de préciser
26.10.2011 - 15:16
![]() Drops Design wrote:
Drops Design wrote:
Mønster M1 finner du øverst til høyre når du åpner diagrammet. Velg "se diagram" under garninnhold. Lykke til!
28.03.2006 - 13:55
![]() Gulli Hovland wrote:
Gulli Hovland wrote:
Jeg lurer på hvor mønster M1 finnes. Takk
28.03.2006 - 12:37
|
||||||||||
Baby Pearl#babypearljacket |
||||||||||
|
|
||||||||||
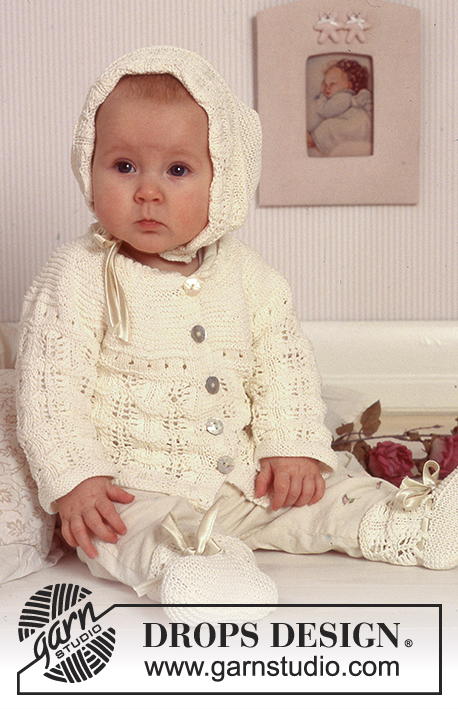
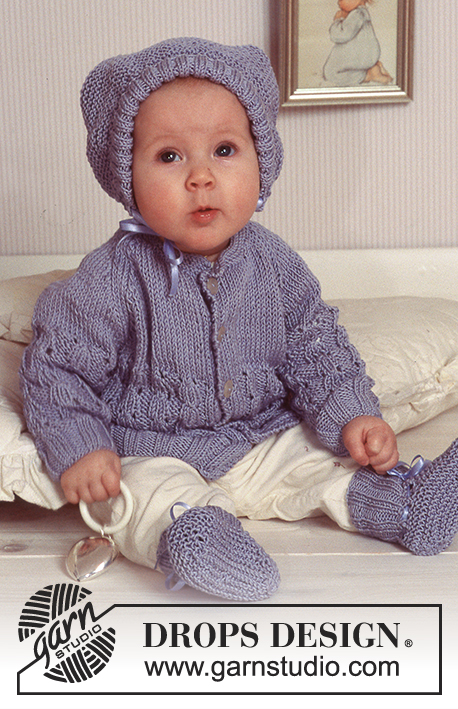
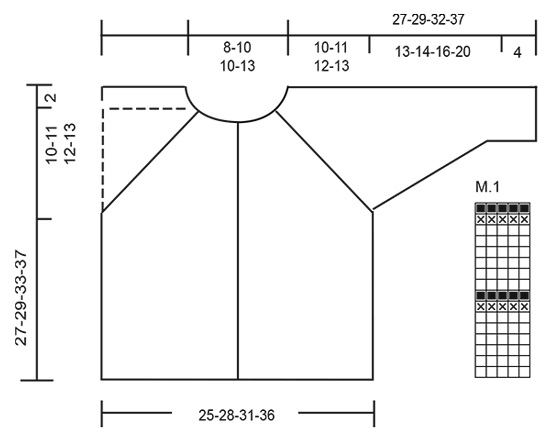
Cardigan in “Pelliza” and “Cotton Viscose” with raglan sleeves.
DROPS Baby 11-16 |
||||||||||
|
Knitting tension: 25 sts x 34 rows on needles size 2.5 mm with Pelliza in stocking sts = 10 x 10 cm. Garter sts (back and forth on row): Knit all rows. Pattern: See diagram M.1. The diagram shows the pattern from the RS. Dec. tips (apply to raglan): Dec each side of the marking threads as explained in the pattern. Dec. as follows from the RS: Before a marking thread: K2 tog. After a marking thread: slip 1 st as if to knit, K1, psso. Dec as follows from the WS: Before a marking thread: P2 twisted tog. After a marking thread: P2 tog. ---------------------------------------------------------------------- Front and back piece: Knit back and forth on circular needle from mid front. Loosely cast on 134-150-166-190 sts (inc. 5 front band sts each side towards mid front) on circular needle size 2.5 mm with Cotton Viscose. Knit 6 rows of garter sts. Put the 5 front band sts each side on a thread. Change to Pelliza and continue with M.1 over the remaining124-140-156-180 sts NB: The edge st each side is knitted in garter sts throughout. Remember the knitting tension! When the piece measures 16-17-20-23 cm knit the next row as follows from the RS: 27-31-35-41 sts = right front piece, cast off 8 sts for the armhole, knit 54-62-70-82 sts = back piece, cast off 8 sts for armhole, knit 27-31-35-41 sts = left front piece. Put piece aside and knit the sleeves. Sleeves: Loosely cast on 38-40-42-44 sts (incl. 1 edge st each side) on pointed needles size 2.5 mm with Cotton Viscose. Knit 16 rows of garter sts, change to Pelliza and continue with M.1. At the same time when the piece measures 4 cm inc 1 st each side a total of 8-9-11-13 times on every 5th row = 54-58-64-70 sts. When the piece measures approx. 17-18-20-25 cm – adjust the length so the finishing row is the same as for the back and front piece – cast off 5 sts each side = 44-48-54-60 sts left. Yoke: Put the sleeves on the same circular needle as the front and back piece where you cast off for the armholes = 196-220-248-284 sts. Insert a marking thread in all the transitions between sleeve and body pieces = 4 MT. Continue in M.1 making sure the pattern continues over sleeves and body pieces. Raglan decreases: There are 8 dec per row. Dec each side of the 4 MT – see dec. tips! Dec 1 st on every other row: 17-18-19-19 times and then 1 st on every row: 0-1-3-6 times. Total dec. = 136-152-176-200 sts. At the same time when the piece measures 23-25-28-32 cm cast off 6-8-9-11 sts each side mid front for neck. Continue to cast off 1 st towards the neck on every other row 2 times. When all dec for the raglan and the neck are completed = 44-48-50-58 sts left on row. Knit 1 row, at the same time dec. 8-8-10-12 sts evenly distributed on row = 36-40-40-46 sts. The piece measures approx 27-29-33-37 cm. Front band: Put the 5 sts from the thread at left front piece on a pointed needle size 2.5 mm. Knit in garter sts with Cotton Viscose until the band is approx 1 cm shorter than the front piece up to the neckline (the band should be stretched slightly when sewn to the front piece) – Put the sts back on a thread. Repeat for right front, but at the same time cast off for buttonholes. 1 buttonhole = cast off the centre st. On the returning row make a yo over the cast off st. Cast off for button holes when the band measures: Size 1/3 month: 2, 6, 10, 14, 18 and 21 cm Size 6/9 month: 2, 6, 10, 14, 19 and 23 cm Size 12/18 month: 2, 7, 12, 17, 22 and 26 cm Size 24 month: 2, 7, 13, 25 and 30 cm Assembly: Place the front band as follows: 1 st from the front band at the top of 1 st from the front piece and sew from the RS with small invisible sts. Collar: Put sts from the neckline on circular needle size 2.5 mm and pick up approx 8 to15 sts on each front piece + additional 5 sts from the front band = 62 to 86 sts. Knit in garter sts over all sts with Cotton Viscose, at the same time inc 1 st each side and mid front inside the 1 edge st on every 3rd row a total of 3 times. When the collar measures 3 cm cast off each side on every other row: 1 st 1 time, 3 sts 1 time and 4 sts 1 time. Cast off remaining sts. Crochet borders: Crochet round the collar with Cotton Viscose and crochet hook size 2.5 mm as follows: 1 dc, *3 ch, skip 1 st, 1 dc in the following st*, repeat from *-*. Sew the sleeve seams inside the 1 edge st and sew the openings under the sleeves. Sew in the buttons in the transition between the band and the front piece. |
||||||||||
Diagram explanations |
||||||||||
|
||||||||||
 |
||||||||||
Have you finished this pattern?Tag your pictures with #dropspattern #babypearljacket or submit them to the #dropsfan gallery. Do you need help with this pattern?You'll find 28 tutorial videos, a Comments/Questions area and more by visiting the pattern on garnstudio.com. © 1982-2026 DROPS Design A/S. We reserve all rights. This document, including all its sub-sections, has copyrights. Read more about what you can do with our patterns at the bottom of each pattern on our site. |
||||||||||


With over 40 years in knitting and crochet design, DROPS Design offers one of the most extensive collections of free patterns on the internet - translated to 17 languages. As of today we count 324 catalogues and 12290 patterns translated into English (UK/cm). 12290
We work hard to bring you the best knitting and crochet have to offer, inspiration and advice as well as great quality yarns at incredible prices! Would you like to use our patterns for other than personal use? You can read what you are allowed to do in the Copyright text at the bottom of all our patterns. Happy crafting!
Post a comment to pattern DROPS Baby 11-16
We would love to hear what you have to say about this pattern!
If you want to leave a question, please make sure you select the correct category in the form below, to speed up the answering process. Required fields are marked *.