
Popular categories
Looking for a yarn?


Comments / Questions (4)
![]() Catherine wrote:
Catherine wrote:
Au début du tricot,après la réunion du dos , des manches et le relevage des mailles des manches , on a une série d’augmentations pour les manches. Les inclinaisons des augmentations sont les mêmes sur l’envers comme sur l’endroit. Ne devraient elles pas être contrariées ? Est-ce normal que le dessin des augmentations sur l’endroit du travail donne une inclinaison à droite et juste au dessus une inclinaison à gauche?
29.03.2026 - 10:03DROPS Design answered:
Bonjour Catherine, effectivement les augmentations doivent être inclinées dans le même sens (et pas inversement sur l'endroit/sur l'envers), j'ai transmis votre retour à nos stylistes pour correction. Bonne continuation!
07.04.2026 - 11:35
![]() Gunilla Olofsson wrote:
Gunilla Olofsson wrote:
Jag har missat att dela fram och bakstycke och har alltså 12 maskor för mycket på slutet av arbetet drops nr 264-14 Behöver jag riva upp allt eller kan det lösas på annat sätt
14.01.2026 - 14:57DROPS Design answered:
Hei Gunilla. Hvor i arbeidet er du? Om du har strikket flere omganger / flere cm fra der arbeidet skal deles (ca 19-20-22-24-24-26-28 cm fra toppen av skulderen), vil du få et for stort bærestykke, og maskeantallet vil ikke stemme med resten av oppskriften. Ville nok ha rivet opp arbeidet og delt atbeidet der det skal i den str. du strikker etter. mvh DROPS Design
29.01.2026 - 11:09
![]() Lucie wrote:
Lucie wrote:
Bonjour, je ne comprends pas pourquoi on a besoin de 2x moins de kid silk que de flora, les deux qualités ont pourtant la même longueur de fil pour 50g ? Comme on les tricote ensemble, on a besoin d'exactement la même longueur de fil au total, non ?
01.11.2025 - 14:44DROPS Design answered:
Bonjour Lucie, tout à fait, mais notez que les pelotes Flora vont 50 g et les pelotes Kid-Silk 25 g seulement, ainsi vous aurez besoin en taille XS et S de 6 pelotes Flora et 6 pelotes Kid-Silk. Bon tricot
03.11.2025 - 07:33
![]() Liv wrote:
Liv wrote:
Her er det en alvorlig feil i møsteret. Bakstykket er bare 20 pinner. Store deler av bakstrykket er ikk med i oppskriften.
10.10.2025 - 11:31
|
|
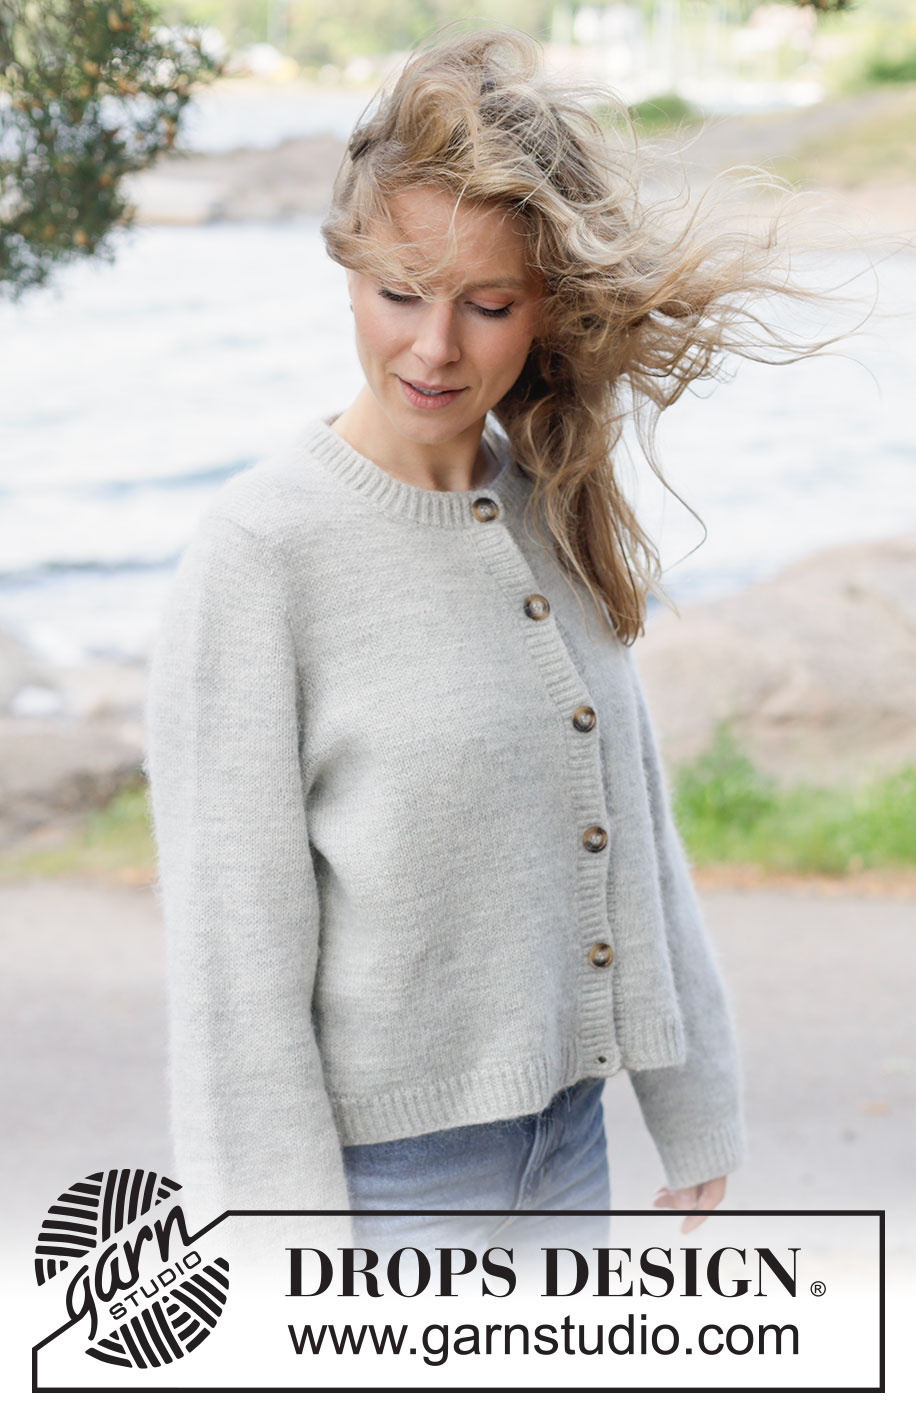
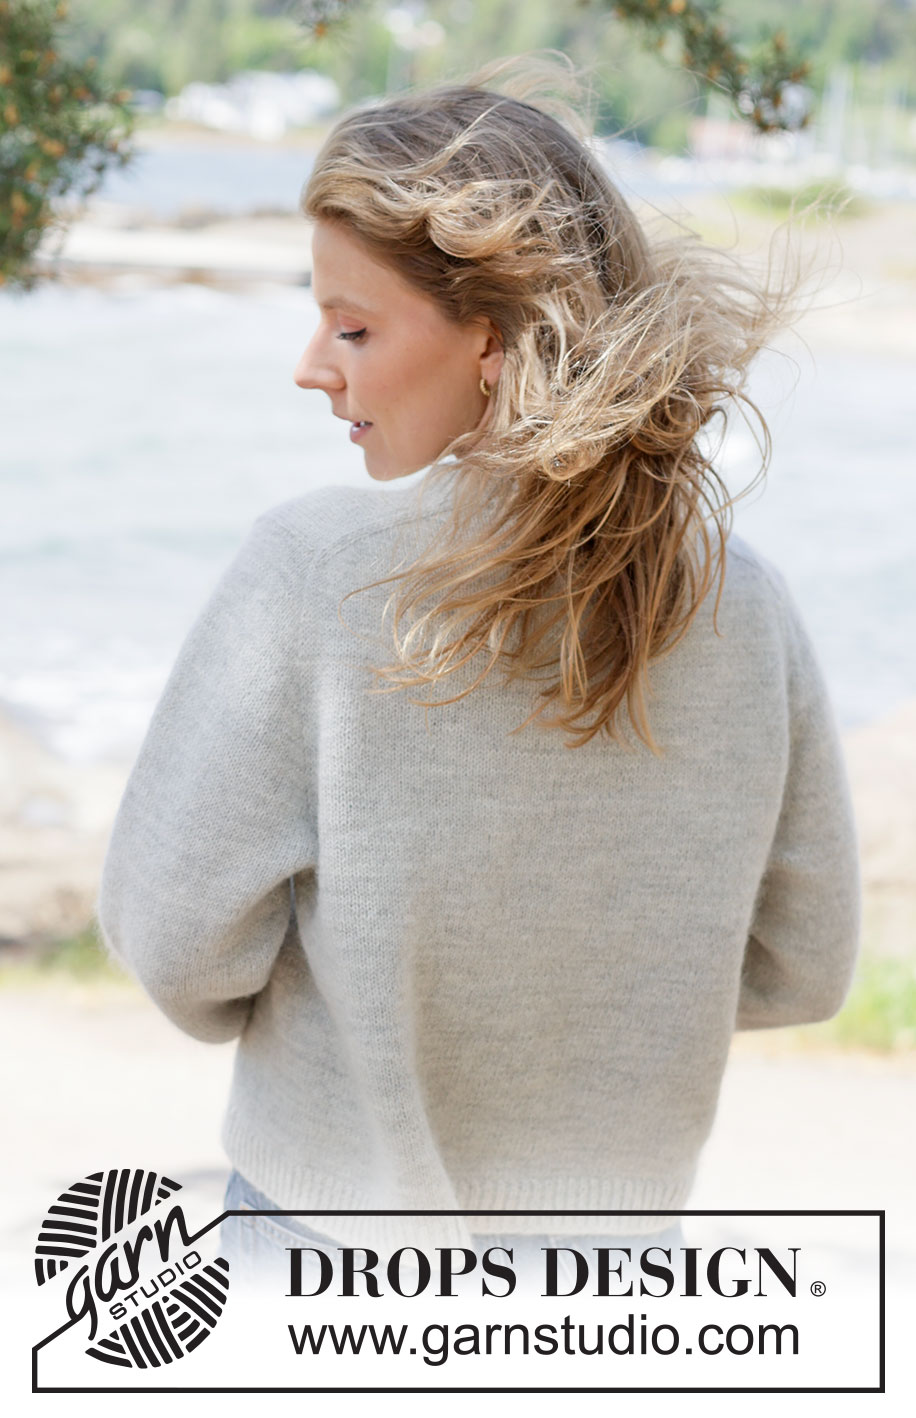
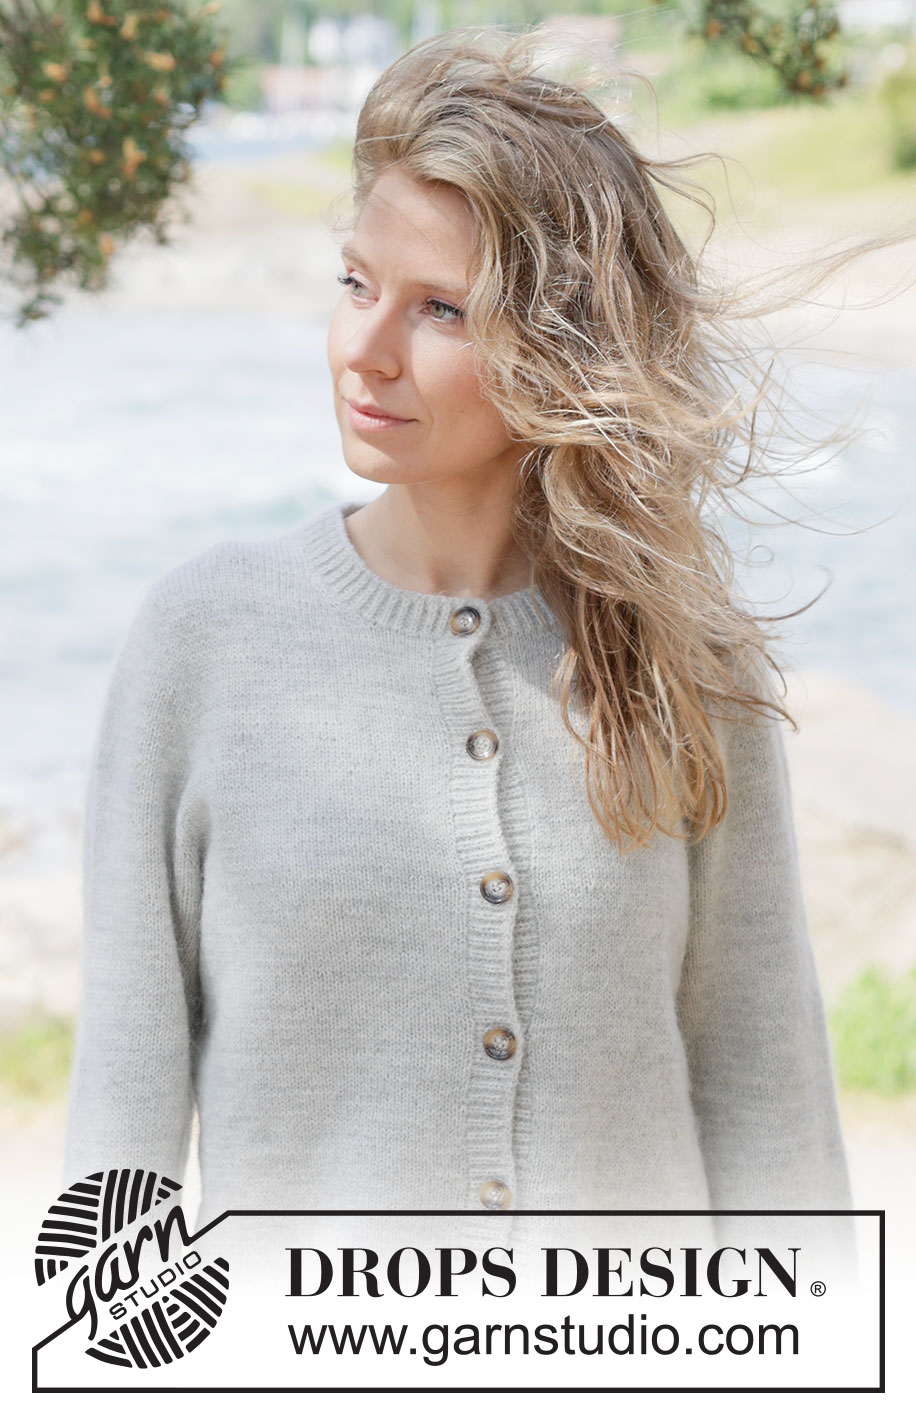
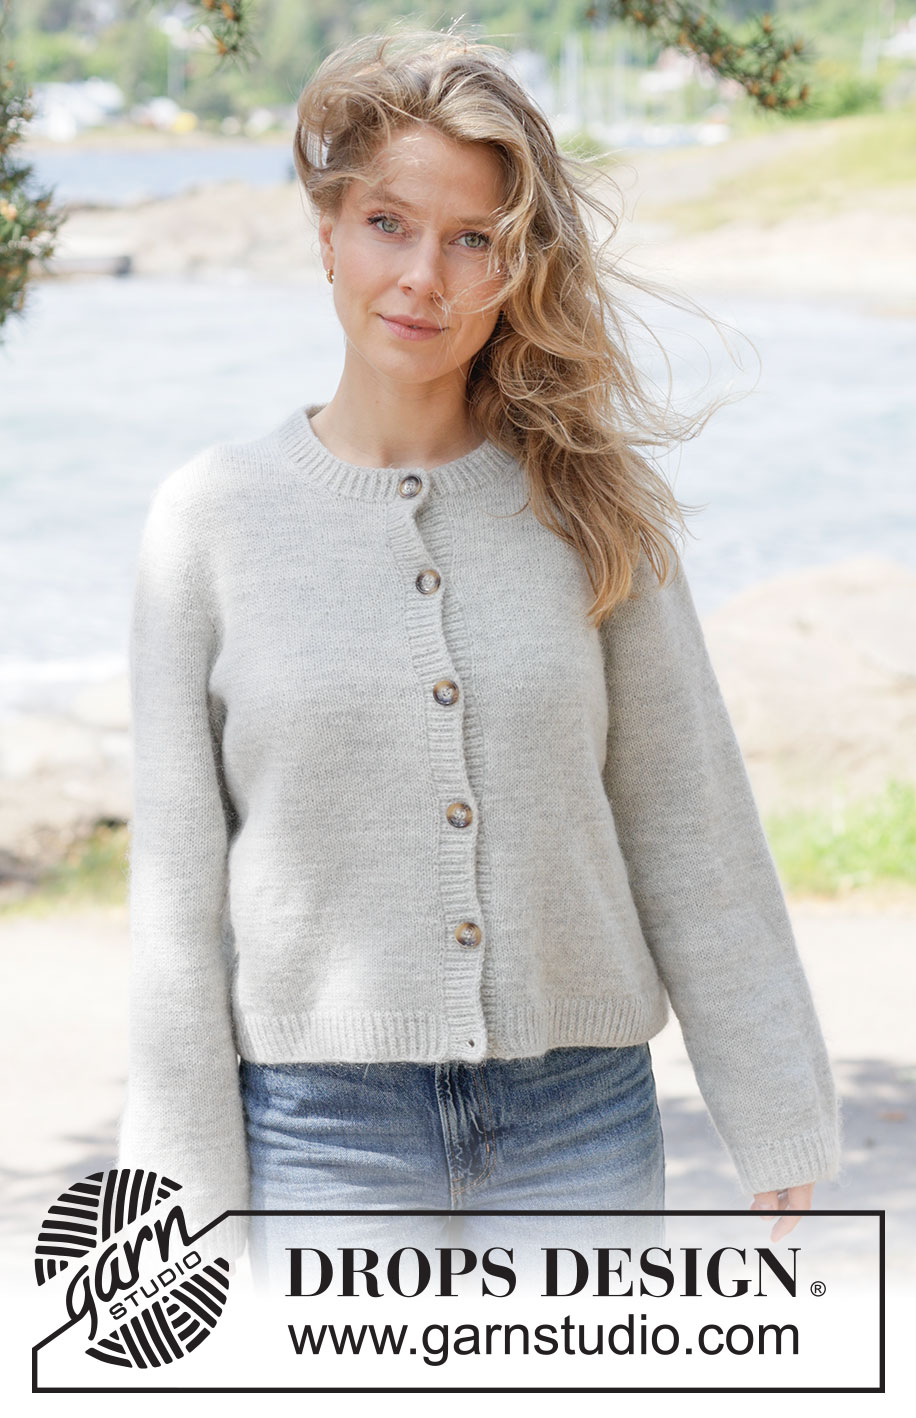
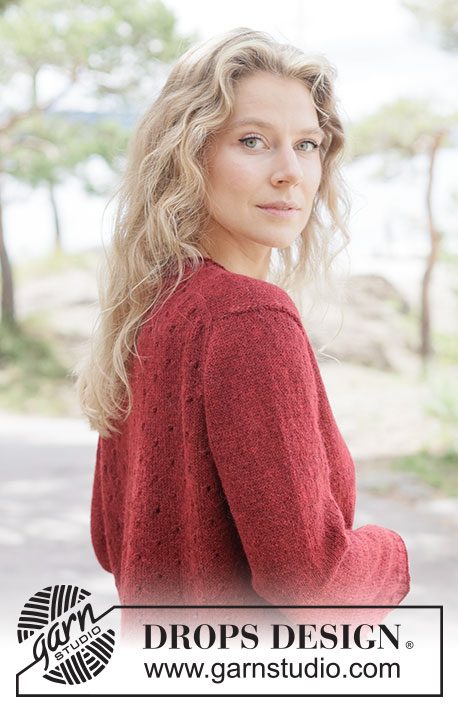
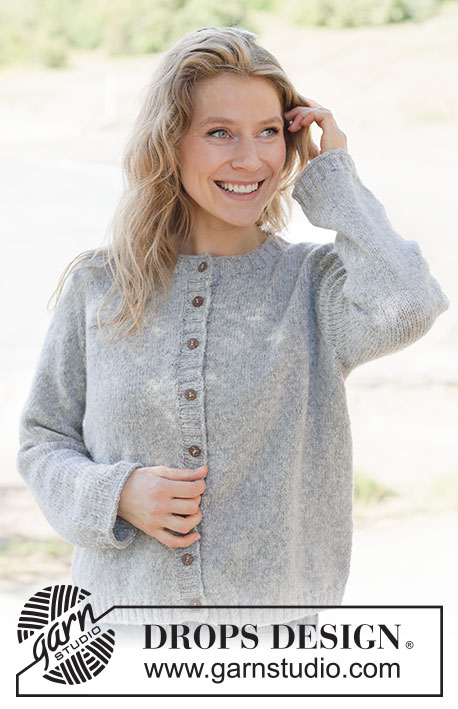
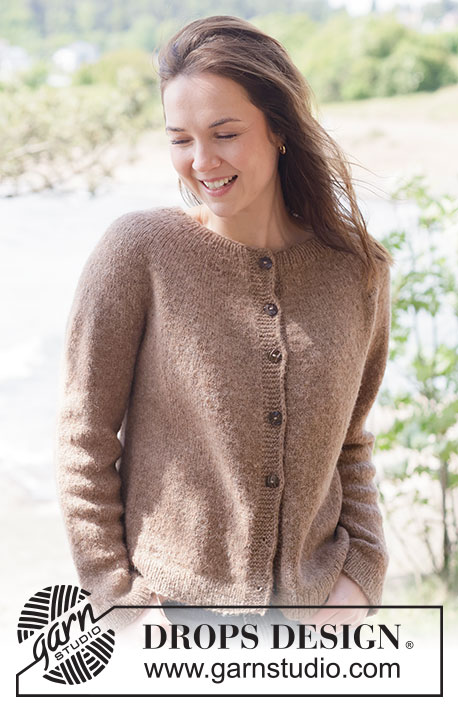
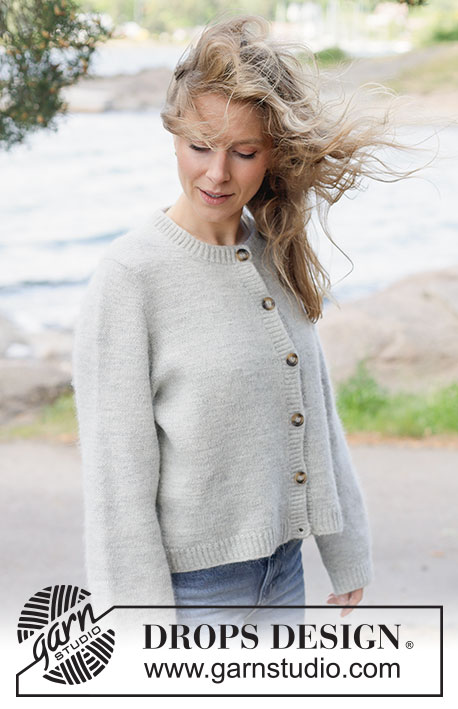
Silver Drift Cardigan#silverdriftcardigan |
|
 |
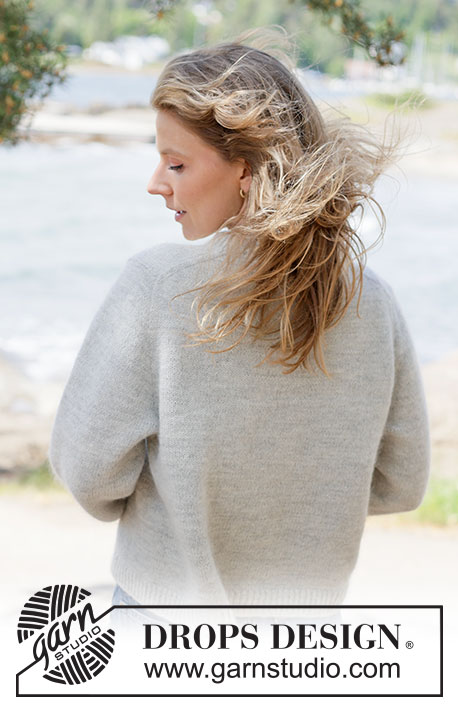 |
Knitted jacket in 1 strand DROPS Flora and 1 strand DROPS Kid-Silk. Piece is knitted top down in stocking stitch with European yoke and edges i English rib. Size XS – XXXL.
DROPS 264-14 |
|
|
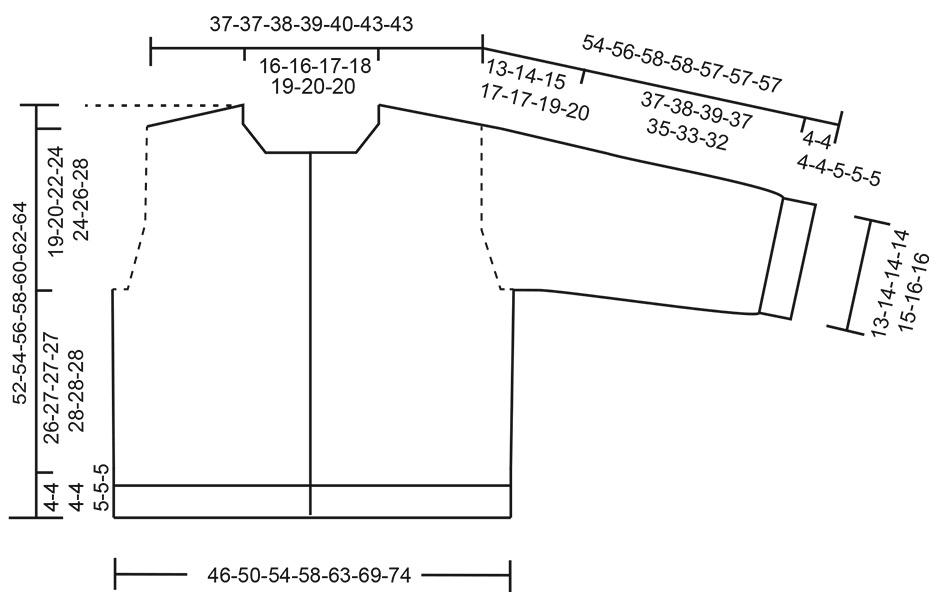
---------------------------------------------------------- EXPLANATION FOR THE PATTERN: ---------------------------------------------------------- INCREASE TIP-1: INCREASE 1 STITCH TOWARDS THE LEFT - from RIGHT SIDE: Use left needle to pick up yarn between 2 stitches from row below, pick up yarn from the front and knit in the stitch loop that is on the back of the needle. INCREASE 1 STITCH TOWARDS THE RIGHT - from RIGHT SIDE: Use left needle to pick up yarn between 2 stitches from row below, pick up yarn from the back and knit in the stitch loop that is on the front side of the needle. . INCREASE TIP-2: INCREASE 1 STITCH TOWARDS THE RIGHT - from WRONG SIDE: Use left needle to pick up yarn between 2 stitches from row below, pick up yarn from the back and purl in the stitch loop that is on the front side of the needle. INCREASE 1 STITCH TOWARDS THE LEFT - from WRONG SIDE: Use left needle to pick up yarn between 2 stitches from row below, pick up yarn from the front and purl in the stitch loop that is on the back side of the needle. GARTER STITCH (when working back and forth): Knit on all rows, i.e. knit from right side and knit from wrong side. 1 ridge vertically = knit 2 rows. SLEEVE TIP: When picking up stitches mid under sleeve, there will be a small hole in the transition between stitches on body and sleeves. The holes can be closed by picking up the strand between two stitches - work this strand twisted together with the first stitch between body and sleeve to close the hole. DECREASE TIP: Decrease 1 stitch on each side of marker thread as follows: Work until 3 stitches remain before marker thread, knit 2 together, knit 2 (marker thread is between these 2 stitches), slip 1 stitch knitwise, knit 1, pass slipped stitch over stitch worked (= 2 stitches decreased). BUTTONHOLES: Decrease for 6-6-7-7-7-7-8 buttonholes on right band. 1 buttonhole = work 2 stitches together, make 1 yarn over. On next row knit yarn over to make holes. Top buttonhole is placed approx. 8-8½-7½-7½-8-8-7½ cm from top edge, bottom buttonhole approx. 2 cm from bottom edge. Place the remaining 3-3-4-4-4-4-5 buttonholes evenly approx. 8-8½-7½-7½-8-8-7½ cm apart. Decrease the last buttonhole when neck edge is worked. ---------------------------------------------------------- START THE PIECE HERE: ---------------------------------------------------------- JACKET - SHORT OVERVIEW OF THE PIECE: In this pattern needles of different length have been used, begin with fitting length for number of stitches and switch as needed. Garment is worked as point 1 - 5. 1 BACK PIECE: Cast on stitches in the back of neck and work back piece back and forth downwards while at the same time increasing in each side of piece until number of stitches for shoulder width is reached. Back piece has a slight diagonal shoulder. 2 FRONT PIECES: Begin by picking up stitches along one shoulder from back piece, work front piece downwards while increasing towards the neck. Repeat on the other shoulder. 3 YOKE: On next row work all stitches on to same circular needle - work as follows: Work one front piece, pick up stitches for sleeve along the side on front piece, work stitches on back piece, pick up stitches for sleeve along the side on the other front piece and work stitches on last front piece = work yoke over all stitches back and forth from mid front. 4 INCREASES FOR BODY AND SLEEVES: When working the yoke, increase stitches for body and sleeves, first increase for sleeves and then increase for both body and sleeves. 5 BODY AND SLEEVES: When all stitches have been increased and yoke is knitted to given measurements, divide the piece for body and sleeves. Work body downwards back and forth on circular needle while putting the sleeves aside. Then work sleeves downwards in the round on needle. Finish by picking up stitches around the neck and work the neck edge back and forth. If 0 is given for the chosen size, it means that you skip the information until next information. BACK PIECE: Work piece back and forth on circular needle. Cast on 32-32-34-36-38-40-40 stitches on circular needle size 4 mm with 1 strand DROPS Flora and 1 strand DROPS Kid-Silk (= 2 strands). ROW 1 (= wrong side): Purl all stitches. ROW 2 (= right side): Read INCREASE TIP-1 and knit 3, increase 1 stitch towards the left, knit until 3 stitches remain, increase 1 stitch towards the right, knit 3. ROW 3 (= wrong side): Read INCREASE TIP-2 and purl 3, increase 1 stitch towards the right, purl until 3 stitches remain, increase 1 stitch towards the left, purl 3. AFTER 3RD ROW: Work 2nd and 3rd ROW 10-10-10-10-10-11-11 times in total (= 20-20-20-20-20-22-22 rows have been worked), after increase there are = 72-72-74-76-78-84-84 stitches on needle. Remember to follow the knitting tension! Cut the yarn, slip stitches on a thread or a stitch holder. RIGHT FRONT PIECE: Find right shoulder on back piece as follows: Place back piece flat with right side up, place back piece so that stitches on thread/stitch holder are towards you, right side of piece = right shoulder. Now pick up stitches along right diagonal shoulder on back piece - begin from right side at the armhole and pick up stitches in towards the neck as follows: Pick up 1 stitch in every worked row inside outermost stitch = 20-20-20-20-20-22-22 stitches. Insert 1 marker in piece in towards the neck. All length measurements are done from this marker, measured in stitch direction. Work in stocking stitch (work first row from wrong side). When piece measures 6-6-7-7-7-8-9 cm, increase stitches towards the neck as follows: ROW 1 (= right side): Work until 3 stitches remain, increase 1 stitch towards the right, knit 3 – remember INCREASE TIP-1. ROW 2 (= wrong side): Purl all stitches. Work 1st and 2nd ROW 6-6-6-6-6-6-6 times (= 12-12-12-12-12-12-12 rows have been worked) = 26-26-26-26-26-28-28 stitches. On next row from right side, cast on 11-11-12-13-14-15-15 new stitches for neck at the end of row = 37-37-38-39-40-43-43 stitches. Work 1 row from wrong side, first stitch is an edge stitch and is worked in GARTER STITCH - read explanation above. Increases for neck are now done. Piece now measures approx. 11-11-12-12-12-13-14 cm from marker. Some of the neck depth will be over on back piece. Neck depth at the front = 9-9-9-9-9-10-11 cm. Neck depth at the back = 2-2-3-3-3-3-3 cm. Then work in stocking stitch with 1 stitch in garter stitch mid front until front piece measures 11-12-13-13-14-14-15 cm from marker - finish with a row from wrong side. Cut the yarn, slip stitches on a thread or stitch holder, now work left shoulder along the left diagonal shoulder on back piece as explained below. LEFT FRONT PIECE: Pick up stitches along left diagonal shoulder on back piece - begin from right side at the neck and pick up stitches out towards the armhole as follows: Pick up 1 stitch in every worked row inside outermost stitch = 20-20-20-20-20-22-22 stitches. Insert 1 marker in piece in towards the neck. All length measurements are done from this marker, measured in stitch direction. Work in stocking stitch (work first row from wrong side). When piece measures 6-6-7-7-7-8-9 cm, increase stitches towards the neck as follows: ROW 1 (= right side): Remember INCREASE TIP-1 and knit 3, increase 1 stitch towards the left, work the rest of row. ROW 2 (= wrong side): Purl all stitches. Work 1st and 2nd ROW 6-6-6-6-6-6-6 6 times in total (= 12-12-12-12-12-12-12 rows worked) = 26-26-26-26-26-28-28 stitches. On next row from wrong side, cast on 11-11-12-13-14-15-15 new stitches at the end of row = 37-37-38-39-40-43-43 stitches. Increases for neck are now done. Piece measures 11-11-12-12-12-13-14 cm from marker. Some of the neck depth will be over on back piece. Neck depth at the front = 9-9-9-9-9-10-11 cm. Neck depth at the back = 2-2-3-3-3-3-3 cm. Then work in stocking stitch with 1 edge stitch in garter stitch mid front until front piece measures 11-12-13-13-14-14-15 cm from marker - finish with a row from wrong side, do not cut the yarn. Then slip front pieces and back piece together and pick up stitches for sleeve as explained below. ROW 1 (= right side): Begin from right side with stitches from left front piece: Work 1 edge stitch in garter stitch, knit until 2 stitches remain on needle, slip 1 stitch, knit 1, pass slipped stitch over (= 1 stitch decreased), insert 1 marker here, pick up 22-22-24-24-26-26-28 stitches along the side on left front piece (= stitches for sleeve - pick up stitches inside outermost stitch), insert 1 marker, knit the first 2 stitches from back piece together (= 1 stitch decreased), work until 2 stitches remain on back piece, slip 1 stitch, knit 1, pass slipped stitch over (= 1 stitch decreased), insert 1 marker, pick up 22-22-24-24-26-26-28 stitches along the side on right piece (= stitches for sleeve - pick up stitches inside outermost stitch), insert 1 marker, work stitches from right front piece back on left needle, knit the first 2 stitches together (= 1 stitch decreased), knit over stitches from right front piece (the last stitch is an edge stitch and always worked in garter stitch) = 186-186-194-198-206-218-222 stitches. ROW 2 (= wrong side): Work 1 edge stitch as before, purl until first marker, move marker on to right needle, increase 1 stitches towards the left, purl until next marker, increase 1 stitch towards the right, move marker on to right needle, purl until next marker, move marker on to right needle, increase 1 stitch towards the left, purl until next marker, increase 1 stitch towards the right, move marker on to right needle, work the rest of row as before = 190-190-198-202-210-222-226 stitches. ROW 3 (= right side): Work 1 edge stitch as before, work until first marker, move marker on to right needle, increase 1 stitch towards the left, knit until next marker, increase 1 stitch towards the right, move marker on to right needle, knit until next marker, move marker on to right needle, increase 1 stitch towards the left, knit until next marker, increase 1 stitch towards the right, move marker on to right needle, work the rest of row as before = 194-194-202-206-214-226-230 stitches. ROW 4 (= wrong side): Work 1 edge stitch and purl until first marker, move marker on to right needle, increase 1 stitch towards the left, purl until next marker (= sleeve), increase 1 stitch towards the right, move marker on to right needle, purl until next marker, move marker on to right needle, increase 1 stitch towards the left, purl until next marker, increase 1 stitch towards the right, move marker on to right needle, work the rest of row as before: 198-198-206-210-218-230-234 stitches. ROW 5 (= right side): Work as before until first marker, move marker on to right needle, increase 1 stitch towards the left, work until next marker (= sleeve), increase 1 stitch towards the right, move marker on to right needle, work until next marker, move marker on to right needle, increase 1 stitch towards the left, work until next marker (= sleeve), increase 1 stitch towards the right, move marker on to right needle, work the rest of row as before = 202-202-210-214-222-234-238 stitches. ROW 6 (= wrong side): Purl with 1 edge stitch in garter stitch in each side without increasing. AFTER 6TH ROW: Work 5th and 6th row 7-5-5-6-3-2-0 more times (= 14-10-10-12-6-4-0 rows worked). 11-9-9-10-7-6-4 increases have been done in total for sleeves = 44-40-42-44-40-38-36 stitches on each sleeve, 36-36-37-38-39-42-42 stitches on each front piece and 70-70-72-74-76-82-82 stitches on back piece = 230-222-230-238-234-242-238 stitches. Then increase on both sleeves and body, increase on body 2 stitches inside marker so that there are 2 stitches between increase for body and increase for sleeve - work next row as follows: ROW 1 (= right side): Work 1 edge stitch and then knit until 2 stitches remain before first marker, increase 1 stitch towards the right, knit 2 stitches, move marker on to right needle, increase 1 stitch towards the left, knit until next marker (= sleeve), increase towards the right, move the marker on to right needle, knit 2 stitches, increase 1 stitch towards the left, knit until 2 stitches remain before next marker, increase 1 stitch towards the right, knit 2 stitches, move marker on to right needle, increase 1 stitch towards the left, work until next marker (= sleeve), increase 1 stitch towards the right, move marker on to right needle, knit 2 stitches, increase 1 stitch towards the left, work the rest of row as before (= 8 stitches increased, on each side of 2 stitches in every transition between body and sleeve). ROW 2 (= wrong side): Purl with edge stitch in each side as before. Repeat these 2 rows until 6-10-11-13-16-19-22 increases have been done in total on body and sleeves. 17-19-20-23-23-25-26 increases have been done in total for sleeve = 56-60-64-70-72-76-80 stitches on each sleeve, 42-46-48-51-55-61-64 stitches on each front piece and 82-90-94-100-108-120-126 stitches on back piece = 278-302-318-342-362-394-414 stitches. Piece should now measure approx. 13-14-15-17-17-19-20 cm on sleeve, when the jacket is folded double at the shoulder, it should measure approx. 19-20-22-24-24-26-28 cm from the top of shoulder. If the garment is shorter than this, continue until correct measurements without increases. Now divide yoke for body and sleeves. DIVIDING FOR BODY AND SLEEVES: AT THE SAME TIME as next row is worked divide yoke for body and sleeves as follows: Work 42-46-48-51-55-61-64 stitches as before (= front piece), slip the next 56-60-64-70-72-76-80 stitches on a thread for sleeve, cast on 6-6-8-10-12-12-14 new stitches on row (= in the side mid under sleeve), work the next 82-90-94-100-108-120-126 stitches in stocking stitch (= back piece), slip the next 56-60-64-70-72-76-80 stitches on a thread for sleeve, cast on 6-6-8-10-12-12-14 new stitches on row (= in the side mid under sleeve) and work the last 42-46-48-51-55-61-64 stitches as before (= front piece). Finish body and sleeves separately. BODY: = 178-194-206-222-242-266-282 stitches. Work in stocking stitch with 1 edge stitch in garter stitch in each side until piece measures 26-27-27-27-28-28-28 cm from division, finish with a row from right side, and increase at the same time 1 stitch on last row = 179-195-207-223-243-267-287 stitches. Switch to circular needle size 2.5 mm and work next row from wrong side as follows: 1 edge stitch in garter stitch, * make 1 yarn over, slip 1 stitch purlwise, knit 1 *, work from *-* until 2 stitches remain, make 1 yarn over, slip 1 stitch purlwise, 1 edge stitch in garter stitch. Work next row as follows from right side: 1 edge stitch in garter stitch, * knit yarn over and slipped stitch together, purl 1 *, work from *-* until 2 stitches remain, knit yarn over and slipped stitch together, 1 edge stitch in garter stitch. Repeat these 2 rows for 4-4-4-4-5-5-5 cm, finish with a row from wrong side and cast off by knitting from right side. Jacket measures approx. 52-54-56-58-60-62-64 cm from the top of shoulder. SLEEVES: Slip 56-60-64-70-72-76-80 sleeve stitches from one thread on to circular needle size 4 mm and pick in addition up 1 stitch in each of the 6-6-8-10-12-12-14 stitches cast on under sleeve – read SLEEVE TIP = 62-66-72-80-84-88-94 stitches. Insert 1 marker in the middle of the 6-6-8-10-12-12-14 new stitches under sleeve - round begins at the marker thread. Work in stocking stitch in the round on needle - AT THE SAME TIME when sleeve measures 3 cm from division, decrease mid under sleeve – read DECREASE TIP and decrease as follows: Decrease 2 stitches every 8-6-4½-3-2½-2-1½ cm 4-6-8-11-12-13-15 times in total = 54-54-56-58-60-62-64 stitches. Work until sleeve measures 37-38-39-37-35-33-32 cm from division. Switch to circular needle size 2.5 mm and work next round as follows: * Make 1 yarn over, slip 1 stitch purlwise, purl 1 *, work from *-* Work next round as follows: * Knit yarn over and slipped stitch together, purl 1 *, work from *-*. Repeat these 2 rounds for 4-4-4-4-5-5-5 cm and cast off by knitting from right side. Sleeve measures 41-42-43-41-39-38-37 cm in total from division. LEFT BAND: Use circular needle size 2.5 mm, begin from right side at the neck and pick up approx. 109 to 137 stitches along the edge on front piece (pick up inside 1 garter stitch), number of stitches must be uneven. Work first row as follows from wrong side: 1 stitch in garter stitch, * make 1 yarn over, slip 1 stitch purlwise, knit 1 *, work from *-* until 2 stitches remain, make 1 yarn over, slip 1 stitch purlwise, 1 stitch in garter stitch. Work next row as follows from right side: 1 stitch in garter stitch, * knit yarn over and slipped stitch together, purl 1 *, work from *-* until 2 stitches remain, knit yarn over and slipped stitch together, 1 stitch in garter stitch. Continue back and forth like this until band measures 3-3-3-3-4-4-4 cm, finish with a row from wrong side and cast off by knitting from right side. RIGHT BAND: Use circular needle size 2.5 mm, begin from right side on right front piece and pick up approx. 109 to 137 stitches along the edge on front piece (pick up the same number of stitches as on left band and pick up inside 1 stitch in garter stitch), number of stitches must be uneven. Work first row as follows from wrong side: 1 stitch in garter stitch, * make 1 yarn over, slip 1 stitch purlwise, knit 1 *, work from *-* until 2 stitches remain, make 1 yarn over, slip 1 stitch purlwise, 1 stitch in garter stitch. Work next row as follows from right side: 1 stitch in garter stitch, * knit yarn over and slipped stitch together, purl 1 *, work from *-* until 2 stitches remain, knit yarn over and slipped stitch together, 1 stitch in garter stitch. Continue rib until band measures 1½-1½-1½-1½-2-2-2 cm. Now decrease for BUTTONHOLES – read explanation above. Continue to work until band measures 3-3-3-3-4-4-4 cm. Cast off stitches with knit over knit and purl over purl. NECK EDGE: Use circular needle size 2.5 mm, begin from right side mid front, pick up approx. 81 to 101 stitches around the neck inside 1 stitch (pick up a few extra stitches over band so that the rib does not contract over the bands – number of stitches must be uneven). Work first row as follows from wrong side: 1 stitch in garter stitch, * make 1 yarn over, slip 1 stitch purlwise, knit 1 *, work from *-* until 2 stitches remain, make 1 yarn over, slip 1 stitch purlwise, 1 stitch in garter stitch. Work next row as follows from right side: 1 stitch in garter stitch, * knit yarn over and slipped stitch together, purl 1 *, work from *-* until 2 stitches remain, knit yarn over and slipped stitch together, 1 stitch in garter stitch. When rib measures 1½ cm, decrease for 1 buttonhole at the beginning of next row from right side as follows: work 5 stitches as before, make 1 yarn over and purl the next 2 stitches together, work the rest of row as before. Continue until rib measures 3-3-3-3-4-4-4 cm, then cast off by knitting from right side. ASSEMBLY: Sew the buttons on to the left band. |
|
 |
|
Have you finished this pattern?Tag your pictures with #dropspattern #silverdriftcardigan or submit them to the #dropsfan gallery. Do you need help with this pattern?You'll find 40 tutorial videos, a Comments/Questions area and more by visiting the pattern on garnstudio.com. © 1982-2026 DROPS Design A/S. We reserve all rights. This document, including all its sub-sections, has copyrights. Read more about what you can do with our patterns at the bottom of each pattern on our site. |
|


With over 40 years in knitting and crochet design, DROPS Design offers one of the most extensive collections of free patterns on the internet - translated to 17 languages. As of today we count 324 catalogues and 12290 patterns translated into English (UK/cm). 12290
We work hard to bring you the best knitting and crochet have to offer, inspiration and advice as well as great quality yarns at incredible prices! Would you like to use our patterns for other than personal use? You can read what you are allowed to do in the Copyright text at the bottom of all our patterns. Happy crafting!
Post a comment to pattern DROPS 264-14
We would love to hear what you have to say about this pattern!
If you want to leave a question, please make sure you select the correct category in the form below, to speed up the answering process. Required fields are marked *.