
Popular categories
Looking for a yarn?


Comments / Questions (26)
![]() Michala wrote:
Michala wrote:
Snažím se uplést tento svetr, ale nejsem si jistá, že přidávám správně, píšete: "Pak přidáváme pro raglán v každé 2. řadě na předním a zadním dílu, a v každé 4. řadě na rukávech (tj. přidáváme střídavě 4 a 8 ok). " - "v každé 2. řadě " - to znamená, že v lícové řadě přidávám a v rubové ne? Nebo mám přidávat v každé druhé lícové řadě?
08.04.2026 - 17:36DROPS Design answered:
Dobrý den Míšo, ano pro raglánové zkosení přidáváte pouze v lícových řadách. Na předním/zadním dílu přidáváte v každé 2. řadě (tj. každé lícové řadě) a na rukávech v každé 4. řadě (tj. každé 2. lícové řadě). Tedy se vám budou přidávání stále střídat, v první lícové řadě přidáte celkem 4 oka (přední/zadní díl) a v následující lícové řadě přidáte celkem 8 ok (přední/zadní díl + rukávy), opakujete dokud nedosáhnete počet přidání pro Vámi zvolenou velikost. Hodně zdaru!
10.04.2026 - 08:04
![]() Simona wrote:
Simona wrote:
Vorrei sapere come calcolare quante maglie saranno riprese per il bordo. Sto lavorando il deep river cardigan taglia S e mi dice che devovrebbere essere riprese 296 maglie. Come sono calcolate? Grazie.
23.03.2026 - 19:16DROPS Design answered:
Buonasera Simona, il n° di maglie è proporzionale alla grandezza del capo. Buon lavoro!
23.03.2026 - 22:10
![]() Anka H wrote:
Anka H wrote:
Après avoir fait toutes les augmentations, vous annoncez 418 mailles (2XL). Il m’en manque 100🤨. Pour l’encolure, 20 fois 2 mailles Pour les 2 manches, 14 fois 4 mailles Pour devant et dos, 14 fois 4 mailles Pour le raglan, 28 fois 4 mailles. Je crois que ma compréhension de votre traduction de l’explication n’est pas correcte. Pourriez-vous m’expliquer ce que j’ai oublié de faire ? Je vais sans doute devoir tout détricoter. Merci
20.02.2026 - 18:08DROPS Design answered:
Bonjour Anka, en taille XXL vous augmentez pour le raglan d'abord 14 x 8 m (dos, devants et manches, tous les 2 rangs ), puis 28 x 4 m pour le dos/les devants (tous les 2 rangs) et, en même temps 14x 4 m pour les manches (tous les 4 rangs), et 20 x 2 m pour l'encolure = 98+(14x8)+(28x4)+(14x4)+(20x2)=418 mailles. Bon tricot!
23.02.2026 - 07:38
![]() Helga Silvia wrote:
Helga Silvia wrote:
Sorry, mir ist es ein Bedürfnis mitzuteilen: Was für eine hübsche Frau in gesetzterem Alter, welche für dieses und andere Anleitungen Modell stand!!! Liebe Grüsse, Helga, Schweiz
07.02.2026 - 11:06
![]() Gosset Myriam wrote:
Gosset Myriam wrote:
J\'espère avoir le téléchargement
20.10.2025 - 18:25
![]() Sophia wrote:
Sophia wrote:
Hello! I’m wondering how I’m supposed to knit my increases in 2x2 ribbing without disturbing the rib pattern. It calls for: “knit 2, purl 2 – remember to increase” but how am I supposed to increase? If I make an increase between k2 p2 in the next RS row I would have a knit stitch in between my “ribs”.
18.10.2025 - 06:50DROPS Design answered:
Hi Sophia, The increases are worked on the first row of the ribbing and are incorporated into the rib. For example, you could knit 2, purl 1, then make 1 yarn over (which is knitted twisted when you work back from the wrong side to avoid a hole), knit 2, purl 2, etc. The increases are neatest if the yarn overs are worked in the purled stitches (from the right side) and need to be spaced evenly along the row. Hope this helps. Regards, Drops Team.
20.10.2025 - 06:50
![]() Tonia wrote:
Tonia wrote:
Bij maat xl is opzetten 96 steken. Maar dan is de verdeling 2 voorpand, 24 mouw, 40 achterpand 24 mouw,2 voorpand. Het totaal aantal steken is dan totaal 92 steken en je houdt dan 4 steken over.Dus het klopt niet. Wilt u zo goed zijn dit aan te passen, alvast bedankt
23.09.2025 - 16:01DROPS Design answered:
Dag Tonia,
Je voegt de markeerdraden
![]() Mirja wrote:
Mirja wrote:
Hallo, kann ich die Jacke auch ohne Umrechnung in Cotton Light stricken?
22.09.2025 - 10:17DROPS Design answered:
Hi, Mirja, this patterns is knitted using a yarn in Yarn Group B, so you can use other yarns in the same yarn group. Just remember to calculate how much yarn you need, you can use our Yarn Calculator. Happy knitting!
22.10.2025 - 09:31
![]() Gabi Schäffler wrote:
Gabi Schäffler wrote:
Guten Tag, Frage zum Modell da-012. Ich zähle in der 1. Zunahmereihe 92 Maschen, statt der notwendigen 96 Maschen. Was zähle ich falsch ?
14.09.2025 - 09:37DROPS Design answered:
Liebe Gabi, welche Stelle genau meinen Sie? 96 Maschen sind in der Größe XL doch die Anfangsmaschen, die Sie anschlagen?
17.09.2025 - 10:07
![]() Lily wrote:
Lily wrote:
Hallo ist die Angabe der weite nur von der Vorderseite oder insgesamt?
10.08.2025 - 12:50DROPS Design answered:
Liebe Lily, die Angaben in der Maßskizze sind für die Breite, wenn die Jacke flach liegt. Hier lesen Sie mehr. Viel Spaß beim Stricken!
11.08.2025 - 07:59
|
|
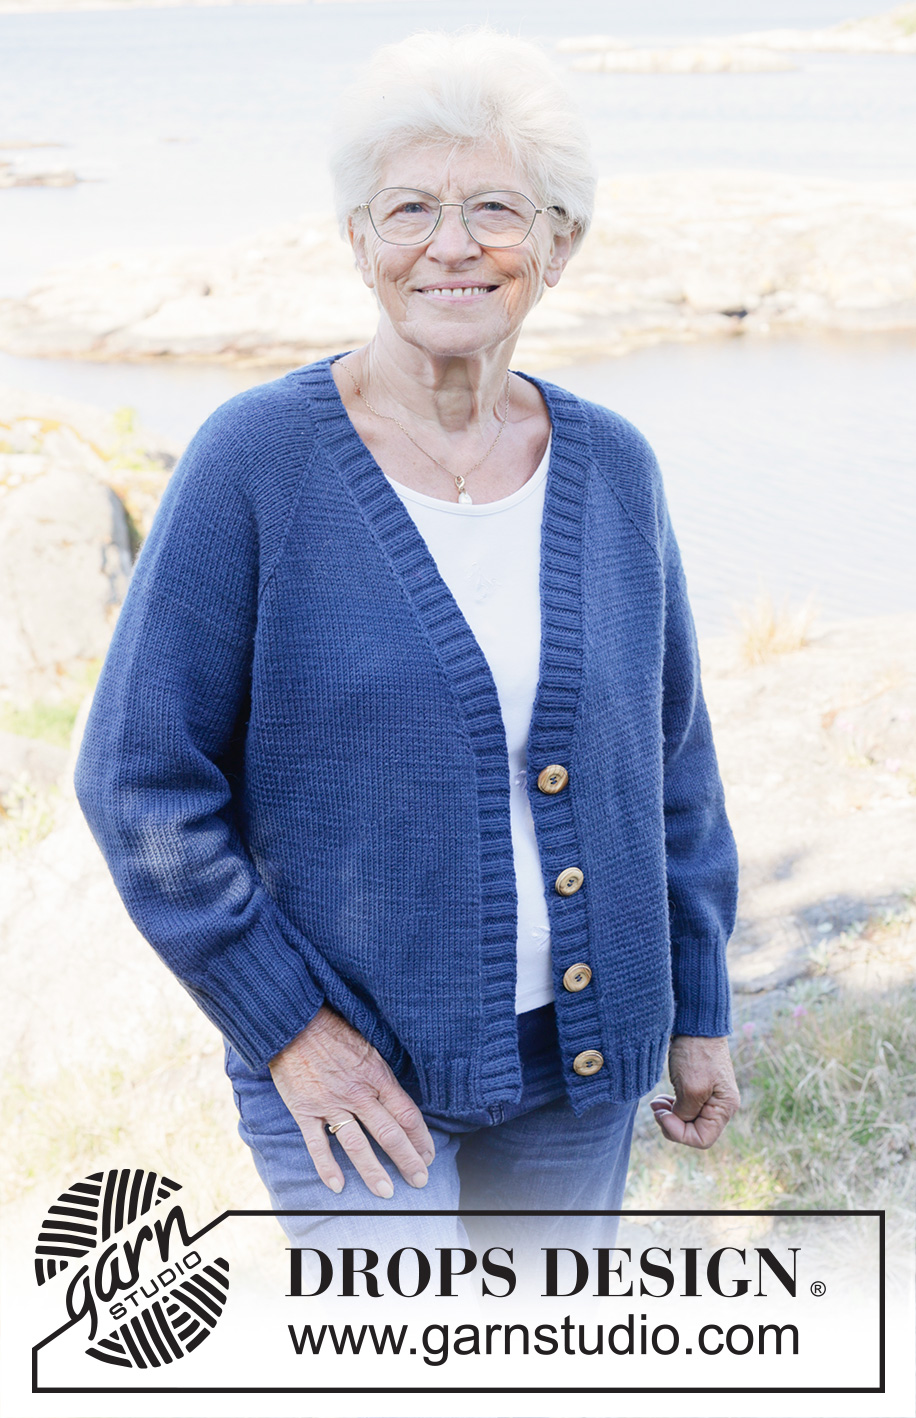
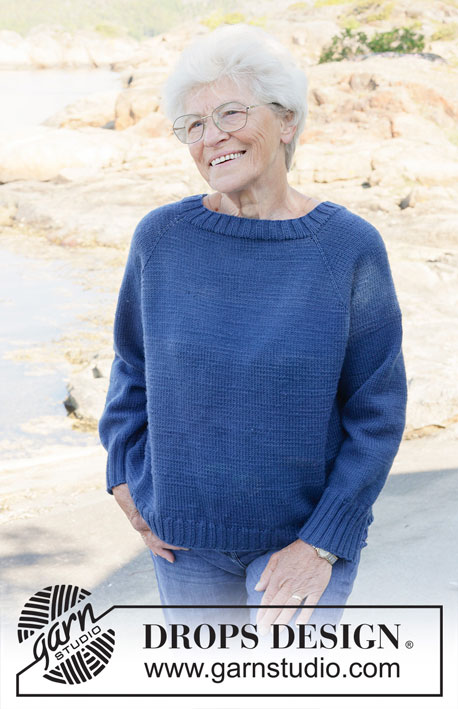
Deep River Cardigan#deeprivercardigan |
|
 |
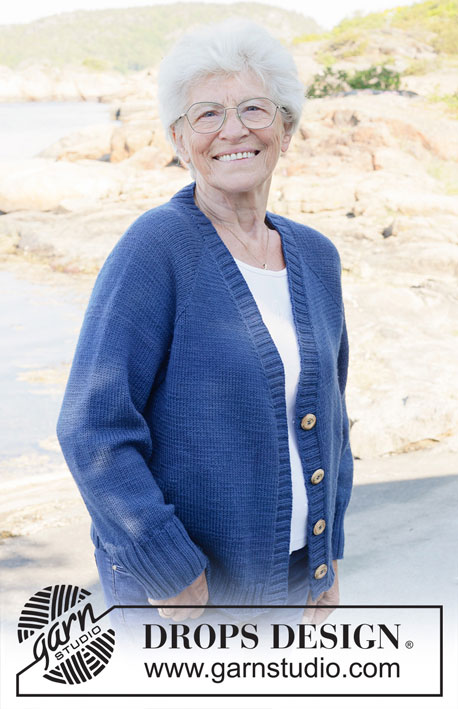 |
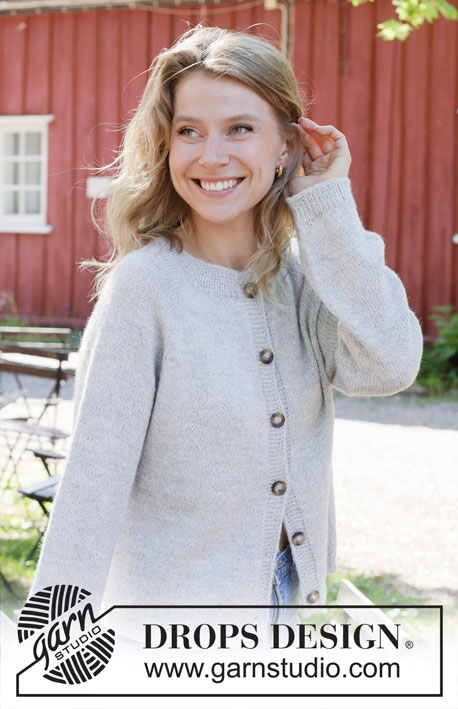
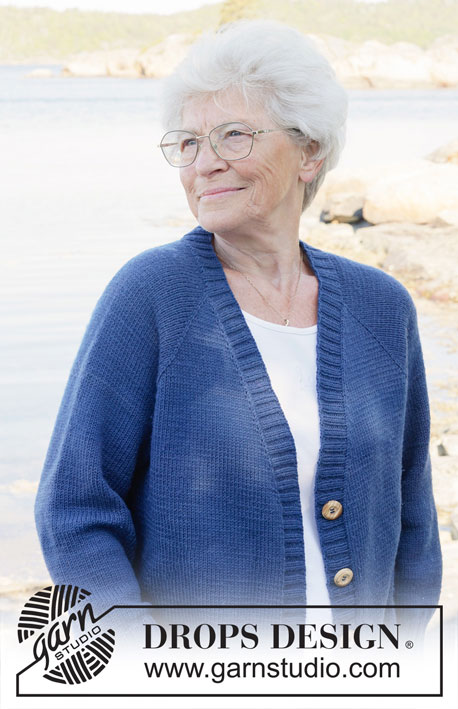
Knitted jacket in DROPS Daisy or DROPS Karisma. The piece is worked top down with raglan. Sizes S - XXXL.
DROPS 254-11 |
|
|
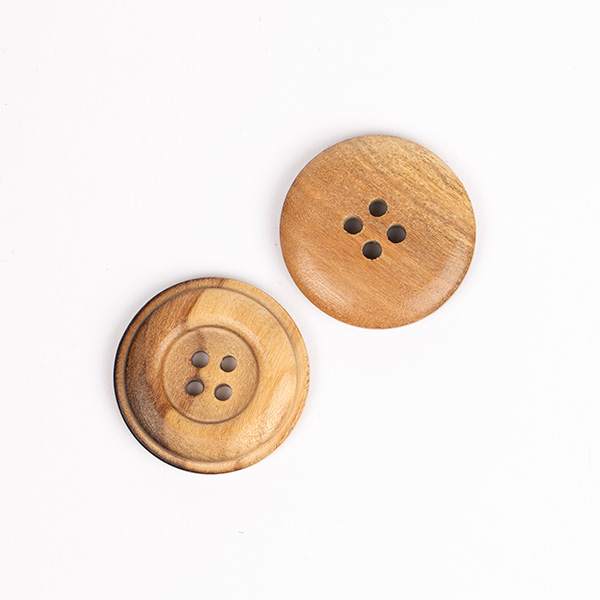
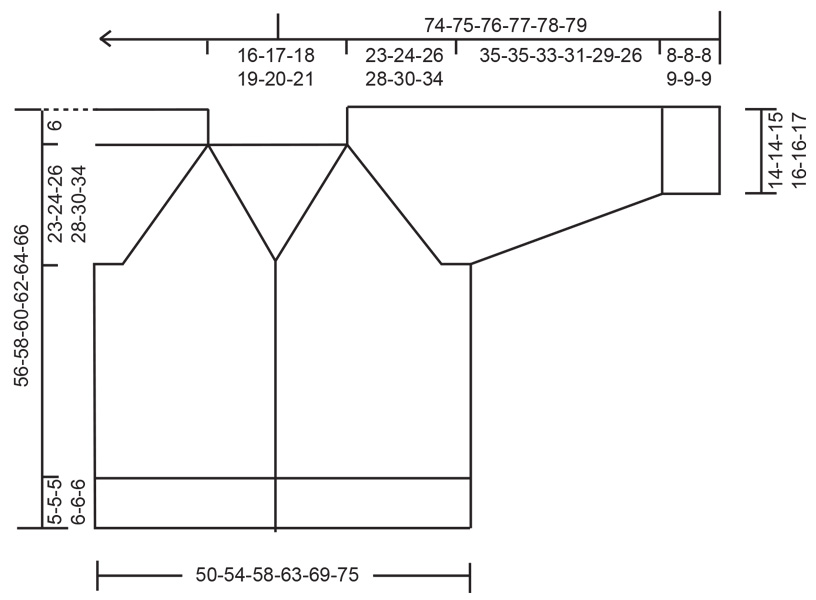
------------------------------------------------------- EXPLANATIONS FOR THE PATTERN: ------------------------------------------------------- GARTER STITCH (worked back and forth): Knit all rows, from both the right and wrong side. 1 ridge in height = knit 2 rows. RAGLAN: Increase 1 stitch by making 1 yarn over, which is worked as follows on the next row: BEFORE MARKER: Purl through the back loop to avoid a hole. Then work the new stitch in stocking stitch. AFTER MARKER: Slip the yarn over off the left needle and replace it twisted (insert the left needle through the back when replacing it). Purl the front loop to avoid a hole. Then work the new stitch in stocking stitch. KNITTING TIP: When knitting up stitches under the sleeve, a small hole can be left in the transition between the stitches on the body and sleeve. This hole can be closed by picking up the strand between 2 stitches and working it twisted together with the first stitch between the body and sleeve. DECREASE TIP (for sleeves): Decrease 1 stitch on each side of the marker-thread as follows: Work until there are 3 stitches left before the marker-thread, knit 2 together, knit 2 (marker-thread sits between these 2 stitches), slip 1 stitch knit-wise, knit 1 and pass the slipped stitch over the knitted stitch (2 stitches decreased). BUTTONHOLES: Work 4 buttonholes on the right band. 1 buttonhole = knit 2 together and make 1 yarn over– NOTE: It is neatest if you purl 2 together in a section with 2 purled stitches (seen from the right side). On the next row knit the yarn over to leave a hole. The top buttonhole is worked just below the V-neck, the bottom buttonhole in the transition between the stocking stitch and rib. The other 2 buttonholes are worked evenly between. ------------------------------------------------------ START THE PIECE HERE: ------------------------------------------------------- JACKET – SHORT OVERVIEW OF THE PIECE. The pattern uses both long and short needles; start with the length which fits the number of stitches and change when necessary. The yoke is worked back and forth with circular needle, from mid front and top down. When the yoke is finished, it is divided for body and sleeves and the body continued back and forth with circular needle, while the sleeves wait. The sleeves are worked in the round. Stitches are knitted up along both front pieces and neckline and the bands are worked to finish. NECKLINE: Cast on 90-92-94-96-98-100 stitches with circular needle size 4 mm and DROPS Daisy or DROPS Karisma. Insert 4 markers without working the stitches as follows: Count 2 stitches (= front piece), insert 1 marker in the next stitch, count 24 stitches (= sleeve), insert 1 marker in the next stitch, count 34-36-38-40-42-44 stitches (= back piece), insert 1 marker in the next stitch, count 24 stitches (= sleeve), insert 1 marker in the next stitch, there are 2 stitches left on the row (= front piece). Work stocking stitch back and forth with 1 GARTER STITCH on each side – read description above, increasing for raglan and V-neck. Read RAGLAN and V-NECK before continuing. Remember to maintain the knitting tension. RAGLAN: Increase for raglan before and after each marker-stitch (8 increased stitches), every 2nd row a total of 9-9-13-16-14-11 times. Then increase for raglan every 2nd row on the front and back pieces and every 4th round on the sleeves (alternately 4 and 8 increased stitches). Increase like this a total of 22-24-22-22-28-36 times on the front and back pieces (11-12-11-11-14-18 times on the sleeves). You have increased a total of 31-33-35-38-42-47 times for raglan on the front and back pieces and 20-21-24-27-28-29 times on the sleeves. V-NECK: After you have increased 2 times for raglan, begin increasing from the right side for the V-neck: Increase 1 stitch both at the beginning and end of the row, inside 2 stitches (i.e., 1 garter stitch + 1 stocking stitch). Increase every 4th row 16-17-18-19-20-21 times. Insert 1 marker in the stocking stitch and increase by making 1 yarn over in the same way as described under RAGLAN – increasing after the marker-stitch at the beginning of the row and before the marker-stitch at the end of the row. After the last increase there are 326-342-366-394-418-446 stitches. Continue working without further increases until the yoke measures 23-24-26-28-30-34 cm, measured straight down (not along the V-neck), from the beginning of the raglan-line on the front piece. DIVIDE FOR BODY AND SLEEVES: Work the next row as follows: Work 50-53-56-60-65-71 stitches as before (= front piece), place the next 64-66-72-78-80-82 stitches on a thread for the sleeve, cast on 8-10-12-14-16-18 stitches (in side mid-under sleeve), work 98-104-110-118-128-140 stitches (= back piece), place the next 64-66-72-78-80-82 stitches on a thread for the sleeve, cast on 8-10-12-14-16-18 stitches (in side mid-under sleeve), work the last 50-53-56-60-65-71 stitches as before (= front piece). The body and sleeves are finished separately. BODY: = 214-230-246-266-290-318 stitches. Continue with stocking stitch and 1 garter stitch on each side until the piece measures 45-47-49-50-52-54 cm from the cast-on edge mid-front. Now work rib and increase 22-26-26-26-30-34 stitches evenly on the row = 236-256-272-292-320-352 stitches, as follows: Change to circular needle size 3 mm. Work 1 garter stitch, rib (knit 2, purl 2 – remember to increase) until there are 3 stitches left, knit 2 and 1 garter stitch. When the rib measures 5-5-5-6-6-6 cm, cast off. The jacket measures approx. 50-52-54-56-58-60 cm from the cast-on edge mid-front and 56-58-60-62-64-66 cm from the shoulder. SLEEVES: Place the 64-66-72-78-80-82 sleeve-stitches from one thread on circular needle size 4 mm and knit up 1 stitch in each of the 8-10-12-14-16-18 stitches cast on under the sleeve – read KNITTING TIP = 72-76-84-92-96-100 stitches. Insert a marker-thread in the middle of the 8-10-12-14-16-18 stitches under the sleeve. Start at the marker-thread and work stocking stitch in the round. When the sleeve measures 4 cm, decrease 2 stitches under the sleeve – read DECREASE TIP. Decrease like this every 4-3½-3-2-1½-1½ cm a total of 7-8-10-13-14-15 times = 58-60-64-66-68-70 stitches. Continue working until the sleeve measures 35-35-33-31-29-26 cm from the division. Change to double pointed needles size 3 mm. Work rib (knit 2, purl 2), AT THE SAME TIME increase 6-8-8-6-8-8 stitches evenly on the first round = 64-68-72-72-76-78 stitches. When the rib measures 8-8-8-9-9-9 cm, cast off. The sleeve measures approx. 43-43-41-40-38-35 cm from the division. BANDS: Use circular needle size 3 mm. Start from the right side at the bottom of the right front piece and knit up 296-304-316-328-340-352 stitches inside 1 edge stitch (stitch count must be divisible by 4), up the right front piece, around the neckline and down the left front piece. Work rib back and forth as follows (first row from the wrong side): 1 garter stitch, * purl 2, knit 2 *, work from *-* until there are 3 stitches left, purl 2 and 1 garter stitch. Continue this rib for 1½ cm. Now work 4 BUTTONHOLES evenly spaced – read explanation above. Cast off when the rib measures 3 cm. Sew the buttons onto the left band. |
|
 |
|
Have you finished this pattern?Tag your pictures with #dropspattern #deeprivercardigan or submit them to the #dropsfan gallery. Do you need help with this pattern?You'll find 32 tutorial videos, a Comments/Questions area and more by visiting the pattern on garnstudio.com. © 1982-2026 DROPS Design A/S. We reserve all rights. This document, including all its sub-sections, has copyrights. Read more about what you can do with our patterns at the bottom of each pattern on our site. |
|


With over 40 years in knitting and crochet design, DROPS Design offers one of the most extensive collections of free patterns on the internet - translated to 17 languages. As of today we count 324 catalogues and 12290 patterns translated into English (UK/cm). 12290
We work hard to bring you the best knitting and crochet have to offer, inspiration and advice as well as great quality yarns at incredible prices! Would you like to use our patterns for other than personal use? You can read what you are allowed to do in the Copyright text at the bottom of all our patterns. Happy crafting!
Post a comment to pattern DROPS 254-11
We would love to hear what you have to say about this pattern!
If you want to leave a question, please make sure you select the correct category in the form below, to speed up the answering process. Required fields are marked *.