
Popular categories
Looking for a yarn?


Comments / Questions (14)
![]() Stefanie wrote:
Stefanie wrote:
Ich verstehe die Anleitung in der 1. Reihe nach I-Cord-Verbindung der Blenden nicht. Ich habe 67 M. in der Größe L zugenommen, soll die Marker jeweils nach den Blenden + 1 M. dann jeweils nach 17 M. setzen. Für den Rücken bleiben nicht 27 M. übrig, sondern 31. Wo ist mein Denkfehler? Wenn ich dann in der 1. Reihe die Muster stricke, nehme ich noch nicht für die Raglanärmel usw. zu? Ich stricke in der 1. Reihe genau nach Anleitung? Was ist mit dem re. Ärmel? Rückenteil Perlmuster?
14.04.2026 - 08:52DROPS Design answered:
Liebe Stefanie, beachten Sie, daß die Markierer nicht zwischen den Maschen sondern je in einer Masche eingestetzt werden, so haben Sie in L: 10+1+17+1+25+1+17+1+10=83 Maschen. Das Perlmuster stricken Sie wie bei der Schriftlichen Anleitung bzw wie in den Diagrammen gezeigt. Viel Spaß beim Stricken!
14.04.2026 - 09:01
![]() Marta wrote:
Marta wrote:
Kiedy mam dodawać oczka na dekolt V i reglan? Czy schematy A1,A2 i A4 juz uwzględniają oczka dodawane na dekolt i reglan? Czy muszę je jeszcze dodatkowo dodac? Pogubilam się już w pierwszym rzędzie karczku.
26.07.2025 - 23:50DROPS Design answered:
Witaj Marto, pierwsze dodawania oczek na dekolt i reglan są uwzględnione w schematach. Kolejne będą wykonywane analogicznie, ale patrz w opisie jaka jest częstotliwość dodawania oczek dla Twojego rozmiaru. Pozdrawiamy!
27.07.2025 - 08:14
![]() Kristina wrote:
Kristina wrote:
Ich habe zu Beginn gemäß der Anleitung 1 linke Blende gestrickt und beiseite gelegt. Nun habe ich die rechte Blende gestrickt, aber verstehe nicht wie ich diese weiter stricke. Versteh ich das richtig, dass ich an dieser Blende das Passe stricke? Was beudeutet es in der Anleitung ,,über die rechte Blende stricken? Oder muss ich ein komplett neues Stück anfangen, indem ich 65/69 neue Maschen anschlage? Gibt es hier vielleicht ein Video für den Übergang der Blende zu Passe?
19.03.2025 - 20:52DROPS Design answered:
Liebe Kristina, die beiden Blende sind zuerst separat gestrickt, dann wird man Maschen dazwischen für den Halsausschnitt + Ärmel anschalgen; schauen Sie mal dieses Video (stricken Sie die Blende wie hier in der Anleitung, im Video sind sie anders gestrickt), dann ab ca 11:00 wird man die Maschen zwischen beide Blende anschlagen und ab ca 12:45 zeigt man wie diese Blende später angenäht werden. Viel Spaß beim Stricken!
20.03.2025 - 09:57
![]() Squirrelzzzz wrote:
Squirrelzzzz wrote:
I am trying to make this with combined Baby Merino and Kid Silk in XL. I am confused about the yolk increases. If I alternate right side increases of 8 and 4 stitches I will end up with 403 stitches instead of 321! Any idea where am I going wrong?
17.08.2024 - 17:23DROPS Design answered:
Dear Squirrelzzzz, you will alternate between 8 stitches (increases both on front and back piece and the sleeves) or 4 stitches (you only increase for the front/back pieces). You increase 8 stitches 2 times (so only 2 times in the sleeves) and 4 stitches 2 times. Or, in total, you have increased for the front/back pieces 4 stitches 27 times (=108 increases) and for the sleeves 4 stitches 25 times (=100 increases). Add it to the 26 stitches for the V-neck and the 87 initial stitches and you have 321 stitches. Remember that the increases in the charts are the same as the V-neck and raglan increases, and not worked additionally. Happy knitting!
18.08.2024 - 22:48
![]() Stefanie Heller wrote:
Stefanie Heller wrote:
Ich komme mit den beiden Anfangsblenden nicht zurecht. Sie werden immer beide gleich, auch wenn ich nach Anleitung stricke. Sie müssten doch gegengleich sein, oder? Und sie werden NICHT abgekettet, richtig?
15.07.2024 - 15:41DROPS Design answered:
Liebe Stefanie, genau, die Blenden werden nicht abgekettet - bei der rechten Blende wird direkt weitergestrickt und die linke Blende wird dann mit in die Reihe eingestrickt. Die beiden Blenden müssten in Bezug auf den Rand gegengleich sein - die eine Seite der Blenden besteht aus einem geraden Rand, die andere Seite aus einem Knötchenrand. Ansonsten sind die Blenden aber gleich und man kann aufgrund der Krausrippen auch leicht Vorder- und Rückseite verwechseln. Markieren Sie sich am besten die Vorderseite, wenn Sie dann genau nach Anleitung stricken, müsste der gerade Blenden-Rand bei der einen Blende an der rechten und bei der anderen Blende an der linken Seite erscheinen.
16.07.2024 - 17:57
![]() Turbang Claire wrote:
Turbang Claire wrote:
Peut-on le tricoter sans aiguilles circulaires, juste des aiguilles droites ? Merci et je vous souhaite une excellente journée .
19.02.2024 - 18:27DROPS Design answered:
Bonjour Mme Turbang, tout à fait, l'empiècement et le dos/les devants peuvent juste être tricotés sur aiguille circulaire, pour les manches, cette leçon pourra vous aider à faire les ajustements nécessaires. Bon tricot!
20.02.2024 - 07:47
![]() Aurore wrote:
Aurore wrote:
Aurore
20.01.2024 - 14:55
![]() Sylvie wrote:
Sylvie wrote:
Orangeade
18.01.2024 - 20:21
![]() Katja Salomies wrote:
Katja Salomies wrote:
Peach party
18.01.2024 - 18:30
![]() Claudia wrote:
Claudia wrote:
Fresh summer fruit
18.01.2024 - 16:20
|
||||||||||||||||
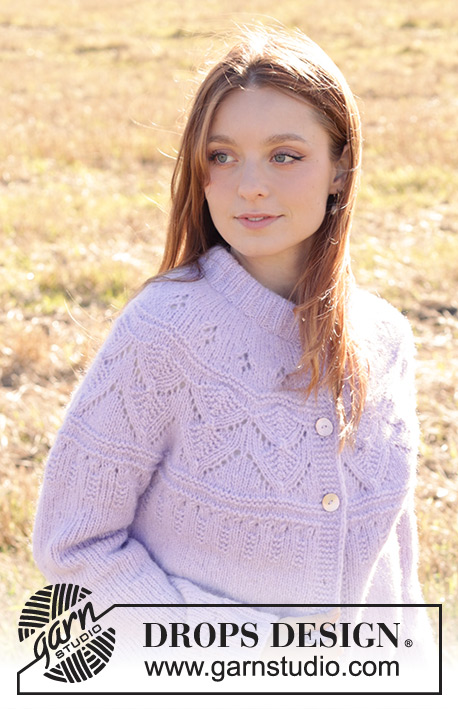
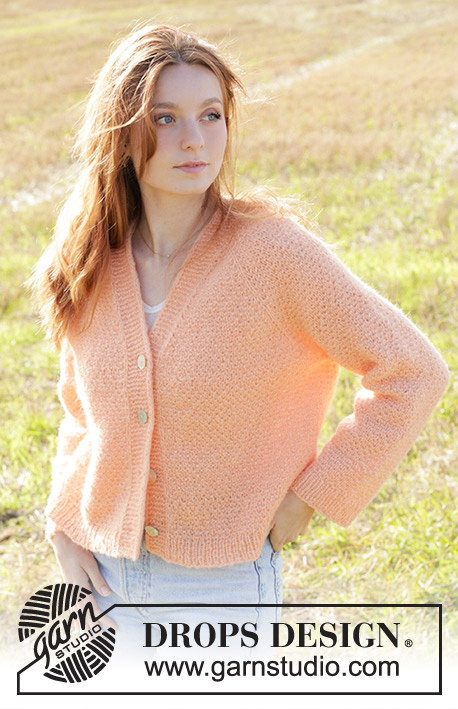
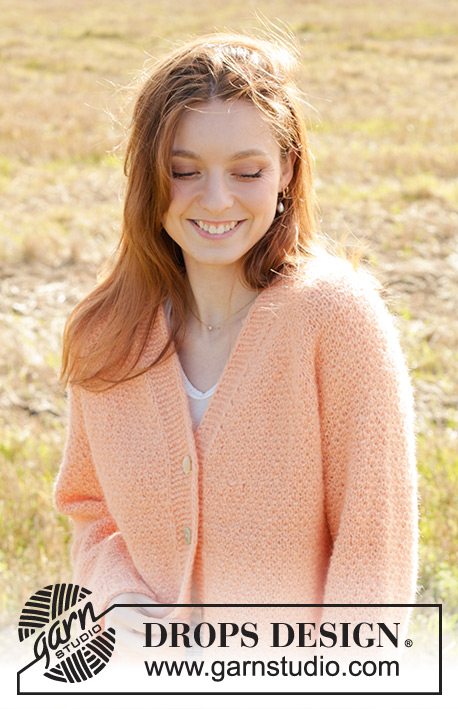
Perfectly Peach Jacket#perfectlypeachjacket |
||||||||||||||||
 |
 |
|||||||||||||||
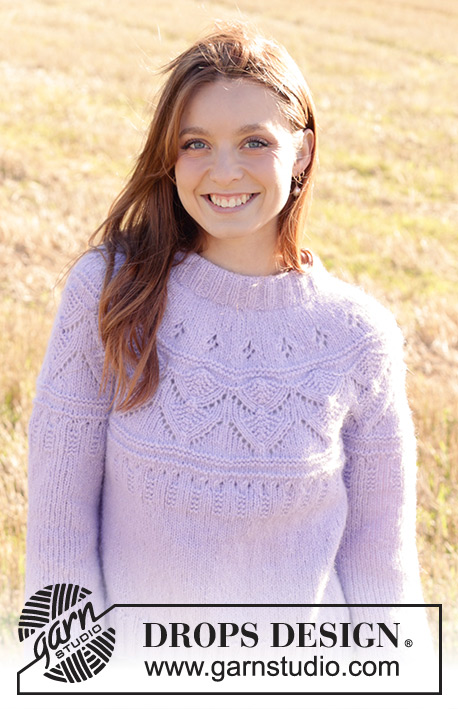
Knitted jacket in DROPS Air. The piece is worked top down with moss stitch, raglan, V-neck and I-cord. Sizes XS - XXL.
DROPS 248-23 |
||||||||||||||||
|
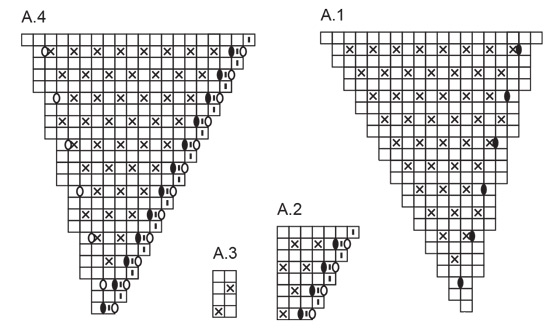
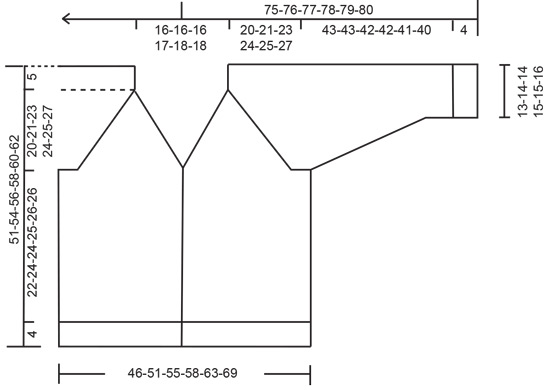
------------------------------------------------------- EXPLANATIONS FOR THE PATTERN: ------------------------------------------------------- GARTER STITCH (worked back and forth): Knit all rows. 1 ridge = 2 rows. BANDS WITH I-CORD: START OF ROW: Work the band as follows: Slip 1 stitch purl-wise with yarn in front, knit 1, work 7 garter stitches. END OF ROW: Work the band as follows: Work until there are 9 stitches left on the row, work 7 garter stitches, slip 1 stitch purl-wise with yarn in front, knit 1. Work in the same way both from the right and wrong side. PATTERN: See diagrams A.1 to A.4. The diagrams show all rows in the pattern from the right side. RAGLAN: All increases are worked from the right side! Increase 1 stitch before/after each marker-stitch, Marker-stitch worked in stocking stitch. Increase 1 stitch by making 1 yarn over. On the next row (= wrong side) work yarn overs as follows to avoid holes: BEFORE MARKER-STITCH: Purl yarn over twisted. AFTER MARKER-STITCH: Slip yarn over onto right needle knit-wise, insert left needle and place yarn over back on left needle, purl the front loop. Work the new stitches into the pattern. V-NECK: All increases are worked from the right side! Increase for the V-neck inside the 9 band stitches and 1 stocking stitch on each front piece as follows: Work the left band, 1 stocking stitch, make 1 yarn over, work until there are 10 stitches left, make 1 yarn over, 1 stocking stitch and work the right band. On the next row (= wrong side) work the yarn overs as follows to avoid holes: AFTER RIGHT BAND: Slip yarn over onto right needle knit-wise, insert left needle and place yarn over back on left needle, purl the front loop. BEFORE LEFT BAND: Purl the yarn over twisted. Work the new stitches into the pattern. BUTTONHOLES: Work buttonholes on the right band (when the garment is worn). Work from the right side when there are 6 stitches left on the row as follows: Make 1 yarn over, knit 2 together, work the other band-stitches as before. On the next row (wrong side), knit the yarn over to leave a hole. The first buttonhole is worked 1 cm after the last increase for the V-neck. The other 3 buttonholes are then worked with approx. 7-8-8-8½-8½-9 cm between each one. The bottom buttonhole is worked in the transition between the stocking stitch and rib. DECREASE TIP (for sleeves): All decreases are worked on a round of stocking stitch. Decrease 1 stitch on each side of the marker-thread as follows: Start at the marker-thread, knit 1, slip 1 stitch knit-wise, knit 1, pass the slipped stitch over the knitted stitch, work until there are 3 stitches left before the marker-thread at the end of the round, knit 2 together, knit 1. ------------------------------------------------------- START THE PIECE HERE: ------------------------------------------------------- JACKET – SHORT OVERVIEW OF THE PIECE. In this pattern long and short needles have been used - begin with fitting length and switch as needed. Start by working 2 loose bands, then cast on stitches between them for the yoke. The yoke is worked back and forth with circular needle from mid-front and top down. When the yoke is finished it is divided for the body and sleeves. The body is continued back and forth with circular needle while the sleeves wait. The sleeves are worked in the round with short circular needle/double pointed needles. The bands are fastened to the neckline to finish. LEFT BAND: Cast on 9 stitches with needle size 5 mm and DROPS Air, work as follows: RIGHT SIDE: Slip 1 stitch purl-wise with strand in front, knit 1, 7 GARTER STITCHES – read description above. WRONG SIDE: 7 garter stitches, slip 1 stitch purl-wise with strand in front, knit 1. Work back and forth like this for 17-17-17-17½-18-18 cm, with the last row from the right side. Cut the strand and lay to one side. RIGHT BAND: Cast on 9 stitches with needle size 5 mm and DROPS Air, work as follows: RIGHT SIDE: 7 garter stitches, slip 1 stitch purl-wise with strand in front, knit 1. WRONG SIDE: Slip 1 stitch purl-wise with strand in front, knit 1, 7 garter stitches. Work back and forth like this for 17-17-17-17½-18-18 cm, with the last row from the right side. Turn, then work the yoke as described below. YOKE: The yoke is worked back and forth with BANDS WITH I-CORD on each side, read description above. Work the right band stitches as before from the wrong side, cast on 65-65-65-67-69-69 stitches, work the left band stitches as before from the wrong side = 83-83-83-85-87-87 stitches. Insert 4 markers, without working the stitches, as follows: Count 10 stitches (front piece), insert 1 marker in the next stitch, count 17 stitches (sleeve), insert 1 marker in the next stitch, count 25-25-25-27-29-29 stitches (back piece), insert 1 marker in the next stitch, count 17 stitches (sleeve), insert 1 marker in the next stitch, there are 10 stitches left (front piece). Now work pattern back and forth at the same time as increasing for the V-neck and for raglan – read all paragraphs, to where you divide for the body and sleeves, before continuing. REMEMBER THE KNITTING TENSION! Work PATTERN as follows from the right side: Work the left band, work A.1 over the left front piece as far as the first marker, * work A.2, repeat A.3 to the next marker *, work from *-* a total of 3 times, work A.4 over the right front piece and work the right band. Work as follows from the wrong side: Work the right band, purl until there are 9 stitches left (remember to work the yarn overs twisted in the correct directions), work the left band. The moss stitch/A.3 is repeated in height – the diagrams establish the moss stitch on each row from the right side, then work the increased stitches into the pattern. AT THE SAME TIME, continue increasing for the V-neck and raglan as described below. V-NECK: Increase for V-NECK – read description above, inside the bands and 1 stocking stitch on each side, every 4th row 11-11-12-12-13-14 times (including the increases shown in the diagrams). 1 cm after the last increase for the V-neck, work the first BUTTONHOLE on the right band – read description above. RAGLAN: Increase on each side of the marker-stitches as described under RAGLAN above, every 2nd row (each row from the right side = 8 increased stitches) 11-20-21-22-23-23 times (including the increases shown in the diagrams). Then continue to increase for raglan every 2nd row but every other increase is only on the front and back pieces, i.e., increase on the front and back pieces every 2nd row, on the sleeves every 4th row (increase alternately 8 and 4 stitches). Increase like this 11-3-4-4-4-7 times on the front and back pieces (5-1-2-2-2-3 times on the sleeves). You increase a total of 22-23-25-26-27-30 times on the front and back pieces and 16-21-23-24-25-26 times on the sleeves. Continue working the bands, moss stitch/A.3 until all the increases are finished. After the last increase there are 257-281-299-309-321-339 stitches. Continue working without further increases until the piece measures 20-21-23-24-25-27 cm from mid-back. Work the last row from the wrong side. DIVIDE FOR BODY AND SLEEVES: Work the left band and the next 35-38-41-42-45-50 stitches in moss stitch/A.3, place the next 49-55-59-61-61-61 stitches on 1 thread for the sleeve, cast on 8-10-12-14-16-18 stitches (in side under sleeve), work the next 71-77-81-85-91-99 stitches in moss stitch/A.3, place the next 49-55-59-61-61-61 stitches on 1 thread for the sleeve, cast on 8-10-12-14-16-18 stitches (in side under sleeve), work the next 35-38-41-42-45-50 stitches in moss stitch/A.3, work the right band. BODY: = 175-191-205-215-231-253 stitches. Continue with moss stitch/A.3 and the bands as before until the body measures 22-24-24-25-26-26 cm from the division – with the last row from the right side. Purl back from the wrong side and increase 18-20-22-24-26-28 stitches evenly spaced (do not increase over the bands) = 193-211-227-239-257-281 stitches. Change to circular needle size 4 mm and work as follows from the right side: Work the band as before, * knit 1, purl 1 *, work from *-* until there are 10 stitches left, knit 1, work the band as before. Work this rib for 4 cm. Cast off. The jacket measures approx. 51-54-56-58-60-62 cm from the shoulder. SLEEVES: Place the 49-55-59-61-61-61 stitches from the thread on the one side of the piece on short circular needle/double pointed needles size 5 mm and knit up 1 stitch in each of the 8-10-12-14-16-18 stitches cast on under the sleeve = 57-65-71-75-77-79 stitches. Insert a marker-thread in the middle of the 8-10-12-14-16-18 stitches under the sleeve. Start at the marker-thread and work moss stitch/A.3 in the round as before – making sure the pattern continues from the yoke. When the sleeve measures 4-4-4-4-3-3 cm from the division, decrease 2 stitches under the sleeve – read DECREASE TIP. Decrease like this every 6½-4-3-3-3-3 cm a total of 6-9-12-12-13-12 times = 45-47-47-51-51-55 stitches. Work until the sleeve measures 43-43-42-42-41-40 cm. There is 4 cm left; try the jacket on and work to desired length before the rib. Knit 1 round and increase 5-7-7-5-5-5 stitches evenly spaced = 50-54-54-56-56-60 stitches. Change to double pointed needles size 4 mm. Work rib (knit 1, purl 1) for 4 cm. Cast off. The sleeve measures approx. 47-47-46-46-45-44 cm from the division. ASSEMBLY: Sew the buttons onto the left band. Sew the cast-on edge on each band together and sew the bands to the neckline – stretching them slightly while sewing. |
||||||||||||||||
Diagram explanations |
||||||||||||||||
|
||||||||||||||||
 |
||||||||||||||||
 |
||||||||||||||||
Have you finished this pattern?Tag your pictures with #dropspattern #perfectlypeachjacket or submit them to the #dropsfan gallery. Do you need help with this pattern?You'll find 34 tutorial videos, a Comments/Questions area and more by visiting the pattern on garnstudio.com. © 1982-2026 DROPS Design A/S. We reserve all rights. This document, including all its sub-sections, has copyrights. Read more about what you can do with our patterns at the bottom of each pattern on our site. |
||||||||||||||||


With over 40 years in knitting and crochet design, DROPS Design offers one of the most extensive collections of free patterns on the internet - translated to 17 languages. As of today we count 325 catalogues and 12298 patterns translated into English (UK/cm). 12298
We work hard to bring you the best knitting and crochet have to offer, inspiration and advice as well as great quality yarns at incredible prices! Would you like to use our patterns for other than personal use? You can read what you are allowed to do in the Copyright text at the bottom of all our patterns. Happy crafting!
Post a comment to pattern DROPS 248-23
We would love to hear what you have to say about this pattern!
If you want to leave a question, please make sure you select the correct category in the form below, to speed up the answering process. Required fields are marked *.