
Popular categories
Looking for a yarn?


Comments / Questions (48)
![]() Jennyfer wrote:
Jennyfer wrote:
Buonasera, non riesco a capire come lavorare gli aumenti fra le coste dello sprone, che cosa si intende a sezioni alterne? Grazie mille per l'aiuto.
06.01.2023 - 19:55DROPS Design answered:
Buonasera Jennyfer, a sezioni alterne significa una sezione si e una no. Buon lavoro!
06.01.2023 - 22:14
![]() Carolyn Lewis wrote:
Carolyn Lewis wrote:
I am keen to knit this sweater but I cannot find the measurements to go with the sizing S - XXL. I am from Australia and I have no idea what size to make. Is there a chart somewhere
16.12.2022 - 12:51DROPS Design answered:
Dear Mrs Lewis, measure a similar garment you have and like the shape and compare them to the measurements in the chart, this is the best accurate way to find out your size. Read more here. Happy knitting!
16.12.2022 - 13:39
![]() Shirley wrote:
Shirley wrote:
I am knitting a Medium. You recommend a yarn where 21 stitches=4 inches. After completion of A1 in the yolk, there are 300 stitches, which equals 57 inches. Seems too large. After completion of the yolk, there are 340 stitches, equaling 65 inches! (about 20 inches too large). What am I doing wrong? The neck is fine, but the yolk increases seem off. Thanks!
22.11.2022 - 13:34DROPS Design answered:
Dear Shirley, these 324 sts at the end of the yoke are all around shoulders, they include stitches for both sleeves + front + back piece; after you have divided piece for sleeve and cast on new stitches under sleeves, you should have 212 sts on needle = approx. 101 cm/39.76 inches around = approx. 51 cm / 20.08 inches in width. Happy knitting!
22.11.2022 - 16:09
![]() Rensche wrote:
Rensche wrote:
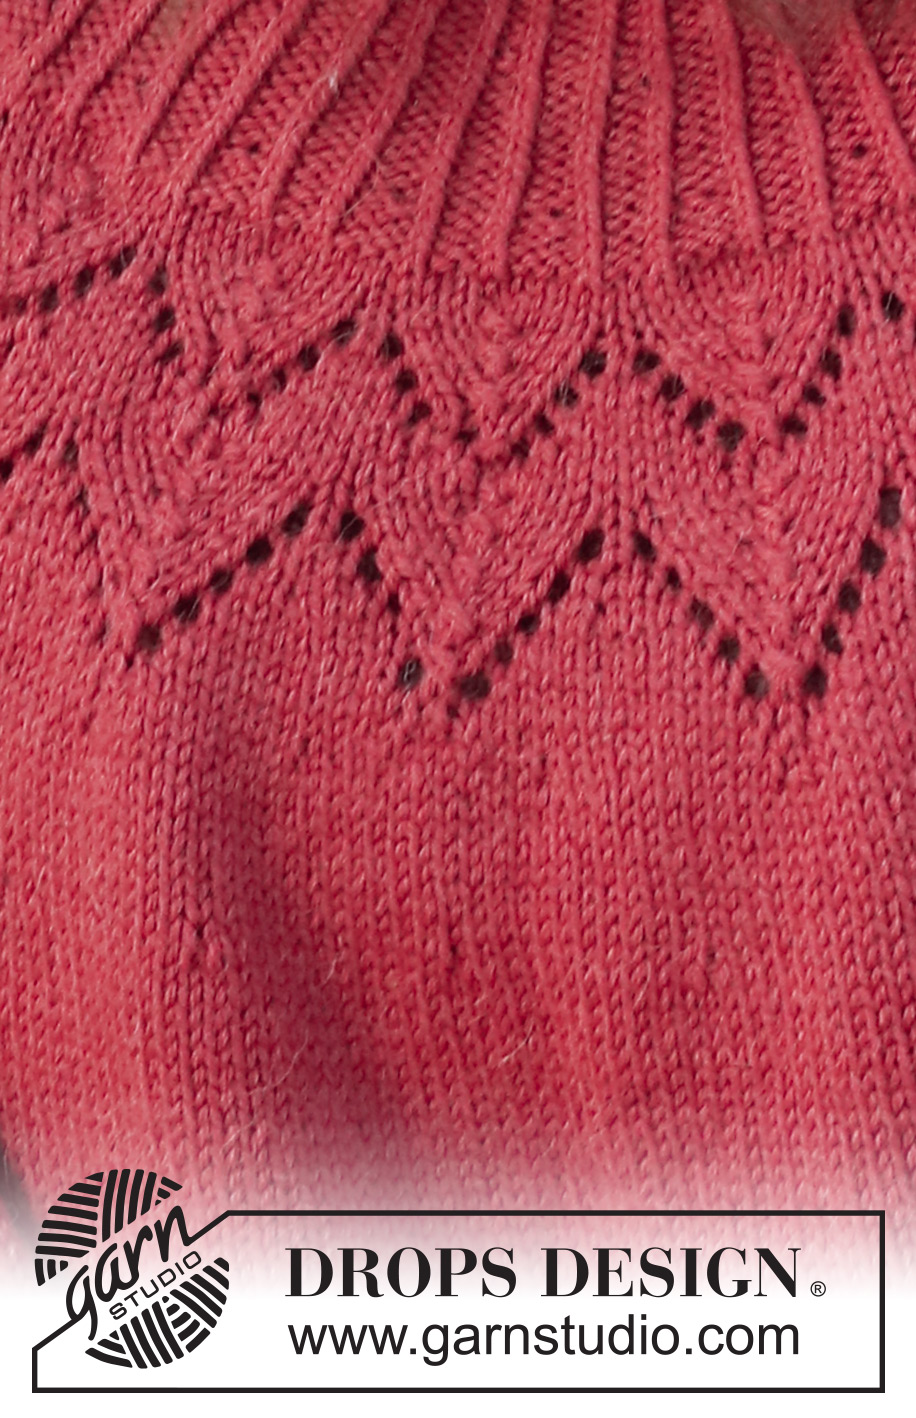
I have a problem with Row 10 of diagram A-1. It appears to be an increase row, but there are no increases marked in the pattern? Please assist as I can’t work out where to increase.
24.10.2022 - 18:44DROPS Design answered:
Hi Rensche, Row 10 is not an increase row. The increased number of stitches on this row is due to the 2 yarn overs on the previous row, which are not cancelled out by equivalent decreases as in previous rows. Happy knitting!
25.10.2022 - 07:06
![]() Rensche wrote:
Rensche wrote:
I have a problem with Row 10 of diagram A-1. It appears to be an increase row, but there are no increases marked in the pattern? Please assist as I can’t work out where to increase.
24.10.2022 - 18:40DROPS Design answered:
Dear Mrs Rensche, on row 9 in A.1 (S,M, L) / row 11 (XL, XXL, XXXL), you will increase 2 sts in each repeat making 2 yarn overs but no decreases as before = you now work A.1 over 12-14 sts. Happy knitting!
25.10.2022 - 08:54
![]() Joske wrote:
Joske wrote:
Ik begrijp het verschil tussen open () en dicht (x) niet. Is het zoals Tamara zegt? Dus om bij het zwarte () geen gaatje te krijgen?
06.09.2022 - 14:08DROPS Design answered:
Dag Joske,
Bij de dichte ovalen brei je de steek op de volgende naald gedraaid recht om ervoor te zorgen dat er geen gaatje ontstaat. Bij de open ovalen brei je de steek op de volgende naald gewoon recht, zodat er wel een gaatje ontstaat. 08.09.2022 - 17:05
![]() Lauren wrote:
Lauren wrote:
There doesn't appear to be any size measurements included in the pattern. How do I know what size to knit?
19.04.2022 - 08:21DROPS Design answered:
Hi Lauren, You will find a size chart at the bottom of the pattern. Happy crafting!
19.04.2022 - 10:15
![]() Mal wrote:
Mal wrote:
Skończyłam robić "body" swetra, dodałam oczka przed ściągaczem jak wskazano w instrukcji. zgodnie z instrukcją, następny rząd będzie pierwszym rzędem ściągacza (robionym na lewej stronie). i tu mam pytanie - tam gdzie dodałam oczka w poprzednim powstaną dziury - nie powinnam najpierw przerobić ich jako przekręconych, a dopiero w następnym rzędzie zacząć ściągacz?
30.03.2022 - 15:27DROPS Design answered:
Witaj Mal, już teraz zaczynasz ściągacz, a gdzie były narzuty przerabiasz oczka przekręcone. Pozdrawiamy!
31.03.2022 - 09:22
![]() Elisabeth Cra wrote:
Elisabeth Cra wrote:
Peut-on tricoter ce pull avec la laine Karisma Merci
10.03.2022 - 15:57DROPS Design answered:
Bonjour Mme Cra, tout à fait, ce pull peut se tricoter soit en Lima, soit en Karisma (cf fournitures pour la quantité nécessaire pour la taille), soit dans un autre fil du groupe B, utilisez alors le convertisseur. Bon tricot!
10.03.2022 - 18:25
![]() Shirley Nash wrote:
Shirley Nash wrote:
Que veut dire augmenter dans une section de mailles envers 2? Je ne comprends pas. Merci.
01.03.2022 - 02:50DROPS Design answered:
Bonjour Mme Nash, vous tricotez en côtes 1 m torse à l'endroit, 1 m envers - 1 section envers = 1 m envers dans les côtes, autrement dit, après avoir augmenté dans 1 section env sur 2, vous aurez: *1 m torse à l'end, 1 m env, 1 m torse à l'end,2 m env* - puis vous augmenterez les 1 m env à 2 pour avoir tout le tour *1 m torse à l'end, 2 m env*, et vous augmenterez ensuite 1 fois sur les 2 les 2 m env à 3 m env (= 1 m torse à l'end, 2 m env, 1 m torse à l'end, 3 m env). Bon tricot!
01.03.2022 - 10:06
|
|||||||||||||
December Bloom#decemberbloomsweater |
|||||||||||||
 |
 |
||||||||||||
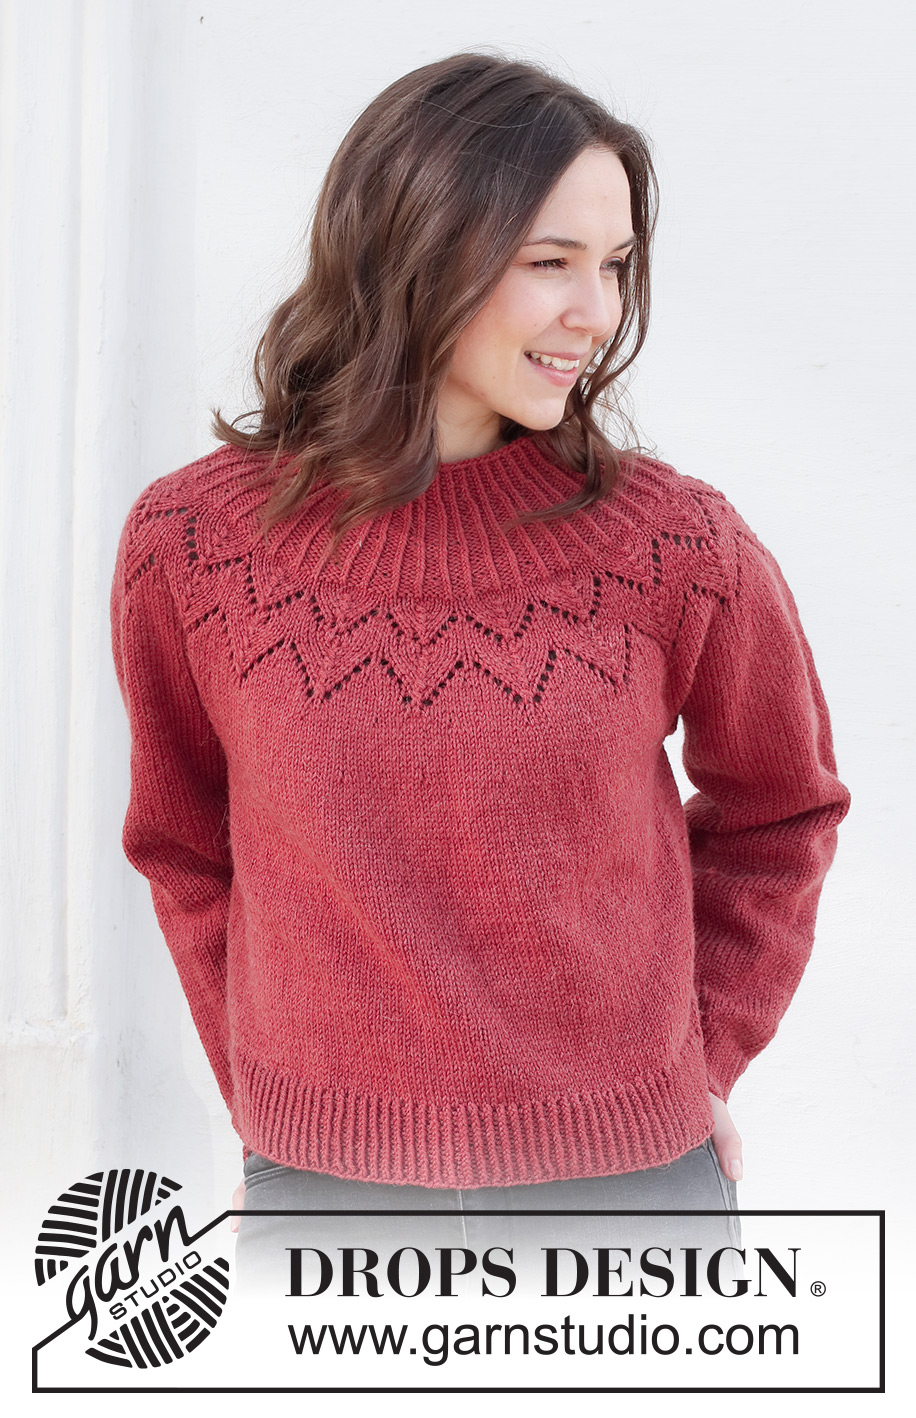
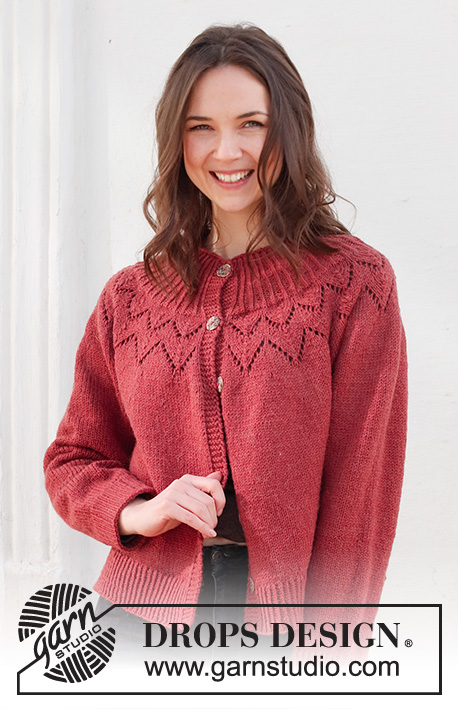
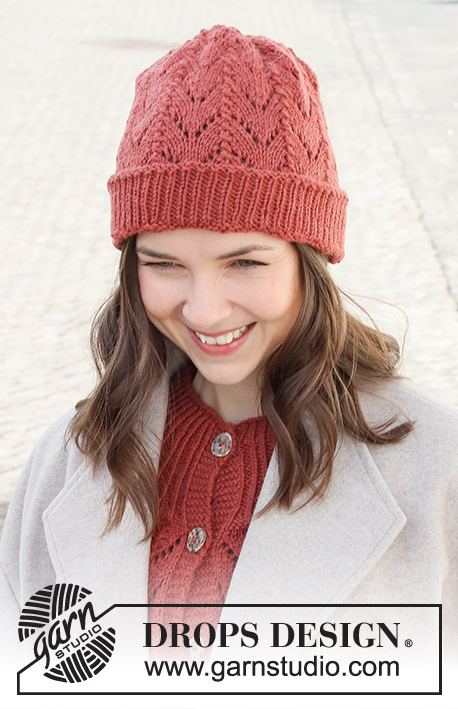
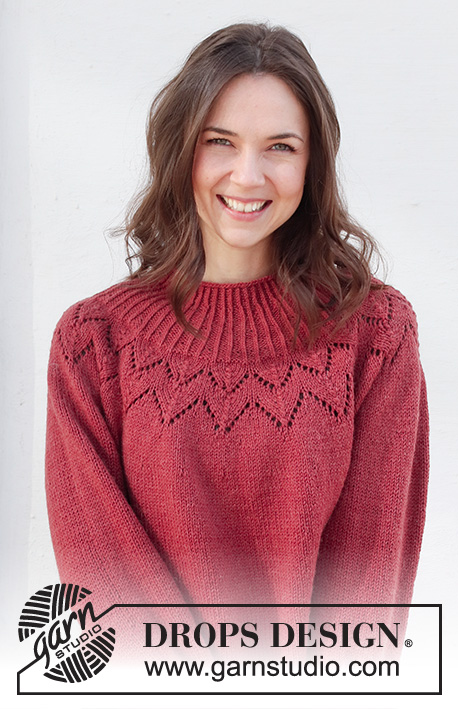
Knitted jumper in DROPS Lima or DROPS Karisma. The piece is worked top down, with round yoke, lace pattern, ribbed edges and split in the sides. Sizes S - XXXL.
DROPS 228-46 |
|||||||||||||
|
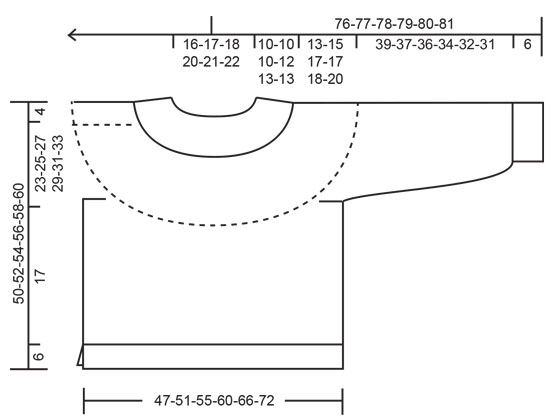
------------------------------------------------------- EXPLANATIONS FOR THE PATTERN: ------------------------------------------------------- RIDGE/GARTER STITCH (worked back and forth): Knit all rows. 1 ridge = knit 2 rows. INCREASE TIP-1: Increase by making 1 yarn over after every other purled section. On the next round purl the yarn overs twisted to avoid holes. INCREASE TIP-2 (evenly spaced): To work out how to increase evenly, count the total number of stitches on the needle (e.g. 175 stitches) and divide by the number of increases to be made (e.g. 15) = 11.7. In this example, increase by making 1 yarn over after approx. each 12th stitch. On the next round work the yarn overs twisted to avoid holes. PATTERN: See diagram A.1. Choose diagram for your size. DECREASE TIP (for sleeves): Decrease 1 stitch on either side of the marker thread as follows: Work until there are 3 stitches left before the marker thread, knit 2 together, knit 2 (marker thread sits between these 2 stitches), slip 1 stitch as if to knit, knit 1 and pass the slipped stitch over the knitted stitch. CASTING-OFF TIP: To avoid the cast-off edge being tight you can cast off with a larger size needle. If the edge is still tight, make 1 yarn over after approx. each 6th stitch at the same time as casting off; the yarn overs are cast off as normal stitches. ------------------------------------------------------- START THE PIECE HERE: ------------------------------------------------------- JUMPER – SHORT OVERVIEW OF THE PIECE: The neck and yoke are worked in the round with circular needle, from mid back and top down. The yoke is divided for body and sleeves and the body is continued in the round with circular needle. The sleeves are worked in the round with short circular needle/double pointed needles, top down. NECK: Cast on 100-104-108-116-120-124 stitches with short circular needle size 3.5 mm and DROPS Lima or DROPS Karisma. Knit 1 round, then work rib in the round (knit 1 twisted, purl 1) for 3-3-3-3-4-4 cm. Now increase every other purl-1 to purl-2 – read INCREASE TIP-1 = 125-130-135-145-150-155 stitches. When the rib measures 6-6-6-7-8-8 cm, increase the remaining purl-1 to purl-2 = 150-156-162-174-180-186 stitches. When the rib measures 9-9-9-11-12-12 cm, increase every other purl-2 to purl-3 = 175-182-189-203-210-217 stitches. Continue working until the rib measures 10-10-10-12-13-13 cm. YOKE: Change to circular needle size 4 mm and work 4 rounds of stocking stitch – AT THE SAME TIME, on round 3, increase 15-18-21-25-30-35 stitches evenly spaced – read INCREASE TIP-2 = 190-200-210-228-240-252 stitches. After the 4 rounds of stocking stitch, work A.1 in the round (= 19-20-21-19-20-21 repeats of 10-10-10-12-12-12 stitches). Continue this pattern. REMEMBER THE KNITTING TENSION! When A.1 has been completed in height there are 285-300-315-342-360-378 stitches and the piece measures approx. 19-19-19-23-24-24 cm from the cast-on edge. Continue with stocking stitch – AT THE SAME TIME on the first round increase 18-24-30-32-34-40 stitches evenly spaced = 303-324-345-374-394-418 stitches. When the piece measures 21-21-21-25-26-26 cm, increase 13-16-19-22-25-28 stitches evenly spaced = 316-340-364-396-419-446 stitches. The increases are finished in S, M and L – go to ALL SIZES. SIZES XL, XXL and XXXL: Continue working until the piece measures 27-28-29 cm. On the next round increase 8-9-14 stitches evenly spaced = 404-428-460 stitches. The increases are finished in XL, XXL and XXXL – go to ALL SIZES. ALL SIZES: = 316-340-364-404-428-460 stitches. Continue with stocking stitch (without further increases) until the piece measures 23-25-27-29-31-33 cm from the cast-on edge. Now divide the yoke for the body and sleeves on the next round as follows: Work 46-50-53-59-64-70 stitches in stocking stitch (= ½ back piece), place the next 66-70-76-84-86-90 stitches on a thread for the sleeve, cast on 6-6-8-8-10-10 stitches (= in side under sleeve), work 92-100-106-118-128-140 stitches in stocking stitch (= front piece), place the next 66-70-76-84-86-90 stitches on a thread for the sleeve, cast on 6-6-8-8-10-10 stitches (= in side under sleeve), work 46-50-53-59-64-70 stitches in stocking stitch (= ½ back piece). Body and sleeves are finished separately. THE PIECE IS NOW MEASURED FROM HERE! BODY: = 196-212-228-252-276-300 stitches. Insert marker threads in the middle of the 6-6-8-8-10-10 stitches cast on under each sleeve. Allow the threads to follow your work onwards; they are used when dividing for the split in each side. Start the round at the marker thread on the right side (when the garment is worn) and work stocking stitch in the round for 17 cm. There is approx. 6 cm left to finished length. Try the jumper on and work to desired length. Now divide for the split in each side. Keep the first 98-106-114-126-138-150 stitches on the needle and place the other stitches on a thread or extra needle. FRONT PIECE: To avoid the following rib being tight, stitches are increased as described below. Knit 1 row from the right side where you increase 29-31-35-37-41-45 stitches evenly spaced – remember INCREASE TIP-2 = 127-137-149-163-179-195 stitches. Change to circular needle size 3.5 mm and work rib as follows: ROW 1 (wrong side): 1 edge stitch in garter stitch, * purl 1 twisted, knit 1 *, work from *-* until there are 2 stitches left, purl 1 twisted and 1 edge stitch in garter stitch. ROW 2 (right side): 1 edge stitch in garter stitch, * knit 1 twisted, purl 1 *, work from *-* until there are 2 stitches left, knit 1 twisted and 1 edge stitch in garter stitch. Repeat rows 1 and 2 until the rib measures 6 cm. Cast off from the right side with garter stitch over garter stitch, knit twisted over knit twisted and purl over purl – read CASTING-OFF TIP! The jumper measures approx. 50-52-54-56-58-60 cm from the shoulder down. BACK PIECE: Place the 98-106-114-126-138-150 stitches from the thread/extra needle on circular needle size 4 mm. Knit 1 row from the right side where you increase 29-31-35-37-41-45 stitches evenly spaced = 127-137-149-163-179-195 stitches. Change to circular needle size 3.5 mm and work rib as follows: ROW 1 (wrong side): 1 edge stitch in garter stitch, * purl 1 twisted, knit 1 *, work from *-* until there are 2 stitches left, purl 1 twisted and 1 edge stitch in garter stitch. ROW 2 (right side): 1 edge stitch in garter stitch, * knit 1 twisted, purl 1 *, work from *-* until there are 2 stitches left, knit 1 twisted and 1 edge stitch in garter stitch. Repeat rows 1 and 2 until the rib measures 6 cm. Cast off from the right side with garter stitch over garter stitch, knit twisted over knit twisted and purl over purl. SLEEVES: Place the 66-70-76-84-86-90 stitches from the thread on the one side of the piece on double pointed needles/short circular needle size 4 mm and knit up 1 stitch in each of the 6-6-8-8-10-10 stitches cast on under the sleeve = 72-76-84-92-96-100 stitches. Insert a marker thread in the middle of the 6-6-8-8-10-10 stitches under the sleeve. Allow the thread to follow your work onwards; it will be used when decreasing under the sleeve. Start at the marker thread and work stocking stitch in the round. When the piece measures 2 cm from the division in all sizes, decrease 2 stitches under the sleeve – read DECREASE TIP. Decrease like this every 3½-3-2½-1½-1½-1½ cm a total of 11-12-14-18-19-20 times = 50-52-56-56-58-60 stitches. Continue working until the sleeve measures 39-37-36-34-32-31 cm from the division (shorter measurements in larger sizes due to wider neck and longer yoke). There is approx. 6 cm left to finished length. Try the jumper on and work to desired length. Knit 1 round where you increase 2-4-2-4-4-6 stitches evenly spaced = 52-56-58-60-62-66 stitches. Change to double pointed needles size 3.5 mm and work rib (knit 1 twisted, purl 1) for 6 cm. Cast off with knit twisted over knit twisted and purl over purl – remember CASTING-OFF TIP! The sleeve measures approx. 45-43-42-40-38-37 cm from the division. Work the other sleeve in the same way. |
|||||||||||||
Diagram explanations |
|||||||||||||
|
|||||||||||||
 |
|||||||||||||
 |
|||||||||||||
Have you finished this pattern?Tag your pictures with #dropspattern #decemberbloomsweater or submit them to the #dropsfan gallery. Do you need help with this pattern?You'll find 35 tutorial videos, a Comments/Questions area and more by visiting the pattern on garnstudio.com. © 1982-2026 DROPS Design A/S. We reserve all rights. This document, including all its sub-sections, has copyrights. Read more about what you can do with our patterns at the bottom of each pattern on our site. |
|||||||||||||


With over 40 years in knitting and crochet design, DROPS Design offers one of the most extensive collections of free patterns on the internet - translated to 17 languages. As of today we count 324 catalogues and 12290 patterns translated into English (UK/cm). 12290
We work hard to bring you the best knitting and crochet have to offer, inspiration and advice as well as great quality yarns at incredible prices! Would you like to use our patterns for other than personal use? You can read what you are allowed to do in the Copyright text at the bottom of all our patterns. Happy crafting!
Post a comment to pattern DROPS 228-46
We would love to hear what you have to say about this pattern!
If you want to leave a question, please make sure you select the correct category in the form below, to speed up the answering process. Required fields are marked *.