Comments / Questions (13)
![]() Millicent Khaw wrote:
Millicent Khaw wrote:
Front Piece: what does bind off stitches for the neck : 2 stitches 1 time and 1 stitch 2 times. Row 1 RS K2together? twice in one row. Row 2 RS would be K2 together Row 3 RS would be K2 together? So would go from 24 to 22 then 21 then 20 over 3 rows ?
10.02.2025 - 02:07DROPS Design answered:
Hi Millicent, You are binding off for the neck rather than decreasing, so bind off as you would usually do on a bound-off edge. First bind off 2 stitches on the first row from the neckline, then work back and bind off 1 stitch on the next row from the neckline, work back and finally bind off 1 stitch on the 3rd row from the neckline. A total of 4 stitches bound off on these rows, leaving you with 20 shoulder-stitches. Happy knitting!
10.02.2025 - 06:42
![]() Kirsti Bakken wrote:
Kirsti Bakken wrote:
Det er vanskelig å få tak i wishgarn. Skal dere slutte å produsere dette?
19.07.2024 - 17:33
![]() Toni wrote:
Toni wrote:
For the front piece, unless I am reading this wrong, for the XL size, you have 90 stiches before changing to 8 mm needles. The next instruction is for 92 stiches : 1 edge stitch in garter stitch, stockinette stitch over the next 14 stitches and decrease-1 stitch (total of 15?) A.4 (= 14 stitches), A.5 (= 32 stitches), A.6 (= 14 stitches), stockinette stitch over the next 14stitches and decrease1 stitches over these stitches, (again a total of 15?) 1 edge stitch
15.01.2023 - 03:35DROPS Design answered:
Dear Toni, you decrease 1 stitch of the 14 stitches (so you have 14-1 = 13; not 15-1 = 14). 1+14 (-1)+14+32+14+14 (-1)+1 = 90 stitches - 2 decreased stitches = 88 stitches. Happy knitting!
15.01.2023 - 10:47
![]() Malene Kastberg Pedersen wrote:
Malene Kastberg Pedersen wrote:
I diagram forklaringen står der, at der i de store yderste snoninger skal sættes 4 masker FORAN på begge snoninger. Jeg vil mene, at de skal bagved på den ene snoning😊.
21.05.2022 - 10:59DROPS Design answered:
Hei Malene. Her var det feil oversatt i den danske teksten, det er nå fikset. Takk for at du gjorde oss oppmerksom på dette. mvh DROPS Design
23.05.2022 - 11:21
![]() Elaine Damme wrote:
Elaine Damme wrote:
I am confused in regard to the sleeve cap. It appears from the photo that the sleeve must have been bound off…then the sleeve cap stitches are knitted after the fact and then attached to the sleeve? Could you provide a bit more direction? Thank you
01.03.2022 - 22:30DROPS Design answered:
Dear Mrs Damme, the sleeve is first worked in the round then back and forth from mid under sleeve for the sleeve cap - you then sew the sleeve to the sleeve cap to the armhole. This video shows how to work the last cm on top of sleeve and how to sew it into the armhole. Happy knitting!
02.03.2022 - 09:52
![]() Paola wrote:
Paola wrote:
Cosa vuol dire "arrotondamento della manica" e come si realizza. Grazie
11.01.2022 - 22:35DROPS Design answered:
Buonasera Paola, l'arrotondamento della manica è la parte della manica vicino alla spalla e si realizza seguendo le spiegazioni indicate nel testo. Buon lavoro!
12.01.2022 - 22:49
![]() Sophia wrote:
Sophia wrote:
Can you help me with A5 diagram.? I knit it one time ,12 rows and I start it from the beginning, but the " holes" in the pattern looks smaller than mine.thank you and merry Christmas to your team.
15.12.2021 - 08:38DROPS Design answered:
Hi Sophia, this video shows how to knit a honey comb pattern (like in A.5) and might help you. Hope it can help, happy knitting!
15.12.2021 - 08:59
![]() Lotta Andersson wrote:
Lotta Andersson wrote:
På beskrivningen över framstycket blir det fel om man stickar som det står ”öve de nästa 4-8-8-12-16-20” i storlek small iallafall. Man skall inte sticka över några maskor. På beskrivningen till ärm hade det varit bra om det stod att man skall lägga upp på strumpstickor nr 7 för det framgick inte där. Så fin tröja. Tack för mig
07.11.2021 - 13:42
![]() Betina Ellegaard wrote:
Betina Ellegaard wrote:
Jeg kan se i opskriften at der hvor man laver snoninger på mønster A4 er forkert i forhånd til original opskriften. Den skal være 4 bagved og ikke foran. 😉
30.10.2021 - 18:53
![]() Aino Vikman wrote:
Aino Vikman wrote:
I am knitting size S and using recommended yarn (Wish). My concern is the yarn consumption. I did minor modifications to knitting order and stitch pattern, but I do not think they would result in such a big deviation from the reported consumption (450 gr vs. nearly 550 gr). Please, see my Ravelry project for details (/projects/AinoTV/227-27-winter-hive)
30.10.2021 - 14:07DROPS Design answered:
Dear Aino, the yarn amounts are calculated for this exact pattern and gauge. If you made any modifications or work at a different gauge, there may be some variations in the amount of yarn needed. For example, depending on the space of the cables, you may use more yarn and, when all these little amounts add up, the final yarn requirements increases. Happy knitting!
01.11.2021 - 13:35
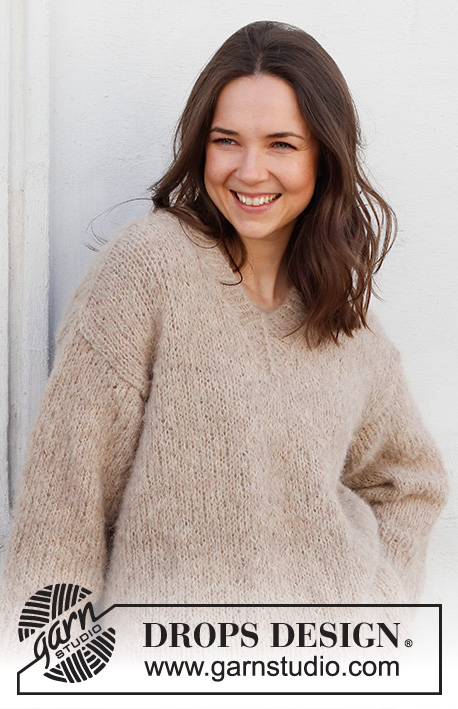
Winter Hive#winterhivesweater |
||||||||||||||||||||||
 |
 |
|||||||||||||||||||||
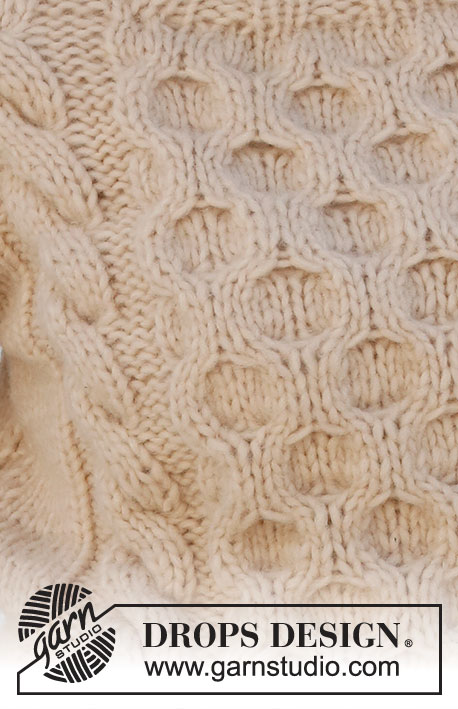
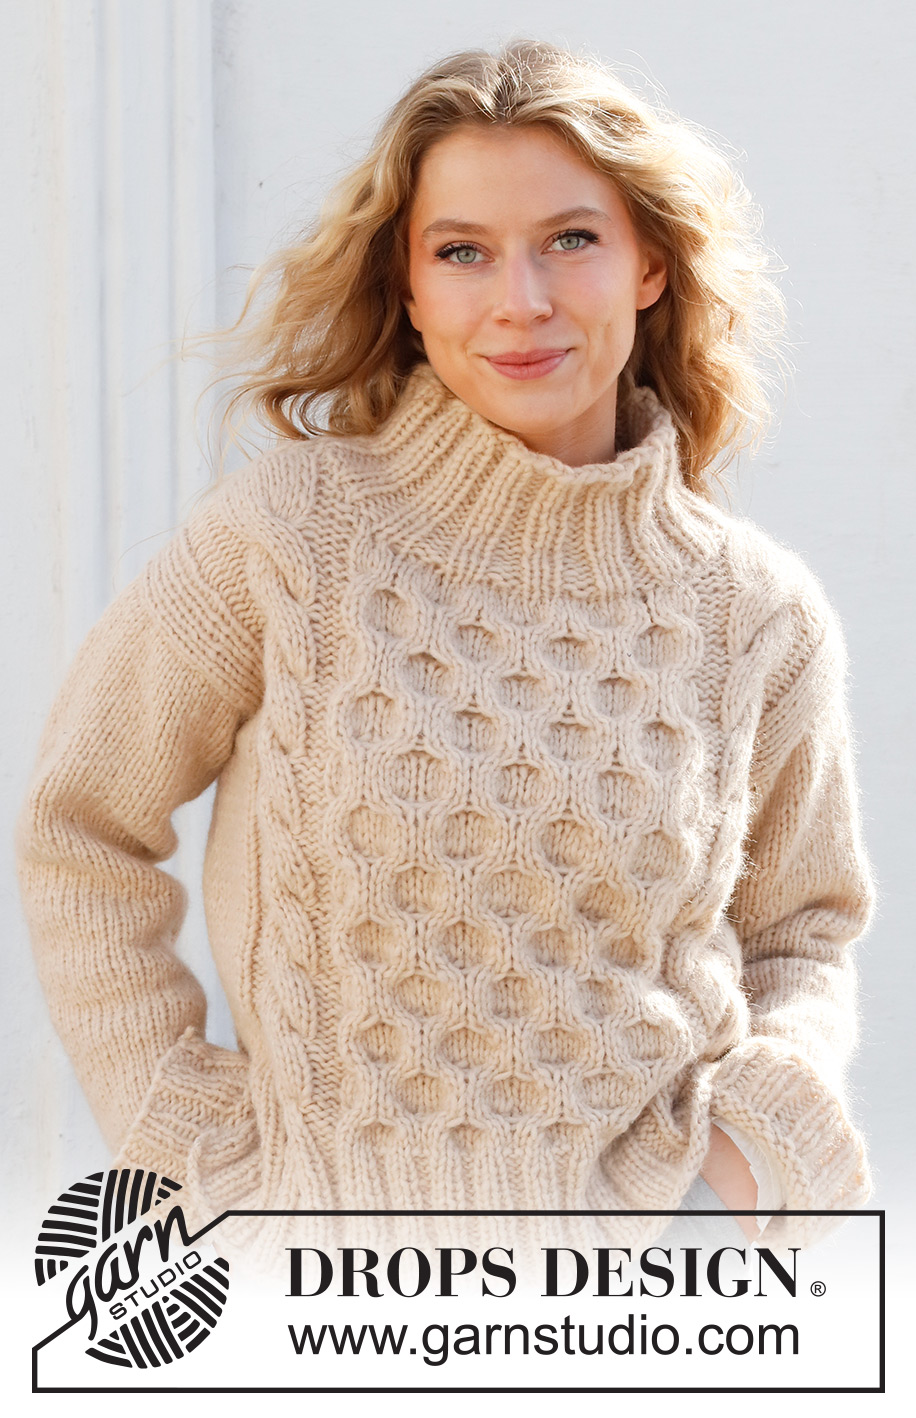
Knitted jumper in DROPS Wish. The piece is worked with cables, honeycomb pattern and high neck. Sizes S - XXXL.
DROPS 227-27 |
||||||||||||||||||||||
|
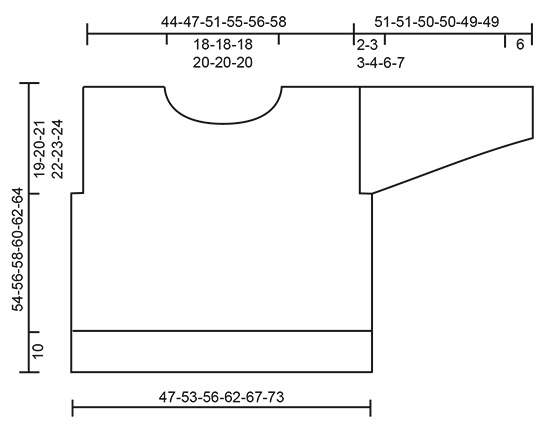
------------------------------------------------------- EXPLANATIONS FOR THE PATTERN: ------------------------------------------------------- RIDGE/GARTER STITCH (worked back and forth): Knit all rows. 1 ridge = knit 2 rows. PATTERN: See diagrams A.1 to A.6. The diagrams show all rows in the pattern from the right side. DECREASE TIP-1 (evenly spaced): To work out how to decrease evenly, count the total number of stitches on needle (e.g. 36 stitches) and divide by number of decreases to be made (e.g. 4) = 9. In this example decrease by knitting each 8th and 9th stitch together. INCREASE TIP (for sleeves): Start 1 stitch before the marker thread, 1 yarn over, knit 2 (marker thread sits between these 2 stitches), 1 yarn over. On the next round knit the yarn overs twisted to avoid holes (2 stitches increased). ------------------------------------------------------- START THE PIECE HERE: ------------------------------------------------------- JUMPER – SHORT OVERVIEW OF THE PIECE: The front and back pieces are worked separately, back and forth and bottom up then sewn together. The sleeves are worked in the round with double pointed needles/short circular needle. The neck is worked to finish. FRONT PIECE: Cast on 74-82-82-90-98-106 stitches with circular needle size 7 mm and DROPS Wish. Purl 1 row from the wrong side. Then work as follows from the right side: 1 edge stitch in GARTER STITCH – read description above, knit 2, * purl 2, knit 2 *, work from *-* over the next 4-8-8-12-16-20 stitches, A.1 (= 14 stitches), A.2 (= 32 stitches), A.3 (= 14 stitches), knit 2, * purl 2, knit 2 *, work from *-* over the next 4-8-8-12-16-20 stitches, 1 edge stitch in garter stitch. Work this rib for 10 cm. Change to circular needle size 8 mm. Then work as follows from the right side: 1 edge stitch in garter stitch, stocking stitch over the next 6-10-10-14-18-22 stitches and decrease 1-2-0-1-2-3 stitches over these stitches, A.4 (= 14 stitches), A.5 (= 32 stitches), A.6 (= 14 stitches), stocking stitch over the next 6-10-10-14-18-22 stitches and decrease 1-2-0-1-2-3 stitches over these stitches, 1 edge stitch in garter stitch = 72-78-82-88-94-100 stitches. Continue this pattern. REMEMBER THE KNITTING TENSION! When the piece measures 35-36-37-38-39-40 cm, cast off 3-4-4-5-7-9 stitches at the beginning of the next 2 rows for the armholes = 66-70-74-78-80-82 stitches. Continue the pattern until the piece measures 48-50-52-54-56-58 cm. Now decrease 14 stitches evenly over A.5. On the next row place the middle 12-12-12-14-14-14 stitches on a thread for the neck and finish each shoulder separately. Then cast off stitches on each row from the neck as follows: 2 stitches 1 time and 1 stitch 2 times = 16-18-20-21-22-23 stitches on the shoulder. Continue working until the piece measures 53-55-57-59-61-63 cm, then decrease 4 stitches evenly over the cable in A.4/A.6 = 12-14-16-17-18-19 stitches. Work until the piece measures 54-56-58-60-62-64 cm, cast off. Work the other shoulder in the same way. BACK PIECE: Cast on 74-82-82-90-98-106 stitches with circular needle size 7 mm and DROPS Wish. Purl 1 row from the wrong side. Then work as follows from the right side: 1 edge stitch in garter stitch, knit 2, * purl 2, knit 2 *, work from *-* over the next 4-8-8-12-16-20 stitches, A.1 (= 14 stitches), A.2 (= 32 stitches), A.3 (= 14 stitches), knit 2, * purl 2, knit 2 *, work from *-* over the next 4-8-8-12-16-20 stitches, 1 edge stitch in garter stitch. Work this rib for 10 cm. Change to circular needle size 8 mm. Then work as follows from the right side: 1 edge stitch in garter stitch, stocking stitch over the next 6-10-10-14-18-22 stitches and decrease 1-2-0-1-2-3 stitches over these stitches, A.4 (= 14 stitches), A.5 (= 32 stitches), A.6 (= 14 stitches), stocking stitch over the next 6-10-10-14-18-22 stitches and decrease 1-2-0-1-2-3 stitches over these stitches, 1 edge stitch in garter stitch = 72-78-82-88-94-100 stitches. Continue this pattern. When the piece measures 35-36-37-38-39-40 cm, cast off 3-4-4-5-7-9 stitches at the beginning of the next 2 rows for the armholes = 66-70-74-78-80-82 stitches. Continue the pattern until the piece measures 52-54-56-58-60-62 cm. Now decrease 14 stitches evenly over A.5. On the next row cast off the middle 18-18-18-20-20-20 stitches for the neck and finish each shoulder separately. Then cast off 1 stitch on the next row from the neck = 16-18-20-21-22-23 stitches on the shoulder. Continue working until the piece measures 53-55-57-59-61-63 cm, then decrease 4 stitches evenly over the cable in A.4/A.6 = 12-14-16-17-18-19 stitches. Work until the piece measures 54-56-58-60-62-64 cm, cast off. Work the other shoulder in the same way. SLEEVE: Cast on 36-40-40-44-44-48 stitches with double pointed needles size 7 mm and DROPS Wish. Knit 1 round then work rib (knit 2, purl 2) for 6 cm. Change to double pointed needles size 8 mm and knit 1 round where you decrease 4-6-4-6-4-6 stitches evenly spaced – read DECREASE TIP = 32-34-36-38-40-42 stitches. Insert a marker thread at the beginning of the round = mid-under sleeve. Work stocking stitch in the round. When the sleeve measures 8 cm, increase 1 stitch on each side of the marker thread– read INCREASE TIP. Increase like this every 9½-9-9-8½-8-8 cm a total of 5 times = 42-44-46-48-50-52 stitches. When the sleeve measures 49-48-47-46-43-42 cm, finish the sleeve cap back and forth (from mid-under sleeve). Continue working until the sleeve measures 51-51-50-50-49-49 cm (sleeve cap 2-3-3-4-6-7 cm). Cast off. Work the other sleeve in the same way. ASSEMBLY: Sew the shoulder seams. Sew the sleeve cap to the armhole. Then sew the rest of the sleeve to the armhole – see sketch. Sew the side seams. NECK: Start from the right side on one shoulder and knit up 56 to 64 stitches around the neck (including the stitches on the thread), with short circular needle size 7 mm and DROPS Wish. The number of stitches should be divisible by 4. Work rib (knit 2, purl 2) for 12 cm. Cast off with knit over knit and purl over purl. |
||||||||||||||||||||||
Diagram explanations |
||||||||||||||||||||||
|
||||||||||||||||||||||
 |
||||||||||||||||||||||
 |
||||||||||||||||||||||
 |
||||||||||||||||||||||
Have you finished this pattern?Tag your pictures with #dropspattern #winterhivesweater or submit them to the #dropsfan gallery. Do you need help with this pattern?You'll find 29 tutorial videos, a Comments/Questions area and more by visiting the pattern on garnstudio.com. © 1982-2026 DROPS Design A/S. We reserve all rights. This document, including all its sub-sections, has copyrights. Read more about what you can do with our patterns at the bottom of each pattern on our site. |
||||||||||||||||||||||








Post a comment to pattern DROPS 227-27
We would love to hear what you have to say about this pattern!
If you want to leave a question, please make sure you select the correct category in the form below, to speed up the answering process. Required fields are marked *.