DROPS Wish
DROPS Wish
50% Alpaca, 33% Cotton, 17% Wool
from 6.45 $ /50g
Get the yarn to make this pattern from 58.05$.

The yarn cost is calculated from the pattern’s smallest size and the yarn’s cheapest product type. Looking for an even better price? You might find it on the DROPS Deals!

DROPS SS24

Winter Hive

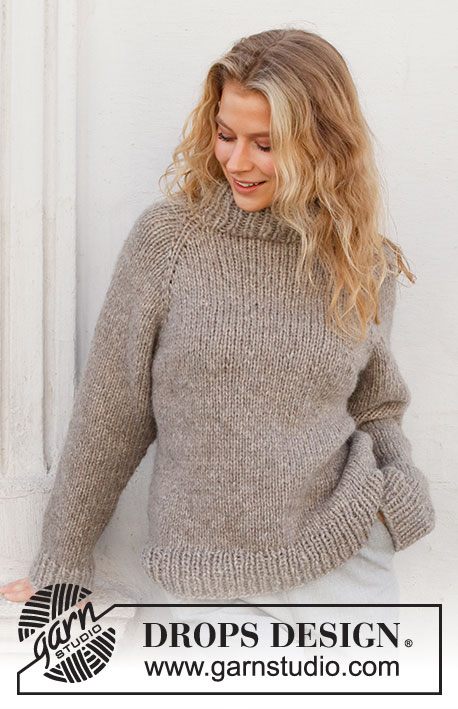
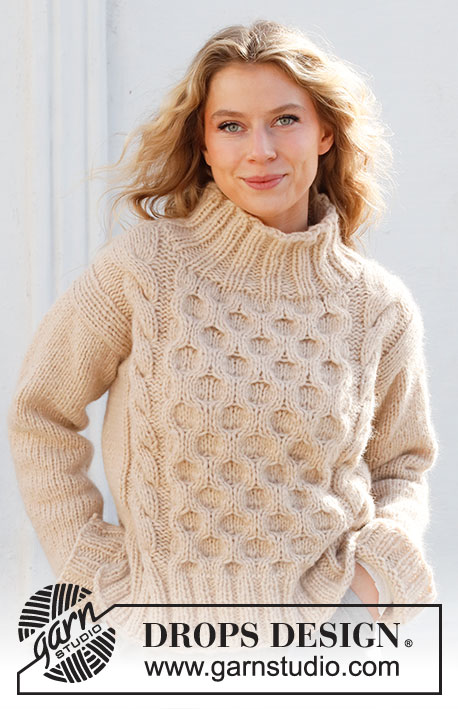
Knitted sweater in DROPS Wish. The piece is worked with cables, honeycomb pattern and high neck. Sizes S - XXXL.

DROPS 227-27
DROPS Design: Pattern no wi-002
Yarn group E or C + C
-------------------------------------------------------

SIZES:
S - M - L - XL - XXL – XXXL

Finished measurements:
Chest measurements: 94-106-112-124-134-146 cm = 37"-41¾"-44"-48¾"-52¾"-57⅜"
Full length: 54-56-58-60-62-64 cm = 21¼"-22"-22¾"-23⅝"-24⅜"-25¼"
All measurements in charts are in cm.

MATERIALS:
DROPS WISH from Garnstudio (belongs to yarn group E)
450-500-550-600-700-750 g color 04, wheat

NEEDLES:
DROPS CIRCULAR NEEDLE SIZE 8 MM = US 11: Length 40 cm = 16" and 60-60-60-80-80-80 cm = 24"-24"-24"-32"-32"-32".
DROPS CIRCULAR NEEDLE SIZE 7 MM = US 10.75: Length 40 cm = 16" and 60-60-60-80-80-80 cm = 24"-24"-24"-32"-32"-32".
DROPS DOUBLE POINTED NEEDLES SIZE 8 MM = US 11.
DROPS DOUBLE POINTED NEEDLES SIZE 7 MM = US 10.75.
DROPS CABLE NEEDLE – for cables.
The technique MAGIC LOOP can be used – you then only need circular needle of 80 cm = 32" in each size.

KNITTING GAUGE:
11 stitches in width and 15 rows in height with stockinette stitch = 10 x 10 cm = 4" x 4".
NOTE: Needle size is only a guide. If you get too many stitches on 10 cm = 4", change to a larger needle size. If you get too few stitches on 10 cm = 4", change to a smaller needle size.

-------------------------------------------------------

Alternative Yarn – See how to change yarns here
Yarn Groups A to F – Use the same pattern and change the yarn here
Yarn usage using an alternative yarn – Use our yarn converter here

-------------------------------------------------------

DROPS Wish
DROPS Wish
50% Alpaca, 33% Cotton, 17% Wool
from 6.45 $ /50g
Get the yarn to make this pattern from 58.05$.

The yarn cost is calculated from the pattern’s smallest size and the yarn’s cheapest product type. Looking for an even better price? You might find it on the DROPS Deals!

Pattern instructions

NOTE: This pattern is written in American English. All measurements in charts are in cm. For conversion from inches to cm - click here. There are different terms for crocheting in American and British English. If this pattern includes crochet, click for "crochet terms" here. For this pattern in British English, please click here.
-------------------------------------------------------

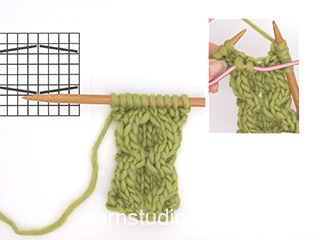
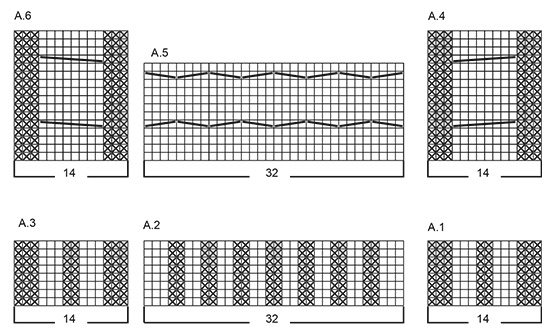
EXPLANATIONS FOR THE PATTERN:

-------------------------------------------------------

RIDGE/GARTER STITCH (worked back and forth):
Knit all rows.
1 ridge = knit 2 rows.

PATTERN:
See diagrams A.1 to A.6. The diagrams show all rows in the pattern from the right side.

DECREASE TIP-1 (evenly spaced):
To work out how to decrease evenly, count the total number of stitches on needle (e.g. 36 stitches) and divide by number of decreases to be made (e.g. 4) = 9.
In this example decrease by knitting each 8th and 9th stitch together.

INCREASE TIP (for sleeves):
Start 1 stitch before the marker thread, 1 yarn over, knit 2 (marker thread sits between these 2 stitches), 1 yarn over. On the next round knit the yarn overs twisted to avoid holes (2 stitches increased).

-------------------------------------------------------

START THE PIECE HERE:

-------------------------------------------------------

SWEATER – SHORT OVERVIEW OF THE PIECE:
The front and back pieces are worked separately, back and forth and bottom up then sewn together. The sleeves are worked in the round with double pointed needles/short circular needle. The neck is worked to finish.

FRONT PIECE:
Cast on 74-82-82-90-98-106 stitches with circular needle size 7 MM = US 10.75 and DROPS Wish. Purl 1 row from the wrong side. Then work as follows from the right side: 1 edge stitch in GARTER STITCH – read description above, knit 2, * purl 2, knit 2 *, work from *-* over the next 4-8-8-12-16-20 stitches, A.1 (= 14 stitches), A.2 (= 32 stitches), A.3 (= 14 stitches), knit 2, * purl 2, knit 2 *, work from *-* over the next 4-8-8-12-16-20 stitches, 1 edge stitch in garter stitch. Work this rib for 10 cm = 4".
Change to circular needle size 8 MM = US 11. Then work as follows from the right side: 1 edge stitch in garter stitch, stockinette stitch over the next 6-10-10-14-18-22 stitches and decrease 1-2-0-1-2-3 stitches over these stitches, A.4 (= 14 stitches), A.5 (= 32 stitches), A.6 (= 14 stitches), stockinette stitch over the next 6-10-10-14-18-22 stitches and decrease 1-2-0-1-2-3 stitches over these stitches, 1 edge stitch in garter stitch = 72-78-82-88-94-100 stitches. Continue this pattern. REMEMBER THE KNITTING GAUGE!

When the piece measures 35-36-37-38-39-40 cm = 13¾"-14¼"-14½"-15"-15¼"-15¾", bind off 3-4-4-5-7-9 stitches at the beginning of the next 2 rows for the armholes = 66-70-74-78-80-82 stitches. Continue the pattern until the piece measures 48-50-52-54-56-58 cm = 19"-19¾"-20½"-21¼"-22"-22¾". Now decrease 14 stitches evenly over A.5. On the next row place the middle 12-12-12-14-14-14 stitches on a thread for the neck and finish each shoulder separately. Then bind off stitches on each row from the neck as follows: 2 stitches 1 time and 1 stitch 2 times = 16-18-20-21-22-23 stitches on the shoulder. Continue working until the piece measures 53-55-57-59-61-63 cm = 21"-21⅝"-22½"-23¼"-24"-24¾", then decrease 4 stitches evenly over the cable in A.4/A.6 = 12-14-16-17-18-19 stitches. Work until the piece measures 54-56-58-60-62-64 cm = 21¼"-22"-22¾"-23⅝"-24⅜"-25¼", bind off. Work the other shoulder in the same way.

BACK PIECE:
Cast on 74-82-82-90-98-106 stitches with circular needle size 7 MM = US 10.75 and DROPS Wish. Purl 1 row from the wrong side. Then work as follows from the right side: 1 edge stitch in garter stitch, knit 2, * purl 2, knit 2 *, work from *-* over the next 4-8-8-12-16-20 stitches, A.1 (= 14 stitches), A.2 (= 32 stitches), A.3 (= 14 stitches), knit 2, * purl 2, knit 2 *, work from *-* over the next 4-8-8-12-16-20 stitches, 1 edge stitch in garter stitch. Work this rib for 10 cm = 4".
Change to circular needle size 8 MM = US 11.
Then work as follows from the right side: 1 edge stitch in garter stitch, stockinette stitch over the next 6-10-10-14-18-22 stitches and decrease 1-2-0-1-2-3 stitches over these stitches, A.4 (= 14 stitches), A.5 (= 32 stitches), A.6 (= 14 stitches), stockinette stitch over the next 6-10-10-14-18-22 stitches and decrease 1-2-0-1-2-3 stitches over these stitches, 1 edge stitch in garter stitch = 72-78-82-88-94-100 stitches. Continue this pattern.

When the piece measures 35-36-37-38-39-40 cm = 13¾"-14¼"-14½"-15"-15¼"-15¾", bind off 3-4-4-5-7-9 stitches at the beginning of the next 2 rows for the armholes = 66-70-74-78-80-82 stitches. Continue the pattern until the piece measures 52-54-56-58-60-62 cm = 20½"-21¼"-22"-22¾"-23⅝"-24⅜". Now decrease 14 stitches evenly over A.5. On the next row bind off the middle 18-18-18-20-20-20 stitches for the neck and finish each shoulder separately. Then bind off 1 stitch on the next row from the neck = 16-18-20-21-22-23 stitches on the shoulder. Continue working until the piece measures 53-55-57-59-61-63 cm = 21"-21⅝"-22½"-23¼"-24"-24¾", then decrease 4 stitches evenly over the cable in A.4/A.6 = 12-14-16-17-18-19 stitches. Work until the piece measures 54-56-58-60-62-64 cm = 21¼"-22"-22¾"-23⅝"-24⅜"-25¼", bind off. Work the other shoulder in the same way.

SLEEVE:
Cast on 36-40-40-44-44-48 stitches with double pointed needles size 7 MM = US 10.75 and DROPS Wish. Knit 1 round then work rib (knit 2, purl 2) for 6 cm = 2⅜".
Change to double pointed needles size 8 MM = US 11 and knit 1 round where you decrease 4-6-4-6-4-6 stitches evenly spaced – read DECREASE TIP = 32-34-36-38-40-42 stitches. Insert a marker thread at the beginning of the round = mid-under sleeve. Work stockinette stitch in the round. When the sleeve measures 8 cm = 3⅛", increase 1 stitch on each side of the marker thread– read INCREASE TIP. Increase like this every 9½-9-9-8½-8-8 cm = 3 5/9"-3½"-3½"-3¼"-3⅛"-3⅛" a total of 5 times = 42-44-46-48-50-52 stitches. When the sleeve measures 49-48-47-46-43-42 cm = 19¼"-19"-18½"-18"-17"-16½", finish the sleeve cap back and forth (from mid-under sleeve). Continue working until the sleeve measures 51-51-50-50-49-49 cm = 20"-20"-19¾"-19¾"-19¼"-19¼" (sleeve cap 2-3-3-4-6-7 cm = ¾"-1⅛"-1⅛"-1½"-2⅜"-2¾"). Bind off. Work the other sleeve in the same way.

ASSEMBLY:
Sew the shoulder seams. Sew the sleeve cap to the armhole. Then sew the rest of the sleeve to the armhole – see sketch. Sew the side seams.

NECK:
Start from the right side on one shoulder and knit up 56 to 64 stitches around the neck (including the stitches on the thread), with short circular needle size 7 MM = US 10.75 and DROPS Wish. The number of stitches should be divisible by 4. Work rib (knit 2, purl 2) for 12 cm = 4¾". Bind off with knit over knit and purl over purl.

Diagram

All measurements in charts are in cm.

symbols = knit from right side, purl from wrong side
symbols = purl from right side, knit from wrong side
symbols = place 2 stitches on cable needle in front of piece, knit 2, knit 2 from cable needle
symbols = place 2 stitches on cable needle behind the piece, knit 2, knit 2 from cable needle
symbols = place 4 stitches on cable needle in front of piece, knit 4, knit 4 from cable needle
symbols = place 4 stitches on cable needle behind the piece, knit 4, knit 4 from cable needle
symbols = Sew the sleeve to the armhole: Sew a to A and b to B
diagram
diagram
diagram

Each of our patterns has specific tutorial videos to help you.

Do you have a question? See a list of frequently asked questions (FAQ)

Knitting tension is what determines the final measurements of your work, and is usually measured per 10 x 10 cm. It is provided like so: number of stitches in width x number of rows in height - eg: 19 stitches x 26 rows = 10 x 10 cm.

The knitting tension is very individual; some people knit/crochet loosely while others work tightly. You adjust the knitting tension with the needle size, which is why the suggested needle size only serve as a guide! You need to adjust this (up or down) to ensure that YOUR knitting tension matches the knitting tension provided in the pattern. If you work with a different knitting tension than provided you will have a different yarn consumption, and your work will have different measurements than what the pattern suggests.

The knitting tension also determines which yarns can replace each other. As long as you achieve the same knitting tension you can replace one yarn with another.

See DROPS lesson: How to measure your tension/gauge

See DROPS video: How to make a gauge tension swatch

The required amount of yarn is provided in grams, eg: 450 g. To calculate how many balls you’ll need you first need to know how many grams are in 1 ball (25g, 50g or 100g). This information is available if you click on the individual yarn quality on our pages. Divide the amount required with the amount of each ball. For example, if each ball is 50g (the most common amount), the calculation will be as follows: 450 / 50 = 9 balls.

The important thing when changing from one yarn to another is that the knitting/crochet tension remains the same. This is so that the measurements of the finished piece will be the same as on the sketch provided. It is easier to achieve the same knitting tension using yarns from the same yarn group. It is also possible to work with multiple strands of a thinner yarn to achieve the knitting tension of a thicker one. Please try our yarn converter. We recommend you to always work a test swatch.

Please NOTE: when changing yarn the garment might have a different look and feel to the garment in the photo, due to individual properties and qualities of each yarn.

See DROPS lesson: Can I use a different yarn than the one mentioned in the pattern?

All our yarns are categorised into yarn groups (from A to F) according to thickness and knitting tension – group A contains the thinnest yarns and group F the thickest. This makes it easier for you to find alternative yarns to our patterns, should you wish to switch yarn. All yarns within the same group have a similar knitting tension and can easily replace each other. However, different yarn qualities have different structures and properties which will give the finished work a unique look and feel.

Click here for an overview of the yarns in each yarn group

At the top of all our patterns you’ll find a link to our yarn converter, which is a helpful tool should you wish to use a different yarn than suggested. By filling in the yarn quality you wish to replace, the amount (in your size) and number of strands, the converter will present good alternative yarns with the same knitting tension. Additionally it will tell you how much you’ll require in the new qualities and whether you’ll need to work with multiple strands. Most skeins are 50g (some are 25g or 100g).

If the pattern is worked with multiple colours, every colour will have to be converted separately. Similarly, if the pattern is worked with several strands of different yarns (for example 1 strand Alpaca and 1 strand Kid-Silk) you will have to find alternatives for each, individually.

Click here to see our yarn converter

Since different yarns have different qualities and textures we have chosen to keep the original yarn in our patterns. However, you can easily find options among our available qualities by using our yarn converter, or simply pick a yarn from the same yarn group.

It is possible that some retailers still have discontinued yarns in stock, or that someone has a few skeins at home that they would like to find patterns for.

The yarn converter will provide both alternative yarn as well as required amount in the new quality.

If you think it's hard to decide what size to make, it can be a good idea to measure a garment you own already and like the size of. Then you can pick the size by comparing those measures with the ones available in the pattern's size chart.

You'll find the size chart at the bottom of the pattern.

See DROPS lesson: How to read size chart

The needle size provided in the pattern serves only as a guide, the important thing is to follow the knitting tension. And since knitting tension is very individual, you will have to adjust the needle size to ensure that YOUR tension is the same as in the pattern – maybe you’ll have to adjust 1, or even 2 needle sizes, up or down to achieve the correct tension. For this, we recommend that you work test swatches.

Should you work with a different knitting tension than the one provided, the measurements of the finished garment might deviate from the measurement sketch.

See DROPS lesson: How to measure your tension/gauge

See DROPS video: How to make a gauge tension swatch

Working a garment top-down provides more flexibility and room for personal adjustment. For example it is easier to try the garment on while working, as well as making adjustments to length of yoke and shoulder caps.

The instructions are carefully explaining every step, in the correct order. Diagrams are adjusted to the knitting direction and are worked as usual.

The diagram depicts all rows/rounds, and every stitch seen from the right side. It is read from bottom to top, from right to left. 1 square = 1 stitch.

When working back and forth, every other row is worked from the right side and every other row is worked from the wrong side. When working from the wrong side, the diagram will have to be worked reversed: from left to right, knit stitches are purled, purl stitches are knit etc.

When working in the round every round is worked from the right side and the diagram are worked from right to left on all rounds.

See DROPS lesson: How to read knitting diagrams

The diagram depicts all rows/rounds, and every stitch seen from the right side. It is worked from bottom to top, from right to left.

When working back and forth every other row is worked from the right side: from right to left and every other row is worked from the wrong side: from left to right.

When working in the round, every row in the diagram are worked from the right side, from right to left.

When working a circular diagram you start in the middle and work your way outwards, counter clockwise, row by row.

The rows usually start with a given number of chain stitches (equivalent to the height of the following stitch), this will either be depicted in the diagram or explained in the pattern.

See DROPS lesson: How to read crochet diagrams

Instructions for working several diagrams after each other on the same row/round, will often be written like so: “work A.1, A.2, A.3 a total of 0-0-2-3-4 times". This means you work A.1 once, then A.2 is worked once, and A.3 is repeated (in width) the number of times provided for your size – in this case like so: S = 0 times, M = 0 times, L=2 times, XL= 3 times and XXL = 4 times.

The diagrams are worked as usual: begin with the first row in A.1, then work the first row in A.2 etc.

See DROPS lesson: How to read knitting diagrams

See DROPS lesson: How to read crochet diagrams

The total width of the garment (from wrist-to-wrist) will be larger in the larger sizes, despite the actual sleeves being shorter. The larger sizes have longer sleeve caps and wider shoulders, so there will be a good fit in all sizes.

The measurement sketch/schematic drawing provides information regarding the full length of the garment. If it’s a jumper or a jacket the length is measured from the highest point on the shoulder (usually closest to the neckline), and straight down to the bottom of the garment. It is NOT measured from the tip of shoulder. Similarly, the length of yoke is measured from the highest point on the shoulder and down to where yoke is split into body and sleeves.

See DROPS lesson: How to read a schematic drawing

Diagrams are often repeated on the round or in height. 1 repeat is the diagram the way it appears in the pattern. If it says to work 5 repeats of A.1 in the round, then you work A.1 a total of 5 times after/next to each other in the round. If it says to work 2 repeats of A.1 vertically/in height you work the entire diagram once, then begin again at the start and work the entire diagram one more time.

Chain stitches are slightly narrower than other stitches and to avoid working the cast-on edge too tight, we simply chain more stitches to begin with. The stitch count will be adjusted on the following row to fit the pattern and measurement sketch.

The rib edge is more elastic and will contract slightly compared to, for example, stocking stitch. By increasing before the rib edge, you avoid a visible difference in width between the rib edge and the rest of the body.

It’s very easy to cast off too tightly, and by making yarn overs while casting off (and simultaneously casting these off) you avoid a too tight cast off edge.

See DROPS video: How to bind off with yarn overs (yo)

To achieve an even increase (or decrease) you can increase on, for example: every 3rd and 4th row alternately, like so: work 2 rows and increase on the 3rd row, work 3 rows and increase on the 4th. Repeat this until the increase is complete.

See DROPS lesson: Increase or decrease 1 st on every 3rd and 4th row alternately

Should you prefer to work in the round instead of back and forth, you may of course adjust the pattern. You’ll need to add steeks mid-front (usually 5 stitches), and follow the instructions. When you would normally turn and work from the wrong side, simply work across the steek and continue in the round. At the end you’ll cut the piece open, pick up stitches to work bands, and cover the cut edges.

See DROPS video: How to knit steeks and cut open

Should you prefer to work back and forth instead of in the round, you may of course adjust the pattern so you work the pieces separately and then assemble them at the end. Divide the stitches for the body in 2, add 1 edge stitch in each side (for sewing) and work the front and back pieces separately.

See DROPS lesson: Can I adapt a pattern for circular needles into straight needles?

Pattern repeats can vary slightly in the different sizes, in order to get the correct proportions. If you’re not working the exact same size as the garment in the photo, yours might deviate slightly. This has been carefully developed and adjusted so that the complete impression of the garment is the same in all sizes.

Make sure to follow instructions and diagrams for your size!

If you have found a pattern you like which is available in women’s size it’s not very difficult to convert it to men’s size. The biggest difference will be the length of sleeves and body. Start working on the women size that you think would fit across the chest. The additional length will be worked right before you cast off for the armhole/sleeve cap. If the pattern is worked top-down you can add the length right after the armhole or before the first decrease on sleeve.

Regarding additional yarn amount, this will depend on how much length you add, but it is better with a skein too many than too few.

All yarns will have excess fibres (from production) that might come off as lint or shedding. Brushed yarns (ie hairier yarns) have more of these loose, excess fibres, causing more shedding.

Shedding also depends on what is worn under or over the garment, and whether this pulls at the yarn fibres. It’s therefore not possible to guarantee that there will be no shedding

Below are some tips on how to get the best result when working with hairier yarns:

1. When the garment is finished (before you wash it) shake it vigorously so the looser hairs come off. NOTE: do NOT use a lint roller, brush or any method that pulls at the yarn.

2. Place the garment in a plastic bag and put it in your freezer - the temperature will cause the fibres to become less attached to each other, and excess fibres will come off easier.

3. Leave in the freezer for a few hours before taking it out and shaking it again.

4. Wash the garment according to the instructions on the yarn label.

Pilling is a natural process that happens to even the most exclusive of fibers. It's a natural sign of wear and tear that is hard to avoid, and that is most visible in high friction areas of your garment like a sweater's arms and cuffs.

You can make your garment look as new by removing the pilling, using a fabric comb or a pill/lint remover.

Still can't find the answer you need? Then scroll down and leave your question so one of our experts can try to help you. This will be done normally within 5 to 10 working days.
In the meantime, you can read the questions and answers that others have left to this pattern or join the DROPS Workshop on Facebook to get help from fellow knitters/crocheters!

You might also like...

Post a comment to pattern DROPS 227-27

We would love to hear what you have to say about this pattern!

If you want to leave a question, please make sure you select the correct category in the form below, to speed up the answering process. Required fields are marked *.

Comments / Questions (11)

country flag Toni wrote:

For the front piece, unless I am reading this wrong, for the XL size, you have 90 stiches before changing to 8 mm needles. The next instruction is for 92 stiches : 1 edge stitch in garter stitch, stockinette stitch over the next 14 stitches and decrease-1 stitch (total of 15?) A.4 (= 14 stitches), A.5 (= 32 stitches), A.6 (= 14 stitches), stockinette stitch over the next 14stitches and decrease1 stitches over these stitches, (again a total of 15?) 1 edge stitch

15.01.2023 - 03:35

DROPS Design answered:

Dear Toni, you decrease 1 stitch of the 14 stitches (so you have 14-1 = 13; not 15-1 = 14). 1+14 (-1)+14+32+14+14 (-1)+1 = 90 stitches - 2 decreased stitches = 88 stitches. Happy knitting!

15.01.2023 - 10:47

country flag Malene Kastberg Pedersen wrote:

I diagram forklaringen står der, at der i de store yderste snoninger skal sættes 4 masker FORAN på begge snoninger. Jeg vil mene, at de skal bagved på den ene snoning😊.

21.05.2022 - 10:59

DROPS Design answered:

Hei Malene. Her var det feil oversatt i den danske teksten, det er nå fikset. Takk for at du gjorde oss oppmerksom på dette. mvh DROPS Design

23.05.2022 - 11:21

country flag Elaine Damme wrote:

I am confused in regard to the sleeve cap. It appears from the photo that the sleeve must have been bound off…then the sleeve cap stitches are knitted after the fact and then attached to the sleeve? Could you provide a bit more direction? Thank you

01.03.2022 - 22:30

DROPS Design answered:

Dear Mrs Damme, the sleeve is first worked in the round then back and forth from mid under sleeve for the sleeve cap - you then sew the sleeve to the sleeve cap to the armhole. This video shows how to work the last cm on top of sleeve and how to sew it into the armhole. Happy knitting!

02.03.2022 - 09:52

country flag Paola wrote:

Cosa vuol dire "arrotondamento della manica" e come si realizza. Grazie

11.01.2022 - 22:35

DROPS Design answered:

Buonasera Paola, l'arrotondamento della manica è la parte della manica vicino alla spalla e si realizza seguendo le spiegazioni indicate nel testo. Buon lavoro!

12.01.2022 - 22:49

country flag Sophia wrote:

Can you help me with A5 diagram.? I knit it one time ,12 rows and I start it from the beginning, but the " holes" in the pattern looks smaller than mine.thank you and merry Christmas to your team.

15.12.2021 - 08:38

DROPS Design answered:

Hi Sophia, this video shows how to knit a honey comb pattern (like in A.5) and might help you. Hope it can help, happy knitting!

15.12.2021 - 08:59

country flag Lotta Andersson wrote:

På beskrivningen över framstycket blir det fel om man stickar som det står ”öve de nästa 4-8-8-12-16-20” i storlek small iallafall. Man skall inte sticka över några maskor. På beskrivningen till ärm hade det varit bra om det stod att man skall lägga upp på strumpstickor nr 7 för det framgick inte där. Så fin tröja. Tack för mig

07.11.2021 - 13:42

country flag Betina Ellegaard wrote:

Jeg kan se i opskriften at der hvor man laver snoninger på mønster A4 er forkert i forhånd til original opskriften. Den skal være 4 bagved og ikke foran. 😉

30.10.2021 - 18:53

country flag Aino Vikman wrote:

I am knitting size S and using recommended yarn (Wish). My concern is the yarn consumption. I did minor modifications to knitting order and stitch pattern, but I do not think they would result in such a big deviation from the reported consumption (450 gr vs. nearly 550 gr). Please, see my Ravelry project for details (/projects/AinoTV/227-27-winter-hive)

30.10.2021 - 14:07

DROPS Design answered:

Dear Aino, the yarn amounts are calculated for this exact pattern and gauge. If you made any modifications or work at a different gauge, there may be some variations in the amount of yarn needed. For example, depending on the space of the cables, you may use more yarn and, when all these little amounts add up, the final yarn requirements increases. Happy knitting!

01.11.2021 - 13:35

country flag MARIA LUCIA LOMBARDO wrote:

Buongiorno, come si può creare l'arrotondamento in piano della manica? Ho acquistato il filato wish e volevo realizzare questo maglione. C'è un video tutorial? Grazie per la risposta. Maria Lucia

25.10.2021 - 11:55

DROPS Design answered:

Buonasera Maria Lucia, deve procedere come indicato nel modello, non ci sono dei tutorial specifici. Buon lavoro!

04.11.2021 - 23:38

country flag Véronique wrote:

Alvéoles

13.08.2021 - 15:16