
Popular categories
Looking for a yarn?


Comments / Questions (11)
![]() Flavia wrote:
Flavia wrote:
Hello I just finished my pullover, but I don’t know how to wash it. Can I wash it in the washing machine and if so at what temperature or should I wash it by hand?
25.12.2024 - 13:31DROPS Design answered:
Hi Flavia, for washing instructions please see info at the yarn label. For DROPS yarns we give washing instructions at every yarn shadecard.
28.12.2024 - 21:50
![]() Yoann wrote:
Yoann wrote:
Bonjour, Une fois les mailles rabattues pour les emmanchures, faut-il refaire une maille lisière en début et fin de rang?
27.07.2024 - 19:11DROPS Design answered:
Bonjour, oui, tricotez toujours les mailles lisieres comme avant. Bon tricot!
28.07.2024 - 16:13
![]() Grace Day wrote:
Grace Day wrote:
Hello, This may be a silly question, how much must the whole garment measure, top to bottom? Are the numbers on the chart in inches or in cm?
27.03.2024 - 11:24DROPS Design answered:
Dear Grace, you can fins all the measurements on the schematic drawings at the bottom of the pattern. The length is on the left side of the drawing. Every measurement is given in centimeters. Happy Knitting!
27.03.2024 - 14:31
![]() Baetens wrote:
Baetens wrote:
Ik snap de correctie niet goed. Daar staat hetzelfde als in het originele patroon. Is het patroon nu aangepast en wel degelijk correct?
04.11.2023 - 17:15DROPS Design answered:
Dag Baetens,
Als er een correctie is gemaakt, dan is deze correctie al doorgevoerd in het online patroon. Als je een afdruk hebt gemaakt van voor de correctiedatum dan is de correctie daar nog niet in doorgevoerd.
05.11.2023 - 19:38
![]() Cal wrote:
Cal wrote:
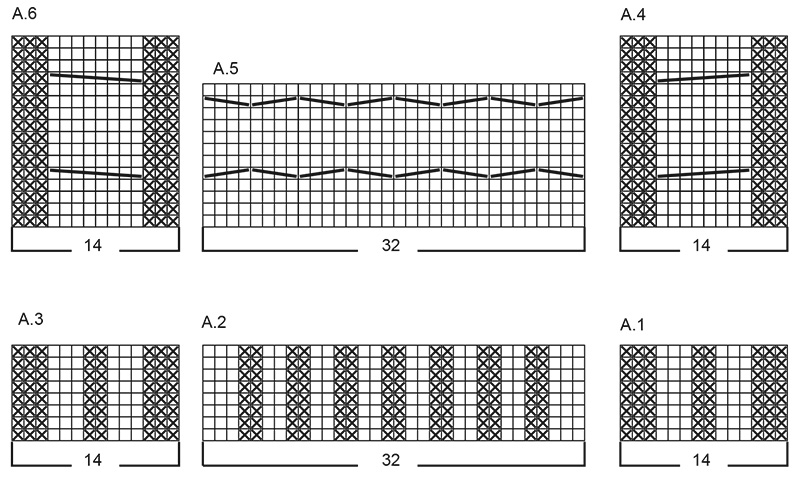
Hi, thanks for answering my previous question. I’m now stuck on the part on the shoulders where you have to decrease 4 stitches evenly over the cables on A.4/A.6. Do you do the decreases on the one row or over multiple rows? I can’t seem to work it so the cable looks right; instead it looks too small compared to the rest of the piece. Would you recommend any specific way to decrease over the cables? Thanks again!
23.09.2023 - 22:19DROPS Design answered:
Dear Cal, you decrease on one row, in the last row of working the cable. You should be able to decrease normally with knit 2 together. This is all done since, as the cable will contract the piece, we increase stitches for the cables before starting to work the pattern. Then, as we finish the cable, we decrease over the cable stitches so that the neck won't be curved and will be flat. These decreases shouldn't affect the size of the cables. Happy knitting!
25.09.2023 - 00:01
![]() Cal wrote:
Cal wrote:
I’m stuck when it comes to repeating the pattern; chart A5 is shorter than A4 & A6, where do I start the repeat? Thanks
13.09.2023 - 13:25DROPS Design answered:
Dear Cal, the diagrams are repeated over a different number of rows in height, so when A.5 is done, repeat A.5 from first row and continue A.4 and A.6 as before, when A.4 and A.6 are done in height, repeat them from first row, continuing A.5 as before. Happy knitting!
13.09.2023 - 16:21
![]() Thera wrote:
Thera wrote:
Winter Hive DROPS Design: Model wi-019 Jeg er ny udi strikkeriets forunderlige verden og indtil videre er det gået rigtigt fint med denne opskrift, hvor alt er godt forklaret. Men jeg kan ikke helt gennemskue, hvordan man strikker ærmekuppel? Synes ikke det fremgår. præcist hvordan man gør dette?
13.01.2023 - 08:21DROPS Design answered:
Hei Thera Du har til nå strikket ermet rundt på rundpinne, men når ermet måler 56-55-54-53-50-49 cm, skal det strikkes frem og tilbake over maskene i noen cm (se hvor mange cm i oppskriften og den str. du strikker). Dette blir da ermtoppen og det blir en splitt iarbeidet fra der du begynte åstrikke frem og tilbake. Ta gjerne en titt på denne videoen, kanskje du da får en bedre oversikt: Hvordan monterer man ærmerne i ryg & forstykke mvh DROPS Design
16.01.2023 - 11:04
![]() Guillaume Lisicki wrote:
Guillaume Lisicki wrote:
Bonjour C'est la première fois que j'essaye un patron en forme de texte. Il y a une chose que je ne comprends pas. Pour faire le devant vous demander de monter 74 mailles en taille s. Lorsque j'additionne le nombre de mailles du dessin A1 + A2 + A3 =60 mailles. J'ai une différence de 14 mailles je ne comprends pas où elles sont passées. pouvez-vous m'aider sur le sujet
02.03.2022 - 17:27DROPS Design answered:
Bonjour Mr Lisicki, vous n'allez pas uniquement tricoter les diagrammes, mais en taille S ainsi: 1 m lis, 2 m end, 2 m env, 2 m end, A.1 (= 14 m), A.2 (= 32 m), A.3 (= 14 m), 2 m end, 2 m env, 2 m end, 1 m lis = 1+2+2+2+14+32+14+2+2+2+1=74 mailles. Bon tricot!
02.03.2022 - 17:44
![]() Motte wrote:
Motte wrote:
Bonjour . Combien de pelotes faut il pour une taille M
12.02.2022 - 19:17DROPS Design answered:
Bonjour Motte, pour la taille M il vous faut 13 pelotes (650 g) de DROPS Wish. Bon tricot!
14.02.2022 - 07:33
![]() Philippart Joelle wrote:
Philippart Joelle wrote:
J\'ai un problème pour payer : aucune de mes carte ne fonctionnent f723333aabf33-12000
31.01.2022 - 17:32DROPS Design answered:
Bonjour Mme Philippart, n'hésitez pas à contacter directement le magasin où vous avez voulu passer votre commande, on pourra vous y aider, même par mail ou téléphone. Bon tricot!
31.01.2022 - 17:58
|
||||||||||||||||||||||
Winter Hive#winterhivesweater |
||||||||||||||||||||||
 |
 |
|||||||||||||||||||||
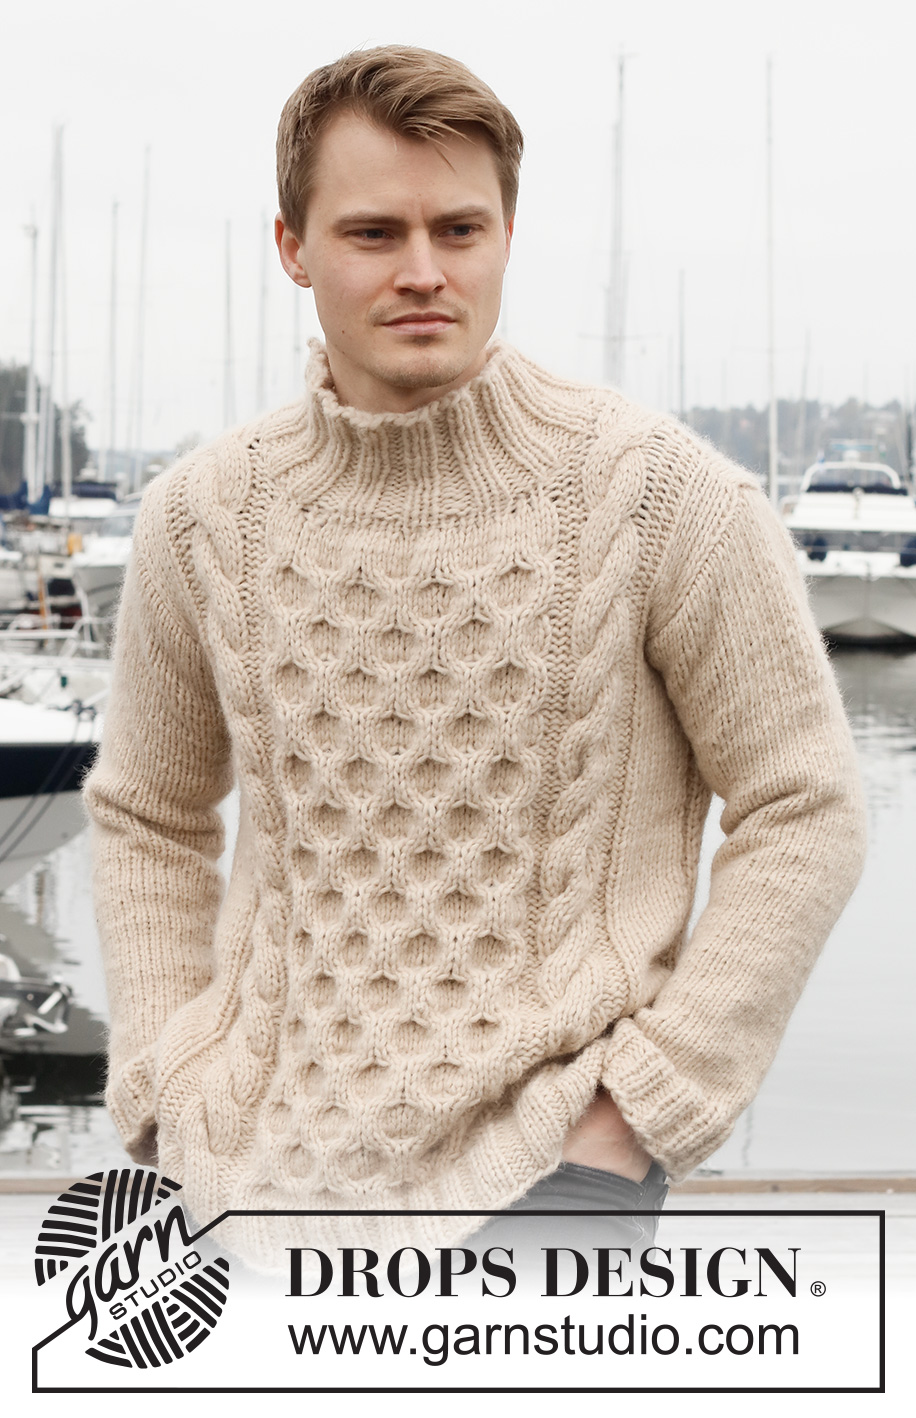
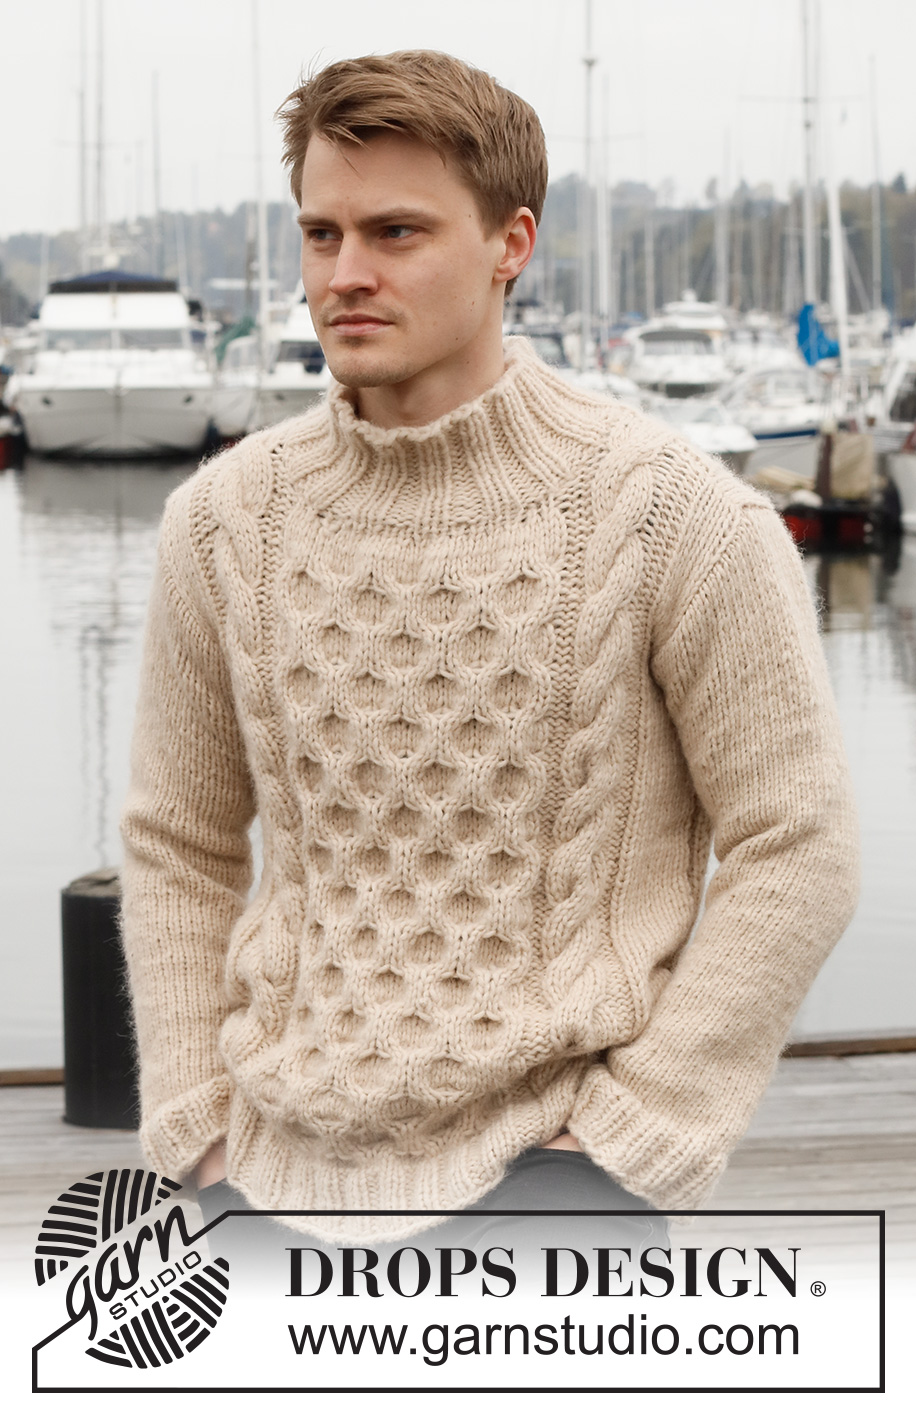
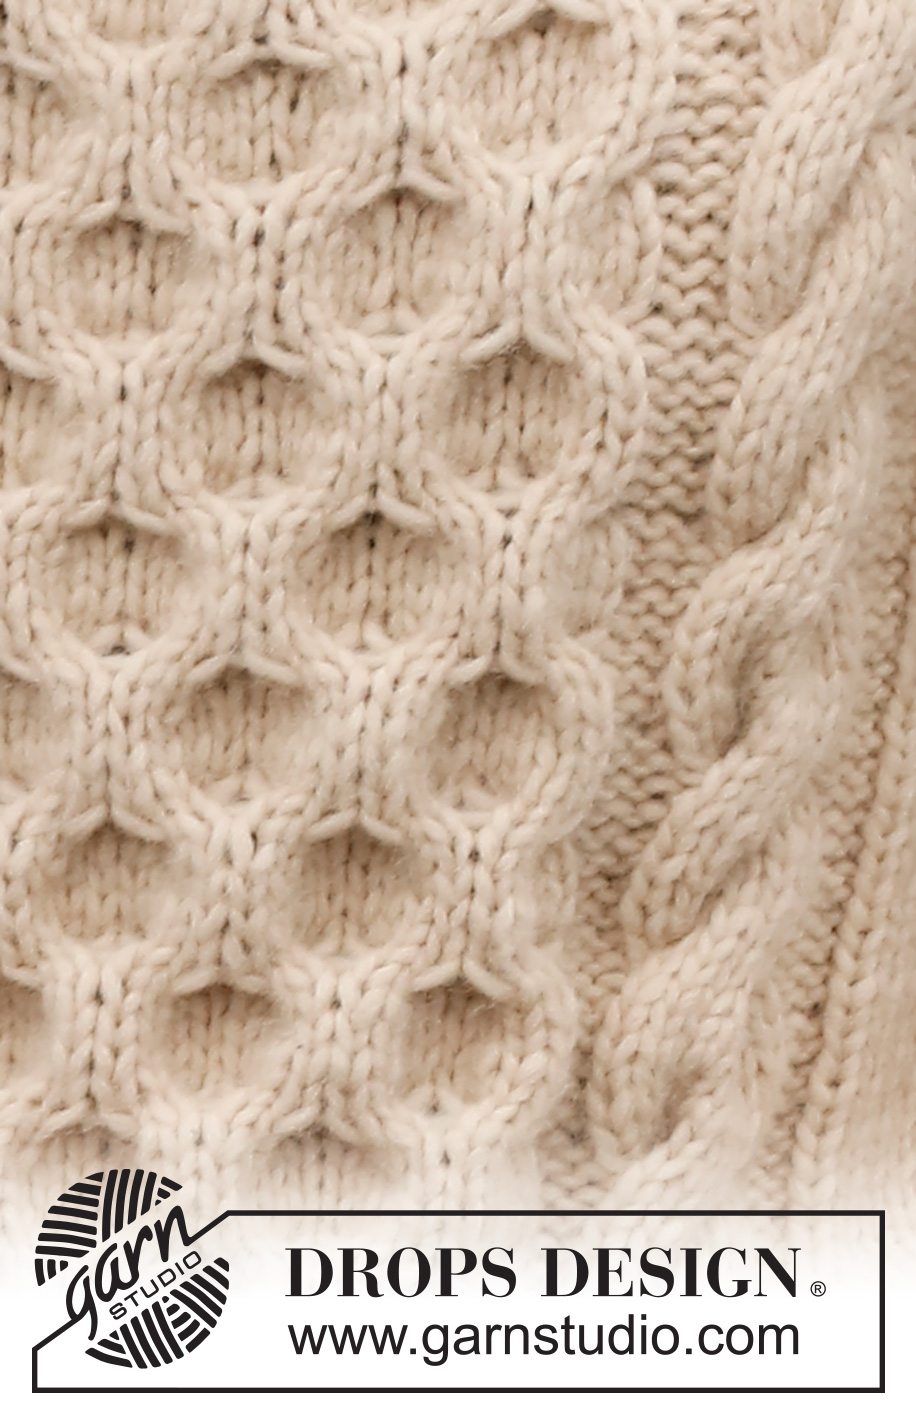
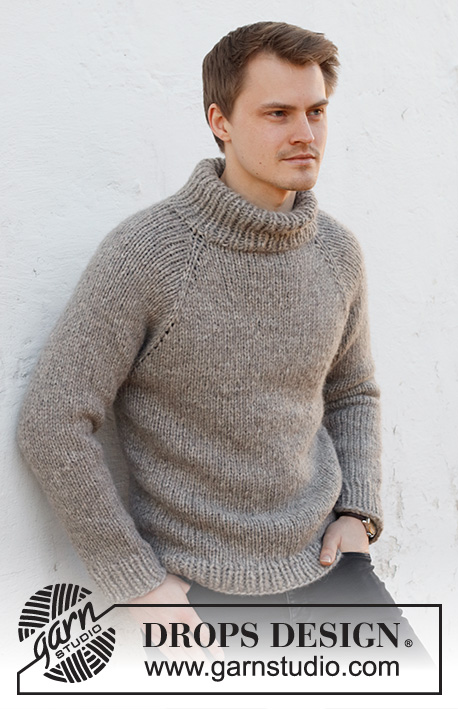
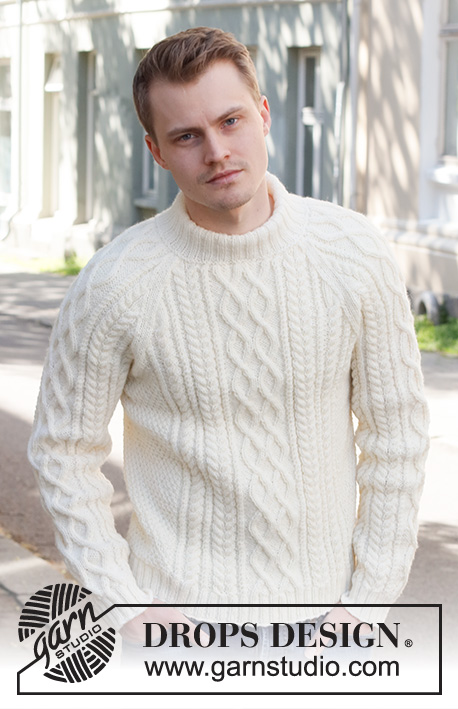
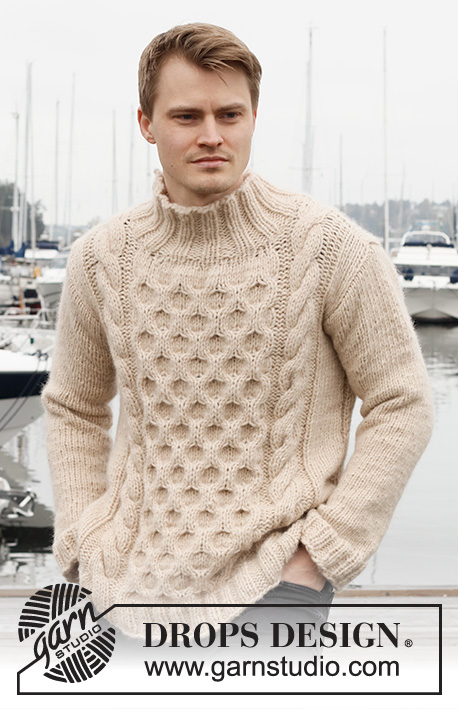
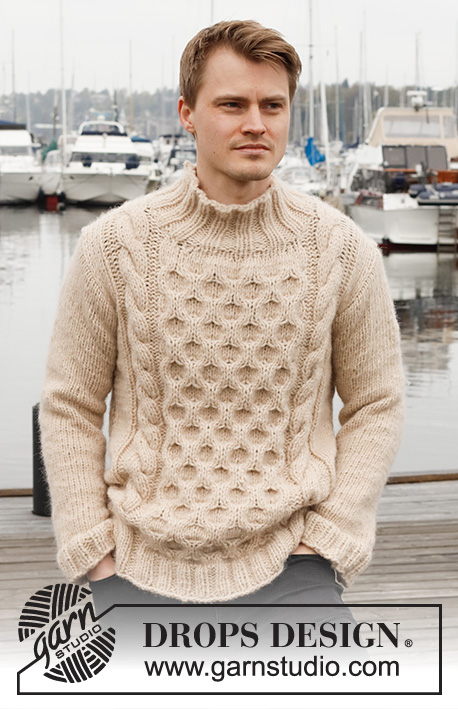
Knitted jumper for men in DROPS Wish. The piece is worked with cables, honeycomb pattern and high neck. Sizes S - XXXL.
DROPS 224-15 |
||||||||||||||||||||||
|
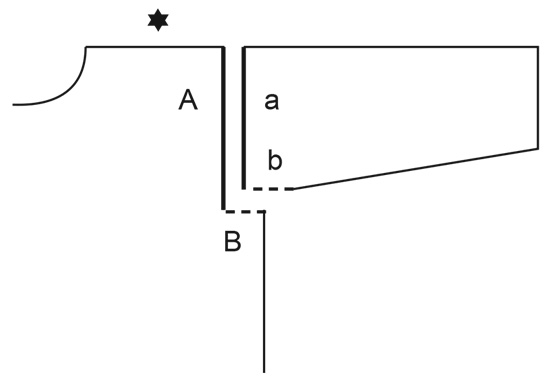
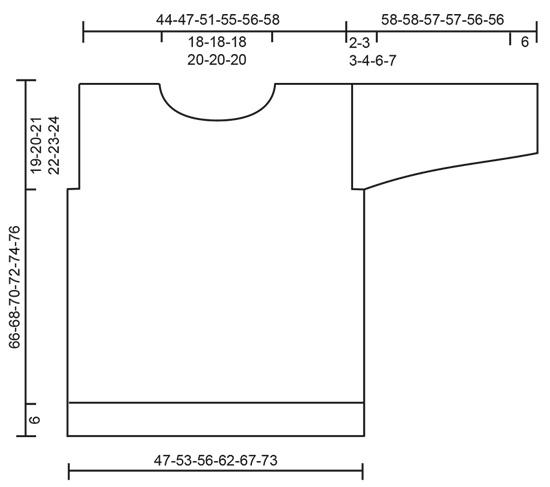
------------------------------------------------------- EXPLANATIONS FOR THE PATTERN: ------------------------------------------------------- RIDGE/GARTER STITCH (worked back and forth): Knit all rows. 1 ridge = knit 2 rows. PATTERN: See diagrams A.1 to A.6. The diagrams show all rows in the pattern from the right side. DECREASE TIP-1 (evenly spaced): To work out how to decrease evenly, count the total number of stitches on needle (e.g. 36 stitches) and divide by number of decreases to be made (e.g. 4) = 9. In this example decrease by knitting together each 8th and 9th stitch. INCREASE TIP (for sleeves): Start 1 stitch before the marker thread, 1 yarn over, knit 2 (marker thread sits between these 2 stitches), 1 yarn over. On the next round knit the yarn overs twisted to avoid holes (2 stitches increased). ------------------------------------------------------- START THE PIECE HERE: ------------------------------------------------------- JUMPER – SHORT OVERVIEW OF THE PIECE: The front and back pieces are worked separately, back and forth and bottom up then sewn together. The sleeves are worked in the round with double pointed needles/short circular needle. The neck is worked to finish. FRONT PIECE: Cast on 74-82-82-90-98-106 stitches with circular needle size 7 mm and DROPS Wish. Purl 1 row from the wrong side. Then work as follows from the right side: 1 edge stitch in GARTER STITCH – read description above, knit 2, * purl 2, knit 2 *, work from *-* over the next 4-8-8-12-16-20 stitches, A.1 (= 14 stitches), A.2 (= 32 stitches), A.3 (= 14 stitches), knit 2, * purl 2, knit 2 *, work from *-* over the next 4-8-8-12-16-20 stitches, 1 edge stitch in garter stitch. Work this rib for 6 cm. Change to circular needle size 8 mm. Then work as follows from the right side: 1 edge stitch in garter stitch, stocking stitch over the next 6-10-10-14-18-22 stitches and decrease 1-2-0-1-2-3 stitches over these stitches, A.4 (= 14 stitches), A.5 (= 32 stitches), A.6 (= 14 stitches), stocking stitch over the next 6-10-10-14-18-22 stitches and decrease 1-2-0-1-2-3 stitches over these stitches, 1 edge stitch in garter stitch = 72-78-82-88-94-100 stitches. Continue this pattern. REMEMBER THE KNITTING TENSION! When the piece measures 47-48-49-50-51-52 cm, cast off 3-4-4-5-7-9 stitches at the beginning of the next 2 rows for the armholes = 66-70-74-78-80-82 stitches. Continue the pattern until the piece measures 60-62-64-66-68-70 cm. Now decrease 14 stitches evenly over A.5. On the next row place the middle 12-12-12-14-14-14 stitches on a thread for the neck and finish each shoulder separately. Then cast off stitches on each row from the neck as follows: 2 stitches 1 time and 1 stitch 2 times = 16-18-20-21-22-23 stitches on the shoulder. Continue working until the piece measures 65-67-69-71-73-75 cm, then decrease 4 stitches evenly over the cable in A.4/A.6 = 12-14-16-17-18-19 stitches. Work until the piece measures 66-68-70-72-74-76 cm, cast off. Work the other shoulder in the same way. BACK PIECE: Cast on 74-82-82-90-98-106 stitches with circular needle size 7 mm and DROPS Wish. Purl 1 row from the wrong side. Then work as follows from the right side: 1 edge stitch in garter stitch, knit 2, * purl 2, knit 2 *, work from *-* over the next 4-8-8-12-16-20 stitches, A.1 (= 14 stitches), A.2 (= 32 stitches), A.3 (= 14 stitches), knit 2, * purl 2, knit 2 *, work from *-* over the next 4-8-8-12-16-20 stitches, 1 edge stitch in garter stitch. Work this rib for 6 cm. Change to circular needle size 8 mm. Then work as follows from the right side: 1 edge stitch in garter stitch, stocking stitch over the next 6-10-10-14-18-22 stitches and decrease 1-2-0-1-2-3 stitches over these stitches, A.4 (= 14 stitches), A.5 (= 32 stitches), A.6 (= 14 stitches), stocking stitch over the next 6-10-10-14-18-22 stitches and decrease 1-2-0-1-2-3 stitches over these stitches, 1 edge stitch in garter stitch = 72-78-82-88-94-100 stitches. Continue this pattern. When the piece measures 47-48-49-50-51-52 cm, cast off 3-4-4-5-7-9 stitches at the beginning of the next 2 rows for the armholes = 66-70-74-78-80-82 stitches. Continue the pattern until the piece measures 64-66-68-70-72-74 cm. Now decrease 14 stitches evenly over A.5. On the next row cast off the middle 18-18-18-20-20-20 stitches for the neck and finish each shoulder separately. Then cast off 1 stitch on the next row from the neck = 16-18-20-21-22-23 stitches on the shoulder. Continue working until the piece measures 65-67-69-71-73-75 cm, then decrease 4 stitches evenly over the cable in A.4/A.6 = 12-14-16-17-18-19 stitches. Work until the piece measures 66-68-70-72-74-76 cm, cast off. Work the other shoulder in the same way. SLEEVE: Cast on 36-40-40-44-44-48 stitches with double pointed needles size 7 mm and DROPS Wish. Knit 1 round then work rib (knit 2, purl 2) for 6 cm. Change to double pointed needles size 8 mm and knit 1 round where you decrease 4-6-4-6-4-6 stitches evenly spaced – read DECREASE TIP = 32-34-36-38-40-42 stitches. Insert a marker thread at the beginning of the round = mid-under sleeve. Work stocking stitch in the round. When the sleeve measures 8 cm, increase 1 stitch on each side of the marker thread– read INCREASE TIP. Increase like this every 11-11-10½-10½-10-9½ cm a total of 5 times = 42-44-46-48-50-52 stitches. When the sleeve measures 56-55-54-53-50-49 cm, finish the sleeve cap back and forth (from mid-under sleeve). Continue working until the sleeve measures 58-58-57-57-56-56 cm (sleeve cap 2-3-3-4-6-7 cm). Cast off. Work the other sleeve in the same way. ASSEMBLY: Sew the shoulder seams. Sew the sleeve cap to the armhole. Then sew the split at the top of the sleeve along the bottom of the armhole – see sketch. Sew the side seams inside the 1 edge stitch. NECK: Start from the right side on one shoulder and knit up 56 to 64 stitches around the neck (including the stitches on the thread), with short circular needle size 7 mm and DROPS Wish. The number of stitches should be divisible by 4. Work rib (knit 2, purl 2) for 12 cm. Cast off with knit over knit and purl over purl. |
||||||||||||||||||||||
Diagram explanations |
||||||||||||||||||||||
|
||||||||||||||||||||||
 |
||||||||||||||||||||||
 |
||||||||||||||||||||||
 |
||||||||||||||||||||||
Have you finished this pattern?Tag your pictures with #dropspattern #winterhivesweater or submit them to the #dropsfan gallery. Do you need help with this pattern?You'll find 33 tutorial videos, a Comments/Questions area and more by visiting the pattern on garnstudio.com. © 1982-2026 DROPS Design A/S. We reserve all rights. This document, including all its sub-sections, has copyrights. Read more about what you can do with our patterns at the bottom of each pattern on our site. |
||||||||||||||||||||||


With over 40 years in knitting and crochet design, DROPS Design offers one of the most extensive collections of free patterns on the internet - translated to 17 languages. As of today we count 324 catalogues and 12290 patterns translated into English (UK/cm). 12290
We work hard to bring you the best knitting and crochet have to offer, inspiration and advice as well as great quality yarns at incredible prices! Would you like to use our patterns for other than personal use? You can read what you are allowed to do in the Copyright text at the bottom of all our patterns. Happy crafting!
Post a comment to pattern DROPS 224-15
We would love to hear what you have to say about this pattern!
If you want to leave a question, please make sure you select the correct category in the form below, to speed up the answering process. Required fields are marked *.