
Popular categories
Looking for a yarn?


Comments / Questions (70)
![]() Marjon wrote:
Marjon wrote:
Ik heb de 16 cm van de hals gebreid en de naald recht is ook gebreid(waarbij ik de steken heb geminderd volgens patroon). Het werk keren en dan starten met patroon A.3 begrijp ik niet. Moet ik dan in de averechte steek een steek onder de steek maken? Ik vind dit niet logisch. Kortom, wat wordt bedoeld met ‘het werk keren?’
05.11.2024 - 22:39DROPS Design answered:
Dag Marjon,
Je keert het werk binnenste buiten, zodat je de volgende naald als het ware in de tegenovergestelde richting breit t.o.v. van de laatste toer.
06.11.2024 - 13:49
![]() Renata wrote:
Renata wrote:
Zamykanie oczek w rękawie. Jak równolegle zamknąć w jednym okrążeniu 34 oczka z 76 aby zostało ich 42 między markerem
04.08.2024 - 08:28DROPS Design answered:
Witaj Renato, będziesz przerabiać na prawo każde 2 kolejne oczka, a co jakiś czas przerabiać 1 oczko prawe między zamykanymi oczkami. Np. *przerabiać 2 oczka razem na prawo 2 razy, przerobić 1 oczko prawe; przerabiać 2 oczka razem na prawo 3 razy, przerobić 1 oczko prawe* i tak przez całe okrążenie. To jest oczywiście mniej więcej. Rozlicz sobie dokładnie podczas zamykania oczek. Pozdrawiamy!
07.08.2024 - 10:19
![]() Eline Dewispelaere wrote:
Eline Dewispelaere wrote:
Ik ben nu begonnen aan de overige 8cm van de hals, maar ik zie niet hoe de hals 24cm lang moet zijn. Als ik de hals op 16cm dubbel geplooid naast mijn nek houdt, dan is dat net zoals op de foto. Waar gaat die andere 8cm naartoe?
25.07.2024 - 19:49DROPS Design answered:
Dag Eline,
Het patroon van de hals loopt als het ware nog een stukje door en is inderdaad in totaal 24 cm.
31.07.2024 - 10:12
![]() Huong Vu wrote:
Huong Vu wrote:
Please share link for how to knit fishman's rib. I'm not sure I do corectly with diagram. Thank you so much
08.06.2024 - 09:28DROPS Design answered:
Dear Huong Vu, you can see how to work this stitch here: https://www.garnstudio.com/video.php?id=1104&lang=en. Happy knitting!
09.06.2024 - 23:04
![]() Janet wrote:
Janet wrote:
Sorry, for some reason I thought I would be able to reply to the last message. If I don't have to do a round of knits, do I then just work into the cast on round like normal for the first round of A.1? Then on the second round I go into the stitch underneath for the fisherman's rib stitch?
07.03.2024 - 07:21DROPS Design answered:
Dear Janet, you are right, you can start with a round of knits, then start A.1 on 2nd round, so that you can work the Fisherman's rib as in A.1. Happy knitting!
07.03.2024 - 08:19
![]() Janet wrote:
Janet wrote:
Do I need to do a round of knits before I start A.1?
07.03.2024 - 05:29DROPS Design answered:
Hi Janet, You do not need to do a knitted round before starting A.1 but, if you would like to do one, that is fine. Happy knitting!
07.03.2024 - 06:57
![]() Patrizia wrote:
Patrizia wrote:
Buongiorno, una domanda appena iniziato: "Avviare 120-120-132-132-150-150 maglie con i ferri circolari n° 5 mm e 2 capi di DROPS Kid-Silk. Passare ai ferri circolari n° 3 mm e lavorare A.1 in tondo per 16 cm"...se devo fare 16 cm in tondo seguendo lo schema A1 vuol dire che lavorerò per 16 cm dal dritto quindi cosa mi serve seguire lo schema A1...lo farò sempre sul dritto? e poi...dove trovo come si lavora a maglia "Fisherman's rib?" grazie
10.02.2024 - 17:27DROPS Design answered:
Buonasera Patrizia, A.1 lavorato in tondo prevede la lavorazione con 2 maglie a maglia legaccio e 1 maglia a Fisherman's rib, di cui trova la spiegazione nel quadratino con il cerchio nero. Buon lavoro!
10.02.2024 - 19:07
![]() Alicja wrote:
Alicja wrote:
Dzień dobry! Moja wątpliwość dotyczy swetra Falling Water Sweater i dodawania oczek do karczka i rękawów co 2 rzędy , czyli: np. w 1,4,7,10…. czy w1,3,5,7…?
22.11.2023 - 09:05DROPS Design answered:
Witaj, dodajesz oczka w 1,3,5,7…rzędzie. Pozdrawiamy!
22.11.2023 - 10:28
![]() Pascale Duchadeau wrote:
Pascale Duchadeau wrote:
Bonjour, comment obtiens-t-on les explications ? j'ai trouvé plusieurs modeles qui me plaisait mais je n'arrive pas à avoir les explications Merci d'avance
15.11.2023 - 22:29DROPS Design answered:
Bonjour Mme Duchadeau, les explications se trouvent sur cette page, si vous ne l'avez pas en français, cliquez sur le menu déroulant sous les photos et sélectionnez "français"; et faites ensuite défiler la page vers le bas pour accéder aux explications. Bon tricot!
16.11.2023 - 10:18
![]() Eva Collier wrote:
Eva Collier wrote:
Opzetten van de markeerdraden op de pas. Ik volg maat L. Mijn mouwen hebben 67 steken en geen 65 waardoor ik op de achterkant geen 33 maar 35 steken overheb. Moet markeerdraden 2 en 3 niet 67 zijn op 65?
12.10.2023 - 21:57DROPS Design answered:
Dag Eva,
Heb je de markeerdraden in de steken geplaatst, en niet tussen 2 steken?
15.10.2023 - 17:02
|
||||||||||
Falling Water Sweater#fallingwatersweater |
||||||||||
 |
 |
|||||||||
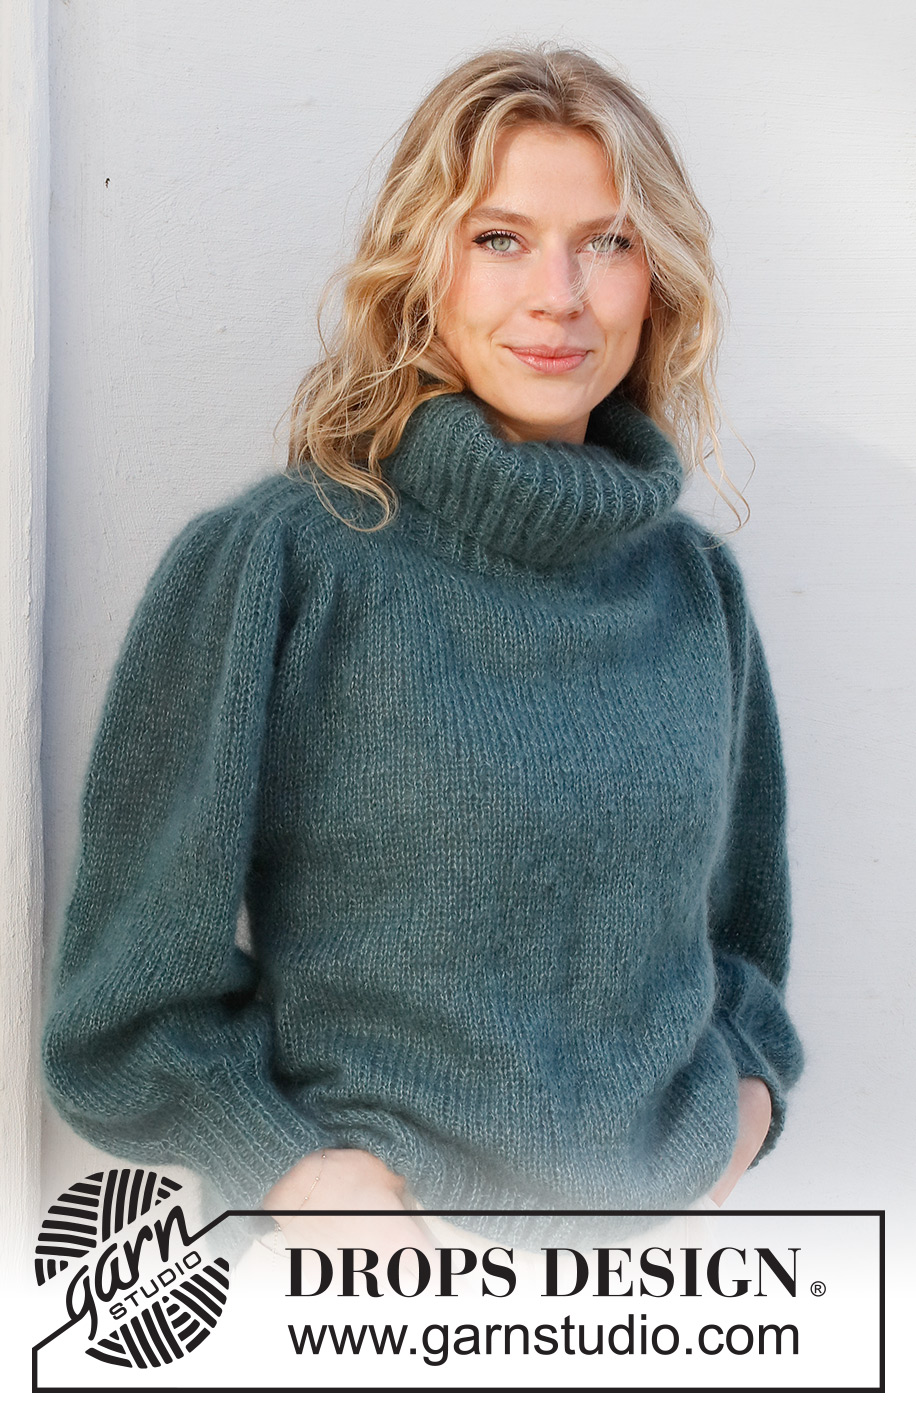
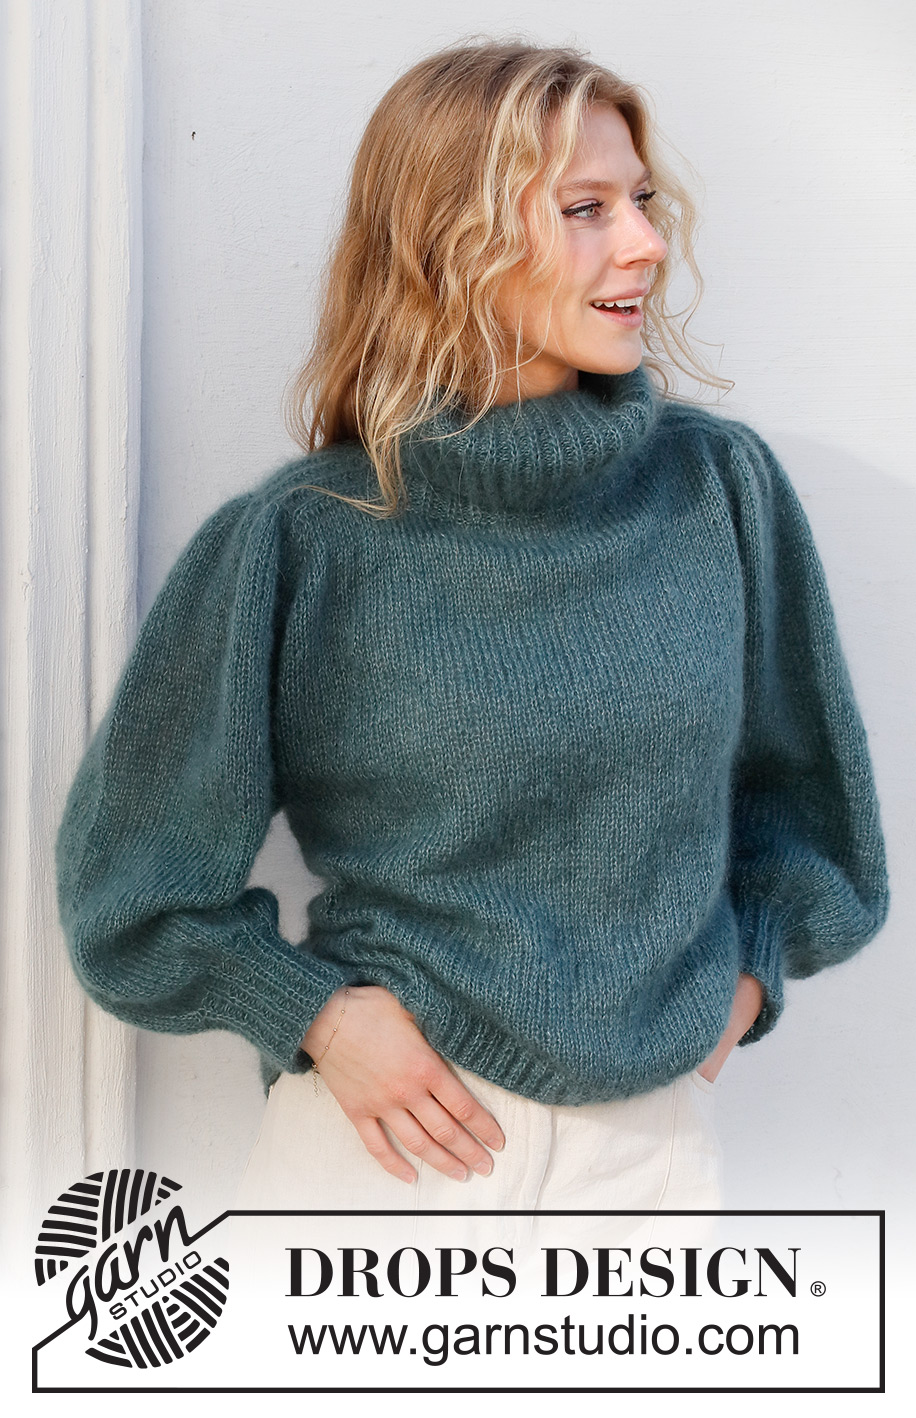
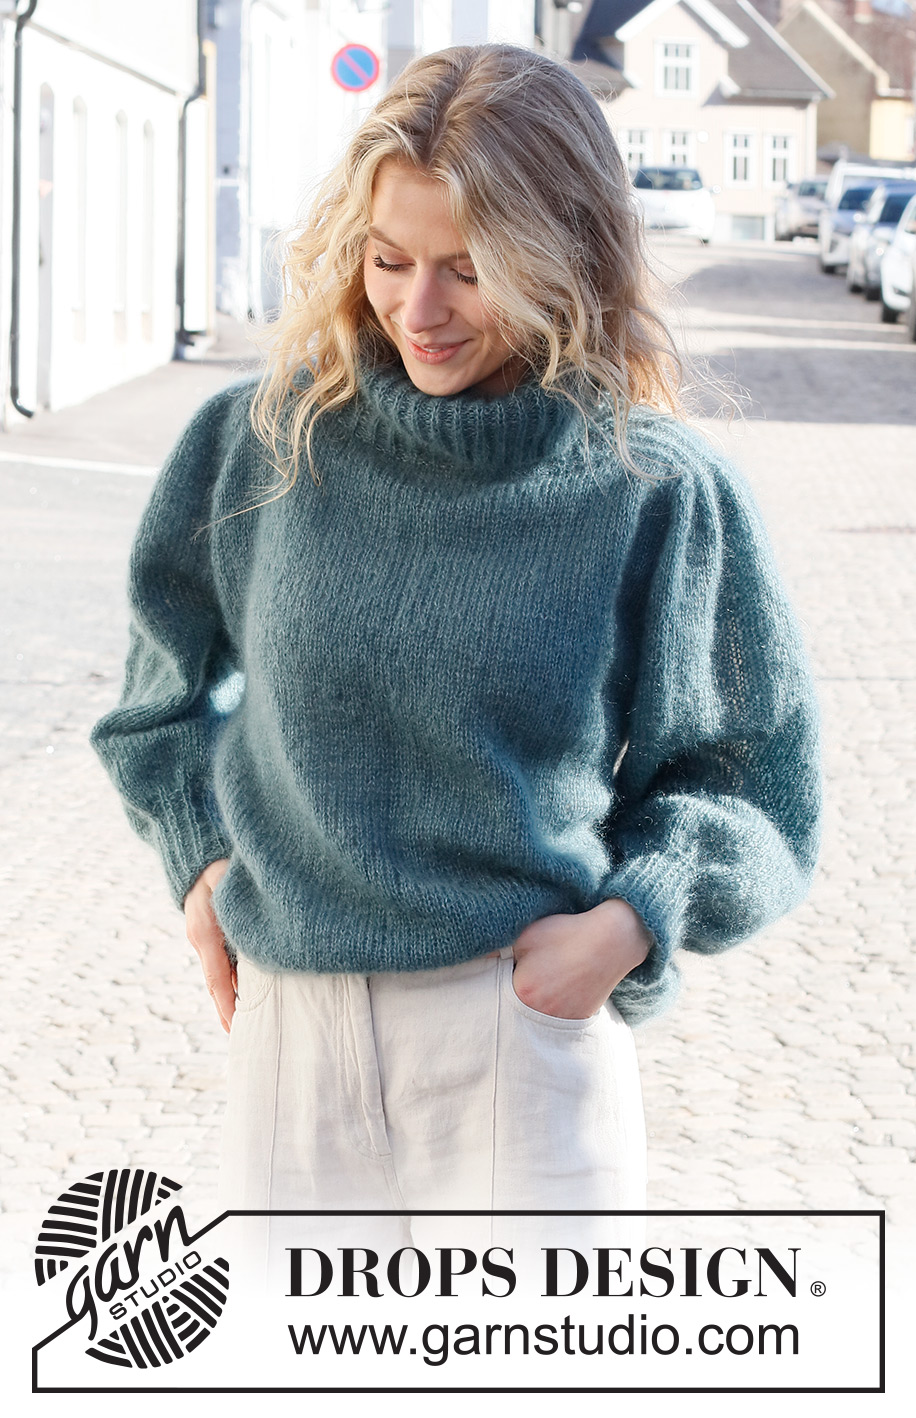
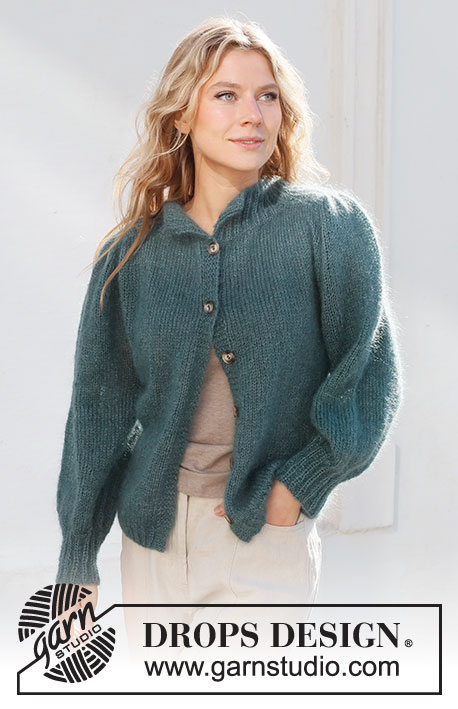
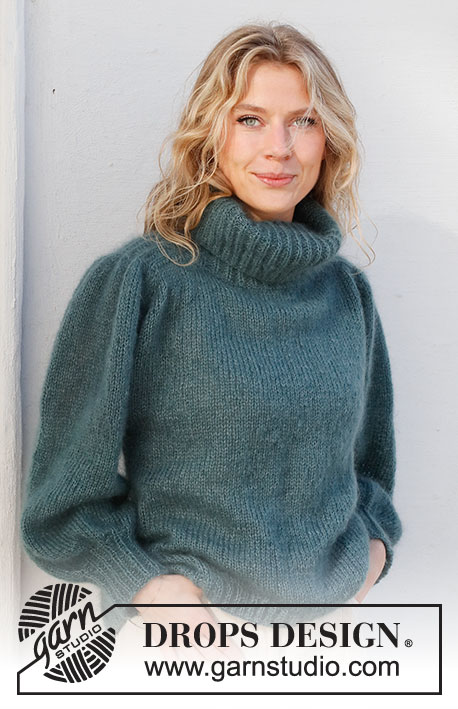
Knitted jumper in 2 strands DROPS Kid-Silk. The piece is worked top down, with saddle shoulders, puffed sleeves and high neck. Sizes S - XXXL.
DROPS 227-39 |
||||||||||
|
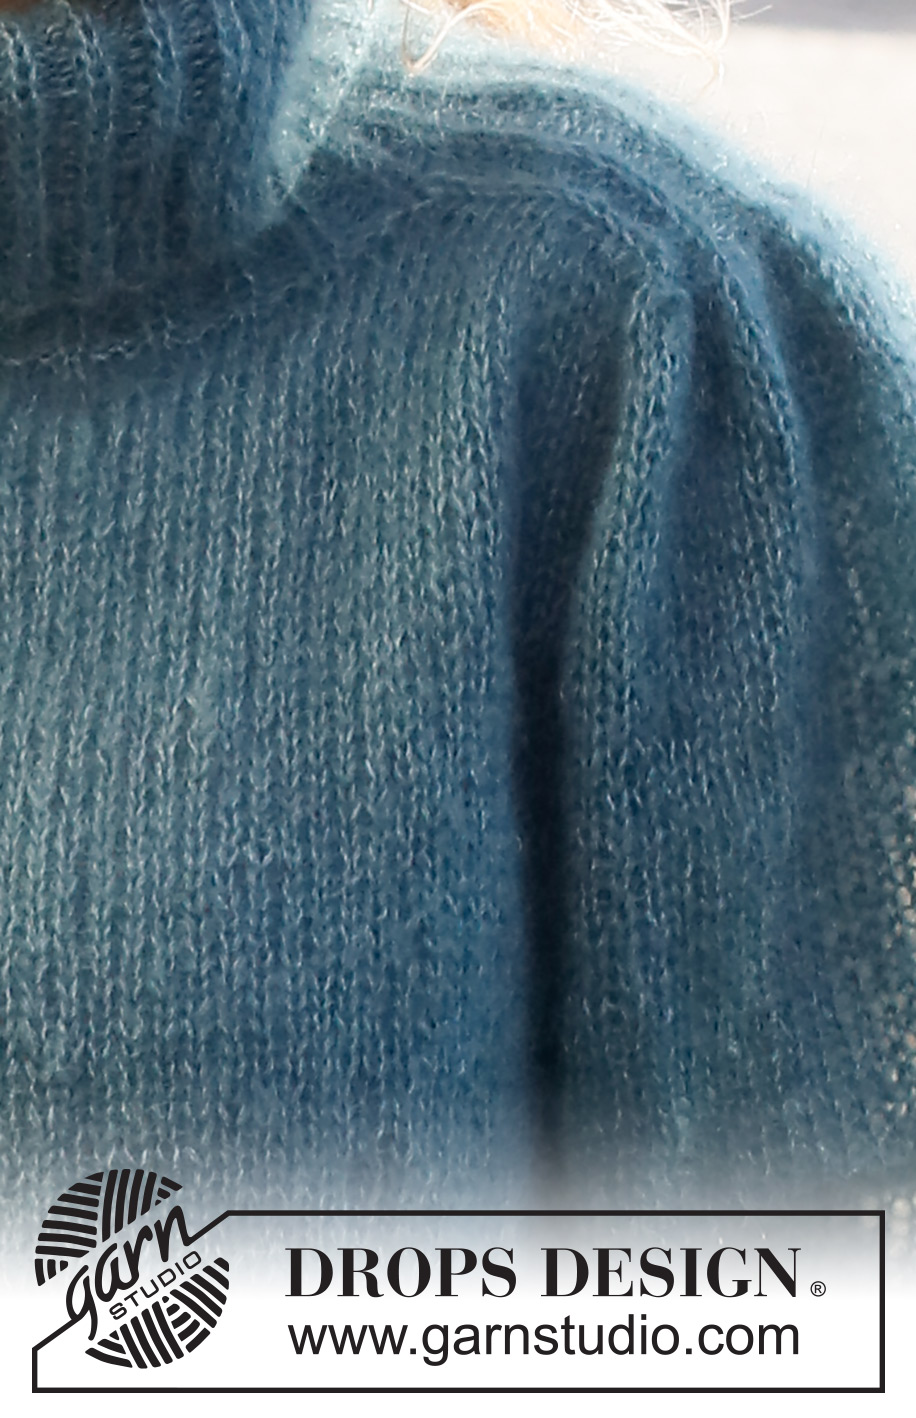
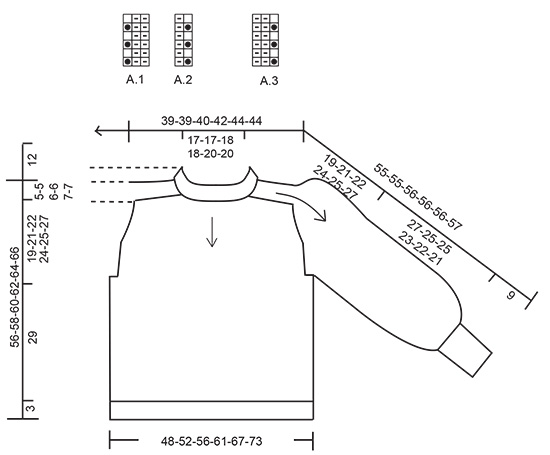
------------------------------------------------------- EXPLANATIONS FOR THE PATTERN: ------------------------------------------------------- RIDGE/GARTER STITCH (worked back and forth): Knit all rows. 1 ridge = knit 2 rows. PATTERN: See diagrams A.1 to A.3. The diagrams show all rows in the pattern from the right side. INCREASE/DECREASE TIP (evenly spaced): To work out how to increase/decrease evenly, count the number of stitches on to be increased/decreased over (e.g. 120 stitches) and divide by the number of increases/decreases to be made (e.g. 18 stitches) = 6.6. In this example, increase by making 1 yarn over after alternately each 6th and 7th stitch (approx.). On the next row work the yarn overs twisted to avoid holes. When decreasing, knit together alternately each 5th and 6th stitch and each 6th and 7th stitch. INCREASE TIP-1: All increases are worked from the right side! Increase 1 stitch by making 1 yarn over. On the next row (wrong side) knit the yarn over twisted to avoid a hole. INCREASE TIP-2: BEFORE MARKER-STITCH: The new stitch twists to the right. Use the left needle to pick up the strand between 2 stitches from the previous round, pick up the back strand and knit in the front loop. AFTER MARKER-STITCH: The new stitch twists to the left. Use the left needle to pick up the strand between 2 stitches from the previous round, pick up the front strand and knit in the back loop. DECREASE TIP (for sleeves): Decrease 1 stitch on either side of the marker thread as follows: Work until there are 3 stitches left before the marker thread, knit 2 together, knit 2 (marker thread sits between these 2 stitches), slip 1 stitch as if to knit, knit 1 and pass the slipped stitch over the knitted stitch (2 stitches decreased). CASTING-OFF TIP: To avoid the cast-off edge being tight you can cast off with a larger size needle. If the edge is still tight, make 1 yarn over after approx. each 4th stitch at the same time as casting off; the yarn overs are cast off as normal stitches. ------------------------------------------------------- START THE PIECE HERE: ------------------------------------------------------- JUMPER – SHORT OVERVIEW OF THE PIECE: The jumper is worked from top down, with 2 strands. The neck is worked in the round with circular needle. The piece is then divided for the front/back pieces and the saddle shoulders. The shoulders are worked separately, back and forth, after which the front and back pieces are worked together again; at the same time stitches are knitted up along the sides of the shoulders. The yoke is continued in the round from mid-back then divided for the body and sleeves. The body is continued in the round. The sleeves are worked in the round with short circular needle/double pointed needles. NECK: Cast on 120-120-132-132-150-150 stitches with circular needle size 5 mm and 2 strands DROPS Kid-Silk. Change to circular needle size 3 mm and work A.1 in the round for 16 cm. Knit 1 round where you decrease 18-18-20-20-22-22 stitches evenly spaced – read INCREASE/DECREASE TIP = 102-102-112-112-128-128 stitches. Now turn the piece so you work in the opposite direction (this means the previous right side will be on the outside when the neck is turned down later). Continue in rib as follows: Work A.3 over the first 18-18-21-21-24-24 stitches, insert a marker here, work A.2 over the next 12-12-14-14-16-16 stitches, work the first stitch in A.2, insert a marker here, work A.1 over the next 36-36-39-39-45-45 stitches, work the first 2 stitches in A.1, insert a marker here, work A.2 over the next 12-12-14-14-16-16 stitches, work the first stitch in A.2, insert a marker here, work A.1 over the next 18-18-18-18-21-21 stitches, work the first 2 stitches in A.1. Continue this pattern for 8 cm (the neck measures 24 cm) – adjust so the next row is an even row in the diagrams. Work the next row as follows: Knit 18-18-21-21-24-24 stitches and decrease 1-0-2-1-3-3 stitches evenly over these stitches (= half back piece), work pattern as before over the next 13-13-15-15-17-17 stitches (= shoulder), knit 38-38-41-41-47-47 stitches and decrease 4-2-3-1-5-5 evenly over these stitches (= front piece), work pattern as before over the next 13-13-15-15-17-17 stitches (= shoulder), knit 20-20-20-20-23-23 and decrease 3-2-1-0-2-2 stitches evenly over these stitches (= half back piece). There are 94-98-106-110-118-118 stitches (34-36-38-40-42-42 stitches on the front/back pieces and 13-13-15-15-17-17 stitches on each shoulder). Cut the strand. Now work the shoulders; leave the other stitches on the needle or place them on a thread. SADDLE SHOULDERS: Starting from the right side, work back and forth over the shoulder-stitches with circular needle size 3 mm and 2 strands DROPS Kid-Silk as follows: Cast on 1 stitch (= edge stitch), work the 13-13-15-15-17-17 stitches in pattern A.2 as before, at the same time as each purl-1 is increased to purl-2 – read INCREASE TIP-1 (= 6-6-7-7-8-8 stitches increased), cast on 1 stitch at the end of the row (= edge stitch) = 21-21-24-24-27-27 stitches. Work 1 row from the wrong side then work the next row from the right side as follows: 1 edge stitch in garter stitch, A.3 until there are 2 stitches left, work the first stitch in A.3 (so the pattern is symmetrical), 1 edge stitch in garter stitch. Continue this pattern back and forth until the piece measures 8-8-9-9-10-10 cm from the purl-increases – adjust so the last row is from the wrong side. Place these stitches on a thread and work the other shoulder in the same way. Now work the front and back pieces and the shoulders onto the same circular needle size 5 mm, at the same time as stitches are knitted up along the sides of the shoulders. Start the round from mid-back: HALF BACK PIECE: Work stocking stitch over the first 17-18-19-20-21-21 stitches, knit up 14-14-14-15-15-15 stitches inside the edge stitch along the side of the shoulder. SHOULDER: Knit 1, * knit 1 in both the front and back loops of the next stitch, make 1 yarn over *, work from *-* a total of 18-18-21-21-24-24 times, knit 1 in both the front and back loops of the next stitch, knit 1 (= 37-37-43-43-49-49 stitches increased and 58-58-67-67-76-76 stitches on the shoulder). FRONT PIECE: Knit up 14-14-14-15-15-15 stitches inside the edge stitch along the other side of the shoulder, knit the next 34-36-38-40-42-42 stitches on the front piece, knit up 14-14-14-15-15-15 stitches inside the edge stitch along the side of the other shoulder. SHOULDER: Knit 1, * knit 1 in both the front and back loops of the next stitch, make 1 yarn over *, work from *-* a total of 18-18-21-21-24-24 times, knit 1 in both the front and back loops of the next stitch, knit 1 (= 37-37-43-43-49-49 stitches increased and 58-58-67-67-76-76 stitches on the shoulder). HALF BACK PIECE: Knit up 14-14-14-15-15-15 stitches inside the edge stitch along the other side of the shoulder, knit the remaining 17-18-19-20-21-21 stitches on the back piece. There are 240-244-266-274-296-296 stitches on the needle. YOKE: Insert a marker thread at the beginning of the round (= mid-back). THE PIECE IS NOW MEASURED FROM HERE! Now insert 4 markers as follows: Marker 1: Work stocking stitch over the first 31-32-33-35-36-36 stitches, insert the marker in the next stitch (= half back piece). Marker 2: Work stocking stitch over the next 56-56-65-65-74-74 stitches, insert the marker in the next stitch (= right sleeve). Marker 3: Work stocking stitch over the next 62-64-66-70-72-72, stitches, insert the marker in the next stitch (= front piece). Marker 4: Work stocking stitch over the next 56-56-65-65-74-74 stitches, insert the marker in the next stitch (= left sleeve). Work stocking stitch over the last 31-32-33-35-36-36 stitches (= half back piece). Allow the 4 markers to follow your work onwards; they are used when increasing. Continue with stocking stitch in the round. AT THE SAME TIME, on the next round the increase for the sleeves and yoke will start. The increase are done at the same time, but in size L, XL, XXL and XXXL the increases continue on the yoke after the increases for the sleeves are finished. Increase as explained below. On the first round increase 4 stitches for the sleeves and 4 stitches for the yoke. Increase 1 stitch on each side of the 4 markers – read INCREASE TIP-2 ( = 8 increased on the round). SLEEVE INCREASES: Increase AFTER markers 1 and 3 and BEFORE markers 2 and 4. Increase like this every 2nd round a total of 7-9-6-9-6-8 times = 72-76-79-85-88-92 stitches on the sleeves (including the marker-stitches on each side) YOKE INCREASES: Increase BEFORE markers 1 and 3 and AFTER markers 2 and 4. Increase like this every 2nd round a total of 7-9-11-12-16-21 times = 76-82-88-94-104-114 stitches on the front and 76-82-88-94-104-114 on the back piece. When all the increases are finished there are 296-316-334-358-384-412 stitches. Continue with stocking stitch until the piece measures 19-21-22-24-25-27 cm from the marker thread after the neck. Now divide for the body and sleeves as follows: Work the first 38-41-44-47-52-57 stitches (= half back piece), place the next 72-76-79-85-88-92 stitches on a thread for the sleeve, cast on 6-6-8-10-10-10 stitches (= in side under sleeve), work the next 76-82-88-94-104-114 stitches (= front piece), place the next 72-76-79-85-88-92 stitches on a thread for the sleeve, cast on 6-6-8-10-10-10 stitches (= in side under sleeve), work the last 38-41-44-47-52-57 stitches (= half back piece). The body and sleeves are finished separately. THE PIECE IS NOW MEASURED FROM HERE. BODY: = 164-176-192-208-228-248 stitches. Continue with stocking stitch in the round for 29 cm. Try the jumper on and work to desired length (3 cm left to finished length). Increase 37-40-42-47-51-55 stitches evenly spaced = 201-216-234-255-279-303 stitches. Change to circular needle size 3 mm. Work A.1 for 3 cm. Cast off with knit over Fisherman’s rib and purl over purl – read CASTING-OFF TIP. The jumper measures approx. 56-58-60-62-64-66 cm from the shoulder down. SLEEVES: Place the 72-76-79-85-88-92 stitches from the thread on the one side of the piece on double pointed needles/short circular needle size 5 mm and knit up 1 stitch in each of the 6-6-8-10-10-10 stitches cast on under the sleeve = 78-82-87-95-98-102 stitches. Insert a marker thread in the middle of the new stitches under the sleeve. Start at the marker thread and work stocking stitch in the round for 4 cm. Now decrease 1 stitch on either side of the marker thread – read DECREASE TIP. The decreases in sizes S and M are finished (= a total of 1-1 time). In sizes L, XL, XXL and XXXL repeat the decrease every 8-2½-2-2 cm 1-3-4-4 more time(s) (= a total of 2-4-5-5 times). When all decreases are worked, there are 76-80-83-87-88-92 stitches on the round. Continue working until the sleeve measures 27-25-25-23-22-21 cm from the division. Try the jumper on and work to desired length (9 cm left to finished length). Knit 1 round where you decrease 34-38-38-42-40-41 stitches evenly spaced = 42-42-45-45-48-51 stitches. Change to double pointed needles size 3 mm and work A.1 for 9 cm. Cast off with knit over Fisherman’s rib and purl over purl – remember CASTING-OFF TIP. The sleeve measures approx. 36-34-34-32-31-30 cm from the division. Work the other sleeve in the same way. |
||||||||||
Diagram explanations |
||||||||||
|
||||||||||
 |
||||||||||
Have you finished this pattern?Tag your pictures with #dropspattern #fallingwatersweater or submit them to the #dropsfan gallery. Do you need help with this pattern?You'll find 33 tutorial videos, a Comments/Questions area and more by visiting the pattern on garnstudio.com. © 1982-2026 DROPS Design A/S. We reserve all rights. This document, including all its sub-sections, has copyrights. Read more about what you can do with our patterns at the bottom of each pattern on our site. |
||||||||||


With over 40 years in knitting and crochet design, DROPS Design offers one of the most extensive collections of free patterns on the internet - translated to 17 languages. As of today we count 324 catalogues and 12290 patterns translated into English (UK/cm). 12290
We work hard to bring you the best knitting and crochet have to offer, inspiration and advice as well as great quality yarns at incredible prices! Would you like to use our patterns for other than personal use? You can read what you are allowed to do in the Copyright text at the bottom of all our patterns. Happy crafting!
Post a comment to pattern DROPS 227-39
We would love to hear what you have to say about this pattern!
If you want to leave a question, please make sure you select the correct category in the form below, to speed up the answering process. Required fields are marked *.