
Popular categories
Looking for a yarn?


Comments / Questions (18)
![]() Anna wrote:
Anna wrote:
Dzień dobry Górny brzeg plisy przy dekoldzie trochę odstaje (nie przylega do ciała jak na zdjęciu). Sweterek zrobiony i co zrobić aby górny brzeg plisy trochę "położyć"
15.02.2026 - 13:39DROPS Design answered:
Witaj Anno, przy podwójnej plisie) zaczynam przerabiać na drutach takich jak podane w opisie, na 1/4 wysokości plisy biorę cieńsze druty (zwykle o połowę) i przerabiam do 3/4 wysokości plisy, a ostatnie 1/4 plisy przerabiam znów na tych drutach co na początku. Wtedy plisa ładniej przylega. 2-ga możliwość: może została nabrana za duża liczba oczek, wtedy plisę należy spruć i nabrać mniej oczek. Zaczęłabym od pierwszego sposobu. Pozdrawiamy!
20.02.2026 - 20:39
![]() Debra Traughber wrote:
Debra Traughber wrote:
Hello. When measuring the front and back does the number include or exclude the rib? Ex: if I’m making a size small is it 36 cm with the rib or 36cm of just stockinette stitch? Thank you.
26.12.2025 - 05:11DROPS Design answered:
Hi Debra, it is given with rib. Happy knitting!
28.12.2025 - 23:53
![]() Mie wrote:
Mie wrote:
Når ærmet lukkes af til ærmekuppel står der, at det gøres “i hver side”. Betyder det at det kun er i starten af hver pind, eller er det i start OG slutning af hver pind?
04.01.2025 - 15:03DROPS Design answered:
Hei Mie. Tipper det er i starten av hver pinne, men oppskriften er oversendt Design avd. for en dobbeltsjekk. mvh DROPS Design
07.01.2025 - 14:46
![]() Marlies Plaqlez wrote:
Marlies Plaqlez wrote:
Mouwkop Er staat in het patroon minderd aaniedere kant 5steken En daarna 3x2 steken minderen aan beide kanten En daarna aan iedere kant 1 steek Daarna weet ik niet hoe het verder moet En ook een Opmerking voorpand En rugpand bij de mindering aan de armsgaten Is helemaal anders gedaan als bij de mouwkop
05.12.2023 - 18:00DROPS Design answered:
Dag Marlies,
Bij de mouw ga je de hele tijd door met 1 steek afkanten aan elke kant totdat je op de juiste lengte bent. Het klopt dat de minderingen voor het armsgat anders zijn. Bij de panden betreft het namelijk het armsgat, vanaf de oksel. De mouw kop komt tegen de schouder aan.
06.12.2023 - 20:00
![]() Sylwia wrote:
Sylwia wrote:
Hallo, Ik heb de voorpand, achterpand en mouwen gebreid volgens de aanwijzingen maar nu heb ik een probleem met de stukken aan elkaar te zetten. Hij de achterpand beginnen de armsgaten bij maat L met 38 cm en bij de voorpand met 48 cm dus ze zijn niet symmetrisch. De mouwen zijn wel symmetrisch afgekant.
08.11.2022 - 07:14DROPS Design answered:
Dag Sylwia,
Dan is er ergens toch iets mis gegaan, want volgens de beschrijving brei je de armsgaten op dezelfde hoogte op het voorpand en het achterpand.
08.11.2022 - 19:37
![]() Jackie wrote:
Jackie wrote:
Hi me again. Its my first time knitting and first time trying to read a pattern please help. On the sleeves it says increase like this every 5 1/2 cm a total of 6 time right. Then it says when sleeves measure 44cm (my calculations say for every 5 1/2 cm it will be 33cm on top of the 14cm before increasing it would be 47cm.) this is confusing. Also when it comes to casting off is it cast off 6 sts 1 time then 2 sts 3 times than 1 stich on each side all in one row or how? Please help.
02.11.2022 - 16:05DROPS Design answered:
Dear Jackie, you should start increasing when sleeve measures 14 cm, then 2nd increase: 24 cm (10 cm after), 3rd increase: 34 cm, 4th increase: 44 cm - work until piece measures 46 cm then start to cast off for sleeve cap. Happy knitting!
02.11.2022 - 16:14
![]() Jackie wrote:
Jackie wrote:
Hi. On the front piece it says knit til 50cm (xl) than place the middle stitches on a thread for neck and finish each shoulder. Don’t I have to cast off for the armholes?
31.10.2022 - 09:37DROPS Design answered:
Dear Jackie, yes you have to work as on back piece, ie cast on the same number of stitches as for back piece and decrease after rib as on back piece then cast off and decrease for armholes as on back piece. But neckline will be shaped on front piece earler (50 cm) than on back piece (56 cm). Happy knitting!
31.10.2022 - 13:13
![]() Alessandra wrote:
Alessandra wrote:
Come si fa una cucitura elastica per il collo doppio di questo maglione? Grazie
13.10.2022 - 08:29DROPS Design answered:
Buonasera Alessandra, per ottenere un bordo di chiusura elastico, non deve tirare troppo il filo durante la chiusura, oppure inserire dei gettati regolari durante la chiusura e intrecciarli come maglie normali. Buon lavoro!
13.10.2022 - 22:34
![]() Tos wrote:
Tos wrote:
Ik heb een vraag over het laatste stuk van de mouw. Er staat ‘kant af aan elke kant voor de mouwkop als volgt’, en daarna staat nog een paar keer ‘aan elke kant’. Betekent dat dat je elke naald (de goede en de verkeerde kant) af kant, of betekent het aan het begin en aan het einde van de naald, of betekent het dat allebei?
17.05.2022 - 23:17DROPS Design answered:
Dag Tos,
Het betekent dat je steeds aan het begin van elke naald afkant. Dus je begint met afkanten, je breit de naald verder helemaal uit, dan keer je het werk en kant je weer af aan het begin van de naald.
19.05.2022 - 20:49
![]() Tos wrote:
Tos wrote:
Dit moet mijn eerste trui worden, maar ik begrijp het nog niet helemaal: er staat ribbelsteek, maar ik zie nergens ribbels op de foto’s. Het ziet eruit alsof er in tricotsteek wordt gebreid (afwisselend een naald recht aan de goede kant, en een naald averecht aan de verkeerde kant) en bij de uiteinden in boordsteek van 1 recht 1 averecht wordt gebreid. Begrijp ik het verkeerd?
15.01.2022 - 22:16DROPS Design answered:
Dag Tos,
De kantsteken worden in ribbelsteek gebreid. Bij het in elkaar zetten van de trui worden de kantsteken gebruikt en deze zijn daarna niet meer zichtbaar. Het klopt dus dat je geen ribbelsteek ziet op de foto.
16.01.2022 - 13:55
|
|||||||
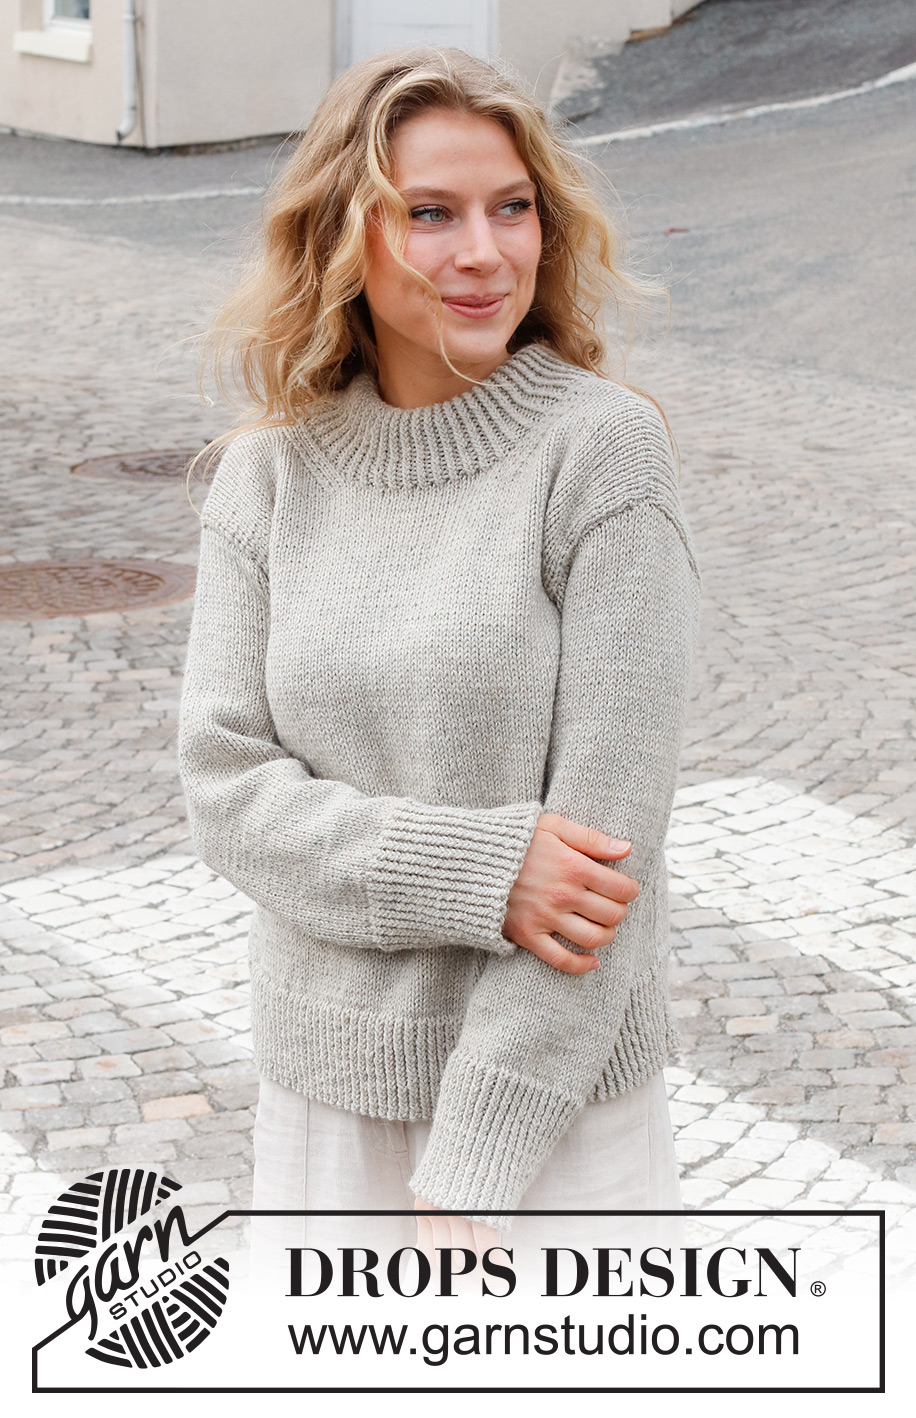
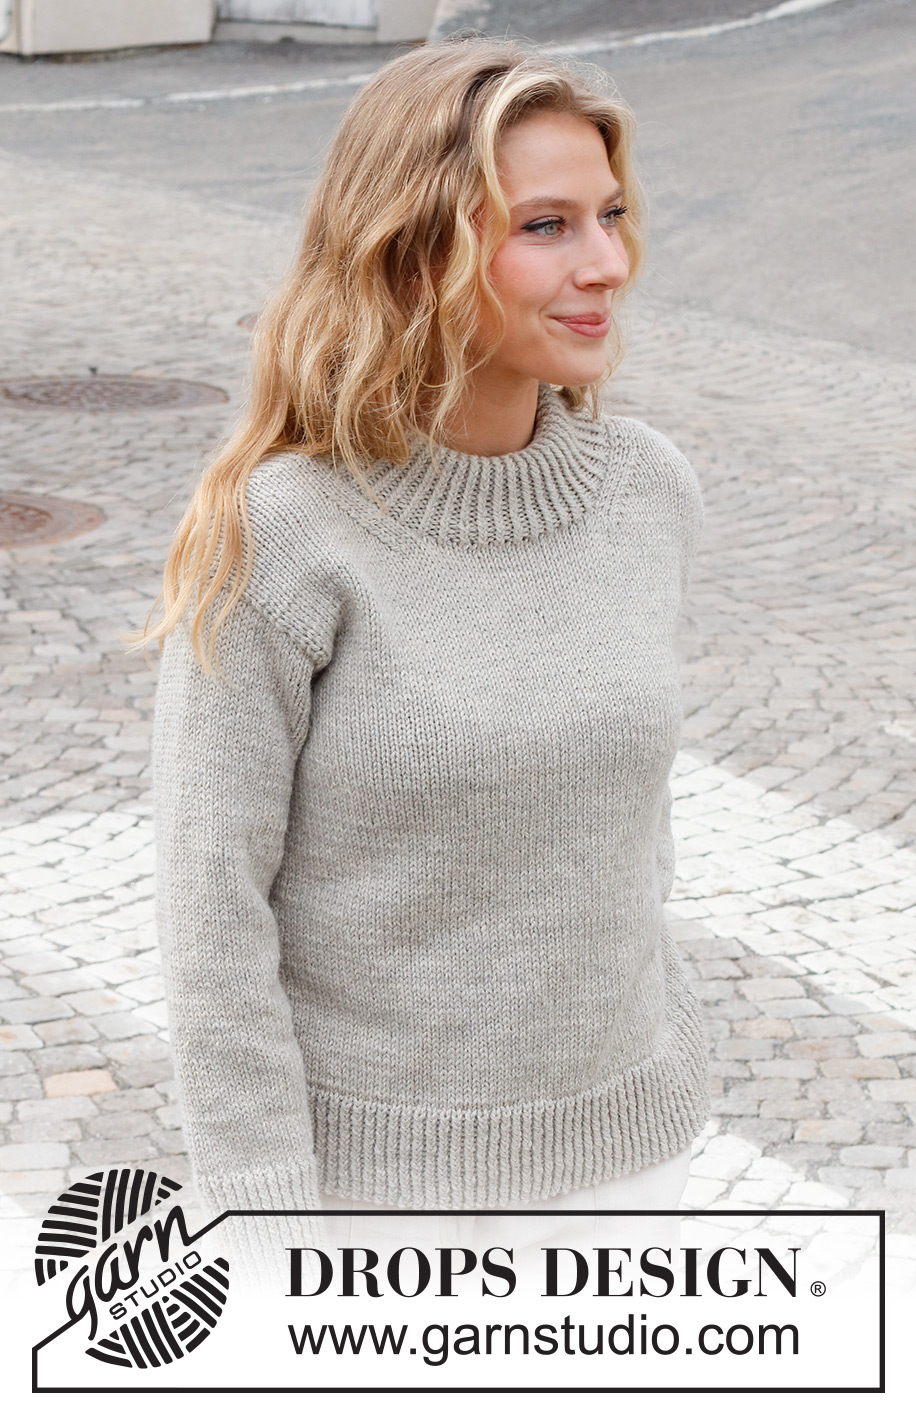
Stone Fences#stonefencessweater |
|||||||
 |
 |
||||||
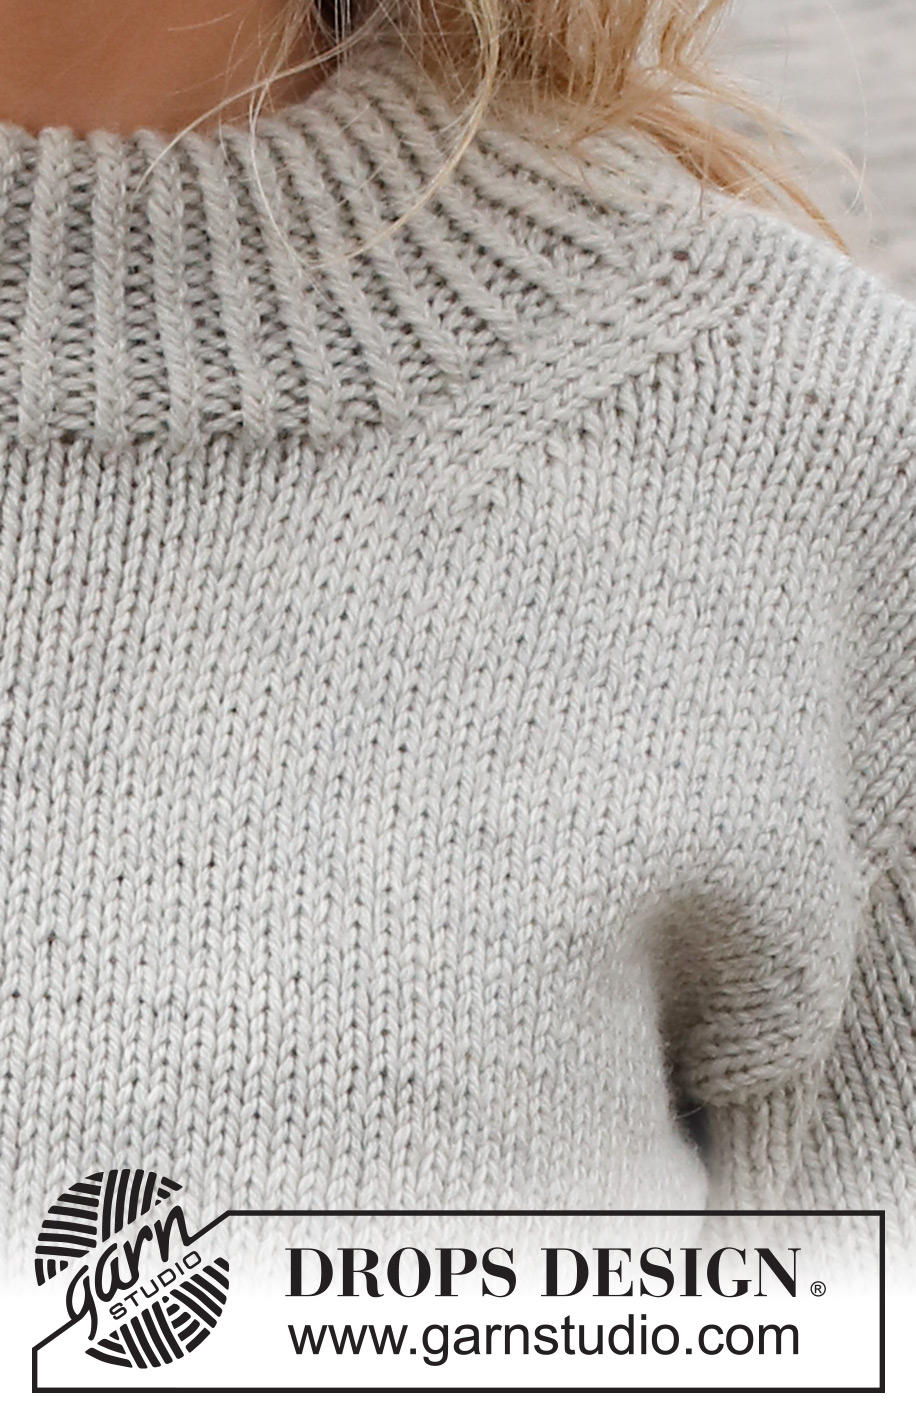
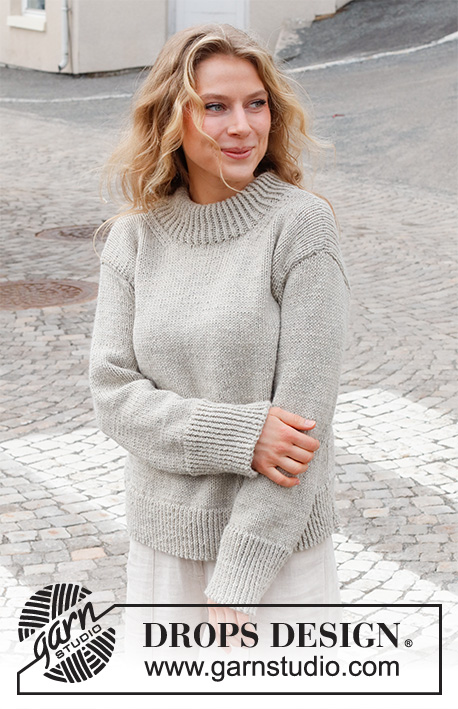
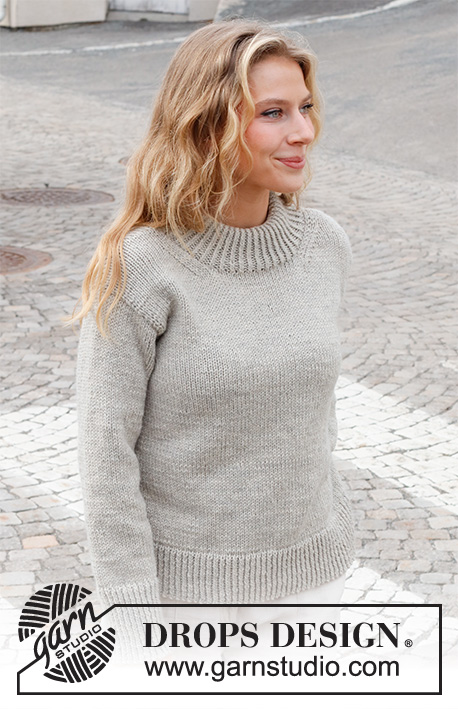
Knitted jumper in DROPS Nepal or DROPS Alaska. The piece is worked with ribbed edges and double neck. Sizes S - XXXL.
DROPS 228-24 |
|||||||
|
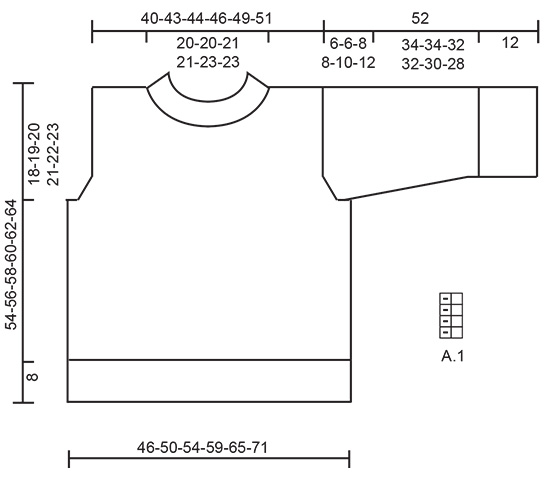
------------------------------------------------------- EXPLANATIONS FOR THE PATTERN: ------------------------------------------------------- RIDGE/GARTER STITCH (worked back and forth): Knit all rows. 1 ridge = knit 2 rows. PATTERN: See diagram A.1. The diagram shows all rows in the pattern from the right side. DECREASE TIP-1 (evenly spaced): To work out how to decrease evenly, count the total number of stitches on the needle (e.g. 109 stitches) minus the edge stitches (e.g. 2 stitches) and divide the remaining stitches by the number of decreases to be made (e.g. 27) = 3.96. In this example decrease by knitting together each 3rd and 4th stitch (approx.). Do not decrease the edge stitches. DECREASE TIP-2 (for armholes and neck): All decreases are worked from the right side! DECREASE AT BEGINNING OF ROW: 1 edge stitch in garter stitch, knit 2, slip 1 stitch as if to knit, knit 1 and pass the slipped stitch over the knitted stitch (= 1 stitch decreased). DECREASE AT END OF ROW: Work until there are 5 stitches left, knit 2 together, knit 2 and 1 edge stitch in garter stitch (= 1 stitch decreased). INCREASE TIP (for sleeves): All increases are worked from the right side! Increase 1 stitch by making 1 yarn over. On the next row purl the yarn over twisted to avoid a hole. CASTING-OFF TIP: To avoid the cast-off edge being tight you can cast off with a larger size needle. If the edge is still tight, make 1 yarn over after approx. each 4th stitch at the same time as casting off; the yarn overs are cast off as normal stitches. ------------------------------------------------------- START THE PIECE HERE: ------------------------------------------------------- JUMPER – SHORT OVERVIEW OF THE PIECE: The piece is worked back and forth in sections and then sewn together. The neck is worked in the round to finish. BACK PIECE: Cast on 101-109-117-129-143-155 stitches (including 1 edge stitch on each side) with circular needle size 4.5 mm and DROPS Nepal or DROPS Alaska. Purl 1 row from the wrong side. Then work rib as follows: 1 edge stitch in GARTER STITCH – read description above, A.1 until there are 2 stitches left, work the first stitch in A.1 (so the rib is symmetrical) and 1 edge stitch in garter stitch. Continue this rib back and forth for 8 cm – adjust so the next row is from the right side. Knit 1 row where you decrease 25-27-29-33-37-39 stitches evenly spaced – read DECREASE TIP-1 = 76-82-88-96-106-116 stitches. Change to circular needle size 5.5 mm. Continue with stocking stitch and 1 edge stitch in garter stitch on each side. REMEMBER THE KNITTING TENSION! When the piece measures 36-37-38-39-40-41 cm, cast off 3-3-5-6-8-8 stitches at the beginning of the next 2 rows for the armholes = 70-76-78-84-90-100 stitches. Continue to decrease as follows: Decrease 1 stitch on each side of the piece, every row from the right side a total of 2-3-3-4-5-8 times – read DECREASE TIP-2 = 66-70-72-76-80-84 stitches. Continue with stocking stitch and 1 edge stitch in garter stitch on each side. When the piece measures 50-52-54-56-58-60 cm, cast off the middle 30-30-32-32-34-34 stitches for the neck and finish each shoulder separately (= 18-20-20-22-23-25 stitches on each shoulder). Decrease 1 stitch on the next row from the neck = 17-19-19-21-22-24 stitches. Continue with stocking stitch and 1 edge stitch in garter stitch on each side until the piece measures 54-56-58-60-62-64 cm. Cast off. Work the other shoulder in the same way. FRONT PIECE: Cast on and work in the same way as the back piece, until the piece measures 45-47-48-50-51-53 cm. On the next row from the right side, place the middle 18-18-18-18-20-20 stitches on a thread for the neck and finish each shoulder separately. RIGHT SHOULDER: Continue back and forth with 1 edge stitch in garter stitch on each side. Decrease 1 stitch at the beginning of each row from the right side 7-7-8-8-8-8 times – remember DECREASE TIP-2 = 17-19-19-21-22-24 stitches. Continue working until the piece measures 54-56-58-60-62-64 cm. Cast off. LEFT SHOULDER: Continue back and forth with 1 edge stitch in garter stitch on each side. Decrease 1 stitch at the end of each row from the right side 7-7-8-8-8-8 times = 17-19-19-21-22-24 stitches. Continue working until the piece measures 54-56-58-60-62-64 cm. Cast off. SLEEVES: Cast on 64-66-68-72-74-74 stitches (including 1 edge stitch on each side) with circular needle size 4.5 mm and DROPS Nepal or DROPS Alaska. Purl 1 row from the wrong side. Then work rib as follows: 1 edge stitch in garter stitch, A.1 until there is 1 stitch left and 1 edge stitch in garter stitch. Continue this rib back and forth for 12 cm. Knit 1 row from the right side where you decrease 18-18-18-20-20-20 stitches evenly spaced = 46-48-50-52-54-54 stitches. Change to circular needle size 5.5 mm Continue with stocking stitch and 1 edge stitch in garter stitch on each side. When the piece measures 14 cm, increase 1 stitch inside 2 stitches on each side of the piece – read INCREASE TIP. Increase like this every 10-7½-5½-5½-4-3 cm a total of 4-5-6-6-7-9 times = 54-58-62-64-68-72 stitches. When the sleeve measures 46-46-44-44-42-40 cm, cast off on each side for the sleeve cap on every 2nd row as follows: Cast off 3-3-5-6-8-8 stitches 1 time on each side and 2 stitches 3 times on each side, then 1 stitch on each side until the sleeve measures 51 cm. Finally, cast off 3 stitches 1 time in each side. Cast off – read CASTING-OFF TIP. The sleeve measures approx. 52 cm. Work the other sleeve in the same way. ASSEMBLY: Sew the shoulder seams with grafting stitches. Sew the sleeves into the armholes, inside the 1 edge stitch on the body and the cast-off edge on the sleeve. Sew the side seams from the armholes down, inside the 1 edge stitch. NECK: Start from the right side, at the top of one shoulder and knit up stitches around the neck with circular needle size 4.5 mm and DROPS Nepal or DROPS Alaska. Knit up 98 to 114 stitches (including the stitches from the thread) inside the 1 edge stitch. The number of stitches must be divisible by 2. Work A.1 in the round until the rib measures 15 cm. Cast off with knit over knit and purl over purl – remember CASTING-OFF TIP! Fold the neck double to the inside and sew down. To avoid the neck being tight and rolling outwards, it is important that the seam is elastic. |
|||||||
Diagram explanations |
|||||||
|
|||||||
 |
|||||||
Have you finished this pattern?Tag your pictures with #dropspattern #stonefencessweater or submit them to the #dropsfan gallery. Do you need help with this pattern?You'll find 30 tutorial videos, a Comments/Questions area and more by visiting the pattern on garnstudio.com. © 1982-2026 DROPS Design A/S. We reserve all rights. This document, including all its sub-sections, has copyrights. Read more about what you can do with our patterns at the bottom of each pattern on our site. |
|||||||


With over 40 years in knitting and crochet design, DROPS Design offers one of the most extensive collections of free patterns on the internet - translated to 17 languages. As of today we count 325 catalogues and 12298 patterns translated into English (UK/cm). 12298
We work hard to bring you the best knitting and crochet have to offer, inspiration and advice as well as great quality yarns at incredible prices! Would you like to use our patterns for other than personal use? You can read what you are allowed to do in the Copyright text at the bottom of all our patterns. Happy crafting!
Post a comment to pattern DROPS 228-24
We would love to hear what you have to say about this pattern!
If you want to leave a question, please make sure you select the correct category in the form below, to speed up the answering process. Required fields are marked *.