
Popular categories
Looking for a yarn?


Comments / Questions (48)
![]() Hetty Stok wrote:
Hetty Stok wrote:
Further on from previous question. After sleeve increases the length for size 7/8 is 15 cms according to pattern. Then 2 times increases for yoke = 4 rows, but now the pattern says the measurement from marker on neck should be 17cms. How does 4 rows make 2cms in length? I am an average tension knitter. Something is wrong!
21.05.2024 - 15:13DROPS Design answered:
Dear Mrs Stok, just continue without increasing until piece measures 17 cm for this size, so that you will be sure to get correct measurement. Happy knitting!
21.05.2024 - 16:06
![]() Debbie wrote:
Debbie wrote:
So after reading forward I notice it is correct to have 117 from band to band. You should mention that if you include the band stitches the total stitches will be as stated.
04.05.2024 - 20:25
![]() Debbie wrote:
Debbie wrote:
I am making the 3rd size. It says I need 127 stitches between band markers but I keep ending up with 117 when I follow the increase in tip1 . Am I reading the pattern correctly?
04.05.2024 - 16:04DROPS Design answered:
Dear Debbi, In the advice you have an EXAMPLE on how to calculate the increases. In the case of this particular sweter and the 3d size you start with 104 stitches, if you take out the button band stitches (5x2), you will have 94 stitches. If you divide this with the 23 stitches you need to increase, you get 4,08. So, you need to increase every 4th sitches, (94:4= 23,5 stitches increase, just make sure you place the increases so you increase 23 stitches and forget/leave out that "half stitch". Happy Knitting.
04.05.2024 - 20:05
![]() Veronique wrote:
Veronique wrote:
Bonjour je me demande si il n'y a pas une erreur dans le nombre de mailles entre la taille 3 4 ans et la taille 5 6 ans les écarts semblent énormes pouvez vous m'éclairer svp merci
17.04.2024 - 09:38DROPS Design answered:
Bonjour Véronique, je ne suis pas bien sûre de comprendre de quel écarts vous parlez, mais vous pouvez retrouver toutes les mesures pour chaque taille dans le schéma - retrouvez ici comment lire le schéma des mesures. Bon tricot!
17.04.2024 - 11:17
![]() Halina wrote:
Halina wrote:
Dlaczego schemat pokazuje, aby dziurki wykonywać co ósmy rząd, to jest w rzędach parzystych skoro prawa strona robótki reprezentuje rzędy nieparzyste?
31.03.2024 - 21:22DROPS Design answered:
Witaj Halino, schemat przedstawia wszystkie rzędy robótki, z widokiem na prawej jej stronie. Narzuty są wykonywane w rzędach nieparzystych, czyli na prawej stronie robótki. Na lewej stronie robótki przerabiamy narzuty na lewo. Pozdrawiamy!
31.03.2024 - 21:50
![]() Louise wrote:
Louise wrote:
Bonjour à vous, j’aimerais comprendre le point fantaisie avec les augmentations…je n’arrive pas à suivre le modèle pour avoir les mailles ajourées aux bons endroits…pouvez-vous me donner un exemple en utilisant la grandeur 5/6 ans…Merci à l’avance!
30.03.2024 - 22:29DROPS Design answered:
Bonjour Louise, tricotez simplement les augmentations en jersey jusqu'à ce que vous ayez suffisamment de mailles pour tricoter un motif du point ajouré (vous devez toujours avoir 1 jeté pour 1 diminution dans le point ajouré pour que le nombre de mailles tombe juste). Quand vous augmentez au début du point ajouré, tricotez les nouvelles mailles en lisant le diagramme 1 m en plus à droite, à la fin du point ajouré, tricotez les nouvelles mailles en lisant le diagramme 1 m en plus à gauche et pour le dos, 1 m en plus de chaque côté. Bon tricot!
02.04.2024 - 14:37
![]() Marjo wrote:
Marjo wrote:
De knoopsgaten iomenbop het rechter voorpand en dat is dus aan het begin van de naald, niet aan het eind zoals in het patroon staat
01.02.2024 - 21:12
![]() Candier wrote:
Candier wrote:
Bonjour, je ne comprend pas vos explications pour monter les augmentations en même temps des épaules et du dos . Pourtant ce n'est pas d’aujourd'hui que je tricote. Mais la je capte pas Cordialement
21.07.2023 - 15:34DROPS Design answered:
Bonjour Mme Candier, on va d'abord augmenter pour les épaules: 1 maille pour chaque devant et 2 mailles pour le dos (4 m au total à chaque fois) - cf cette vidéo, puis on va augmenter pour les manches: 2 m pour chaque manche (4 m au total); et enfin pour l'empiècement: 1 m pour chaque devant et 2 m pour chaque manche et pour le dos. En espérant que ceci puisse vous aider. Bon tricot!
28.07.2023 - 08:41
![]() Raile wrote:
Raile wrote:
Tõlkimisel on segamini läinud enne ja pärast terminid varruka kasvatamisel: KASVATUSED VARRUKAL: Jätka parempidises koes ja mustriga, tee 5 nööbiliistusilmust mõlemal küljel ripskoes. SAMAL AJAL kasvata järgmisel töö parempoolsel real 4 silmust järgmiselt: kasvata 1 silmus ENNE 1. ja 3. silmusemärkijat ning PÄRAST 2. ja 4. silmusemärkijat. Silmuste arv esi- ja seljaosal jääb samaks, silmuste arv kasvab varrukatel
03.06.2023 - 05:47
![]() Estela wrote:
Estela wrote:
Hermoso!!!! Muchas gracias!!!! Me pareció excelente la explicación ....lo intentaré....gracias!!!!!!!!
19.07.2022 - 15:17
|
|||||||||||||||||||||||||
Pink Peony Cardigan#pinkpeonycardigan |
|||||||||||||||||||||||||
 |
 |
||||||||||||||||||||||||
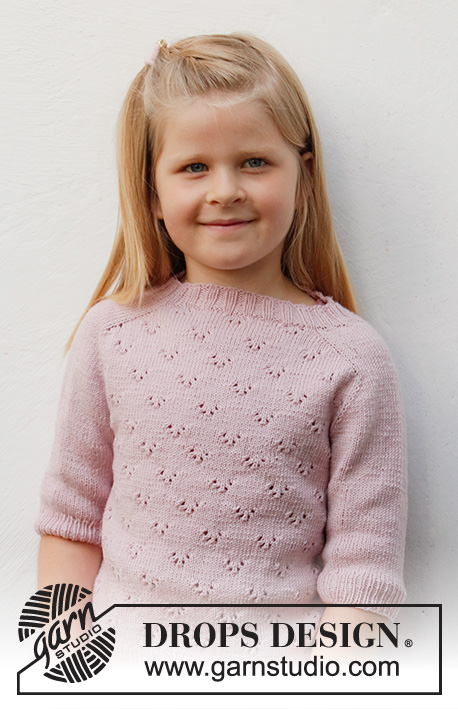
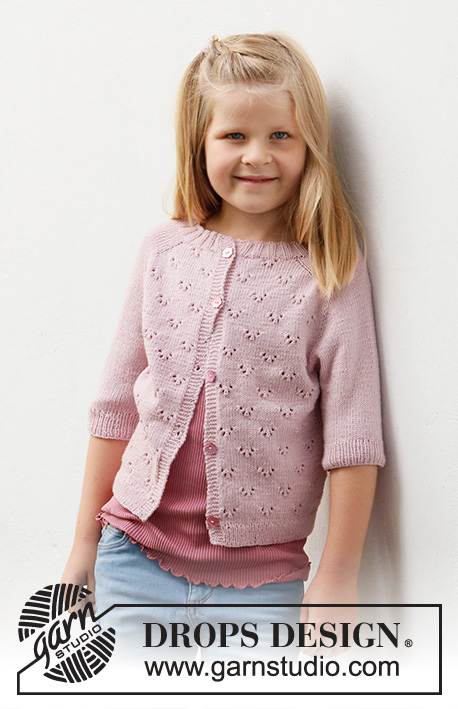
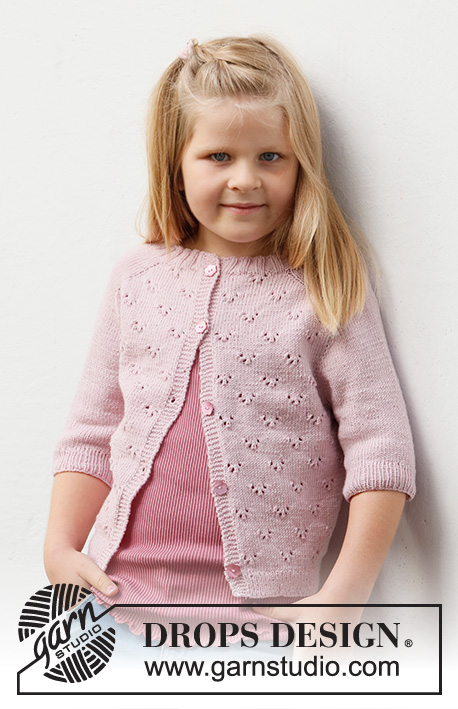
Knitted jacket for children in DROPS BabyMerino. The piece is worked top down with saddle-shoulders, lace pattern and short sleeves. Sizes 3-14 years.
DROPS Baby & Children 38-22 |
|||||||||||||||||||||||||
|
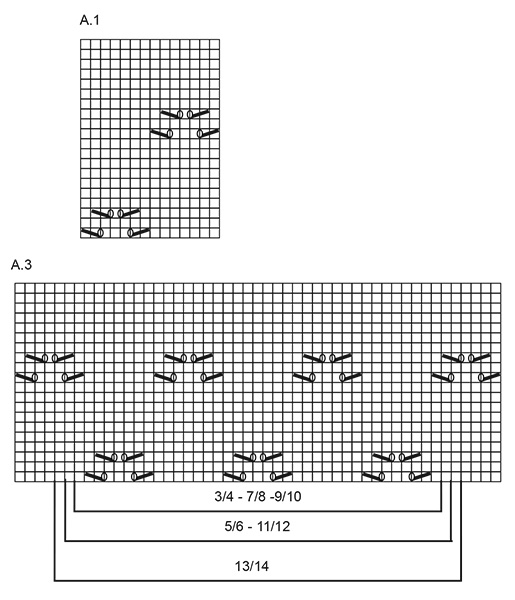
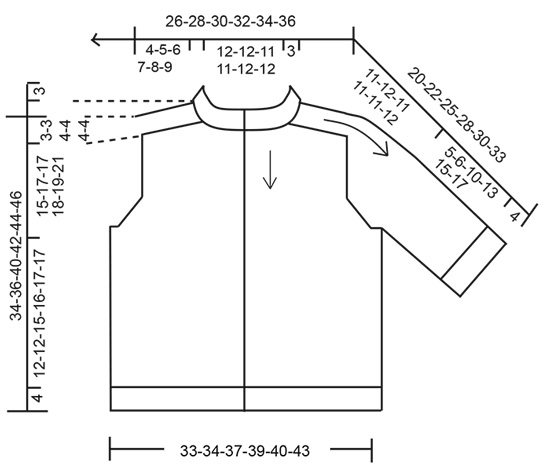
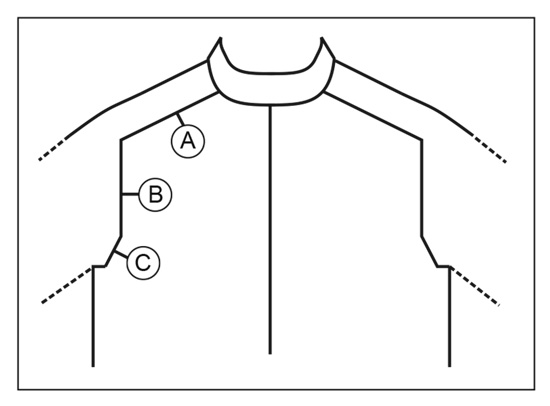
------------------------------------------------------- EXPLANATIONS FOR THE PATTERN: ------------------------------------------------------- RIDGE/GARTER STITCH (worked back and forth): Knit all rows. 1 ridge in height = Knit 2 rows. PATTERN: See diagrams A.1 to A.4. Find your size in the diagrams. The diagrams show all rows in the pattern from the right side. INCREASE TIP-1 (evenly spaced): To work out how to increase evenly, count the total number of stitches on the needle (e.g. 96 stitches), minus the bands (e.g. 10 stitches) and divide the remaining stitches by the number of increases to be made (e.g. 19) = 4.5. In this example, increase by making 1 yarn over after alternately each 4th and 5th stitch. Do not increase on the bands. On the next row work the yarn overs twisted to avoid holes. INCREASE TIP-2 (for saddle shoulders, sleeves and yoke from the RIGHT SIDE): BEFORE MARKER: The new stitch twists to the right. Use the left needle to pick up the strand between 2 stitches from the previous round, pick up the back strand and knit in the front loop. AFTER MARKER: The new stitch twists to the left. Use the left needle to pick up the strand between 2 stitches from the previous round, pick up the front strand and knit in the back loop. INCREASE TIP-3 (for saddle shoulders, sleeves and yoke from the WRONG SIDE): BEFORE MARKER: The new stitch twists to the right. Use the left needle to pick up the strand between 2 stitches from the previous round, pick up the front strand and purl in the back loop. AFTER MARKER: The new stitch twists to the left. Use the left needle to pick up the strand between 2 stitches from the previous round, pick up the back strand and purl in the front loop. BUTTONHOLES: Work buttonholes on the right band (when the garment is worn). Work from the right side when there are 3 stitches left on the row as follows: Make 1 yarn over, knit 2 together and knit 1. On the next row (wrong side), knit the yarn over to leave a hole. The first buttonhole is worked when the neck is finished (transition between neck and yoke). Then work the other 4-5-5-6-6-6 buttonholes with approx. 7-6-6½-6-6-6½ cm between each one. CASTING-OFF TIP: To avoid the cast-off edge being tight you can cast off with a larger size needle. If the edge is still tight, make 1 yarn over after approx. each 6th stitch at the same time as casting off; the yarn overs are cast off as normal stitches. ------------------------------------------------------- START THE PIECE HERE: ------------------------------------------------------- JACKET – SHORT OVERVIEW OF THE PIECE: The neck and yoke are worked back and forth with circular needle, from mid-front and top down. Stitches are increased for the shoulders, then for the sleeves and finally for the yoke. The yoke is divided for the body and sleeves and the body continued back and forth. The sleeves are worked in the round with double pointed needles/short circular needle, top down. NECK: Cast on 96-100-104-104-108-112 stitches (including 5 band stitches on each side towards mid-front) with circular needle size 2.5 mm and Baby Merino. Purl 1 row (= wrong side). The next row is worked as follows from the right side: 5 band stitches in GARTER STITCH – read description above, * knit 2, purl 2 *, work from *-* until there are 7 stitches left, knit 2 and 5 band stitches in garter stitch. Continue this rib for 3 cm. When the rib is finished, knit 1 row from the right side where you increase 19-19-23-23-23-23 stitches evenly spaced – read INCREASE TIP-1 = 115-119-127-127-131-135 stitches. Purl 1 row from the wrong side (yarn overs purled twisted and the bands worked in garter stitch). Change to circular needle size 3 mm. YOKE: Insert a marker after the band at the beginning of the row – THE PIECE IS MEASURED FROM HERE! In addition, insert 4 other markers as described below – without working the stitches and each marker inserted between 2 stitches. The markers should be of a different colour to the marker on the neck and are used when increasing. Marker 1: Count 23-24-23-23-24-25 stitches (= front piece), insert the marker before the next stitch. Marker 2: Count 16-16-22-22-22-22 stitches from marker 1 (= shoulder), insert the marker before the next stitch. Marker 3: Count 37-39-37-37-39-41 stitches from marker 2 (= back piece), insert the marker before the next stitch. Marker 4: Count 16-16-22-22-22-22 stitches from marker 3 (= shoulder), insert the marker before the next stitch. There are 23-24-23-23-24-25 stitches left on the front piece after marker 4. Allow the 4 markers to follow your work onwards. INCREASES FOR SADDLE SHOULDERS: Read the whole of the next section before continuing! Continue working 5 band stitches on each side, A.2 over the next 18-19-18-18-19-20 stitches, stocking stitch over the next 16-16-22-22-22-22 stitches, A.3 over the next 37-39-37-37-39-41 stitches, stocking stitch over the next 16-16-22-22-22-22 stitches, A.4 over the next 18-19-18-18-19-20 stitches. A.1 shows 1 repeat of the pattern. AT THE SAME TIME on the first row from the right side increase 4 stitches for the shoulders as follows: Increase 1 stitch BEFORE markers 1 and 3 and increase 1 stitch AFTER markers 2 and 4 – read INCREASE TIP-2. You are only increasing on the front and back pieces, the number of sleeve stitches remains the same. On the next row from the wrong side increase for the shoulders as follows: Increase 1 stitch BEFORE markers 4 and 2 and increase 1 stitch AFTER markers 3 and 1 – read INCREASE TIP-3. The increases are different on the right and wrong sides, so the stitches lie neatly. Continue the pattern and increase like this every row (i.e. both from the right and wrong side) a total of 12-16-20-22-24-26 times = 163-183-207-215-227-239 stitches. REMEMBER THE KNITTING TENSION! The increased stitches are worked into A.1, make sure that A.1 fits over the stitches from A.2, A.3 and A.4. After the last increase, the piece measures approx. 4-5-6-7-8-9 cm from the marker on the neck. Now increase for the sleeves as described below. INCREASES FOR SLEEVES: Continue with stocking stitch, pattern as before and 5 band stitches in garter stitch on each side. AT THE SAME TIME on the next row from the right side, increase 4 stitches as follows: Increase 1 stitch AFTER markers 1 and 3 and increase 1 stitch BEFORE markers 2 and 4. You are only increasing on the sleeves and the number of stitches on the front and back pieces remains the same. The increased stitches are worked in stocking stitch. Increase like this every 2nd row (i.e. every row from the right side) a total of 13-17-15-16-18-19 times = 215-251-267-279-299-315 stitches. The piece measures approx. 12-16-15-17-19-21 cm from the marker on the neck. INCREASES FOR YOKE: Now increase 1 stitch on each side of all 4 markers as follows: Work until there is 1 stitch left before markers 1 and 3, increase 1 stitch before the marker, work 1 stitch, move the marker to the right needle and increase 1 stitch after the marker. Work to markers 2 and 4, increase 1 stitch before the marker, move the marker to the right needle, work 1 stitch and increase 1 stitch after the marker (= 8 stitches increased). You are now increasing on both the front and back pieces and on the sleeves. The increased stitches are worked into A.1 on the back/front pieces and in stocking stitch on the sleeves. Increase like this every 2nd row a total of 5-2-2-1-0-0 times = 255-267-283-287-299-315 stitches. When all the increases are finished, the piece measures approx. 15-17-17-18-19-21 cm from the marker on the neck. If the piece is shorter than this, continue working without further increases to the correct length. Now divide the piece for body and sleeves on the next row as follows: Work the first 40-42-45-46-48-51 stitches (front piece), place the next 52-54-56-56-58-60 stitches on a thread for the sleeve, cast on 8-8-8-10-10-10 stitches, work 71-75-81-83-87-93 stitches (= back piece), place the next 52-54-56-56-58-60 stitches on a thread for the sleeve, cast on 8-8-8-10-10-10 stitches, work the last 40-42-45-46-48-51 stitches (= front piece). Body and sleeves are finished separately. THE PIECE IS NOW MEASURED FROM HERE. BODY: = 167-175-187-195-203-215 stitches. Work A.1 back and forth with 5 band stitches in garter stitch on each side; the stitches which do not fit into A.1 in the sides are worked in stocking stitch. Continue working until the piece measures 12-12-15-16-17-17 cm from the division. There is approx. 4 cm left to finished length; try the jacket on and continue to desired length. Knit 1 row from the right side, where you increase 36-36-36-40-44-44 stitches evenly spaced = 203-211-223-235-247-259 stitches. NOTE: You increase stitches here to prevent the rib being tight. Change to circular needle size 2.5 mm and work the next row from the wrong side as follows: 5 band stitches in garter stitch, * purl 1, knit 1 *, work from *-* until there are 6 stitches left, purl 1 and 5 band stitches in garter stitch. Continue this rib for 4 cm. Cast off with garter stitch over garter stitch, knit over knit and purl over purl – read CASTING-OFF TIP! The jacket measures approx. 34-36-40-42-44-46 cm from the shoulder down. SLEEVES: Place the 52-54-56-56-58-60 stitches from the thread on the one side of the piece on short circular needle/double pointed needles size 3 mm and knit up 1 stitch in each of the 8-8-8-10-10-10 stitches cast on under the sleeve = 60-62-64-66-68-70 stitches. Insert a marker thread in the middle of the new stitches under the sleeve. Start at the marker thread and work stocking stitch in the round. Continue working until the sleeve measures 5-6-10-13-15-17 cm from the division, There is approx. 4 cm left to finished length; try the jacket on and continue to desired length. Knit 1 round where you decrease 4 stitches evenly spaced = 56-58-60-62-64-66 stitches. Change to double pointed needles size 2.5 mm and work rib (knit 1, purl 1) for 4 cm. Cast off with knit over knit and purl over purl – remember CASTING-OFF TIP! The sleeve measures approx. 9-10-14-17-19-21 cm from the division. Work the other sleeve in the same way. ASSEMBLY: Sew the buttons onto the left band. |
|||||||||||||||||||||||||
Diagram explanations |
|||||||||||||||||||||||||
|
|||||||||||||||||||||||||
 |
|||||||||||||||||||||||||
 |
|||||||||||||||||||||||||
 |
|||||||||||||||||||||||||
 |
|||||||||||||||||||||||||
Have you finished this pattern?Tag your pictures with #dropspattern #pinkpeonycardigan or submit them to the #dropsfan gallery. Do you need help with this pattern?You'll find 29 tutorial videos, a Comments/Questions area and more by visiting the pattern on garnstudio.com. © 1982-2026 DROPS Design A/S. We reserve all rights. This document, including all its sub-sections, has copyrights. Read more about what you can do with our patterns at the bottom of each pattern on our site. |
|||||||||||||||||||||||||


With over 40 years in knitting and crochet design, DROPS Design offers one of the most extensive collections of free patterns on the internet - translated to 17 languages. As of today we count 324 catalogues and 12290 patterns translated into English (UK/cm). 12290
We work hard to bring you the best knitting and crochet have to offer, inspiration and advice as well as great quality yarns at incredible prices! Would you like to use our patterns for other than personal use? You can read what you are allowed to do in the Copyright text at the bottom of all our patterns. Happy crafting!
Post a comment to pattern DROPS Baby & Children 38-22
We would love to hear what you have to say about this pattern!
If you want to leave a question, please make sure you select the correct category in the form below, to speed up the answering process. Required fields are marked *.