
Popular categories
Looking for a yarn?


Comments / Questions (42)
![]() Kristina Fahlen wrote:
Kristina Fahlen wrote:
Om jag börjar varvet mitt bak blir det vid 1 ökningen en slätstickn.maska . Är det på samma varv det menas med 1 ökningen 1 rät m och 2 ökningen en slätsticknings m och sedan blir det samma på 3 och 4, 5 och 6, och 7 och 8.
22.10.2020 - 13:52DROPS Design answered:
Hei Kristina. Du setter alle merkene i en rett maske og når du skal øke skal det økes med 1 kast ETTER 1., 3., 5. og 7.merke. Og økes med 1 kast FØR 2., 4., 6. og 8.merke. God Fornøyelse!
26.10.2020 - 13:04
![]() JoeJ5 wrote:
JoeJ5 wrote:
Vraiment un superbe modèle et beaucoup de plaisir à tricoter. Merci à toute l'équipe
22.10.2020 - 11:42
![]() Kristina Fahlen wrote:
Kristina Fahlen wrote:
Ökningen av oket, ska jag sticka en avig och en rät och inte bry mej om hur det stickades före eller blir det 2 räta ihop och 2 aviga ihop beroende på vilken ökning man är på?
21.10.2020 - 22:37DROPS Design answered:
Hej Kristina. Är inte säker på att jag förstår din fråga, men du ökar genom att göra omslag som stickas vridet på nästa varv och de ökade maskorna stickas fortlöpande in i strukturmönster, dvs 1:a ökningen stickas i rätstickning, 2:a ökningen stickas i slätstickning osv. Mvh DROPS Design
22.10.2020 - 11:38
![]() Carla wrote:
Carla wrote:
Bij het breien van de pas staat, meerder zo iedere naald 15, 17, 19........keer, in mijn geval 19 keer, moet dat niet zijn om de andere naald want ik zit nu pas op 12 centimeter en mijn proeflapje klopte....
07.10.2020 - 21:46DROPS Design answered:
Dag Carla,
Ja, je hebt gelijk, het moet om de naald zijn en niet iedere naald. Ik pas het aan. Dankjewel voor het doorgeven!
10.10.2020 - 11:00
![]() Elena wrote:
Elena wrote:
Grazie mille della risposta!
01.10.2020 - 21:03
![]() Elena wrote:
Elena wrote:
Buongiorno, grazie della risposta! Potete indicare per favore quali modelli sono lavorati dietro con i ferri accorciati? Almeno un modello. Grazie. Elena.
30.09.2020 - 22:32DROPS Design answered:
Buonasera Elena provi a guardare questo modello oppure questo , ma sfogliando le pagine del nostro sito ne può trovare molti altri. Buon lavoro!
30.09.2020 - 23:03
![]() Elena wrote:
Elena wrote:
Buongiorno, sto ammirando i vs modelli e spero di riuscire a fare qualcosa usando le vs istruzioni. La domanda - lavorando con i ferri tondi come proponete voi il collo e la parte sopra sono comodi da portare? C'è la differenza tra davanti e dietro? Sembra che siano uguali e ho visto che tanti lavorano la parte dietro meno profonda facendo i giri corti. Come meglio fare per ottenere un risultato perfetto? Aspetto i vs suggerimenti prima di cominciare fare la maglia. Grazie. Elena.
29.09.2020 - 23:09DROPS Design answered:
Buongiorno Elena, in questo modello in particolare il dietro e il davanti sono uguali anche perchè il bordo del collo è doppio e risvoltato. In alcuni modelli top down che può trovare sul nostro sito il dietro è leggermente più alto del davanti per avere una migliore vestibilità, e questo si ottiene lavorando i ferri accorciati sul dietro. Buon lavoro!
30.09.2020 - 08:50
![]() Mariarosaria Corda wrote:
Mariarosaria Corda wrote:
Chiedo scusa ma sicuri che il colore è 8912 e non 8910 lampone, non vorrei fare un ordine sbagliato
10.09.2020 - 18:11DROPS Design answered:
Buongiorno Mariarosa. Il colore indicato è corretto. Per un maggiore aiuto, può contattare il suo rivenditore Drops di fiducia che la aiuterà nella scelta della tonalità che più le piace. Buon lavoro!
14.09.2020 - 15:46
![]() Lisa wrote:
Lisa wrote:
Beautiful 😍
09.09.2020 - 08:49
![]() Louise Townsend wrote:
Louise Townsend wrote:
I love the simplicity of this design. A timeless design. When is it available please?
26.08.2020 - 18:10
|
|
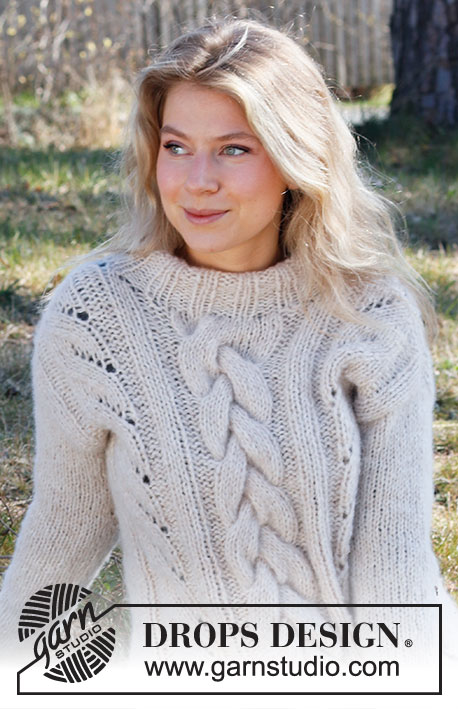
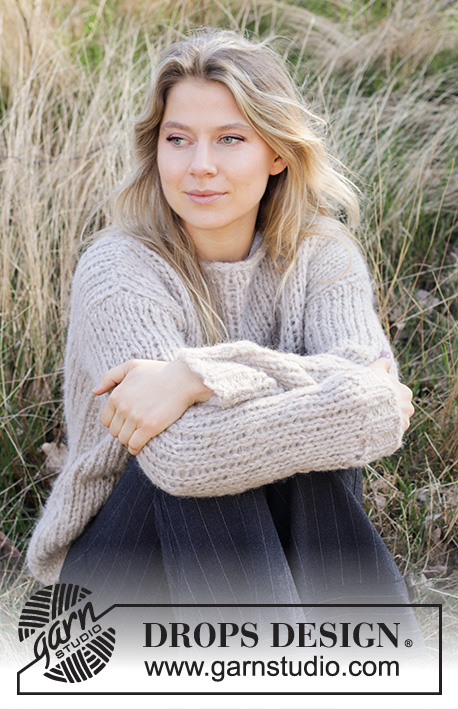
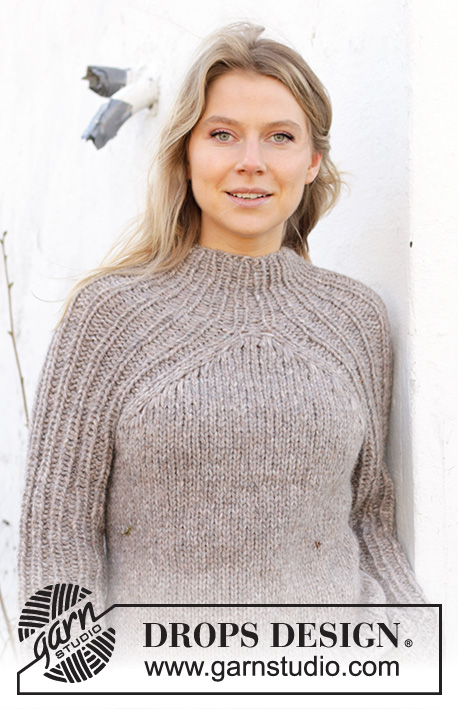
Abstract Rose#abstractrosesweater |
|
 |
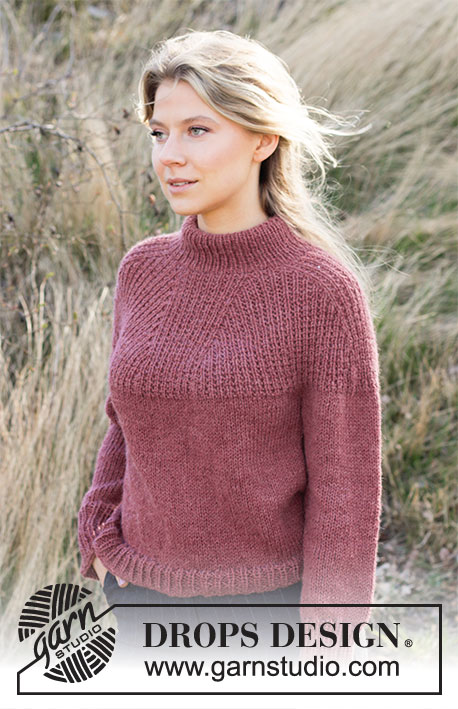 |
Knitted jumper with round yoke in DROPS Nepal. Piece is knitted top down with textured pattern and double neck edge. Size: S - XXXL
DROPS 218-27 |
|
|
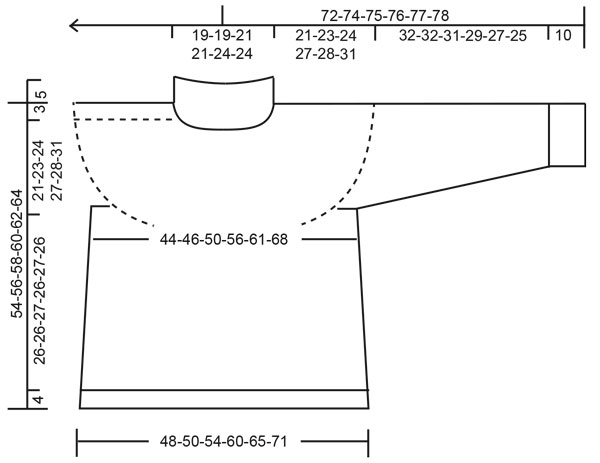
------------------------------------------------------- EXPLANATION FOR THE PATTERN: ------------------------------------------------------- INCREASE TIP-1 (applies to yoke): Increase with 1 yarn over after 1st, 3rd, 5th and 7th marker. Increase with 1 yarn over before 2nd, 4th, 6th and 8th marker. Work yarn overs twisted on next round to avoid holes. Work the increased stitches in textured pattern, i.e. work 1st increase in garter stitch, work 2nd increase in stocking stitch etc. INCREASE TIP-2 (applies to sides of body): Work until 2 stitches remain before marker thread, 1 yarn over, knit 4 (marker thread is in the middle of these stitches), 1 yarn over. On next round work yarn overs twisted to avoid holes. Then work the new stitches in stocking stitch. GARTER STITCH (worked in the round): 1 ridge vertically = 2 rounds, i.e. knit 1 round and purl 1 round. TEXTURED PATTERN: * Knit 1, 1 stitch in GARTER STITCH - read explanation above *, work from *-* over all stitches. DECREASE TIP (applies to sleeves): Decrease 1 stitch on each side of marker thread as follows: Work until 3 stitches remain before marker thread and knit 2 together, knit 2 (marker thread is between these stitches), slip 1 stitch knitwise, knit 1, pass slipped stitch over stitch worked. CAST-OFF TIP: To avoid a tight cast-off edge you may use a larger needle size. If this also is too tight – make 1 yarn over after approx. every 4th stitch and cast off these as regular stitches. ------------------------------------------------------- START THE PIECE HERE: ------------------------------------------------------- JUMPER - SHORT OVERVIEW OF THE PIECE: Work neck edge and yoke in the round on circular needle from mid back, top down. Now divide yoke for body and sleeves. Then work body in the round on circular needle, and work sleeves in the round on a double pointed needles. DOUBLE NECK EDGE: Cast on 88-88-96-96-104-104 stitches with 1 strand Nepal on circular needle size 4 mm. Work rib (knit 1/purl 1) until piece measures approx. 11 cm (fold the neck edge double later, the finish neck will measure approx. 5 cm). On next round work stocking stitch while AT THE SAME TIME decreasing 8 stitches evenly on round = 80-80-88-88-96-96 stitches. Insert 1 marker thread at the beginning of round (= approx. mid back), measure yoke from this marker thread! YOKE: Switch to circular needle size 5.5 mm. Work TEXTURED PATTERN - see explanation above. When 2 rounds have been worked, insert 8 markers on round without working (insert all markers in a knit stitch) as follows: Insert 1st marker in 7th-7th-9th-9th-9th-9th stitch. Insert 2nd marker in 13th-13th-15th-15th-15th-15th stitch. Insert 3rd marker in 27th-27th-31st-31st-33rd-33rd stitch. Insert 4th marker in 33rd-33rd-37th-37th-39th-39th stitch. Insert 5th marker in 47th-47th-53rd-53rd-57th-57th stitch. Insert 6th marker in 53rd-53rd-59th-59th-63rd-63rd stitch. Insert 7th marker in 67th-67th-75th-75th-81st-81st stitch. Insert 8th marker in 73rd-73rd-81st-81st-87th-87th stitch. On next round, increase 1 stitch at every marker – read INCREASE TIP-1 (= 8 stitches increased). I.e. Number of stitch before 1st marker, between 2nd and 3rd marker, between 4th and 5th marker, between 6th and 7th marker, and after 8th marker stays the same. Work stitches increased between 1st and 2nd marker, 3rd and 4th marker, and 5th and 6 marker and 7th and 8th marker. REMEMBER THE KNITTING TENSION! Increase like this every other round 15-17-19-23-24-27 times in total, every 4th round 1 time in total and every 6th round 1 time in total = 216-232-256-288-304-328 stitches. Piece now measures approx. 19-21-23-27-28-31 cm from marker thread. Then work in stocking stitch (size S-M-L), until piece measures 21-23-24-27-28-31 cm from marker thread. Now divide piece for body and sleeves as follows: Work the first 31-33-36-41-44-49 stitches (= half back piece), slip the next 46-50-56-62-64-66 stitches on a stitch holder for sleeve and cast on 8-8-8-8-10-10 new stitches under sleeve, work 62-66-72-82-88-98 as before (= front piece), slip the next 46-50-56-62-64-66 stitches on a stitch holder for sleeve and cast on 8-8-8-8-10-10 new stitches under sleeve, work 31-33-36-41-44-49 stitches as before (= half back piece). BODY: = 140-148-160-180-196-216 stitches. Insert 1 marker thread in the middle of the 8-8-8-8-10-10 stitches under sleeve in each side (= in the sides of body). There are 70-74-80-90-98-108 stitches between marker threads. Move the marker threads upwards when working; they should be used for increase later in the sides. When piece measures 4 cm from division, increase 1 stitch on each side of every marker thread - read INCREASE TIP-2 (= 4 stitches increased). Increase like this every 4 cm 3 times in total = 152-160-172-192-208-228 stitches. When piece measures 26-26-27-26-27-26 cm from division, increase 10-11-11-12-11-12 stitches evenly on next round= 162-171-183-204-219-240 stitches. Switch to circular needle size 4 mm and work rib = knit 1/purl 2. Cast off by knitting when rib measures 4 cm - read CAST-OFF TIP! SLEEVES: Slip the 46-50-56-62-64-66 stitches from stitch holder in one side of piece on double pointed needles size 5.5 mm, and pick up 1 stitch in each of the 8-8-8-8-10-10 stitches cast on under sleeve = 54-58-64-70-74-76 stitches. Insert 1 marker thread in the middle of the 8-8-8-8-10-10 stitches under sleeve. Move the marker thread upwards, decrease on each side of this later. Continue in the round in stocking stitch. When sleeve measures 3 cm from division, decrease 1 stitch on each side of marker thread - read DECREASE TIP (= 2 stitches decreased). Decrease like this every 3-2½-2-1½-1-1 cm 6-7-9-11-12-12 times in total = 42-44-46-48-50-52 stitches. When sleeve measures 32-32-31-29-27-25 cm from division, increase 0-1-2-0-1-2 stitches evenly = 42-45-48-48-51-54 stitches. Switch to double pointed needles size 4 mm and work rib (= knit 1/purl 2) in the round until rib measures 10 cm. Cast off by knitting. Work the other sleeve the same way. ASSEMBLY: Fold rib at the top of neck down on the inside of garment. Fasten rib to form a folding edge. To avoid a tight neck edge and avoiding the edge to tip outwards, it is important to make the seam elastic. |
|
 |
|
Have you finished this pattern?Tag your pictures with #dropspattern #abstractrosesweater or submit them to the #dropsfan gallery. Do you need help with this pattern?You'll find 26 tutorial videos, a Comments/Questions area and more by visiting the pattern on garnstudio.com. © 1982-2026 DROPS Design A/S. We reserve all rights. This document, including all its sub-sections, has copyrights. Read more about what you can do with our patterns at the bottom of each pattern on our site. |
|


With over 40 years in knitting and crochet design, DROPS Design offers one of the most extensive collections of free patterns on the internet - translated to 17 languages. As of today we count 324 catalogues and 12290 patterns translated into English (UK/cm). 12290
We work hard to bring you the best knitting and crochet have to offer, inspiration and advice as well as great quality yarns at incredible prices! Would you like to use our patterns for other than personal use? You can read what you are allowed to do in the Copyright text at the bottom of all our patterns. Happy crafting!
Post a comment to pattern DROPS 218-27
We would love to hear what you have to say about this pattern!
If you want to leave a question, please make sure you select the correct category in the form below, to speed up the answering process. Required fields are marked *.