
Popular categories
Looking for a yarn?


Comments / Questions (51)
![]() Camilla Holst wrote:
Camilla Holst wrote:
Hvordan strikkes ærmerne på? Sæt ærmerne ind på samme rundpind som ryg- og forstykke hvor der blev lukket af til ærmegab? Hvordan strikkes dette sammen?
16.12.2024 - 22:59
![]() Jacqueline Achterberg wrote:
Jacqueline Achterberg wrote:
Ik begrijp dat stuk van de halsrand niet! Jullie hebben het over de laatste 4 steken op een hulpdraad. Welke laatste 4 steken zijn dat dan? Brei je eerst de rechterkant en dan de linker? Of tegelijkertijd? Hebben jullie misschien een instructiefilmpje hiervoor? Mvgr Jacqueline Achterberg
22.11.2024 - 14:37DROPS Design answered:
Dag Jacqueline,
Die laatste 4 steken en eerste 4 steken zijn eigenlijk dezelfde 4 steken aan de kan van waar je de werkdraad hebt. Het staat er eigenlijk een beetje verwarrend. Je kunt gewoon heen en weer breien over die 4 steken volgens de beschrijving, dus volgens naald 1 t/m naald 4.
28.11.2024 - 20:12
![]() Silke wrote:
Silke wrote:
Hallo, ich bin im Zweifel, welche Wolle ich für die Jacke bestellen kann. In der Anleitung werden 2 Fäden der Gruppe A genannt oder alternativ 1 Faden der Gruppe B (Drops Sky). Auf Ihrer Webseite wird aber darauf hingewiesen, dass 2 Fäden der Garngruppe A einem Faden der Garngruppe C entspricht. Ist Drops Sky also die richtige Garnstärke? Vielen Dank
27.10.2024 - 17:05DROPS Design answered:
Liebe Silke, hier wurde die Textur etwas fester als normaleweise gestrickt, deshalb wurde man mit Lace und Kid-Silk mit dergleichen Maschenprobe als Sky (also B anstatt C) gestrickt, Hauptsache ist immer, daß Ihre Maschenprobe stimmt (und daß Ihnen die Textur gefällt). Viel Spaß beim Stricken!
28.10.2024 - 09:43
![]() Vibeke Mogensen wrote:
Vibeke Mogensen wrote:
Hej Når jeg følger opskriften til halskanten, hvor jeg strikker 3 masker samme, vender strikketøjet og strikker vrang tilbage, opstår der nogle ret stor huller langs kanten(efter de 4 første masker). er det meningen?
27.09.2024 - 08:35DROPS Design answered:
Hei Vibeke. Skal ikke bli noen store hull. Prøv å stram tråden når du vender arbeidet. mvh DROPS Design
07.10.2024 - 11:18
![]() Vibeke Mogensen wrote:
Vibeke Mogensen wrote:
Hej hvordan skal nedenstående forstås: Tag ind til RAGLAN – læs forklaring over, på hver 4.pind 2-1-1-1-3-4 gange og på hver 2.pind 22-27-30-33-33-34 gange (= totalt 24-28-31-34-36-38 gange). Hvis man tager ind på hver 2. pind, så tager man jo altid ind på hver 4. pind, skal man tage 16 masker ind på hver 4. pind?
15.09.2024 - 13:55DROPS Design answered:
Hej Vibeke. Du tar först in på hver 4. pind 2-1-1-1-3-4 gange, etter det tar du ind på hver 2.pind 22-27-30-33-33-34 gange. Mvh DROPS design
18.09.2024 - 13:55
![]() Chantal wrote:
Chantal wrote:
Bonjour, J'ai compris que, à partir du rang 6, il faut tricoter en jersey, sans maille lisière, et avec la 4e maille à l'envers au début et à la fin de chaque rang. Est-ce bien cela ?
03.09.2024 - 16:25DROPS Design answered:
Bonjour Chantal, c'est à partir du 4ème rang (ou 5ème si vous comptez le 1er rang sur l'envers) que vous tricotez 3 mailles jersey de chaque côté, autrement dit 3 mailles envers sur l'envers et 3 mailes endroit sur l'endroit de chaque côté - la 4ème maille à partir du bord se tricote en jersey envers (à l'endroit sur l'envers et à l'envers sur l'endroit) - cf 4ème maille de A.1 et 1ère maille de A.2. Bon tricot!
04.09.2024 - 08:32
![]() Marianne De Jonge wrote:
Marianne De Jonge wrote:
Bij Raglan staat, minder iedere andere naald. Betekent dit iedere naald aan de goede kant?
12.11.2023 - 09:37DROPS Design answered:
Dag Marianne,
Dit betekent de ene naald wel en de andere naald niet, dus in dit geval inderdaad aan de goede kant en aan de verkeerde kant niet.
12.11.2023 - 17:31
![]() Cristina Bernini wrote:
Cristina Bernini wrote:
Buongiorno, non capisco la corrispondenza tra le misure a le maglie avviate: (CORPO) Se avvio 193 maglie (corrispondenti ad una S), essendo il campione 21 maglie = 10cm , ottengo una misura di 193/21 x10 cm cioè 92 cm mentre la misura sul modello è di 44cm davanti e 44 dietro quindi 88 cm. Sempre nel corpo la spiegazione dice di fare delle diminuzioni ; devo farle solo sulla maglia di diritto o anche sul rovescio? e dove? al centro o sui bordi? Grazie, saluti
29.05.2023 - 10:57DROPS Design answered:
Buongiorno Cristina, deve considerare il bordino da sormontate, nella circonferenza finale. Per le diminuzioni, sul corpo viene diminuita una sola maglia per una sola volta. Buon lavoro!
30.05.2023 - 08:57
![]() Tove Søndergaard Bak wrote:
Tove Søndergaard Bak wrote:
XXXX
20.02.2023 - 09:05
![]() Helena wrote:
Helena wrote:
Chtěla bych Vás moc poprosit, zda by bylo možné publikovat tento návod a variantu bez knoflíků v českém jazyce. Jako začátečnici by mi to velmi pomohlo. Děkuji.
19.01.2023 - 15:16DROPS Design answered:
Dobrý den, Heleno, díky za zprávu - oba návody přidáme v čj během několika dnů - sledujte, prosím, naše stránky. Hezký večer! Hana
22.01.2023 - 19:43
|
|||||||
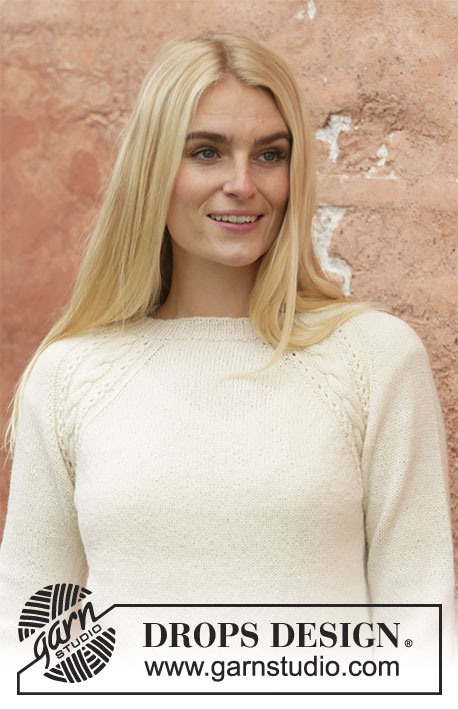
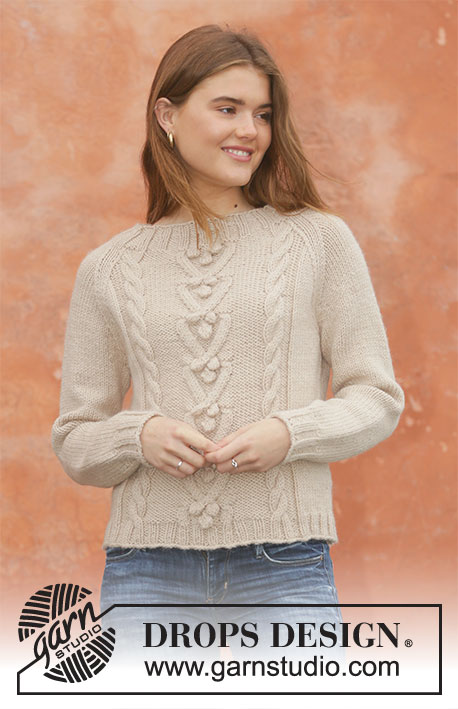
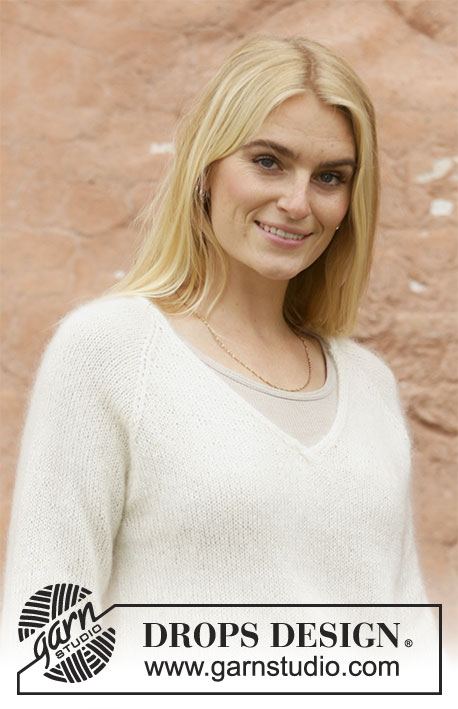
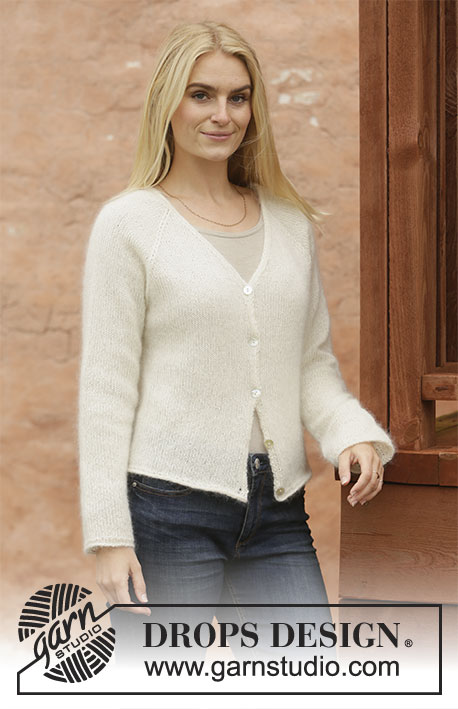
December Moon Jacket#decembermoonjacket |
|||||||
 |
 |
||||||
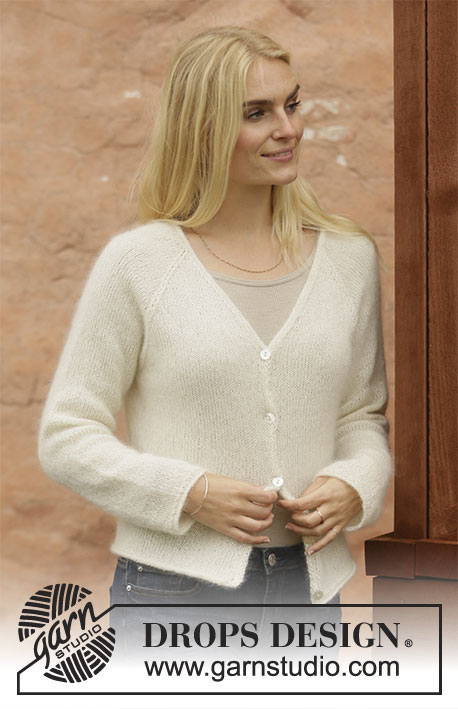
Knitted jacket with raglan and V-neck in DROPS Lace and DROPS Kid-Silk or DROPS Sky. Size: S - XXXL
DROPS 206-34 |
|||||||
|
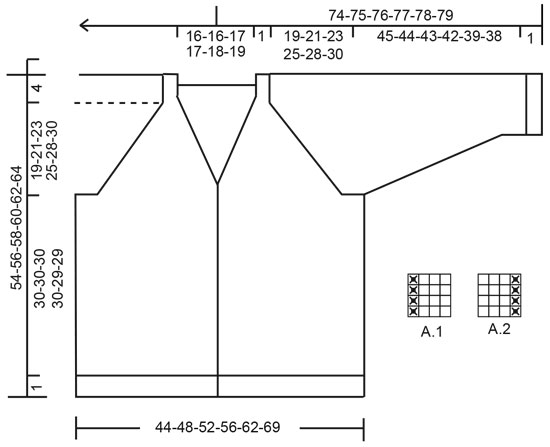
---------------------------------------------------------- EXPLANATION FOR THE PATTERN: ---------------------------------------------------------- PATTERN: See diagrams A.1 and A.2. Diagrams show all rows in pattern seen from the right side. INCREASE TIP (applies to sleeves): Work until 2 stitches remain before marker thread, 1 yarn over, knit 4 (marker thread is in the middle of these stitches), 1 yarn over. On next round knit yarn overs twisted to avoid holes. Then work the new stitches in stocking stitch. RAGLAN: All decreases are done from the right side! Decrease 1 stitch on each side of marker thread as follows: Work until 2 stitches remain before marker thread, knit 2 together, marker thread is here, slip 1 stitch knitwise, knit 1, pass slipped stitch over stitch worked. Repeat at each of the remaining marker threads (= 8 stitches decreased). V-NECK: Decrease for V-neck on front pieces. All decreases are done from the right side! Decrease as follows after A.1: Slip 1 stitch knitwise, knit 1, pass slipped stitch over. Decrease as follows before A.2: Work until 2 stitches remain before A.2, knit 2 together. BUTTONHOLES: Decrease for buttonholes on right band. 1 BUTTONHOLE = knit third and fourth stitch from edge together and make 1 yarn over. On next row knit yarn over = hole. Decrease for buttonholes when piece measures: S: 3, 11, 20, 28 and 37 cm M: 2, 11, 20, 29 and 38 cm L: 3, 12, 21, 30 and 39 cm XL: 2, 11, 21, 30 and 40 cm XXL: 3, 12, 22, 31 and 41 cm XXXL: 2, 12, 22, 32 and 42 cm ---------------------------------------------------------- START THE PIECE HERE: ---------------------------------------------------------- JACKET - SHORT OVERVIEW OF THE PIECE: Work piece back and forth on circular needle. First work body. Then work sleeves in the round on double pointed needles/a short circular needle. Then slip sleeves on to same circular needle as body before working the yoke. Finish by working the neck edges. BODY: Cast on 193-209-229-245-269-297 stitches on circular needle size 4.5 mm with 1 strand Lace + 1 strand Kid-Silk (= 2 strands) or 1 strand Sky. Purl 1 row from wrong side. Switch to circular needle size 4 mm and work rolling edge as follows: ROW 1 (= right side): Knit all stitches. ROW 2 (= wrong side): Purl all stitches. ROW 3: Knit all stitches. ROW 4: Purl 3, * knit 1, purl 1 * until 4 stitches remain on needle, knit 1, purl 3. Now work as follows from right side: A.1 (= 4 stitches), stocking stitch until 4 stitches remain at the same time as decreasing 1 stitch by knitting 2 together, A.2 over the last 4 stitches = 192-208-228-244-268-296 stitches. Continue back and forth like this. REMEMBER THE KNITTING TENSION! Remember BUTTONHOLES on right band - read explanation above. When piece measures 31-31-31-31-30-30 cm cast off stitches for armhole on next row from wrong side as follows: Work the first 46-50-54-58-63-68 stitches on row(= left front piece), cast off the next 8-8-10-10-12-16 stitches for armhole, work the next 84-92-100-108-118-128 stitches (= back piece), cast off the next 8-8-10-10-12-16 stitches for armhole, work the remaining 46-50-54-58-63-68 stitches (= right front piece). Put piece aside and work the sleeves. SLEEVE: Cast on 50-52-54-56-56-60 stitches on circular needle size 4.5 mm with 1 strand Lace + 1 strand Kid-Silk (= 2 strands) or 1 strand Sky. Work rolling edge as follows: Knit 1 round. Switch to double pointed needles size 4 mm and knit 3 rounds. Work next round as follows: * Knit 1, purl 1 *, repeat from *-* the entire round. Work in stocking stitch in the round. When piece measures 10-10-10-8-9-9 cm, increase 2 stitches under sleeve - read INCREASE TIP! Increase like this every 3½-2½-2-2-1½-1½ cm 10-13-16-17-18-18 times in total = 70-78-86-90-92-96 stitches. When sleeve measures 46-45-44-43-40-39 cm, cast off the middle 8-8-10-10-12-16 stitches under sleeve (= 4-4-5-5-6-8 stitches on each side of marker thread) = 62-70-76-80-80-80 stitches. Put piece aside and knit another sleeve the same way. YOKE: Slip sleeves on to same circular needle as body where armholes were cast off = 300-332-360-384-404-424 stitches. Now insert 4 marker threads in the piece between front pieces, back piece and sleeves, but displace marker threads so that there are 1-1-1-2-4-6 stitches in each side of front/back piece on each side of sleeves. I.e. there are 82-90-98-104-110-116 stitches for back piece, 45-49-53-56-59-62 stitches on each front piece, and 64-72-78-84-88-92 stitches for each sleeve. Continue back and forth with stocking stitch and A.1 and A.2 in each side as before. AT THE SAME TIME on first row from right side begin decrease for raglan, and when piece measures 7-8-9-10-12-13 cm from where sleeves were slipped onto same circular needle as body, work V-neck on front piece: RAGLAN: Decrease for RAGLAN - read explanation above. Decrease like this every 4th row 2-1-1-1-3-4 times and every other row 22-27-30-33-33-34 times (= 24-28-31-34-36-38 times in total). V-NECK: When yoke measures 7-8-9-10-12-13 cm, decrease for V- neck on front piece, begin from right side as follows: Work A.1 as before over the first 4 stitches, decrease 1 stitch for V-NECK – read explanation above, work stocking stitch (continue decrease for raglan as before) until 6 stitches remain on needle, decrease 1 stitch – remember V-NECK, work A.2 over the last 4 stitches. Continue back and forth like this, and decrease for V-neck every other row 15-14-15-13-14-14 times, and every 4th row 1-2-2-4-4-5 times (= 16-16-17-17-18-19 stitches in total decreased for V-neck in each side). When all decreases for V-neck and raglan are done, there are 76-76-78-78-80-82 stitches on needle. Work next row from right side as follows: Knit the first 3 stitches, purl the next 2 stitches together (= 1 stitch decreased), knit until 5 stitches remain on needle, purl the next 2 stitches together (= 1 stitch decreased), knit the last 3 stitches = 74-74-76-76-78-80 stitches. Work 1 row from wrong side with knit over knit and purl over purl. Jumper measures approx. 54-56-58-60-62-64 cm from shoulder and down. NECK EDGE: Insert a marker thread mid back on neck edge. Slip the last 4 stitches on needle on a stitch holder, and work back and forth over the first 4 stitches for neck edge, at the same time work neck edge together with the remaining stitch on sleeve and neck line on back piece as follows: Work as follows from right side: ROW 1: Knit the first 3 stitches, knit the next 2 stitches together (= 1 stitch decreased). ROW 2: Turn and purl the 4 stitches. ROW 3: Knit the first 3 stitches, knit the next 3 stitches together (= 2 stitches decreased). ROW 4: Turn and purl the 4 stitches. ROWS 5-8: Work the same way as on 3rd and 4th row. Repeat rows 1-8 until you have worked until marker thread mid back in the neck. Cast off the 4 stitches on neck edge. Slip the 4 stitches from stitch holder on needle 4 and work from wrong side as follows: ROW 1: Purl the first 3 stitches, purl the next 2 stitches together (= 1 stitch decreased). ROW 2: Turn and knit the 4 stitches. ROW 3: Purl the first 3 stitches, purl the next 3 stitches together (= 2 stitches decreased). ROW 4: Turn and knit the 4 stitches. ROWS 5-8: Work the same way as on 3rd and 4th row. Repeat rows 1-8 until you have worked until marker thread mid back in the neck. Cast off the 4 stitches on neck edge. Sew cast-off edge together on the 2 neck edges mid back in the neck. Fasten off. |
|||||||
Diagram explanations |
|||||||
|
|||||||
 |
|||||||
Have you finished this pattern?Tag your pictures with #dropspattern #decembermoonjacket or submit them to the #dropsfan gallery. Do you need help with this pattern?You'll find 30 tutorial videos, a Comments/Questions area and more by visiting the pattern on garnstudio.com. © 1982-2026 DROPS Design A/S. We reserve all rights. This document, including all its sub-sections, has copyrights. Read more about what you can do with our patterns at the bottom of each pattern on our site. |
|||||||


With over 40 years in knitting and crochet design, DROPS Design offers one of the most extensive collections of free patterns on the internet - translated to 17 languages. As of today we count 324 catalogues and 12290 patterns translated into English (UK/cm). 12290
We work hard to bring you the best knitting and crochet have to offer, inspiration and advice as well as great quality yarns at incredible prices! Would you like to use our patterns for other than personal use? You can read what you are allowed to do in the Copyright text at the bottom of all our patterns. Happy crafting!
Post a comment to pattern DROPS 206-34
We would love to hear what you have to say about this pattern!
If you want to leave a question, please make sure you select the correct category in the form below, to speed up the answering process. Required fields are marked *.