
Popular categories
Looking for a yarn?


Comments / Questions (58)
![]() Alexandra wrote:
Alexandra wrote:
Danke für die schnelle Antwort! Noch eine Frage: das Diagramm zeigt das Muster von rechts. Wie wird dann die Rückseite gestrickt?
10.12.2018 - 19:13DROPS Design answered:
Liebe Alexandra, alle Reihen sind im Diagram gezeigt, die Hinreihen werden rechts nach links gelesen/gestrickt und die Rückreihen links nach rechts (z.B. 1 leeres Kästchen wird rechts von der Vorderseite und links von der Rückseite gestrickt). Viel Spaß beim stricken!
11.12.2018 - 08:45
![]() Alexandra wrote:
Alexandra wrote:
Was bedeutet es, wenn es heißt: "M1A, 231 (253-275) M. von M1B usw.," oder entsprechend: "M2A, 229 (251-273) M. in M2B usw.,"? Einmal M1A und dann M1B? Oder 231 Maschen in M1A und am Schluss M1B?
10.12.2018 - 16:40DROPS Design answered:
Liebe Alexandra, wenn Sie M.1A, 231 M (in der 1. Größe) von M1B stricken sollen, stricken Sie wie folgt: M.1A (= 2 M), dann M.1b (= 11 M) x 21 Mal in der Breite wiederholen (= 11 x 21 = 231). Viel Spaß beim stricken!
10.12.2018 - 16:42
![]() Tuchman Brigitte wrote:
Tuchman Brigitte wrote:
Das Musterdiagram von Muster 2 ist falsch, würden sie das bitte korrigieren.
01.11.2018 - 10:21DROPS Design answered:
Liebe Frau Tuchman, danke für den Hinweis, Diagram wird korrigiert. Viel Spaß beim stricken!
02.11.2018 - 09:02
![]() Pirjo Kosonen wrote:
Pirjo Kosonen wrote:
Kiitos neuvosta! Pitkän mietinnän jälkeen hoksasin itsekin kuinka ruutupiirrosta tulkitaan.Ihana malli ja lanka kutoa! Nyt takki valmis!
12.03.2018 - 19:20
![]() Pirjo Kosonen wrote:
Pirjo Kosonen wrote:
Kudon jakkua kokoa S . Pitsineuleen ruutupiirroksissa on merkinnät M1A ja M1 B. Kumpaa minun tulee seurata
16.02.2018 - 21:27DROPS Design answered:
Hei, sinun tulee neuloa molempien mukaisesti, eli aluksi 5 silmukkaa helmineuletta, sitten M.1A kerran, tämän jälkeen 231 silmukkaa piirroksen A.1B mukaisesti.
20.02.2018 - 18:20
![]() Katherine wrote:
Katherine wrote:
Si j'ai bien compris votre réponse, pour le 2eme rang, je tricote 2 mailles endroit, 1 envers, 7 endroit, 1 envers et je répète sur tout le rang et je finis par M1a ? Ça me paraît étrange
23.01.2018 - 21:47DROPS Design answered:
Bonjour Katherine, les diagrammes montrent tous les rangs comme ils se présentent sur l'endroit, ainsi, sur l'envers vous tricotez M.1B (= 2 m env, 1 m end, 7 m env, 1 m end) et M.1A (= 2 m env). Les cases blanches se tricotent en jersey endroit (= à l'end sur l'end et à l'env sur l'env) et celles avec une croix en jersey env (= à l'env sur l'end et à l'end sur l'env). Bon tricot!
24.01.2018 - 09:25
![]() Katherine wrote:
Katherine wrote:
Pour faire les rangs pairs qui ne sont pas sur les diagrammes, faut-il tricoter toutes les mailles à l'envers ? Merci de votre réponse
22.01.2018 - 20:22DROPS Design answered:
Bonjour Katherine, tous les rangs sont représentés dans les diagrammes, ils se lisent en commençant en bas à droite et de droite à gauche sur l'endroit, de gauche à droite sur l'envers. Bon tricot!
23.01.2018 - 08:22
![]() Pattinson wrote:
Pattinson wrote:
What about the M2 pattern ??
16.01.2018 - 23:05DROPS Design answered:
Dear Mrs Pattinson, work M.2 as follows: 5 front band sts, M.2 (= 4 sts), repeat the 11 sts in M.2B a total of 20-22-24 times and then work the first 9-9-9 sts in M.2B (= over the next 229-251-273 sts) so that pattern will be symetrical on each side, 5 sts in garter st. Happy knitting!
17.01.2018 - 08:37
![]() Joanne Pattinson wrote:
Joanne Pattinson wrote:
M2A / M2B 5sts + 4sts + Multiples 11 + 5 sts 1= does not equal cast on sts. Please provide pattern correction.
14.01.2018 - 17:42DROPS Design answered:
Dear Mrs Pattinson, work as follows; 5 front band sts, M.1A (= 2 sts), then repeat M.1B (= 11 sts) a total of 21-23-25 times (= over the next 231-253-275 sts, finish with 5 front band sts. Happy knitting!
15.01.2018 - 09:53
![]() Alvy wrote:
Alvy wrote:
Super, merci beaucoup pour les infos et pour le petit explicatif très utile (c'est la 1ère fois que je fais des manches ^^) encore merci
13.11.2017 - 13:58
|
|||||||||||||||||||
Beach Love |
|||||||||||||||||||
|
|
|||||||||||||||||||
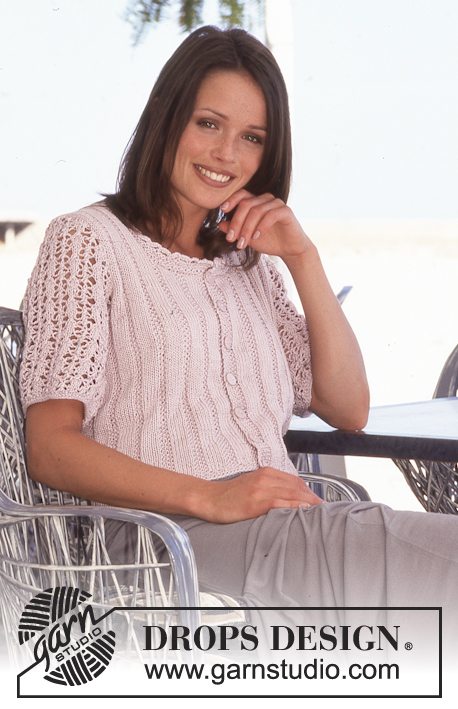
DROPS jacket in Muskat
DROPS 60-16 |
|||||||||||||||||||
|
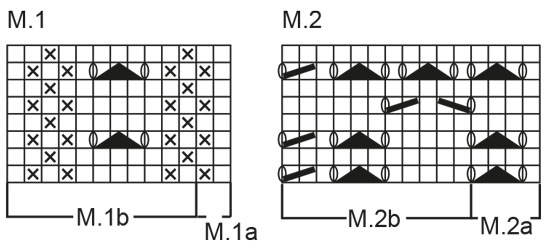
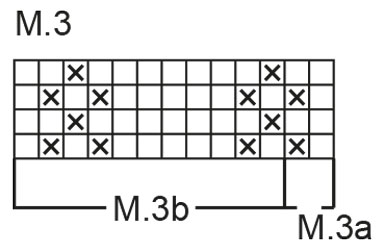
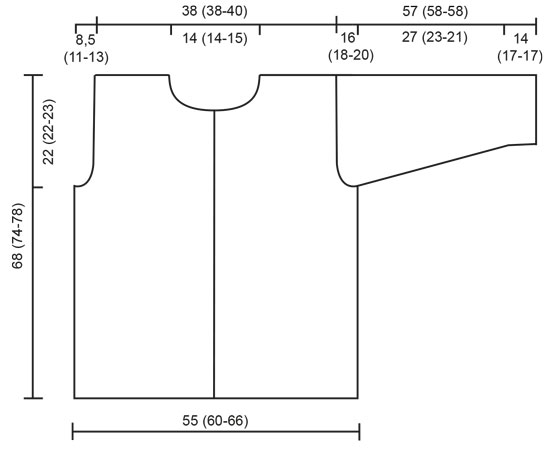
Knitting tension: 21 stitches x 28 rows with needle size 4 mm and stocking stitch = 10 x 10 cm. Remember needle size is only a guide! Ridge/Garter stitch: 1 ridge = Knit 2 rows. Pattern: See diagram (1 diagram = 1 repeat). The pattern in the diagram is seen from the right side. Moss stitch: * Row 1: K1, P1. Row 2: Knit over purl and purl over knit. * Repeat row 2 onwards. Buttonhole: When piece measures 29 (30-32) cm, 34 (34.5-37) cm, 39 (39.5-42) cm, 44 (44-47) cm, 49 (49-52) cm, 54 (53.5-57) cm and X (58-62) cm work buttonholes on right front piece as follows: Cast off the 3rd and 4th stitches and cast on 2 new stitches over the cast off stitches on next row. -------------------------------------------------------------- Body: The jacket is worked back and forth with circular needle. Cast on 243 (265-287) stitches (incl. 2 x 5 band stitches) with circular needle size 4 mm and light grey and work 1 ridge, then 3 rows moss stitch. Work the next row as follows: 5 stitches moss stitch (= band), M.1A, 231 (253-275) stitches of M.1B, 5 stitches moss stitch (= band). Continue pattern upwards. Remember the knitting tension. When piece measures 29 (30-32) cm, work next row as follows: 5 stitches moss stitch (= band), M.2A, 229 (251-273) stitches of M.2B, 5 stitches moss stitch (= band). Continue pattern upwards, - remember to work buttonholes in right band as you work upwards (see description above). When piece measures 43 (47-49) cm - adjust after pattern - work next row as follows: 5 stitches moss stitch (= band), M.3A, 231 (253-275) stitches of M.3B, 5 stitches moss stitch (= band). Continue pattern to finished length. When piece measures 46 (52-55) cm work next row as follows: 59 (65-70) stitches front piece, cast off 8 stitches for armhole, 109 (119-131) stitches back piece, cast off 8 stitches to armhole, 59 (65-70) stitches front piece. Each piece is finished separately. Front piece: = 59 (65-70) stitches. Continue to cast off for armholes every 2nd row: 3 stitches x 3 (4-4), 2 stitches x 2 (3-5), 1 stitch x 2 = 44 (45-46) stitches. On row after last buttonhole - when piece measures 54 (58-62) cm - cast off for neck every 2nd row: 10 (11-11) stitches x 1, 3 stitches x 1, 2 stitches x 2, 1 stitch x 2. Cast off when piece measures 68 (74-78) cm. Back piece: = 109 (119-131) stitches. Continue to cast off for armholes as for front piece = 79 (79-83) stitches. When piece measures 66 (72-76) cm cast off middle 25 (25-27) stitches at back for neck. Then cast off 2 stitches on next row towards neck. Cast off when piece measures 68 (74-78) cm. Sleeve: The sleeve is worked back and forth with circular needle. Cast on 59 (59-59) stitches (incl. 2 edge stitches for seam) with circular needle size 4 mm and light grey and work 1 ridge, then 3 rows moss stitch. Work next row as follows: 1 stitch garter stitch (= edge stitch), M.2A, 53 (53-53) stitches of M.2B, 1 stitch garter stitch (= edge stitch). Continue pattern upwards. When piece measures 14 (17-17) cm - adjust after pattern - work next row as follows: 1 stitch garter stitch (= edge stitch), M.3A, 55 stitches of M.3B, 1 stitch garter stitch (= edge stitch). Continue pattern upwards while at the same time you increase in each side: 1 stitch x 15 (15-16) for S: Alternately every 4th and 5th row, M: Alternately every 3rd and 4th row, L: Every 3rd row = 89 (89-91) stitches. The increased stitches are worked into pattern as you go. When piece measures 41 (40-38) cm cast off for sleeve cap in each side every 2nd row: 3 stitches x 2 (1-1), 2 stitches x 2, 1 stitch x 15 (19-22), 2 stitches x 2 (3-2), 3 stitches x 2 (1-1), cast off. Piece measures approx. 57 (58-58) cm. Assembly: Sew shoulder seams. Knit up approx. 115-125 stitches around neck with circular needle size 4 mm and light grey and work 3 rows moss stitch, then 1 ridge, cast off. Sew sleeve seams as follows: Lay edges side by side (not on top of each other) and graft neatly together. Crochet edge: Work edges along bottom of body, along bands, around neck and around bottom of sleeves. Work from right side with light grey and hook size 2 mm as follows: Row 1: 1 double crochet, * 4 chain stitches, skip approx. 1.5 cm, 1 slip stitch *, repeat *-* to end of row, Row 2: 4 double crochets around each chain-space, 1 slip stitch in slip stitch from previous row. Sew in sleeves and sew on buttons. |
|||||||||||||||||||
Diagram explanations |
|||||||||||||||||||
|
|||||||||||||||||||
 |
|||||||||||||||||||
 |
|||||||||||||||||||
 |
|||||||||||||||||||
Have you finished this pattern?Tag your pictures with #dropspattern or submit them to the #dropsfan gallery. Do you need help with this pattern?You'll find 27 tutorial videos, a Comments/Questions area and more by visiting the pattern on garnstudio.com. © 1982-2026 DROPS Design A/S. We reserve all rights. This document, including all its sub-sections, has copyrights. Read more about what you can do with our patterns at the bottom of each pattern on our site. |
|||||||||||||||||||


With over 40 years in knitting and crochet design, DROPS Design offers one of the most extensive collections of free patterns on the internet - translated to 17 languages. As of today we count 324 catalogues and 12290 patterns translated into English (UK/cm). 12290
We work hard to bring you the best knitting and crochet have to offer, inspiration and advice as well as great quality yarns at incredible prices! Would you like to use our patterns for other than personal use? You can read what you are allowed to do in the Copyright text at the bottom of all our patterns. Happy crafting!
Post a comment to pattern DROPS 60-16
We would love to hear what you have to say about this pattern!
If you want to leave a question, please make sure you select the correct category in the form below, to speed up the answering process. Required fields are marked *.