
Popular categories
Looking for a yarn?


Comments / Questions (17)
![]() Bee wrote:
Bee wrote:
Hello! I'm working on an xl size. My v-neck increases end during the raglan increases. But on the yoke instructions it says to work until it's 10 1/4 inch, then split for sleeves. In the body section it says my v-neck will measure 11 inches. Am I supposed to be spacing out my v neck increases further than the pattern says so I can reach 11 inches? Thank you.
15.10.2024 - 04:58DROPS Design answered:
Dear Bee, make sure you have done all raglan increases before dividing, V-neck increases might be done in your size - just make sure you get the correct tension in height. Happy knitting!
15.10.2024 - 10:28
![]() Katrin wrote:
Katrin wrote:
Hallo, Ich habe eine Frage zu den V-Ausschnitt-Zunahmen. In der Anleitung steht, dass pro Zunahmereihe 2 Maschen zugenommen werden. Nachdem ich für Größe L also 16 mal beidseitig zugenommen habe, komme ich vor dem Teilen auf insgesamt 358 Maschen und nicht 390 wie in einer der anderen Antworten, da ich eben bei den V-Ausschnitt-Zunahmen nur 2 Maschen pro Reihe zugenommen habe. Habe ich etwas missverstanden in der Anleitung?
17.07.2024 - 13:34DROPS Design answered:
Liebe Kathrin, Sie haben Recht, es sind nur 358 Maschen. Sie haben nichts missverstanden. Es werden für die V-Ausschnitt-Zunahmen insgesamt 32 Maschen zugenommen (je 16 beidseitig, d.h. für jedes Vorderteil 16 zugenommene Maschen), nicht 64. Viel Spaß beim Weiterstricken!
22.07.2024 - 10:04
![]() CHALOUNI wrote:
CHALOUNI wrote:
Bonjour, je suis bloqué à la partie de "continuer les augmentations de l'encolure V comme avant" Qu'entendez-vous dans continuer les augmentations encolure V comme avant ? Doit-on répéter "2 fois au total tous les 6 rangs, 10-13-13-13-14-15 fois tous les 4 rangs et 3-0-1-1-1-0 fois tous les 2 rangs (= on a augmenté un total de 15-15-16-16-17-17 mailles)" ou bien augmenter l'encolure V tous les 2 rangs ?
23.01.2024 - 23:15DROPS Design answered:
Bonjour Mme Chalouni, quand les augmentations du raglan sont faites, celles de l'encolure doivent continuer, donc continuez à augmenter en fonction de votre taille comme indiqué, autrement dit vous devez augmenter 2 x tous les 6 rangs puis 10-13-13-13-14-15 fois tous les 4 rangs et 3-0-1-1-1-0 fois tous les 2 rangs, donc en fonction de là où vous en êtes, continuez simplement à augmenter comme avant, soit tous les 4 rangs soit tous les 2 rangs. Bon tricot!
24.01.2024 - 08:26
![]() Madelyn wrote:
Madelyn wrote:
My question wasn’t answered. I finished my v-neck increases before I split off my sleeves so I am confused why it still says I need to continue my v-neck stitches after I split off my sleeves? Did I do something wrong?
30.08.2023 - 10:38DROPS Design answered:
Dear Madelyn, if you have finished to increase for V-neck before dividing, just continue working as before increasing for the raglan until all increases are done, and divide piece when you reach the measurement for your size. Happy knitting!
30.08.2023 - 16:10
![]() Madelyn wrote:
Madelyn wrote:
Thanks for answering my last question. This one is in regards to the V-Neck increase. By my calculations my V-Neck increases will be done before I have to split off the sleeve stitches since I would increase on row 6 and 12 and then every 4th row 13 times which would take me to row 64 and then 1 time every other row, ie. row 66. This is before I split off the sleeves but then in the body section it says I should still be increasing the V-neck even though I already have 230 stitches?
30.08.2023 - 03:04DROPS Design answered:
Dear Madelyn, the 230 sts on body are without sleeves, not including sleeves, this means this is after you have finished raglan increases and slip stitches for sleeves on a thread. You have to increase for raglan a total of 32 times and at the same time increase for neck, and after all stitches for raglan are done and piece measures 23 cm, divide piece for body and sleeves. You will have 78 sts for sleeve but the first and last stitch on each sleeve belong to front/back piece. Happy knitting!
30.08.2023 - 09:14
![]() Madelyn wrote:
Madelyn wrote:
The splitting into sleeves and body doesn't work... I have 230 stitches and I cannot split that into 76 stitches on each sleeve and have 102 stitches to work across the back piece. This would involve not having a front section at all and including the cast on stitches as worked across the back. Makes 0 sense mathematically
25.08.2023 - 08:36DROPS Design answered:
Hi Madelyn, It looks like you are working size L. You cast on 70 stitches and increase for raglan 32 times on each side of all 4 marker-threads (32 x 8 = 256). You also increase for the V-neck 16 times (32 x 2 = 64). You should therefore have 70 + 256 + 64 = 390 stitches at the end of the increases, before dividing for the body and sleeves. Each sleeve has 76 stitches, the back piece 102 stitches and 68 stitches on each front piece. Hope this helps and happy knitting!
25.08.2023 - 09:54
![]() Betina wrote:
Betina wrote:
Jeg har løst det selv, men vil stadig mene der er noget fejl i opskriften. Eftersom man når de 214 masker i en str m allerede inden man deler til ærmer. Og der så længere nede står at man når de 214 m Ca 4 cm efter delingen - det stemmer jo ikke rigtig 🙂
21.11.2021 - 11:35
![]() Betina wrote:
Betina wrote:
Hej drops, tak for svar. Men jeg følger opskriften fuldt ud og har derfor samme antal pinde som i opskriften, det undre mig bare i ikke skriver i opskriften at nogle størrelser ikke skal fortsætte med udtag allerede før der deles til ærmer, hvis ikke jeg havde læst frem havde jeg fået for mange masker på forstykket. Men dejlige opskrifter i har og ellers normalt meget nemme at læse og forstå 🙂
19.11.2021 - 10:35DROPS Design answered:
Godt at du fandt ud af det - tak for roserne :)
19.11.2021 - 13:44
![]() Betina wrote:
Betina wrote:
Jeg kan ikke få maske antal til at passe i opskriften. Der står flere steder at man skal øge halsudskæringen hele vejen ned og at der til slut skal være 214 masker på pinden str m. Dette har jeg allerede efter raglan udtag 31 g og hals udtag 15 g. Her har jeg 2*49 på forstykke, 96 ryg +2*10 under ærme altså 214 m. Så kan man jo ikke fortsætte med at øge halsen som der står i opskriften?
18.11.2021 - 18:52DROPS Design answered:
Hej Betina, hvis du har flere pinde i højden end hvad vi har i opskriften, så bliver du færdig med udtagningerne tidligere end hvad vi gør. Når du har antal masker ifølge din størrelse, strikker du de sidste cm uden udtagning. God fornøjelse!
19.11.2021 - 10:20
![]() Ana wrote:
Ana wrote:
Hola! Voy a animarme con este patrón a hacer mi primera chaqueta de punto, así que es un gran reto para mi. Tengo la duda de se hace el aumento del cu kli en V, me pueden explicar cómo sería "hacer una hebra dentro de un punto orillo en punto musgo"? Muchas gracias!!
10.11.2021 - 21:37DROPS Design answered:
Hola Ana, dentro significa trabajar antes o después del punto orillo. Por lo tanto, trabajas el punto orillo, después haces 1 hebra y después trabajas el siguiente punto. Si es el final de la vuelta, sería al revés; trabajas el punto antes del punto orillo, haces la hebra y trabajas el punto orillo.
14.11.2021 - 19:34
|
|
Hamptons Holiday Jacket#hamptonsholidayjacket |
|
 |
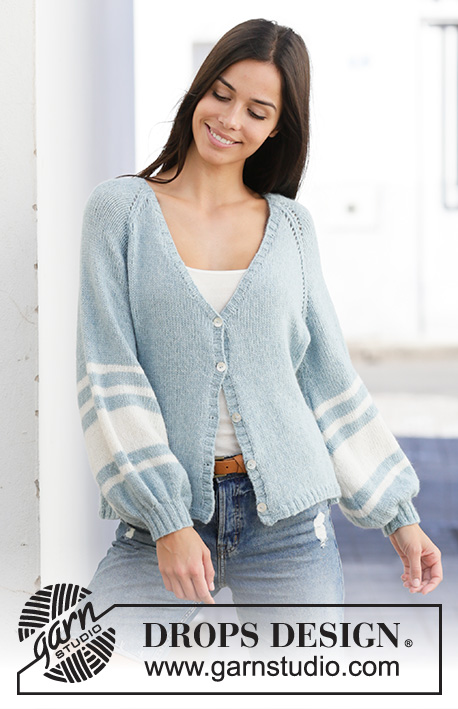 |
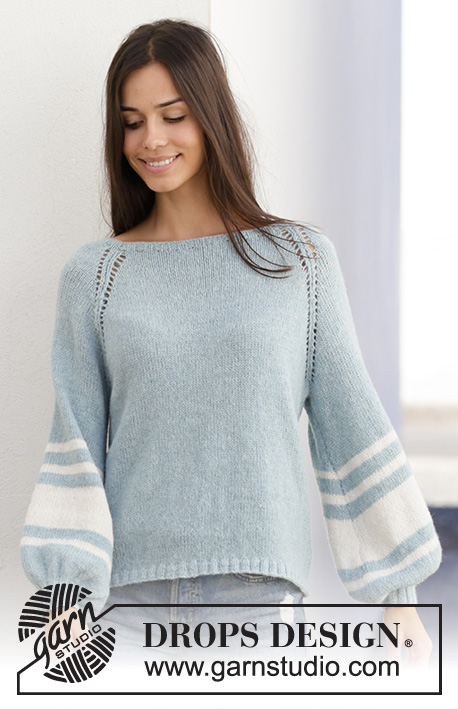
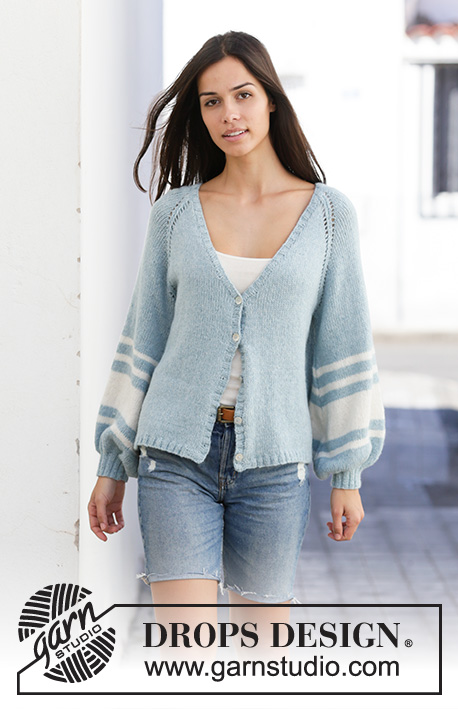
Knitted jacket with balloon sleeves in DROPS Sky. Piece is knitted top down with raglan, V-neck and stripes. Size: S - XXXL
DROPS 199-10 |
|
|
---------------------------------------------------------- EXPLANATION FOR THE PATTERN: ---------------------------------------------------------- GARTER STITCH (back and forth): Knit all rows. 1 ridge vertically = knit 2 rows. RAGLAN: All increases are done from the right side. Increase for raglan in every transition between sleeves and body as follows: Work until 1 stitch remains before marker thread, make 1 yarn over, knit 2 (marker thread is in the middle of these 2 stitches), make 1 yarn over = 2 stitches increased. On next row (wrong side) purl the yarn over to make a hole. Then work the new stitches in stocking stitch. Increase 8 stitches in total on every increase row. V-NECK: All increases are done from the right side. Make 1 yarn over inside 1 edge stitch in garter stitch (= 1 stitch increased) in each side. On next row (wrong side) purl yarn over twisted to avoid holes. Then work the new stitches in stocking stitch. Increase 2 stitches in total on every increase row. INCREASE/DECREASE TIP (evenly): To calculate how to increase/decrease evenly, use the total number of stitches on row (e.g. 198 stitches) and divide stitches by number of increases/decreases to be done (e.g. 38) = 5.2. In this example increase by making 1 yarn over after approx. every 5th stitch. On next row work yarn overs twisted to avoid holes. If decreasing work every 4th and 5th stitch together. INCREASE TIP (applies to sleeves): Work until 1 stitch remains before marker thread, 1 yarn over, knit 2 (marker thread is in the middle of these stitches), 1 yarn over. On next round knit yarn overs twisted to avoid holes. Then work the new stitches in stocking stitch. STRIPES (applies to sleeves): 1½ cm with white. 2 cm with light mint. 1½ cm with white. 2 cm with light mint. 7 cm with white. 2 cm with light mint. 1½ cm with white. Then work with light mint until finished measurements. BUTTONHOLES: Decrease for buttonholes on right band (when garment is worn). Decrease from right side (decrease buttonholes in purl sections) as follows: 1 buttonhole = purl 2 together, make 1 yarn over. On next row knit yarn over to make holes. Decrease first buttonhole 2-2-3-4-3-4 cm from bottom edge of jacket. Then decrease the next 4-4-4-4-5-5 buttonholes, approx. 7-7-7-7-6-6 cm between each. ---------------------------------------------------------- START THE PIECE HERE: ---------------------------------------------------------- JACKET - SHORT OVERVIEW OF THE PIECE: Work yoke and body back and forth on circular needle from mid front, work top down. Work sleeves in the round on double pointed needles/a short circular needle, top down. Then work a band/neck edge along the entire edge mid front. YOKE: Cast on 64-64-70-70-76-76 stitches (including 1 edge stitch in each side towards mid front) on circular needle size 4 mm with light mint. Purl 1 row from wrong side. Insert 4 marker threads in piece as follows (without working the stitches): Insert first marker thread after the first 3-3-3-3-3-3 stitches (= front piece), insert 2nd marker thread after the next 12-12-14-14-16-16 stitches (= sleeve), insert 3rd marker thread after the next 34-34-36-36-38-38 stitches (= back piece), and insert 4th marker thread after the next 12-12-14-14-16-16 stitches (= sleeve), 3-3-3-3-3-3 stitches remain on row after last marker (= front piece). Then work in stocking stitch with 1 edge stitch in GARTER STITCH - read explanation above, in each side towards mid front – AT THE SAME TIME on first row from right side increase for RAGLAN in every transition between body and sleeves – read explanation above. Continue increase for raglan every other row (i.e. on every row from right side) until increase has been done 28-31-32-36-38-42 times in total on each side of the 4 marker threads. AT THE SAME TIME on 6th row (i.e. on 3rd row from right side) increase for V-NECK in each side towards mid front – read explanation above, as follows: Increase every 6th row 2 times in total, every 4th row 10-13-13-13-14-15 times in total and every other row 3-0-1-1-1-0 times in total (= 15-15-16-16-17-17 stitches in total increased in each side towards mid front). REMEMBER THE KNITTING TENSION! After last increase for raglan continue without increases until piece measures 20-22-23-26-27-31 cm, but continue with increase for V-neck as before. Work next row as follows from right side: Work until first marker thread, work 0-0-1-2-4-6 stitches after marker thread (= front piece), slip the next 68-74-76-82-84-88 stitches on 1 stitch holder for sleeve, cast on 8-10-12-12-12-16 new stitches on needle (= in the side under sleeve), work 90-96-102-112-122-134 stitches (= back piece), slip the next 68-74-76-82-84-88 stitches on 1 stitch holder for sleeve, cast on 8-10-12-12-12-16 new stitches on needle (= in the side under sleeve), work until marker thread (= 0-0-1-2-4-6 stitches) and work the remaining stitches on needle (= front piece). Then finish body and sleeves separately. NOW MEASURE THE PIECE FROM HERE! BODY: Continue with stocking stitch, 1 edge stitch in garter stitch in each side (work first row from wrong side) and increase for V-neck as before. When increase for V-neck is done, there are 198-214-230-250-270-302 stitches on needle. Piece measures approx. 4-4-4-2-2-1 cm from division (V-neck measures approx. 24-26-27-28-29-30 cm from shoulder). Continue with stocking stitch and 1 edge stitch in garter stitch in each side. When piece measures 29-29-30-28-29-27 cm from division, knit 1 row from right side while increasing 38-42-46-50-54-62 stitches evenly - read INCREASE/DECREASE TIP = 236-256-276-300-324-364 stitches. Switch to circular needle size 3 mm. Work next row as follows from wrong side: 1 edge stitch in garter stitch, * purl 2, knit 2 *, repeat from *-* until 3 stitches remain on needle, purl 2 and finish with 1 edge stitch in garter stitch. Continue rib like this for 2 cm. Cast off with knit over knit and purl over purl (to avoid a tight cast-off edge use circular needle size 4 mm). Jacket measures approx. 54-56-58-60-62-64 cm from shoulder. SLEEVE: Slip the 68-74-76-82-84-88 stitches from stitch holder in one side of piece on a short circular needle/double pointed needles size 4 mm and pick in addition up 1 stitch in each of the 8-10-12-12-12-16 stitches cast on in the side under sleeve = 76-84-88-94-96-104 stitches. Insert 1 marker thread in the middle of the 8-10-12-12-12-16 stitches under sleeve and move the marker thread upwards when working, it is used for increasing later. Begin round at the marker thread and work stocking stitch in the round. When piece measures 7 cm from division, increase 2 stitches mid under sleeve - read INCREASE TIP. Increase like this every 2½-3-2½-3-2½-3 cm 12-10-11-10-11-9 times in total = 100-104-110-114-118-122 stitches. AT THE SAME TIME when piece measures 19-18-17-15-15-13 cm, work STRIPES - read explanation above. Continue until piece measures 42-41-40-38-38-35 cm from division - or desired length (shorter measurements in the larger sizes because of longer yoke). Work 1 round while decreasing 4-0-6-2-6-2 stitches evenly - read INCREASE/DECREASE TIP = 96-104-104-112-112-120 stitches. Work 1 round while knitting the stitches together 2 by 2 = 48-52-52-56-56-60 stitches. Switch to double pointed needles size 3 mm and work rib in the round = knit 2/purl 2 for 5 cm. Cast off with knit over knit and purl over purl (to avoid a tight cast-off edge use double pointed needles size 4 mm). Work the other sleeve the same way. BAND + NECK EDGE: Insert 1 marker mid back of neck on back piece, marker should be used to calculate half the stitches on band/neck edge. Begin at the bottom on right front piece from right side and pick up approx. 161-169-177-185-189-193 stitches (divisible with 4 + 1) along the entire front edge up to marker in the neck, on circular needle size 3 mm with light mint – leave the marker. Continue by picking up approx. 161-169-177-185-189-193 stitches (divisible with 4 + 1) along the entire front edge down to edge on left front = 322-338-354-370-378-386 stitches. NOTE: If more or fewer stitches stitches than this are picked up adjust number of stitches on first row – adjust to make it the same on each side of marker in the neck. It is important that the rib is not to loose with too many stitches but it should not be too tight either with tight front edges. Work next row as follows from wrong side: 2 stitches in garter stitch, * purl 2, knit 2 *, repeat from *-* until 4 stitches remain, purl 2 and finish with 2 stitches in garter stitch. Continue rib like this. When rib measures 1 cm, decrease for BUTTONHOLES - see explanation above. Continue like this until rib measures 2 cm. Cast off with knit over knit and purl over purl (to avoid a tight cast-off edge use circular needle size 4 mm). ASSEMBLY: Sew buttons on to left front piece. |
|
 |
|
Have you finished this pattern?Tag your pictures with #dropspattern #hamptonsholidayjacket or submit them to the #dropsfan gallery. Do you need help with this pattern?You'll find 27 tutorial videos, a Comments/Questions area and more by visiting the pattern on garnstudio.com. © 1982-2026 DROPS Design A/S. We reserve all rights. This document, including all its sub-sections, has copyrights. Read more about what you can do with our patterns at the bottom of each pattern on our site. |
|


With over 40 years in knitting and crochet design, DROPS Design offers one of the most extensive collections of free patterns on the internet - translated to 17 languages. As of today we count 325 catalogues and 12298 patterns translated into English (UK/cm). 12298
We work hard to bring you the best knitting and crochet have to offer, inspiration and advice as well as great quality yarns at incredible prices! Would you like to use our patterns for other than personal use? You can read what you are allowed to do in the Copyright text at the bottom of all our patterns. Happy crafting!
Post a comment to pattern DROPS 199-10
We would love to hear what you have to say about this pattern!
If you want to leave a question, please make sure you select the correct category in the form below, to speed up the answering process. Required fields are marked *.