
Popular categories
Looking for a yarn?


Comments / Questions (68)
![]() Maude Cotnoir wrote:
Maude Cotnoir wrote:
Bonjour . Concernant les instructions des manches, il est dit de tricoter le motif A1 sous le milieu de la manche. Je ne comprends pas la raison de ce motif décoratif sous la manche. ? Pourriez vous clarifier ces instructions ?
18.10.2020 - 18:39DROPS Design answered:
Bonjour Mme Cotnoir, on tricote simplement A.1 sous la manche pour faire un léger rappel du A.1 du devant. S'il ne vous convient pas, vous pouvez tout à fait ne pas le tricoter, à vous de décider. Bon tricot!
19.10.2020 - 10:05
![]() Cécile wrote:
Cécile wrote:
Bonjour J’aurais besoin de précisions pour démarrer A1 sur le rang de diminution juste après les côtes. Doit-on le faire sur un rang de mailles endroits ou sur un rang de mailles envers ? Et du coup le jeté de A1 doit-on le tricoter maille endroit ou maille envers ? Merci pour vos précisions Cordialement Cécile Q.
23.02.2020 - 16:38DROPS Design answered:
Bonjour Cécile, le 1er rang de A.1 (= 2 mailles ensemble à l'endroit, 1 jeté) doit se tricoter sur l'endroit (et au milieu) . Bon tricot!
24.02.2020 - 09:19
![]() Gisela Jansson wrote:
Gisela Jansson wrote:
Å vad jag tycker avslutet på ryggstycket känns svårt att förstå. De fyra varven rätstickning, är det en del av halsringningen?
24.01.2020 - 21:11DROPS Design answered:
Hej Gisela, Ja det stämmer, de fyra varven du stickar innan du maskar av till hals blir till halskant. Du fortsätter med 2 m i rätstickning mot halskanten tills du maskar av. Lycka till :)
31.01.2020 - 08:25
![]() Walaa wrote:
Walaa wrote:
I don't quite understand the part of the sleeves which says (knit 2 then work A1(= purl 1 and knit 1) should i purl 1 and knit 1 or work A1 as the diagram ? also how is this middle under arm if i knitted 2 at the first of the row this is not the middle it will be abit shifted to the right
26.12.2019 - 23:55DROPS Design answered:
Dear Walaa, you work A.1 over the next 2 stitches (these stitches are P1 and K1), then knit to the end of the round. ie the first stitch in A.1 is worked over P1 from the rib and the 2nd stitch in A.1 is worked over K1 from the rib. Middle of the sleeve is: K2, A.1, K2 so that you will inc at the end of the round before the K2 before A.1 and after the K2 after A.1 - see INCREASE TIP (for sleeves). Happy knitting!
02.01.2020 - 11:16
![]() Nathalie wrote:
Nathalie wrote:
Bonjour, je fais ce pull en M. Le rang avec l'étoile est mon 69ème rang et est celui où je diminue les 2 m. centrales de A2. Je fais mon 70ème rang comme décrit mais à mon 71ème rang, la dernière diminution (après le jeté) est décalé donc le motif aussi.. En suivant vos explications, il ne me reste que 2m end. à la fin de A2. Je pense qu'il y a 1 m. end. de trop. Pourriez-vous m'aider svp? Merci d'avance
05.09.2019 - 23:04DROPS Design answered:
Bonjour Nathalie, au 7ème rang de A.1 (= étoile), on diminue 2 mailles, au rang suivant, on termine chaque devant séparément, on doit tricoter 2 mailles endroit sur l'envers côté encolure, et, sur l'endroit, on va continuer la diagonale ajourée de A.2 comme avant, par ex côté droit de A.2 on doit avoir 3 m end, puis 2 m ens à l'end, 1 jeté, 1 m end, 2 m ens à l'end, 1 jeté, puis on aura 2 m end avant les 2 m ens à l'end, 1 jeté, 1 m end, 2 m ens à l'end, 1 m end. Les jours de A.2 doivent continuer en diagonale le long de l'encolure. N'hésitez pas à placer un marqueur pour délimiter A.2, ce sera plus facile de suivre le diagramme. Bon tricot!
06.09.2019 - 08:20
![]() Clare Myers wrote:
Clare Myers wrote:
I have a question about the decrease row on the Front: XXL size. After decreases in 1st half I have 54 stitches - then A1= 2 stitches - then decreases in the 2nd half leaves 56 stitches. So A1 is not quite central 54/2/56. The following row says to do A1 over the MIDDLE two stitches. The middle 2 stitches of this row would be 55 & 56 (A1 was 57/58 the equiv of in the previous row) . Does this mean it should not line up with the A1 in the row before?
13.08.2019 - 10:04DROPS Design answered:
Dear Mrs Myers, there are 112 sts on needle, then you decrease 2 sts on 7th row in A.2 = 110 sts remain, you should have now 55 stitches for each front piece. When you start working A.2, the 2 middle sts in A.2 should be the 2 sts from A.1 (= the 2 middle sts on piece), On 7th row, you dec the 8th and 9th stitch in A.2, K2 and dec the next 2 sts - if A.2 has been worked over A.1, you should have the 55 sts on each side. Happy knitting!
13.08.2019 - 11:36
![]() Nathalie Perlot wrote:
Nathalie Perlot wrote:
Bonjour, je commence le pull avec la laine "Air" du modèle et les aiguilles préconisées mais si mon échantillon jersey est égale au votre,lorsque je commence le modèle en côtes,je me retrouve avec 75 cm de largeur.est-ce vraiment normal de monter autant de mailles ? j'ai l'impression en voyant la photo que la bordure côte est plutôt moins large que la suite en jersey alors que si je suis les instructions,je vais avoir l'effet inverse.. merci de m'éclairer
28.05.2019 - 14:42DROPS Design answered:
Bonjour Mme Perlot, si votre tension est correcte en jersey, vous devriez avoir, après les côtes les 110 m + 2 m lis (en taille XXL) = 73 cm (soit 112 m = 74.6 cm environ). On monte plus de mailles au début pour éviter que les côtes ne resserrent trop la base du pull, on va ensuite diminuer pour avoir la bonne largeur, ainsi, les côtes feront la même largeur que le pull. Bon tricot!
28.05.2019 - 14:59
![]() Britt wrote:
Britt wrote:
Der Anschlag für die Ärmel in Gr. S und M müssten doch 42 Maschen sein, sonst geht der Rapport nicht auf? Und ist es richtig, dass das Muster am unteren Ärmel gestrickt wird? (auf den Bildern ist das leider nicht zu erkennen)
24.05.2019 - 10:04DROPS Design answered:
Liebe Britt, Sie sind ja recht, in die beiden ersten Größen muss man 42 Maschen anschlagen. Anleitung wird angepasst. Viel Spaß beim stricken!
24.05.2019 - 14:06
![]() Marianne Antonsen wrote:
Marianne Antonsen wrote:
Finner ikke diagrammene til oppskriften.
20.05.2019 - 21:37DROPS Design answered:
Hei Marianne. Diagrammene ligger helt nederst på siden, sammen med målskissen. Om du har problemer med å se den kan du forsøke å bytte enhet, eventuelt printe ut oppskriften. God fornøyelse
21.05.2019 - 14:28
![]() Kristin Eriksen wrote:
Kristin Eriksen wrote:
Er det noen grunn til at man ikke kan strikke denne på rundpinne opp til ermhull?
19.05.2019 - 23:03
|
||||||||||||||||||||||
Robin Song#robinsongsweater |
||||||||||||||||||||||
 |
 |
|||||||||||||||||||||
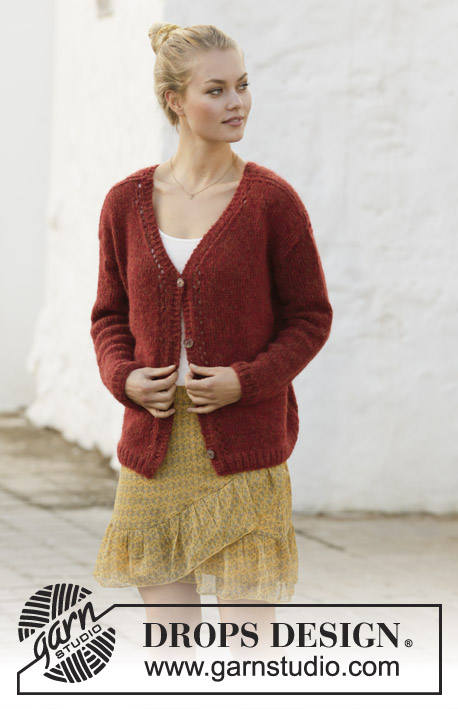
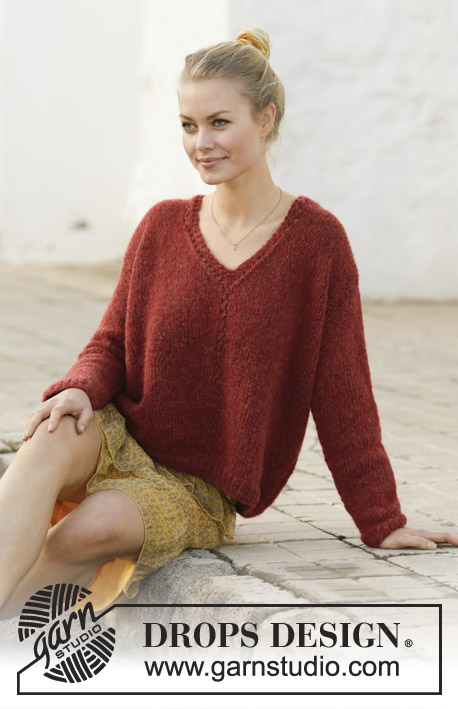
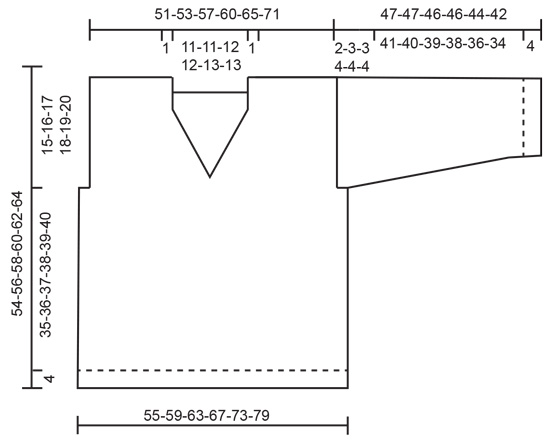
Knitted jumper with V-neck in DROPS Air. The piece is worked with lace pattern. Sizes S - XXXL.
DROPS 202-27 |
||||||||||||||||||||||
|
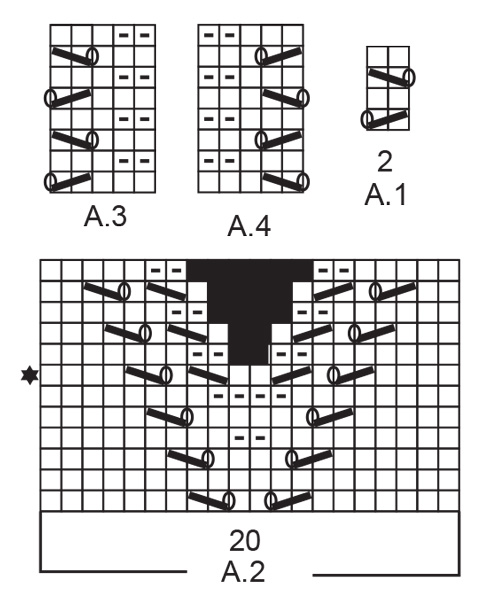
------------------------------------------------------- EXPLANATIONS FOR THE PATTERN: ------------------------------------------------------- RIDGE/GARTER STITCH (worked back and forth): Knit all rows. 1 ridge in height = Knit 2 rows. PATTERN: See diagrams A.1 to A.4. Diagrams show all rows in pattern seen from the right side. DECREASE TIP-1 (evenly spaced): To work out how to decrease evenly, count the total number of stitches on needle (e.g. 105 stitches) minus edge stitches (= 2 stitches) and divide the remaining stitches by number of decreases to be made (e.g. 21) = 4.9. In this example, decrease by knitting together approx. each 4th and 5th stitch DECREASE TIP-2 (for neck on back piece): All decreases worked from right side. Decrease 1 stitch after the 2 stitches in garter stitch from the neck as follows: Slip 1 stitch as if to knit, knit 1 and pass the slipped stitch over the knitted stitch. Decrease 1 stitch before the 2 stitches in garter stitch towards the neck as follows: Knit 2 together. INCREASE TIP (for sleeves): Work until there are 2 stitches left before A.1 under the sleeve, make 1 yarn over, knit 2, A.1, knit 2, make 1 yarn over. On the next round knit yarn overs twisted to avoid holes. Then work new stitches in stocking stitch ------------------------------------------------------- START THE PIECE HERE: ------------------------------------------------------- JUMPER - SHORT OVERVIEW OF THE PIECE: The piece is worked back and forth with circular needle in sections and sewn together to finish. The sleeves are worked in the round with double pointed needles. BACK PIECE: Cast on 105-111-117-129-141-153 stitches (including 1 edge stitch on each side) with circular needle size 5 mm and Air. Purl 1 row from the wrong side. Then work rib as follows: 1 edge stitch in GARTER STITCH – read description above, (knit 1, purl 2) until there are 2 stitches left on row, knit 1 and 1 edge stitch in garter stitch. Continue like this back and forth for 4 cm. Now knit 1 row from the right side where you decrease 21-21-21-27-29-33 stitches evenly spaced – read DECREASE TIP-1 = 84-90-96-102-112-120 STITCHES. Change to circular needle size 6 mm. Work stocking stitch with 1 edge stitch in garter stitch on each side until the piece measures 39-40-41-42-43-44 cm. REMEMBER THE KNITTING TENSION! At the beginning of the next 2 rows cast off 3-4-4-5-6-6 stitches for armholes = 78-82-88-92-100-108 stitches. Continue with stocking stitch and 1 edge stitch in garter stitch on each side. When the piece measures 50-52-54-56-58-60 cm, work garter stitch over the middle 18-18-20-20-22-22 stitches on the row. When you have worked 2 ridges over these stitches work the next row from the right side as follows: Work the first 32-34-36-38-41-45 stitches and place on 1 thread for right shoulder, cast off the next 14-14-16-16-18-18 stitches for neck and work the remaining 32-34-36-38-41-45 stitches. Then finish the shoulders separately. Work 1 edge stitch in garter stitch towards the armhole, 2 stitches in garter stitch towards the neck and stocking stitch over the remaining stitches. On the next row from the right side decrease 1 stitch inside the 2 stitches in garter stitch towards neck – read DECREASE TIP-2 = 31-33-35-37-40-44 stitches. Continue working until the armhole measures 15-16-17-18-19-20 cm. Cast off. The piece measures approx. 54-56-58-60-62-64 cm from the shoulder down. Work the other shoulder in the same way. FRONT PIECE: Cast on 105-111-117-129-141-153 stitches (including 1 edge stitch on each side) with circular needle size 5 mm and Air. Purl 1 row from the wrong side then work rib as follows: 1 edge stitch in garter stitch, (knit 1, purl 2) until there are 2 stitches left on row, knit 1 and 1 edge stitch in garter stitch. Continue back and forth like this until the piece measures 4 cm. Now work as follows: Work the first 51-54-57-63-68-75 stitches and decrease at the same time 10-10-10-13-14-16 stitches evenly spaced, work A.1 (= 2 stitches), work the remaining stitches on the row and decrease at the same time 11-11-11-14-15-17 stitches evenly spaced = 84-90-96-102-112-120 stitches. Change to circular needle size 6 mm. Continue back and forth with A.1 over the middle 2 stitches, stocking stitch and 1 edge stitch in garter stitch on each side. When the piece measures 34-36-37-39-40-42 cm work A.2 over the middle 20 stitches on the row. The 2 middle stitches in A.2 should match the 2 stitches in A.1. When you have worked the row with the star, you have decreased 2 stitches in A.2 and the piece is now divided in the middle. Place the first half of the stitches (seen from the right side) on a thread (= right front piece/shoulder) and continue back and forth over the left front piece/shoulder. Continue with stocking stitch, 1 edge stitch in garter stitch towards the armhole and A.2 towards the neck; i.e. you decrease for neck as shown in the last 6 rows of the diagram (3 decreases are shown in diagram) until you have decreased a total of 8-8-9-9-10-10 times. AT THE SAME TIME when the piece measures 39-40-41-42-43-44 cm cast off 3-4-4-5-6-6 stitches at the beginning of the row from the armhole. When all the decreases are finished, work as shown in A.3 over the outermost 5 stitches on the left front piece (towards the neck) to finished length. When all the decreases to neck and armhole are finished there are 31-33-35-37-40-44 stitches on shoulder. Continue working until the armhole measures approx. 15-16-17-18-19-20 cm - adjust to match the back piece. Cast off. The piece measures approx. 54-56-58-60-62-64 cm from the shoulder down. Place the stitches from the thread back on the circular needle and work right front piece/shoulder in the same way as the left, but reversed; i.e. start from the wrong side, at the neck on the row after the star in A.2 and work as follows: Work the 9 stitches in A.2, stocking stitch until there is 1 stitch left and 1 edge stitch in garter stitch. Continue back and forth like this and decrease for neck and armhole in the same way as on the left front piece. When the 8-8-9-9-10-10 decreases for neck are finished work A.4 over the outermost 5 stitches towards the neck to finished length. Adjust the length to match left front piece/shoulder and back piece. SLEEVE: The sleeve is worked in the round with double pointed needles. Cast on 42-42-45-48-48-51 stitches with double pointed needles size 5 mm. Knit 1 round. Then work rib (knit 1, purl 2) for 4 cm. Change to double pointed needles size 6 mm. The next round is worked as follows: Knit 2, work A.1 over the next 2 stitches (= purl 1 and knit 1), knit to end of round at the same time as you decrease 9-8-8-10-9-11 stitches evenly spaced = 33-34-37-38-39-40 stitches. Continue in the round with stocking stitch and A.1 mid under sleeve. AT THE SAME TIME when the piece measures 8-9-9-9-8-8 cm, increase 1 stitch on each side – read INCREASE TIP. Increase in the different sizes as follows: Size S: Increase alternately every 6 and 7 cm a total of 6 times. Size M: Increase every 5 cm a total of 7 times. Size L: Increase every 5 cm a total of 7 times. Size XL: Increase every 4 cm a total of 8 times. Size XXL: Increase alternately every 3 and 4 cm a total of 9 times. Size XXXL: Increase every 3 cm a total of 10 times. When all the increases are finished there are 45-48-51-54-57-60 stitches on the round. Continue working until the piece measures 45-44-43-42-40-38 cm (shorter measurements in larger sizes due to wider shoulders). Finish the round in the middle of diagram A.1 (= mid under sleeve). Now continue back and forth with stocking stitch over all stitches (to allow you to sew the sleeve to the armhole). When you have worked back and forth for 2-3-3-4-4-4 cm the sleeve measures a total of 47-47-46-46-44-42 cm. Cast off. Work the other sleeve in the same way. ASSEMBLY: Sew shoulder seams with grafting stitches inside the cast-off edge. Sew sleeves to body. Sew side seams inside the 1 edge stitch in garter stitch on each side. |
||||||||||||||||||||||
Diagram explanations |
||||||||||||||||||||||
|
||||||||||||||||||||||
 |
||||||||||||||||||||||
 |
||||||||||||||||||||||
Have you finished this pattern?Tag your pictures with #dropspattern #robinsongsweater or submit them to the #dropsfan gallery. Do you need help with this pattern?You'll find 27 tutorial videos, a Comments/Questions area and more by visiting the pattern on garnstudio.com. © 1982-2026 DROPS Design A/S. We reserve all rights. This document, including all its sub-sections, has copyrights. Read more about what you can do with our patterns at the bottom of each pattern on our site. |
||||||||||||||||||||||


With over 40 years in knitting and crochet design, DROPS Design offers one of the most extensive collections of free patterns on the internet - translated to 17 languages. As of today we count 324 catalogues and 12290 patterns translated into English (UK/cm). 12290
We work hard to bring you the best knitting and crochet have to offer, inspiration and advice as well as great quality yarns at incredible prices! Would you like to use our patterns for other than personal use? You can read what you are allowed to do in the Copyright text at the bottom of all our patterns. Happy crafting!
Post a comment to pattern DROPS 202-27
We would love to hear what you have to say about this pattern!
If you want to leave a question, please make sure you select the correct category in the form below, to speed up the answering process. Required fields are marked *.