
Popular categories
Looking for a yarn?


Comments / Questions (23)
![]() Christine wrote:
Christine wrote:
Bonjour Est il possible de tricoter les manches avec des aiguilles droites s'il vous plait ? Si oui comment s'y prendre ? Par avance un grand merci pour votre réponse.
04.11.2025 - 01:15DROPS Design answered:
Bonjour Christine, découvrez ici quelques astuces qui vous permettront de faire les ajustements nécessaires. Bon tricot!
04.11.2025 - 08:17
![]() Denise wrote:
Denise wrote:
What is the amount of ease on this cardigan?I’m a 42 bust.
06.06.2025 - 15:50DROPS Design answered:
Dear Denise, for size M, you have a 43⅜" final measurement of the bust of the garment. So that would be the best size for your bust measurements. The first size has a bust size of 41" so it won't fit your measurements. The jacket is not a too tight fit but it shouldn't hang loosely either. To ensure that the pattern has as much ease as you want you can compare its measurements to those of you usual clothes. Happy knitting!
08.06.2025 - 13:35
![]() Vigdis Bakken Naustvik wrote:
Vigdis Bakken Naustvik wrote:
Strikker Robin Song Jacket i str M. Strikket ryggstykket og får altfor mange cm lengde fra vrangbord og opp til skulder (72 m). Hvor lang skal egentlig skulderen være fra nakken?
01.04.2025 - 09:26DROPS Design answered:
Hei Vigdis. Du finner alle mål til jakken på målskissen, helt nederst på oppskriften. I str. M skal målet fra vrangborden/oppleggskanten være 56 cm. mvh DROPS Design
07.04.2025 - 09:28
![]() Joelle Langlois wrote:
Joelle Langlois wrote:
Bonjour, je voudrais tricoter ce gilet avec un fil plus petit et des aiguilles n°4. Est ce possible ? Si oui pourriez vous me conseiller quel fil je pourrais prendre. Cordialement.
26.11.2023 - 08:14DROPS Design answered:
Bonjour Mme Langlois, retrouvez tous nos gilets et vestes tricotés avec une tension de 22-20 mailles (adaptez la taille des aiguilles si besoin), ici, n'hésitez pas à ajouter des filtres pour affiner votre recherche. Bon tricot!
27.11.2023 - 09:28
![]() Fabienne Hénault wrote:
Fabienne Hénault wrote:
Bonjour, Pouvez-vous me dire combien de pelotes sont nécessaires pour une taille L. Je vous remercie, cordialement
08.02.2023 - 17:34DROPS Design answered:
Bonjour Mme Hénault, vous trouverez les quantités nécessaires dans l'en-tête, avec les tailles, l'échantillon et l'aiguille, autrement dit, en taille L, il vous faudra 350 g DROPS Air / 50 g la pelote = 7 pelotes DROPS Air. Bon tricot!
09.02.2023 - 09:40
![]() Mieke Nouwen wrote:
Mieke Nouwen wrote:
Hallo, zou ik dit model ook in de drops cotton merino kunnen maken? ik ben een absolute beginner , alleen sjaals gemaakt tot nu, en weet nog niet hoe meerderen en verminderen in elkaar zit. is dit model dan een aanrader? of beter een ander Model? Liefst wel een model met vhals. groetjes! Mieke
01.06.2021 - 12:14DROPS Design answered:
Dag Mieke,
Je kunt het beste garen uit de zelfde categorie (dikte) gebruiken, dus 2 draden Baby Merino (a) of 1 draad Big Merino, zodat je dezelfde stekenverhouding kunt krijgen. Op onze site staan veel video's om je te helpen, maar mocht je twijfelen, dan zou je ook een patroon uit onze basispatronen kunnen kiezen, dit zijn over het algemeen ook makkelijke patronen.
02.06.2021 - 11:46
![]() Ria V Doremalen wrote:
Ria V Doremalen wrote:
Boord v mouw, kan dit met rondbreinaald, er moeten 45 steken opgezet worden met ndn 6 uitleg is niet duidelijk bij drops vest
23.05.2021 - 19:54DROPS Design answered:
Dag Ria,
De mouw wordt in de rondte gebreid met rondbreinaalden zonder knop. Je begint dus gelijk in de rondte te breien. Je kunt dus ook opzetten op de rondbreinaald.
25.05.2021 - 19:30
![]() Marion V Doremalen wrote:
Marion V Doremalen wrote:
Waarom moet ik 11 st minderen na de boord bij het rugpand??
18.04.2021 - 13:43DROPS Design answered:
Dag Marion,
Na de boorsteek minder je steken om op het juiste aantal steken te komen passend bij de maat, zodat de maatvoering klopt op basis van de stekenverhouding.
19.04.2021 - 20:10
![]() Cornelia wrote:
Cornelia wrote:
Ich ergänze: Der Beginn des Linken Vorderteils ist identisch mit dem rechten, das ist wohl falsch, ich habe in der englischen Anleitung gesehen, dass es so ist, wie ich gedacht habe. Also nicht mit 4M kraus re Blende starten! Vielleicht könnte man das in der deutschen Anleitung korrigieren. Super tolle Anleitung und tolles Garn sonst!!!
14.01.2021 - 15:09DROPS Design answered:
Liebe Cornelia, schön, dass Ihnen das Modell und das Garn gefallen! :-) Vielen Dank für Ihren Hinweis, Sie haben recht - rechts und linkes Vorderteil müssen natürlich gegengleich gestrickt werden und nicht identisch. Der Fehler wurde korrigiert. Viel Spaß beim Weiterstricken!
14.01.2021 - 18:20
![]() Cornelia wrote:
Cornelia wrote:
Ich ergänze: Der Beginn des Linken Vorderteils ist identisch mit dem rechten, das ist wohl falsch, ich habe in der englischen Anleitung gesehen, dass es so ist, wie ich gedacht habe. Also nicht mit 4M kraus re Blende starten! Vielleicht könnte man das in der deutschen Anleitung korrigieren. Super tolle Anleitung und tolles Garn sonst!!!
14.01.2021 - 15:02
|
||||||||||||||||
Robin Song Jacket#robinsongjacket |
||||||||||||||||
 |
 |
|||||||||||||||
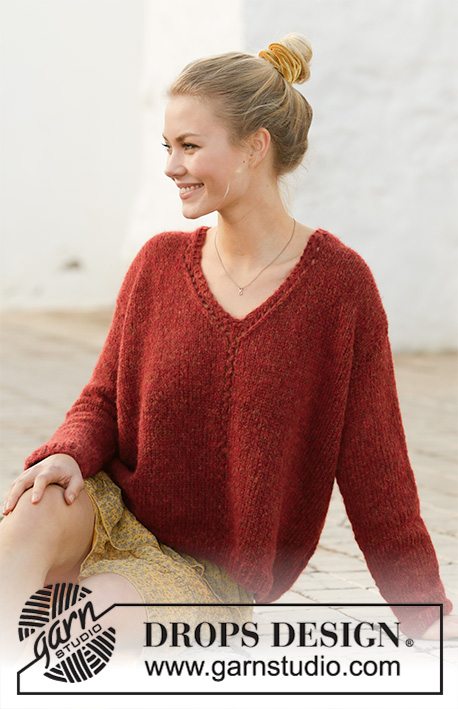
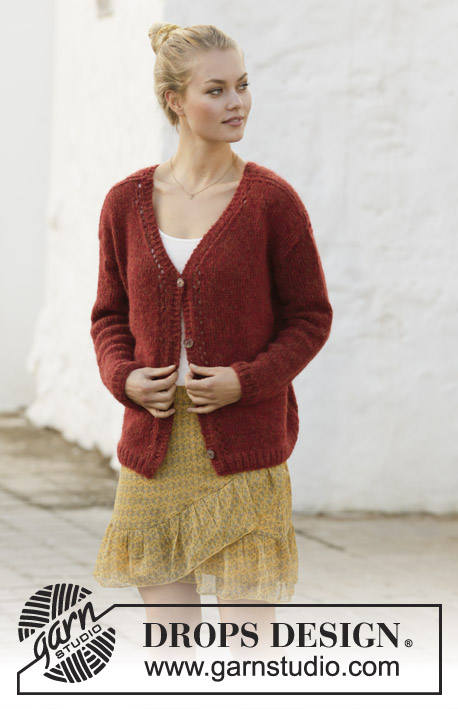
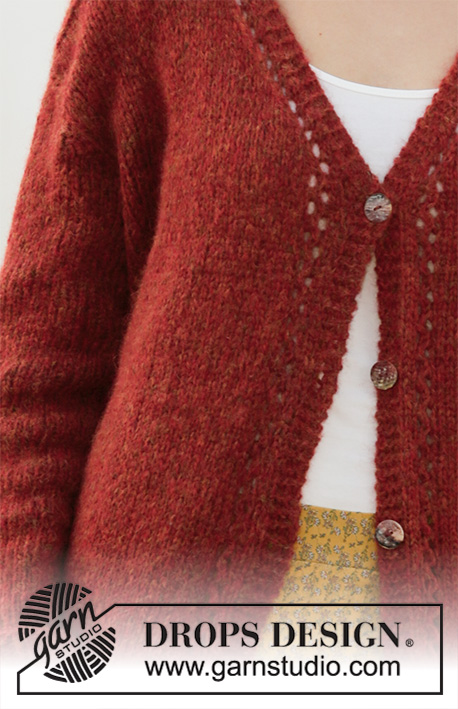
Knitted jacket with V-neck in DROPS Air. The piece is worked with lace pattern. Sizes S - XXXL.
DROPS 202-26 |
||||||||||||||||
|
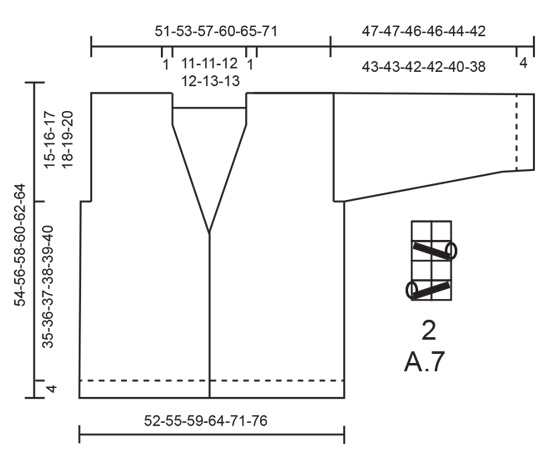
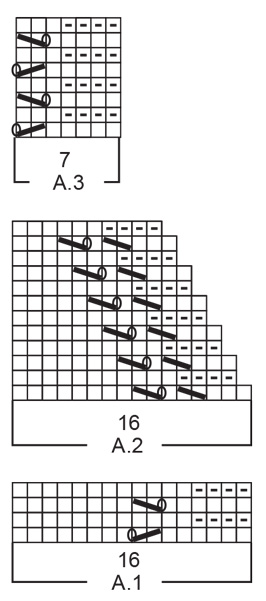
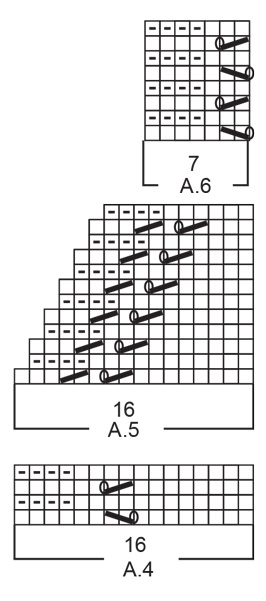
------------------------------------------------------- EXPLANATIONS FOR THE PATTERN: ------------------------------------------------------- RIDGE/GARTER STITCH (worked back and forth): Knit all rows. 1 ridge in height = Knit 2 rows. PATTERN: See diagrams A.1 to A.7. Diagrams show all rows in pattern seen from right side. DECREASE TIP-1 (evenly spaced): To work out how to decrease evenly, count the total number of stitches on needle (e.g. 99 stitches) minus edge stitches (= 2 stitches) and divide the remaining stitches by number of decreases to be made (e.g. 19) = 5.1. In this example, decrease by knitting together approx. each 4th and 5th stitch. DECREASE TIP-2 (for neck on back piece): All decreases worked from right side. Decrease 1 stitch after the 2 stitches in garter stitch from the neck as follows: Slip 1 stitch as if to knit, knit 1 and pass the slipped stitch over the knitted stitch. Decrease 1 stitch before the 2 stitches in garter stitch towards the neck as follows: Knit 2 together. INCREASE TIP (for sleeves): Work until there are 2 stitches left before A.7 under the sleeve, make 1 yarn over, knit 2, A.7, knit 2, make 1 yarn over. On the next round knit yarn overs twisted to avoid holes. Then work new stitches in stocking stitch. BUTTONHOLES (bottom up): Work buttonholes on right band. 1 BUTTONHOLE = knit together 3rd and 4th stitch from the edge and make 1 yarn over. On next row knit the yarn over = hole. Work buttonholes when piece measures: S: 5, 14, 23 and 32 cm. M: 5, 14, 23 and 32 cm. L: 6, 15, 24 and 33 cm. XL: 5, 15, 25 and 35 cm. XXL: 6, 16, 26 and 36 cm. XXXL: 7, 17, 27 and 37 cm. ------------------------------------------------------- START THE PIECE HERE: ------------------------------------------------------- JACKET – SHORT OVERVIEW OF THE PIECE: The piece is worked back and forth with circular needle in sections which are sewn together to finish. Sleeves are worked in the round with double pointed needles. BACK PIECE: Cast on 99-105-111-123-135-144 stitches (including 1 edge stitch on each side) with circular needle size 5 mm and Air. Purl 1 row from the wrong side. Then work rib as follows: 1 edge stitch in GARTER STITCH – read description above, (knit 1, purl 2) until there are 2 stitches left on row, knit 1 and 1 edge stitch in garter stitch. Continue like this back and forth for 4 cm. Change to circular needle size 6 mm. Now knit 1 row from the right side where you decrease 19-21-21-25-27-28 stitches evenly spaced – read DECREASE TIP-1 = 80-84-90-98-108-116 stitches. Work stocking stitch with 1 edge stitch in garter stitch on each side until the piece measures 39-40-41-42-43-44 cm. REMEMBER THE KNITTING TENSION! At the beginning of the next 2 rows cast off 1-1-1-3-4-4 stitches for armholes = 78-82-88-92-100-108 stitches. Continue with stocking stitch and 1 edge stitch in garter stitch on each side. When the piece measures 50-52-54-56-58-60 cm, work garter stitch over the middle 18-18-20-20-22-22 stitches on the row. When you have worked 2 ridges over these stitches work the next row from the right side as follows: Work the first 32-34-36-38-41-45 stitches and place on 1 thread for right shoulder, cast off the next 14-14-16-16-18-18 stitches for neck and work the remaining 32-34-36-38-41-45 stitches. Then finish the shoulders separately. Work 1 edge stitch in garter stitch towards the armhole, 2 stitches in garter stitch towards the neck and stocking stitch over the remaining stitches. On the next row from the right side decrease 1 stitch inside the 2 stitches in garter stitch – read DECREASE TIP-2 = 31-33-35-37-40-44 stitches. Continue working until the armhole measures 15-16-17-18-19-20 cm. Cast off. The piece measures approx. 54-56-58-60-62-64 cm from the shoulder down. Work the other shoulder in the same way. RIGHT FRONT PIECE: Cast on 54-57-60-66-72-75 stitches (including 1 edge stitch in side and 4 band stitches towards mid front) with circular needle size 5 and Air. Purl 1 row from the wrong side. Then work rib as follows: 4 band stitches in garter stitch, (knit 1, purl 2) until there are 2 stitches left on row, knit 1 and 1 edge stitch in garter stitch. Continue this rib back and forth for 4 cm. Change to circular needle size 6 mm. Work the next row from the right side as follows: Work A.1 over the first 16 stitches (the first 4 stitches in garter stitch = band), stocking stitch until there is 1 stitch left on row, at the same time as you decrease 10-11-11-13-14-13 stitches evenly spaced and 1 edge stitch in garter stitch = 44-46-49-53-58-62 stitches. Continue back and forth like this and repeat A.1 in height. Remember BUTTONHOLES! When the piece measures 33-34-35-36-37-38 cm, work A.2 over A.1. When A.2 has been completed in height you have decreased 6 stitches for neck. Continue this pattern and decrease in the same way until you have decreased a total of 12-12-13-13-14-14 stitches for the neck. AT THE SAME TIME when the piece measures 39-40-41-42-43-44 cm, cast off 1-1-1-3-4-4 stitches for armhole on the next row from the side. When all decreases for neck and armhole are finished there are 31-33-35-37-40-44 stitches on the needle. Continue with A.3 over the outermost 7 stitches towards the neck, stocking stitch and 1 edge stitch in garter stitch towards the armhole until the armhole measures 15-16-17-18-19-20 cm – adjust to match the back piece. Cast off. The piece measures approx. 54-56-58-60-62-64 cm from the shoulder down. LEFT FRONT PIECE: Cast on 54-57-60-66-72-75 stitches (including 1 edge stitch in side and 4 band stitches towards mid front) with circular needle size 5 mm and Air. Purl 1 row from the wrong side. Then work rib as follows: 1 edge stitch in garter stitch, (knit 1, purl 2) until there are 5 stitches left on row, knit 1 and 4 band stitches in garter stitch. Continue this rib back and forth for 4 cm. Change to circular needle size 6 mm. Work the next row from the right side as follows: 1 edge stitch in garter stitch, stocking stitch until there are 16 stitches left at the same time as you decrease 10-11-11-13-14-13 stitches evenly spaced and then A.4 over the last 16 stitches (the last 4 stitches in garter stitch = band) = 44-46-49-53-58-62 stitches. Continue back and forth like this and repeat A.4 in height. When the piece measures 33-34-35-36-37-38 cm, work A.5 over A.4. When A.5 has been completed in height you have decreased 6 stitches for neck. Continue this pattern and decrease in the same way until you have decreased a total of 12-12-13-13-14-14 stitches for neck. AT THE SAME TIME when the piece measures 39-40-41-42-43-44 cm, cast off 1-1-1-3-4-4 stitches for armhole on the next row from the side. When all decreases for neck and armhole are finished there are 31-33-35-37-40-44 stitches on the needle. Continue with 1 edge stitch in garter stitch, stocking stitch and A.6 over the outermost 7 stitches towards the neck until the armhole measures 15-16-17-18-19-20 cm – adjust to match the right front piece and back piece. Cast off. The piece measures approx. 54-56-58-60-62-64 cm from the shoulder down. SLEEVE: The sleeve is worked in the round with double pointed needles. Cast on 42-42-45-48-48-51 stitches with double pointed needles size 5 mm. Knit 1 round 1. Then work rib (knit 1, purl 2) for 4 cm. Change to double pointed needles size 6 mm. The next round is worked as follows: Knit 2, work A.7 over the next 2 stitches, knit to end of round at the same time as you decrease 9-8-8-10-9-11 stitches evenly spaced = 33-34-37-38-39-40 stitches. Continue in the round with stocking stitch and A.7 mid under sleeve. AT THE SAME TIME when the piece measures 8-9-9-9-8-8 cm, increase 1 stitch on each side of A.7 – read INCREASE TIP. Increase in the different sizes as follows: Size S: Increase alternately every 6 and 7 cm a total of 6 times. Size M: Increase every 5 cm a total of 7 times. Size L: Increase every 5 cm a total of 7 times. Size XL: Increase every 4 cm a total of 8 times. Size XXL: Increase alternately every 3 and 4 cm a total of 9 times. Size XXXL: Increase every 3 cm a total of 10 times. When all the increases are finished there are 45-48-51-54-57-60 stitches on the needles. Then continue in the different sizes as follows: Sizes S, M and L Continue working until the piece measures 47-47-46 cm (shorter measurements in larger sizes due to wider shoulders). Cast off. Work the other sleeve in the same way. Sizes XL, XXL and XXXL: Continue working until the piece measures 44-41-39 cm (shorter measurements in larger sizes due to wider shoulders). Finish the round in the middle of diagram A.7 (= mid under sleeve). Now continue back and forth with stocking stitch over all stitches, so that you can sew the sleeve to the armhole. When you have worked back and forth with stocking stitch for 2-3-3 cm, the sleeve measures a total of 46-44-42 cm. Cast off. Work the other sleeve in the same way. ASSEMBLY: Sew shoulder seams with grafting stitches inside the cast off edge. Sew sleeves to body. Sew side seams inside the 1 edge stitch in garter stitch on each side. Sew buttons to left band. |
||||||||||||||||
Diagram explanations |
||||||||||||||||
|
||||||||||||||||
 |
||||||||||||||||
 |
||||||||||||||||
 |
||||||||||||||||
Have you finished this pattern?Tag your pictures with #dropspattern #robinsongjacket or submit them to the #dropsfan gallery. Do you need help with this pattern?You'll find 27 tutorial videos, a Comments/Questions area and more by visiting the pattern on garnstudio.com. © 1982-2026 DROPS Design A/S. We reserve all rights. This document, including all its sub-sections, has copyrights. Read more about what you can do with our patterns at the bottom of each pattern on our site. |
||||||||||||||||


With over 40 years in knitting and crochet design, DROPS Design offers one of the most extensive collections of free patterns on the internet - translated to 17 languages. As of today we count 324 catalogues and 12290 patterns translated into English (UK/cm). 12290
We work hard to bring you the best knitting and crochet have to offer, inspiration and advice as well as great quality yarns at incredible prices! Would you like to use our patterns for other than personal use? You can read what you are allowed to do in the Copyright text at the bottom of all our patterns. Happy crafting!
Post a comment to pattern DROPS 202-26
We would love to hear what you have to say about this pattern!
If you want to leave a question, please make sure you select the correct category in the form below, to speed up the answering process. Required fields are marked *.