
Popular categories
Looking for a yarn?


Comments / Questions (40)
![]() Kat wrote:
Kat wrote:
Tulisiko tässä ohjeessa olla sama korjaus kuin Clover 196-4 paidassa eli, jos tekee paitaan korotetun niskan?
03.06.2025 - 19:01
![]() Wanda wrote:
Wanda wrote:
Bonjour, Le dos se tricote-t-il en jersey ou aussi en points ajourés ? D'après les explications, il semblerait que ce soit plutôt en jersey, mais cela ne me semble pas très clair. Merci beaucoup
07.03.2024 - 16:21DROPS Design answered:
Bonjour Wanda, tout à fait, vous avez bien compris, le dos se tricote en jersey, pas en point ajouré. Bon tricot!
08.03.2024 - 08:03
![]() Herta wrote:
Herta wrote:
Hallo, ich möchte gerne diesen Pullover stricken, aber ich habe ein Problem mit der Anzahl der Maschen für die Halsblende. Ich verwende das Garn Drops Air zweifädig und mit der angegebenen Nadelstärke von 7 ist die Maschenprobe nicht richtig. Mit Nadelstärke 8 funktioniert die Probe besser, aber wenn ich nun die Halsblende mit 50 Maschen (laut Anleitung für Größe S) anschlage ist die Halsöffnung deutlich zu eng um einen Kopf durchstecken zu können. Wo ist hier mein Denkfehler?
17.11.2023 - 11:11DROPS Design answered:
Liebe Herta, sollte Ihre Maschenprobe stimmen, dann sollte die Maschenanzahl anpassen, ca 42 cm (mit Maschenprobe 12 M für 10 mit Ndln Nr 7) passen ganz schön um den Hals, sollte aber die Anschlagskante etwas zu eng sein, dann benutzen Sie am besten grösseren Nadeln, damit sie etwas locker und elastisch wird. Viel Spaß beim stricken!
17.11.2023 - 14:52
![]() K Goodin wrote:
K Goodin wrote:
Lovely...merci!..from Colorado
04.02.2022 - 20:11
![]() AUDRAIN wrote:
AUDRAIN wrote:
Bonjour, je mesure 1.70m et suis mince, ma taille est entre 36 et 38, combien de pelotes je dois commander svp?merci
30.09.2021 - 10:44DROPS Design answered:
Bonjour Mme Audrain, mesurez un pull similaire que vous avez et dont vous aimez la forme et comparez ces mesures à celles du schéma, c'est la méthode la plus simple pour trouver sa taille. Retrouvez plus d'infos ici. Bon tricot!
01.10.2021 - 07:27
![]() Debora wrote:
Debora wrote:
Buongiorno, vorrei sapere perchè, una volta finito di lavorare l'alzata, il giro poi non comincia al centro dietro ma spostato di lato. Grazie mille!
13.03.2020 - 14:39DROPS Design answered:
Buongiorno Debora. Dopo l’alzata, l’inizio del giro viene spostato nel passaggio tra la manica e il dietro per rendere meno evidente il cambio del giro. Buon lavoro !
14.03.2020 - 10:50
![]() Line wrote:
Line wrote:
Jeg har lige strikket en str S til min datter og havde ingen problemer hverken med str eller med opskriften, den passer helt perfekt. Nu skal jeg igang med en str M til mig selv.
05.01.2020 - 23:08
![]() Annette wrote:
Annette wrote:
Der er fejl i maskeantallet, når ærmer skal skilles ud fra hele sættet. Maskerne stemmer med udtagninger i raglan, men når der skal strikke ærme for sig og krop for sig, stemmer maskerne ikke!
15.12.2019 - 18:26
![]() Calina wrote:
Calina wrote:
Jeg er gået i gang med denne trøje. Udtagningerne på ærmerne driller mig, da ærmet skal strikkes i perlestrik og en udtagning på ærmet skal jo strikkes drejet ret. På den måde vil det jo ikke passe med perlestrikken. Hvad skal jeg gøre?
05.03.2019 - 09:48DROPS Design answered:
Hei Calina. Kastene på ermene strikkes vridd rett eller vridd vrang slik at det passer med perlestrikken. God fornøyelse
12.03.2019 - 14:42
![]() Mia Merethe wrote:
Mia Merethe wrote:
Jeg lurer på etter økningen til raglan står det at jeg skal strikke videre etter mønster A2, Men på mønster er det kun en maske på starten jeg har 5 etter økningen. Skal jeg fortsette med de 5 eller hvordan gjøres det? På forhånd takk :)
03.03.2019 - 20:36DROPS Design answered:
Hei Mia. Du begynner å strikke A.2 før økningene til raglan er ferdig: Når A.1 er strikket ferdig i høyden gjenstår det 2-4-5-6-3-5 økninger til raglan. Du strikker A.2 over de samme maskene som du striket A.1, og de økte maskene strikkes fortløpende i glattstrikk på hver side av A.2. God fornøyelse
04.03.2019 - 15:00
|
||||||||||||||||
Miss Moss#missmosssweater |
||||||||||||||||
 |
 |
|||||||||||||||
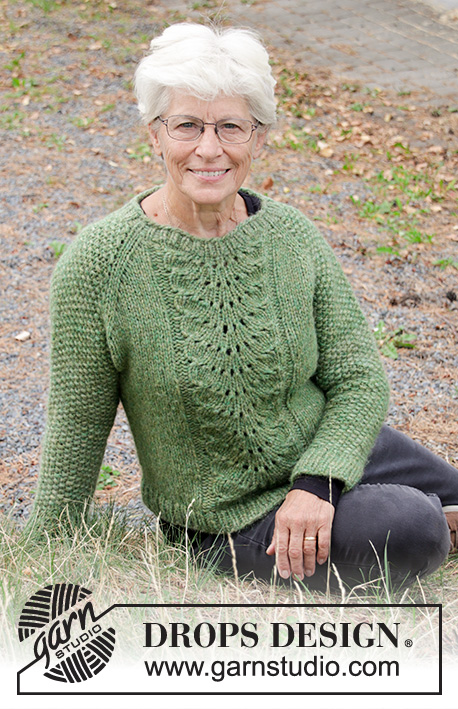
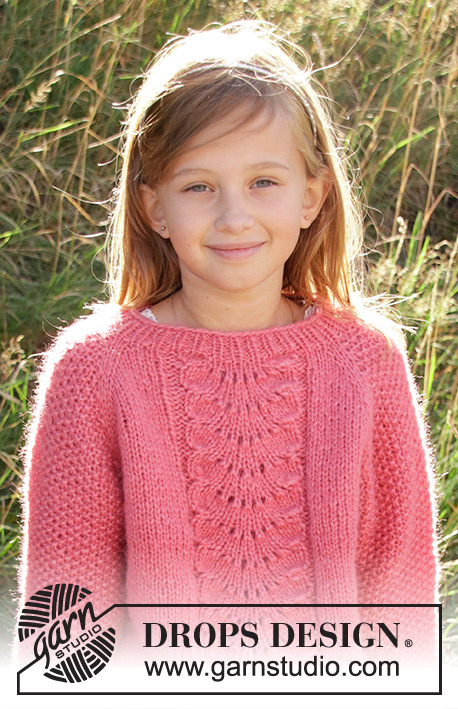
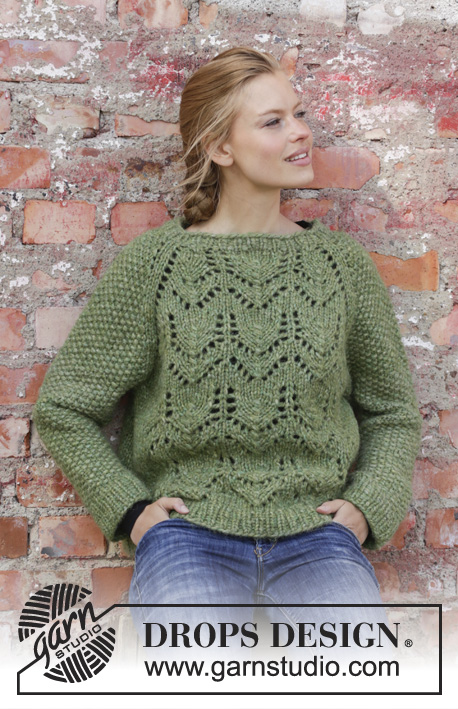
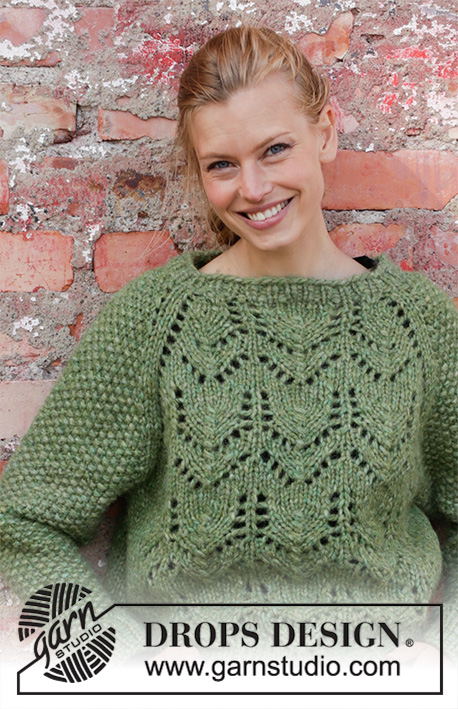
Knitted jumper with raglan in 2 strands DROPS Air. The piece is worked top down with lace pattern and moss stitch. Sizes S - XXXL.
DROPS 196-1 |
||||||||||||||||
|
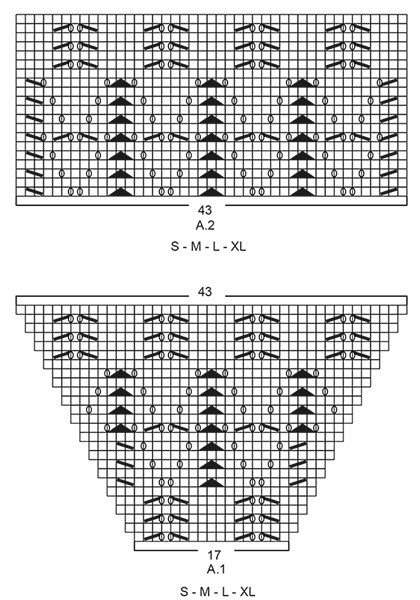
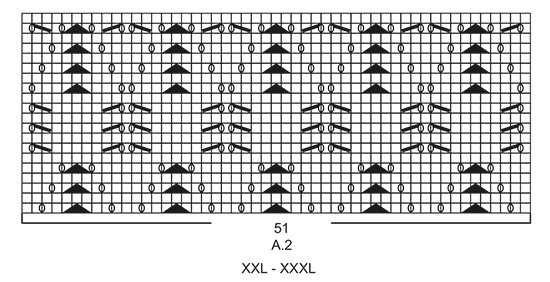
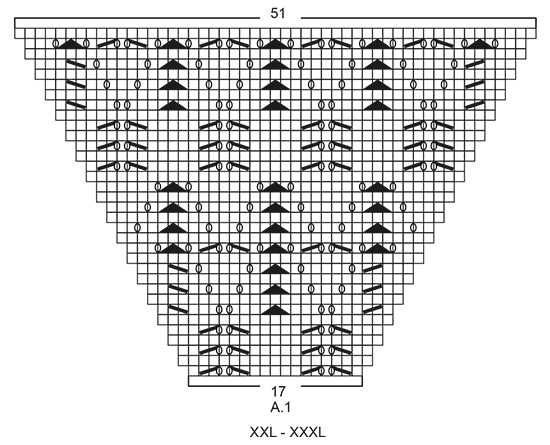
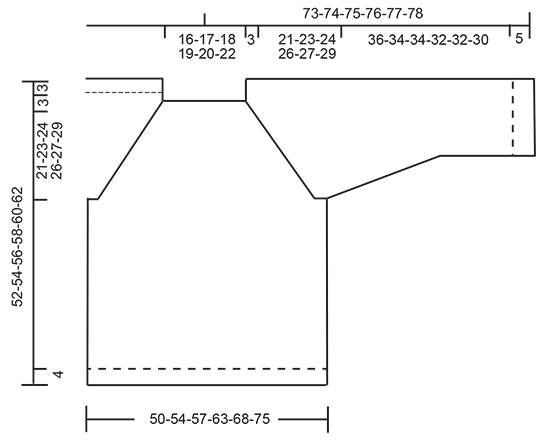
EXPLANATIONS FOR THE PATTERN: ------------------------------------------------------- INCREASE/DECREASE TIP (evenly spaced): To work out how to increase/decrease evenly, count the total number of stitches on the needle (e.g. 50 stitches) and divide by the number of increases/decreases to be made (e.g. 6) = 8.3. In this example, increase by making 1 yarn over after approximately each 8th stitch. On the next round work the yarn overs twisted to avoid holes. When decreasing, in this example, knit each 7th and 8th stitch together (approx.). MOSS STITCH: ROUND 1: * Knit 1, purl 1 *, work from *-*. ROUND 2: Knit over purl and purl over knit. Repeat round 2. PATTERN: See diagrams A.1 and A.2. Choose diagram for your size. RAGLAN: Increase 1 stitch on each side of the 2 knitted stitches in each transition between body and sleeves (= 8 stitches increased on round). Increase 1 stitch by making 1 yarn over. On the next round knit the yarn overs twisted (= no holes), apart from on the front piece where you knit the yarn overs (= holes). Then work the new stitches into the pattern (i.e. in moss stitch on the sleeves, stocking stitch on the back piece and pattern/stocking stitch on the front piece. DECREASE TIP (for sleeves): Decrease 1 stitch on each side of the marker thread as follows: Work until there is 1 stitch left before the marker thread, knit 3 together = 1 stitch (move marker thread to before this stitch). ------------------------------------------------------- START THE PIECE HERE: ------------------------------------------------------- JUMPER - SHORT OVERVIEW OF THE PIECE: The piece is worked in the round with circular needle, top down. You can work an elevation in the back of the neck for a better fit, so that the yoke is slightly higher at the back. This elevation can be left out; the neck is then the same front and back – read description of elevation further down the text. After the yoke the body is worked in the round with circular needle. The sleeves are worked in the round with short circular needle/double pointed needles. NECK: Cast on 50-50-52-56-58-60 stitches with circular needle size 7 mm and 2 strands Air. Knit 1 round. Then work rib (= knit 1 / purl 1) for 3 cm. Knit 1 round where you increase 6-6-8-4-6-0 stitches evenly on round – read INCREASE/DECREASE TIP = 56-56-60-60-64-60 stitches. Change to circular needle size 8 mm. Now you can work an elevation in the back of the neck or go straight to yoke if you do not want an elevation. ELEVATION IN BACK OF NECK: Skip this section if you do not want an elevation. Insert 1 marker at the beginning of the round (mid back). Start from the right side and knit 6-6-6-7-7-7 stitches past the marker, turn, tighten the strand and purl 12-12-12-14-14-14 stitches. Turn, tighten the strand and knit 18-18-18-21-21-21 stitches, turn, tighten the strand and purl 24-24-24-28-28-28 stitches. Turn, tighten the strand and knit 30-30-30-35-35-35 stitches, turn, tighten the strand and purl to mid back, then purl 10 stitches past the marker, turn. Start the next round (i.e. the yoke) here. YOKE: Insert 1 marker here - THE PIECE IS NOW MEASURED FROM HERE! Now insert 4 marker threads in the piece as follows (without working the stitches): Insert 1 marker thread at the beginning of the round (= in transition between sleeve and back piece), the 2nd marker thread is inserted after the next 19 stitches (= back piece), 3rd marker thread is inserted after the next 9-9-11-11-13-11 stitches (= sleeve) and 4th marker thread is inserted after the next 19 stitches (= front piece). There are 9-9-11-11-13-11 stitches left to the first marker thread (= sleeve). The next round is worked as follows: The round starts at the first marker thread, in the transition between sleeve and back piece. Knit 1, make 1 yarn over, work 17 stitches in stocking stitch (= back piece), make 1 yarn over, knit 2 (the marker thread sits in the middle of these 2 stitches), make 1 yarn over, work 7-7-9-9-11-9 stitches MOSS STITCH – read description above (= sleeve), make 1 yarn over, knit 2 (the marker thread sits in the middle of these 2 stitches), make 1 yarn over, work A.1 (= 17 stitches - choose diagram for your size = front piece), make 1 yarn over, knit 2 (the marker thread sits in the middle of these 2 stitches), make 1 yarn over, work 7-7-9-9-11-9 stitches in moss stitch (= sleeve), make 1 yarn over, knit 1. The first increase to RAGLAN – read description above, is now finished (= 8 stitches increased on the round). Continue this pattern and increase to raglan every 2nd round a total of 15-17-18-19-20-22 times (including the first round described above). NOTE: When A.1 has been completed in height, there are still 2-4-5-6-3-5 increases to raglan left. Then work A.2 (= 43-43-43-43-51-51 stitches) over A.1, the last increases are worked in stocking stitch on each side of A.2 as you go. Repeat diagram A.2 in height to finished length. REMEMBER THE KNITTING TENSION! After the last increase to raglan there are 176-192-204-212-224-236 stitches on the needle. Continue with pattern as before, without increases, until the piece measures 21-23-24-26-27-29 cm from the marker at the beginning of the yoke. The next round is worked as follows: Work 50-54-57-60-63-68 stitches in stocking stitch (= on back piece), place the next 37-41-43-43-45-45 stitches on 1 thread for sleeve, cast on 4-4-4-6-8-10 new stitches on the needle (= in side under sleeve), work 4-6-8-10-8-11 stitches in stocking stitch, continue A.2 (= 43-43-43-43-51-51 stitches) and work 4-6-8-10-8-11 stitches in stocking stitch (= front piece), place the next 37-41-43-43-45-45 stitches on 1 thread for sleeve, cast on 4-4-4-6-8-10 new stitches on the needle (= in side under sleeve), work the last 1-1-2-3-4-5 stitches (= on back piece). Body and sleeves are finished separately. THE PIECE IS NOW MEASURED FROM HERE! BODY: = 110-118-126-138-150-166 stitches. Insert a marker thread in the middle of the 4-4-4-6-8-10 new stitches cast on under the sleeve in each side. Start the round by one of the marker threads and allow the marker threads to follow your work onwards. Continue with stocking stitch and pattern A.2. When the piece measures 24-24-25-25-26-26 cm from the division (approx. 48-50-52-54-56-58 cm from the shoulder) knit 1 round where you increase 16-18-18-20-22-24 stitches evenly on round = 126-136-144-158-172-190 stitches. Change to circular needle size 7 mm and work rib (= knit 1 / purl 1) for 4 cm. Cast off with knit over knit and purl over purl – to avoid the cast-off edge being tight, you can cast off with a needle size 8 mm. The jumper measures approx. 52-54-56-58-60-62 cm from the shoulder. SLEEVE: Place the 37-41-43-43-45-45 stitches from the thread on the one side of the piece on short circular needle/double pointed needles size 8 mm and knit up 1 stitch in each of the 4-4-4-6-8-10 stitches cast on under the sleeve = 41-45-47-49-53-55 stitches. Insert 1 marker thread in the middle of the 4-4-4-6-8-10 stitches under the sleeve and start the round here. Work moss stitch. When the piece measures 2 cm from the division, decrease 2 stitches mid under sleeve - read DECREASE TIP. Decrease like this every 4-3½-2½-3-2-2 cm a total of 7-8-9-9-11-11 times = 27-29-29-31-31-33 stitches. Continue working until the piece measures 36-34-34-32-32-30 cm from the division (shorter measurements in larger sizes due to longer yoke). Knit 1 round where you increase 5 stitches evenly on round = 32-34-34-36-36-38 stitches. Change to double pointed needles size 7 mm and work rib (=knit 1/ purl 1) for 5 cm. The sleeve measures approx. 41-39-39-37-37-35 from the division. Cast off with knit over knit and purl over purl - to avoid the cast-off edge being tight, you can cast off with a needle size 8 mm. Work the other sleeve in the same way. |
||||||||||||||||
Diagram explanations |
||||||||||||||||
|
||||||||||||||||
 |
||||||||||||||||
 |
||||||||||||||||
 |
||||||||||||||||
 |
||||||||||||||||
Have you finished this pattern?Tag your pictures with #dropspattern #missmosssweater or submit them to the #dropsfan gallery. Do you need help with this pattern?You'll find 33 tutorial videos, a Comments/Questions area and more by visiting the pattern on garnstudio.com. © 1982-2026 DROPS Design A/S. We reserve all rights. This document, including all its sub-sections, has copyrights. Read more about what you can do with our patterns at the bottom of each pattern on our site. |
||||||||||||||||


With over 40 years in knitting and crochet design, DROPS Design offers one of the most extensive collections of free patterns on the internet - translated to 17 languages. As of today we count 324 catalogues and 12290 patterns translated into English (UK/cm). 12290
We work hard to bring you the best knitting and crochet have to offer, inspiration and advice as well as great quality yarns at incredible prices! Would you like to use our patterns for other than personal use? You can read what you are allowed to do in the Copyright text at the bottom of all our patterns. Happy crafting!
Post a comment to pattern DROPS 196-1
We would love to hear what you have to say about this pattern!
If you want to leave a question, please make sure you select the correct category in the form below, to speed up the answering process. Required fields are marked *.