
Popular categories
Looking for a yarn?


Comments / Questions (82)
![]() Christiane Zeidler wrote:
Christiane Zeidler wrote:
Die Zunahme A1 der Passe irritiert mich bisserl... Ich stricke 3Mre dann 1U dann 2x 3re, 3re, 1U, 2x3re....usw. In der nächsten Runde stricke ich die Umschläge wie ab? Ich lede das Muster A1 doch von rechts nach links? Oder. Dann müsste ich die Umschläge doch links (verschränkt) stricken? Bin etwas ratlos Danke für eure Hilfe
23.01.2021 - 19:39DROPS Design answered:
Liebe Frau Zeidler, die Zunahmen werden in krausrippen gestrickt (= wie die 3 ersten Maschen in A.1), dh wenn Sie bei einer Runde mit nur rechten Maschen zunehmen, dann werden die Umschläge links verschränkt gestrickt. Viel Spaß beim stricken!
25.01.2021 - 09:02
![]() Ulla-charlotte Roi wrote:
Ulla-charlotte Roi wrote:
Jeg skal til 2 udtagning på bærestykket . Har 160 masker på p , men så passer de 3x3 = 9 masker ikke . Det går jo ikke op ?? Har prøvet mange gange nu , og ender hver gang med at have øget med 17 masker . Vh Lotte
16.09.2020 - 16:58DROPS Design answered:
Hei Ulla-Charlotte. Når du har strikket A.1 1 gang i høyden og økt med 16 masker har du 16 rapporter av A.1 med 4 masker og 32 rapporter av A.1 med 3 masker. Når du skal øke 2. gang, strikker du 1 rapport av A.1 (4 masker), deretter 1 rapport der det økes, deretter 2 rapporter uten økning (= 1 rapport av A.1 med 3 masker og 1 rapport av A.4 med 4 masker), og så 1 rapport med økning osv. Så det skal ikke gå opp med 3x3=9 masker på hver omgang. Les siste linje i Øketips-1 i oppskriften. Etter 3. økningen vil A.1 bestå av 4 masker i hver rapport. God Fornøyelse!
21.09.2020 - 09:32
![]() Kylie wrote:
Kylie wrote:
I won't be beaten by this pattern. Lol. Is this correct for yoke increases? Inc 1 =KK inc K KKK KKK Inc 2= KKK KKK inc KKK Inc 3= KKK KKK KK inc K
04.09.2020 - 13:08DROPS Design answered:
Dear Kylie, in your description you keep 3 sts ine ach A.1 while each increased A.1 should become 4 = 1st inc = A.1 (= 4 sts) A.1 (= 3 sts) x 2 -2nd inc= A. (= 4 sts) x 2, A.1 (= 3 sts) - after 3rd inc: A.1 (= 4 sts) x 3 ) all A.1 are 4 sts. Then start again with A.1 = (5 sts) + A.1 (= 4 sts) x 2, then A.1 (= 5 sts) x 2 + A.1 (= 4 sts), and finally all A.1 (= 5 sts); hope this will help. Happy knitting!
04.09.2020 - 13:33
![]() Kylie wrote:
Kylie wrote:
Hi there, Thank you for your help again I still can't understand where the increases are in the yoke. Could you please write each increase row in long format. For example, is this correct? Increase 1 Row 1 =KKKyo, KKK, KKK KKKyo Row 2= PPK repeat Row 3 = K repeat Row 4 = PPK repeat Increase 2 Row 1 = KKK, KKKyo, KKK, KKK, KKKyo Increase 3 Row 1 = KKK, KKK, KKKyo, KKK, KKK Many thanks. Kylie
02.09.2020 - 12:45DROPS Design answered:
Dear Kylie, 1st inc = *incease 1 stitch in first A.1 (= before the K stitch in first A.1), work A.1 over 3 sts a total of 2 times in width *, you will then have on next round: *(A.1 = 4 sts = 3 sts in garter st, 1 st in stocking st), (A.1 = 3 sts = 2 sts in garter st, 1 st in stocking st)x2* repeat from *-*. 2nd increase: (A.1 = 4 sts, A1 = 3 sts increasing at the beg of A.1, A.1 = over 3 sts) = you have now 2 repeats with 4 sts each (= 3 sts in garter st, 1 st in stocking st), 1 repeat with 3 sts, on 3rd increase, all A.1 will have 4 sts each. Repeat this the number of sts required for your size. Happy knitting!
02.09.2020 - 13:23
![]() Kylie wrote:
Kylie wrote:
Sorry, I have another question please 4. Do you read A1 from Right to Left? Many thanks, Kylie:)
01.09.2020 - 15:32DROPS Design answered:
Dear Kylie, A.1 will be read every round from the right towards the left - read more about diagrams here. Happy knitting!
01.09.2020 - 15:50
![]() Kylie wrote:
Kylie wrote:
Hi there, please can you explain 1. How do you keep the vertical yoke lines in alignment if you are increasing. Ie. K1P2 doesn't work with increases. 2. How does A1 work with increases. Ie. Do you increase every 3rd stitch every time? 3. For increase1 of yoke do you start with row 1 of A1 or row 4 of A1? Thanks heaps :)
01.09.2020 - 15:17DROPS Design answered:
Dear Kylie, you will increase as explained under 1st, 2nd, 3rd INCREASE this means you will increaes alternately in every other sections worked in garter stitch = first after the 3rd stitch in A.1 (= stitch in stocing stitch) then on next increase before this stitch (the 3rd stitch in A.1 should be always worked in stocking stitch). The number of stitches worked in garter stitch in A.1 / on either side of the stitch in stocking stitch will by and by increase. Happy knitting!
01.09.2020 - 15:50
![]() Birgit Larsen wrote:
Birgit Larsen wrote:
Jeg klarer ikke å få med meg økningene. Har lest kommentarer om dette men blir ikke klokere. Skal økningene gjøres i omgangene som har en rett to vrang? Og når det står rille trodde jeg det er en omgang rett og en omgang vrang? Tror jeg må gi opp😢 Hva er en rapport?
24.03.2020 - 12:56DROPS Design answered:
Hej Birgit, når du starter består rapporten af de 3 masker du ser i diagrammet. Du øger på hver 4. pind. Du øger efter de 2 masker retstrik i første rapport, så i 4.rapport, så i 7.rapport osv i hver 3. hele omgangen rundt. Når du så har strikket 3 pinde mere, øger du igen på 4. omgang men nu øger du i 2.rapport, 5.rapport, 8.rapport osv. Således fortsætter du hele omgangen rundt. God fornøjelse!
25.03.2020 - 13:46
![]() Birgit Larsen wrote:
Birgit Larsen wrote:
Diagram A.1 består det av en omgang med bare rett hver 3. Omgang? Starter det med første omgang rett andre omgang rett, vrang , rett, vrang og tredje omgang samme som omgang to?
23.03.2020 - 19:37DROPS Design answered:
Hei Birgit, A.1 består av annenhver omgang rett og annenhver omgang 2 vrang, 1 rett, 2 vrang, 1 rett osv. Diagrammet leses fra høyre til venstre og fra bunn oppover. God fornøyelse!
24.03.2020 - 07:37
![]() Malene Grove wrote:
Malene Grove wrote:
Hej Hvor finder jeg diagrammet? Synes ikke jeg kan se det nogen steder, men måske det bare er mig.
15.01.2020 - 14:53DROPS Design answered:
Hej Malene, Diagrammet er nederst i opskriften til højre for måleskitsen. God fornøjelse!
15.01.2020 - 15:05
![]() Frauke wrote:
Frauke wrote:
Guten Tag! Ich möchte den Pullover gerne stricken. In der Anleitung ist die Rede von dem Diagram A1 für die Musterpasse. Leider kann ich das Diagramm nirgens finden. Wo hat es sich wohl versteckt? Vielen Dank & Gruß Frauke
10.12.2019 - 17:54
|
||||||||||
Tornade#tornadesweater |
||||||||||
|
|
||||||||||
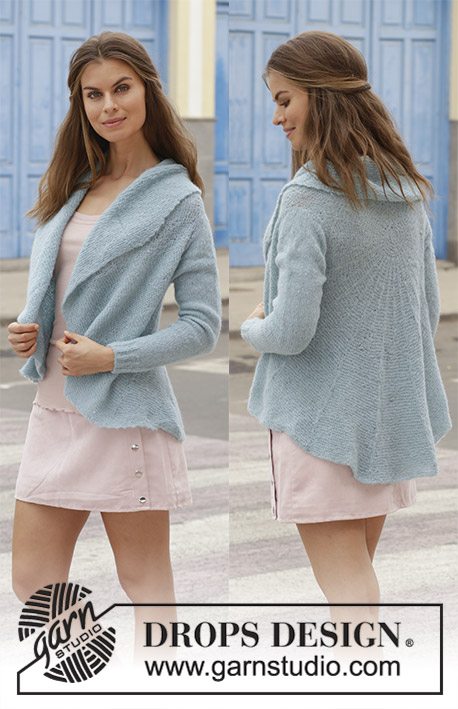
Knitted jumper with garter stitch and round yoke, worked top down. Sizes S - XXXL. The piece is worked in DROPS Brushed Alpaca Silk.
DROPS 188-1 |
||||||||||
|
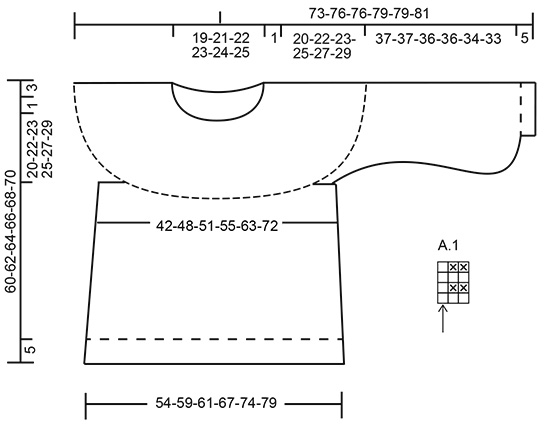
INFORMATION FOR THE PATTERN: RIDGE/GARTER STITCH (worked in the round): 1 ridge = 2 rounds. Knit 1 round and purl 1 round. PATTERN: See diagram A.1. INCREASE TIP-1 (for round yoke): Increase stitches alternately before and after the last knitted stitch in A.1 – See arrow in diagram. i.e. the first increase is after the last knitted stitch and the second is increased before the last knitted stitch. Increase as follows: Make 1 yarn over between 2 stitches, the yarn over is worked twisted on the next round. Then the increased stitch is worked in garter stitch. In other words for each increased stitch, there will be 1 more stitch in garter stitch in the A.1 you are increasing in. INCREASE TIP-2 (for increases in sides of body and sleeves): Work until there are 2 stitches left before the marker thread, make 1 yarn over, knit 4 stitches (the marker thread sits in the middle of these stitches), make 1 yarn over (= 2 stitches increased). Increase like this at each marker thread. The yarn overs are worked twisted on the next round to avoid holes. DECREASE TIP (for sleeves): Work until there are 3 stitches left before the marker thread, slip 1 stitch as if to knit, knit 1, pass the slipped stitch over the knitted stitch, knit 2 stitches (the marker thread sits in the middle of these stitches), knit the next 2 stitches together (= 2 stitches decreased). ---------------------------------------------------------- JUMPER: The piece is worked in the round, top down. The yoke is worked in the round, then the piece is divided and the sleeves and body are then worked separately in the round. YOKE: Cast on 84-88-94-98-102-104 stitches with circular needle size 4 mm. Work 2 RIDGES – see description above. The round starts mid back. The next round is worked as follows: Knit 16-17-18-19-20-21 stitches and increase 3-4-3-4-3-5 stitches evenly over these stitches (= half back piece), * knit 1, 1 yarn over *, work from *-* over the next 10 stitches (= sleeve = 10 stitches increased), knit 32-34-37-39-41-42 stitches and increase 6-9-6-8-6-10 stitches evenly over these stitches (= front piece), * knit 1, 1 yarn over *, work from *-* over the next 10 stitches (= sleeve = 10 stitches increased), knit 16-17-19-20-21-21 stitches and increase 4-5-3-5-4-5 stitches evenly over these stitches (= half back piece) = 117-126-126-135-135-144 stitches. Change to circular needle size 5 mm. Then work A.1 (= 3 stitches) over all stitches (= 39-42-42-45-45-48 times in width), work the yarn overs twisted to avoid holes. AT THE SAME TIME increase as follows: ROUND YOKE: Increase alternately in every 3rd repeat of A.1 in width every 4th round, i.e. as follows: 1st INCREASE: * Increase 1 stitch – read INCREASE TIP-1, in the first A.1, then work 2 repeats of A.1 in width as before *, work from *-* to end of round = 13-14-14-15-15-16 stitches increased. Work 3 rounds of pattern. REMEMBER THE KNITTING TENSION! 2nd INCREASE: * Work 1 repeat of A.1 as before, increase 1 stitch in the next A.1, work the next repeat of A.1 as before *, work from *-* to end of round = 13-14-14-15-15-16 stitches increased. Work 3 rounds of pattern. 3rd INCREASE: * Work 2 repeats of A.1 as before, increase 1 stitch in the next A.1 *, work from *-* to end of round = 13-14-14-15-15-16 stitches increased. Work 3 rounds of pattern. Repeat 1st to 3rd increase a total of 3-3-3-3-4-4 times (= a total of 9-9-9-9-12-12 increase rounds), then repeat 1st increase, 0-1-1-1-1-1 more time (= a total of 9-10-10-10-13-13 increase rounds), then repeat 2nd increase, 0-0-1-1-0-1 more time (= a total of 9-10-11-11-13-14 increase rounds) = 234-266-280-300-330-368 stitches. Continue with pattern until the piece measures 21-23-24-26-28-30 cm from the cast-on edge. The next round is worked as follows: Knit 31-36-38-42-47-55 stitches (= half the back piece), place the next 54-60-64-66-70-74 stitches on 1 thread (= sleeve), cast on 8-8-10-10-12-12 new stitches on needle, insert 1 marker thread in the middle of these stitches (= in side under sleeve), knit the next 63-73-76-84-95-110 stitches (= front piece), place the next 54-60-64-66-70-74 stitches on 1 thread (= sleeve), cast on 8-8-10-10-12-12 new stitches on needle, insert 1 marker thread in the middle of these stitches (=in side under sleeve), knit 32-37-38-42-48-55 stitches (=half the back piece). Body and sleeves are finished separately. THE PIECE IS NOW MEASURED FROM HERE! BODY: = 142-162-172-188-214-244 stitches. Continue working stocking stitch. When the piece measures 3 cm from where the sleeves were placed on threads, increase 1 stitch on each side of the marker threads (= 4 stitches increased) – read INCREASE TIP-2! Increase like this every 2½-3-3-2½-3-5 cm a total of 10-9-9-10-9-6 times = 182-198-208-228-250-268 stitches. When the piece measures 31-31-32-32-32-32 cm from where the sleeves were placed on threads, work 1 round as before where you increase 2-2-0-0-2-0 stitches evenly on round = 184-200-208-228-252-268 stitches. Change to circular needle size 4 mm. Then work rib (purl 2 / knit 2) for 5 cm. Cast off with knit over knit and purl over purl. Make sure the cast-off edge is not tight; you can cast off with a needle 1 size larger if necessary. The piece measures approx. 36-36-37-37-37-37 cm from where the sleeves and body were separated and a total of 60-62-64-66-68-70 cm from the shoulder. SLEEVE: The piece is worked in the round with double pointed needles/short circular needle. Place the 54-60-64-66-70-74 stitches from the thread on the one side of the piece on double pointed needles size 5 mm and knit up 1 stitch in each of the 8-8-10-10-12-12 stitches cast on under the sleeve, insert 1 marker thread in the middle of these stitches = 62-68-74-76-82-86 stitches. Work stocking stitch. When the piece measures 3 cm from where the sleeve was divided from the body, decrease 1 stitch on each side of the marker thread (= 2 stitches decreased) – read DECREASE TIP! Change to short circular needles when needed. Decrease like this every 3 cm a total of 4-4-5-5-6-6 times = 54-60-64-66-70-74 stitches. Then increase 1 stitch on each side of the marker thread (= 2 stitches increased). Increase like this every 3-3-3-3-2-2 cm a total of 7-6-6-7-7-7 times = 68-72-76-80-84-88 stitches. When the piece measures 37-37-36-36-34-33 cm from where the sleeve was divided from the body, change to double pointed needles size 4 mm and work 1 round where all the stitches are knitted together 2 and 2 = 34-36-38-40-42-44 stitches. Then work rib (= purl 2 / knit 2) AT THE SAME TIME as you increase 2-0-2-0-2-0 stitches evenly on the first round = 36-36-40-40-44-44 stitches. Cast off with knit over knit and purl over purl when piece measures 42-42-41-41-39-38 cm from where the sleeve was divided from the body and a total of 63-65-65-67-67-68 cm from the neck edge. Work the other sleeve in the same way. |
||||||||||
Diagram explanations |
||||||||||
|
||||||||||
 |
||||||||||
Have you finished this pattern?Tag your pictures with #dropspattern #tornadesweater or submit them to the #dropsfan gallery. Do you need help with this pattern?You'll find 27 tutorial videos, a Comments/Questions area and more by visiting the pattern on garnstudio.com. © 1982-2026 DROPS Design A/S. We reserve all rights. This document, including all its sub-sections, has copyrights. Read more about what you can do with our patterns at the bottom of each pattern on our site. |
||||||||||


With over 40 years in knitting and crochet design, DROPS Design offers one of the most extensive collections of free patterns on the internet - translated to 17 languages. As of today we count 324 catalogues and 12290 patterns translated into English (UK/cm). 12290
We work hard to bring you the best knitting and crochet have to offer, inspiration and advice as well as great quality yarns at incredible prices! Would you like to use our patterns for other than personal use? You can read what you are allowed to do in the Copyright text at the bottom of all our patterns. Happy crafting!
Post a comment to pattern DROPS 188-1
We would love to hear what you have to say about this pattern!
If you want to leave a question, please make sure you select the correct category in the form below, to speed up the answering process. Required fields are marked *.