
Popular categories
Looking for a yarn?


Comments / Questions (61)
![]() Leontine wrote:
Leontine wrote:
Er staat geen telpatroon van de bloem bij, is het mogelijk die alsnog te plaatsen?
08.02.2015 - 10:35DROPS Design answered:
Hoi Leontine. Wij hebben hiervoor helaas geen telpatroon alleen de geschreven beschrijving in het patroon.
09.02.2015 - 14:13
![]() SMITHA wrote:
SMITHA wrote:
CAN SLEEVES BE ADDED TO THIS PATTERN,IF SO COULD U GIVE ME A PATTERN
28.08.2014 - 23:32DROPS Design answered:
Dear Smitha, if you are looking for a jacket/bolero with sleeves, there might be easier to the matching pattern with the help of our search engine. Happy crocheting!
29.08.2014 - 09:30Vasiliki Bourantoni wrote:
I have a problem with the pattern... following this , after psso i have to leave the stitch on the left needle and to knit it... this way decreases the number of stitches.. is their any advise ? is their any video for this pattern?
25.07.2013 - 10:22DROPS Design answered:
Dear Mrs Bourantoni, On Row 1 of the pattern, you slip 1 st, K the next st and pass the slipped st over the worked st, leave this st on left needle and K1 in this st, so that there is no decrease, both sts will be worked. Happy knitting!
25.07.2013 - 18:20
![]() Petra E. wrote:
Petra E. wrote:
Kann mir jemand sagen, wieviel Wolle ich für den Häkelteil und wieviel für den gestrickten Teil brauche? Hintergrund: Ich habe noch Garnreste und würde die gerne verwerten.
27.03.2013 - 10:06
![]() Marja Van Rooij wrote:
Marja Van Rooij wrote:
Wat teleurstellend dat jullie het patroon waar ik al weken mee worstel, op de site hebben aangepast (waardoor het nu wel duidelijk is), maar niet de moeite hebben genomen mij persoonlijk te informeren. Ik kwam er toevallig achter omdat ik mijn zus in Nederland gevraagd had met een printje van het patroon naar een breiwinkel te gaan. Haar printje week af van de mijne: de beschrijving was inmiddels aangepast ...
04.02.2013 - 09:02DROPS Design answered:
Het online patroon is sowieso altijd de nieuwste versie. Ik plaats alleen een correctie als het patroon in een NL boek is uitgeprint. Ik werk hier alleen met de Nederlandse patronen en ik kan me niet herinneren dat ik dit patroon recent heb aangepast. Normaal zou ik dat uiteraard ook aangeven in mijn laatste reactie naar u toe! Maar het kan natuurlijk zijn dat het in alle drukte is vergeten.
04.02.2013 - 10:27
![]() Marja Van Rooij wrote:
Marja Van Rooij wrote:
Ik woon in Griekenland en mijn Grieks is niet zo geweldig, dat naar een winkel gaan voor mij bij nader inzien wat problematisch is. Daarom zal ik mijn vraag iets concreter maken, misschien dat jullie mij dan toch kunnen helpen. Er staat bij patroon:1 st r afh, 1 r, haal de afgeh st over en laat deze op de linkernld zitten, en brei deze st nog een keer. Welke steek wordt met dat laatste ('deze st') bedoeld: de recht gebreide steek of de overgehaalde steek?
30.01.2013 - 10:02DROPS Design answered:
Als je dit hebt gedaan: 1 st r afh, 1 r, haal de afgeh st over - dan heb je maar 1 st over - laat deze op de linker nld zitten en brei hem nog een keer recht.
31.01.2013 - 16:50
![]() Marja Van Rooij wrote:
Marja Van Rooij wrote:
OK, dat zal ik doen, want ik vind het topje erg leuk en wil het toch graag maken. Hartelijk dank voor de snelle reactie.
29.01.2013 - 08:19
![]() Marja Van Rooij wrote:
Marja Van Rooij wrote:
Het lukt me niet om in patroon te breien zonder dat het breiwerk scheef wordt; afhankelijk van of ik de afgehaalde steek voor of achter insteek wordt de linker of rechterkant van het breiwerk scheef. Omdat ik het patroon kennelijk niet goed lees/begrijp, heb ik allerlei varianten geprobeerd, maar het levert steeds een scheef breiwerk op. Wat doe ik toch verkeerd?
28.01.2013 - 16:28DROPS Design answered:
Beste Marja. Ik kan helaas niet zien wat je eventueel verkeerd doet, en waarom je werk scheef wordt. Neem je de st op van dezelfde lussen op de rij vierkantjes en breit zoals beschreven zou het werk ook recht worden. Het lijkt me beter als je naar een winkel toe kan voor persoonlijke hulp of misschien bij een breigroep/café in de buurt
28.01.2013 - 21:48
![]() Catmouse wrote:
Catmouse wrote:
Danke,das hilft mir sehr weiter.Und ein Kompliment an DROPS:Eure Modelle sind alle aussergewöhnlich chic,haben das gewisse Etwas,sind ausserdem zeitlos!Bin froh dass ich Euch gefunden habe! :)
22.05.2011 - 06:58
![]() DROPS Deutsch wrote:
DROPS Deutsch wrote:
Auf beiden Seiten je 1 M. aufnehmen (4 Aufnahmen pro Runde). Man strickt das Muster mit je 2 Randm in Krausrippe.
21.05.2011 - 20:20
|
|
Beachside Garden#beachsidegardentop |
|
 |
 |
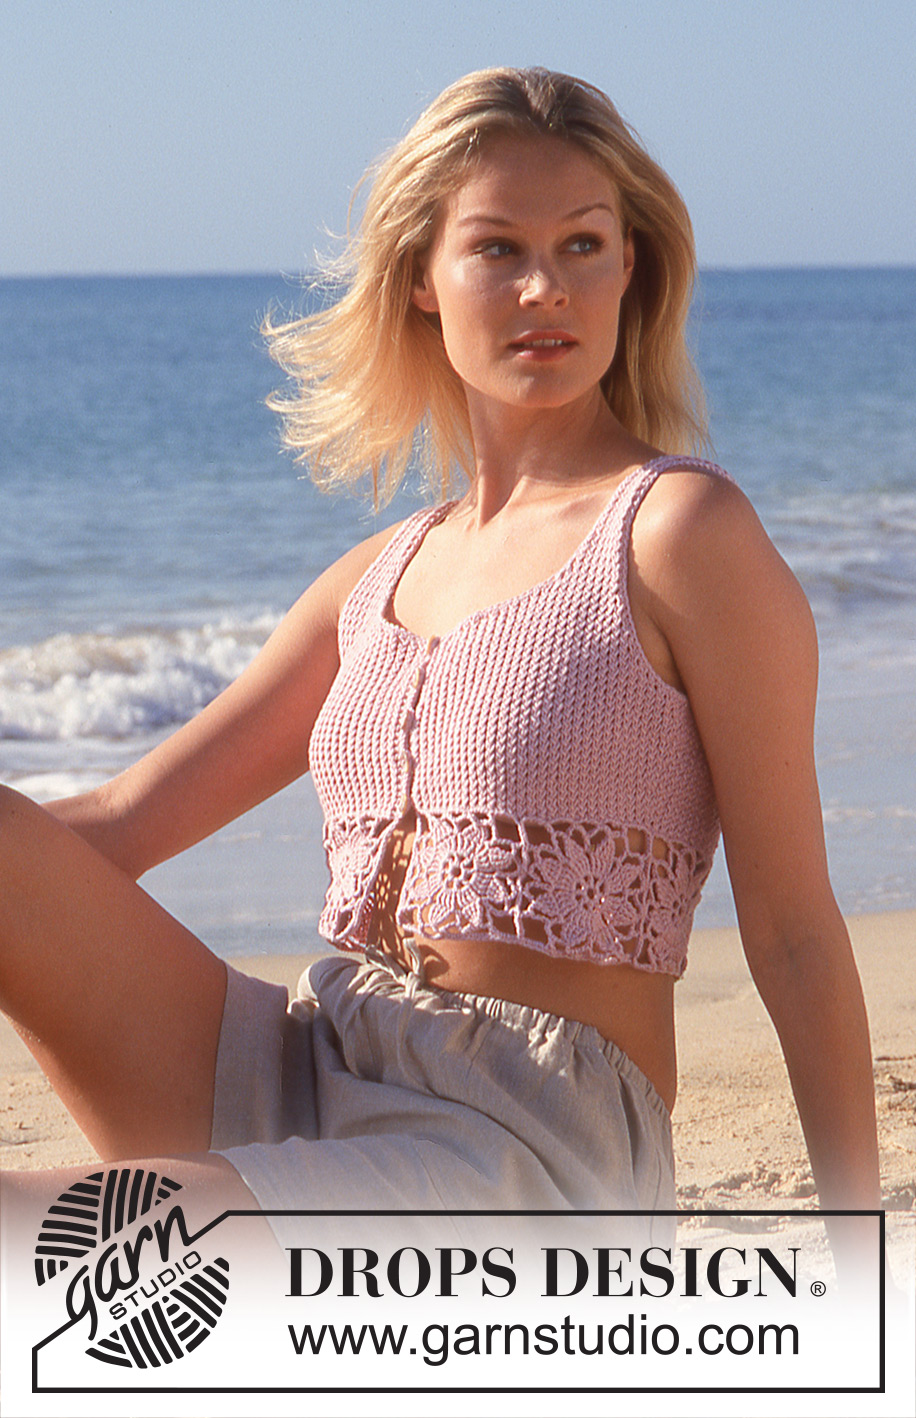
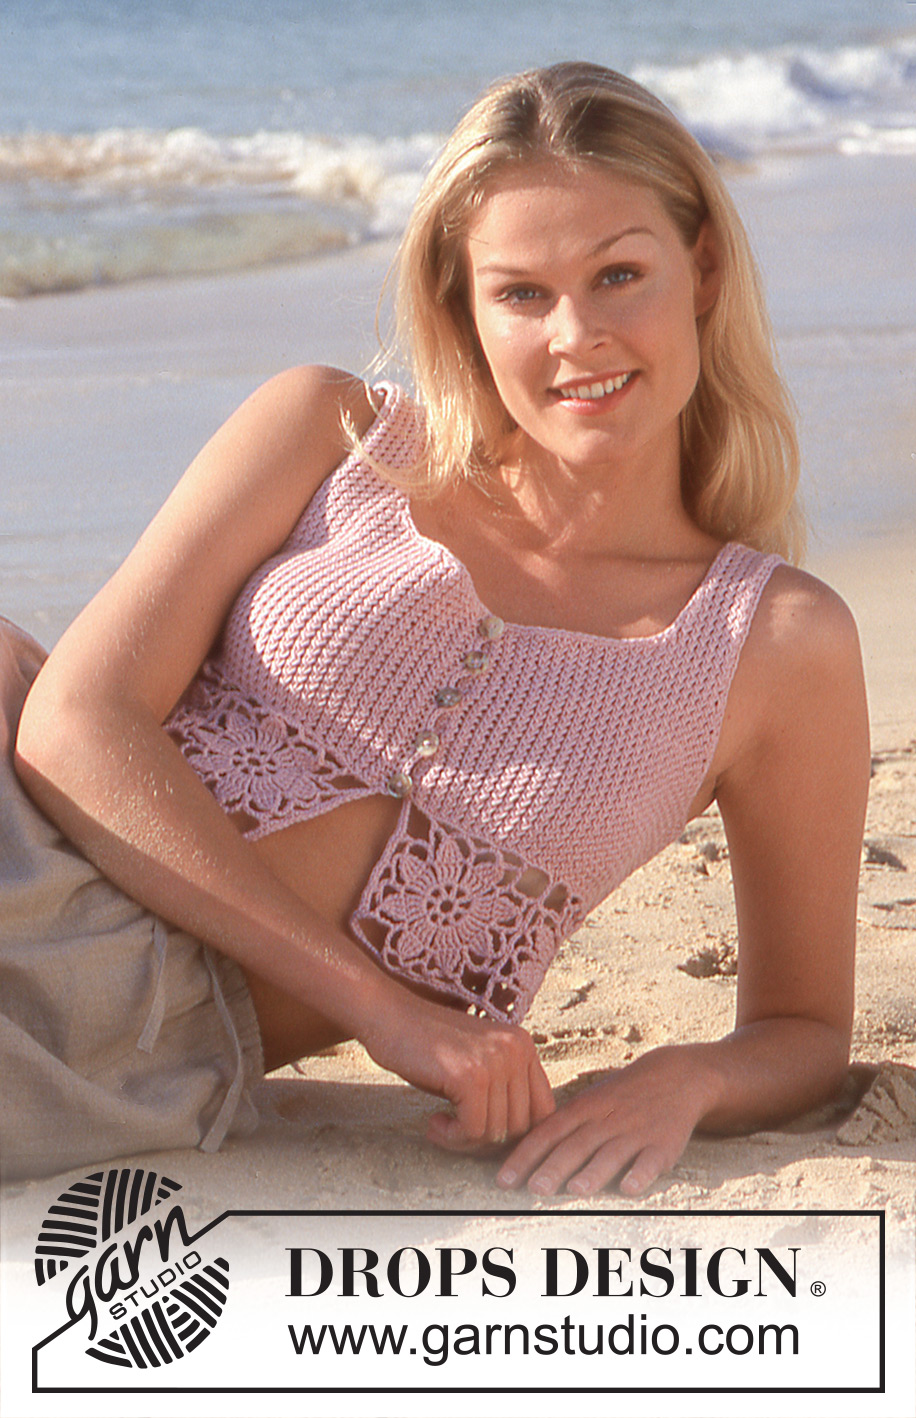
Knitted DROPS short top with crochet flower squares in Safran
DROPS 64-8 |
|
|
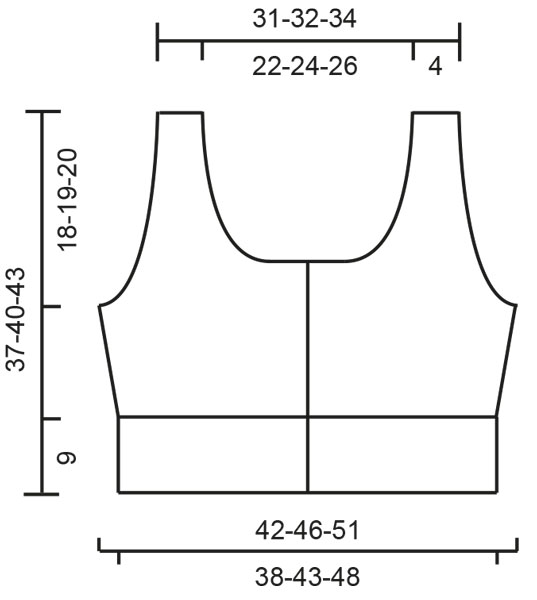
PATTERN: Pattern is divisible by 2. Row 1: * slip one st as if to K, K 1, pass the slipped st over 1 K and leave the slipped st on left needle, K the slipped st *, repeat from *-*. Row 2: K2, purl all stitches and finish with K2. Repeat 1st and 2nd row. Garter st: 1 ridge = 2 rows. Row 1: K all sts, 2nd row: K all sts. Knitting tip: All dec are done on RS of piece inside 1 edge st that is worked in garter st. Dec 2 st as follows: After 1 edge st: Slip 1 st as if to K, K 2 tog, pass slipped st over 2 K tog. Before 1 edge st: K 3 tog. Dec 1 st as follows: After 1 edge st: Slip 1 st as if to K, K 1, pass slipped st over 1 K. Before 1 edge st: K 2 tog. Crochet flower square: Work 8 ch on hook size 3.5 mm with light pink and form a ring with 1 sl st. ROW 1: * 1 tr (first tr is replaced with 3 ch) 2 ch *, repeat from *-* 8 times, finish with 1 sl st in first tr. ROW 2: * 4 dtr (first dtr is replaced with 4 ch), around ch-space, 2 ch *, repeat from *-* 8 times, finish with 1 sl st in first tr. ROW 3: * work 4 dtr tog (first dtr is replaced with 4 ch) = wait with last YO and pull through in each dtr until all dtr are worked, YO and pull YO through all sts on hook (work 1 dtr in each of the dtr from previous row), 6 ch, 1 tr around the 2 ch from previous row, 6 ch, * repeat from *-* 8 times, finish with 1 sl st in first dtr-group. ROW 4: Work sl sts until middle of ch-space, 1 ch, 1 dc around ch-space, * 5 ch, 1 dc around next ch-space, 5 ch, 1 tr around next ch-space, 10 ch, 1 tr around next ch-space (= corner), 5 ch, 1 dc around next ch-space *, repeat from *-* 3 times in total, then 5 ch, 1 dc around next ch-space, 5 ch, 1 tr around next ch-space, 10 ch, 1 tr around next ch-space (= corner), 5 ch, finish with 1 sl st in first dc. Top: Work 8-9-10 flower squares - see explanation above. Sew them tog in to a long strip - sew edge to edge in outer loops of edge sts. Pick up 220-244-272 sts (incl 2 edge sts in each side towards mid front) on needle size 3 mm with light pink in ch-row at the top of the crochet strip - pick up sts with 1 strand to get a nice transition. Insert 1 marker in piece after 55-61-68 sts and 1 marker after 165-183-204 sts. Work Pattern - see explanation above, but work the outermost 2 sts in each side in garter st. Remember the knitting tension! At the same time after 1 cm, inc at markers in each side: 2 sts 5 times every 7th-8th-10th row - inc 2 sts next to each other and work them in pattern so that pattern still fits = 240-264-292 sts. When piece measures 19-21-23 cm, work next row as follows: 57-62-68 sts front piece, cast off 8-10-12 sts for armhole, 110-120-132 sts back piece, cast off 8-10-12 sts for armhole, 57-62-68 sts front piece. Now finish each part separately. Right front piece: = 57-62-68 sts. Then cast off for armhole every other row - see Knitting tip: 2 sts 3-5-6 times, 1 st 6-5-6 times = 45-47-50 sts. When piece measures 23-24-26 cm, cast off 24-26-29 sts towards mid front for neck line. Continue to cast off towards the neck on every other row - see Knitting tip: 2 sts 3 times, 1 st 3 times = 12-12-12 sts remain on each shoulder. Then work Pattern, but work 1 st in each side in garter st. Cast off when piece measures 37-40-43 cm. Left front piece: Work as right front piece but reversed. Back piece: 110-120-132 sts. Then cast off for armholes as on front piece = 86-90-96 sts. When piece measures 23-24-26 cm, cast off the middle 44-48-54 sts for neck line. Continue to cast off towards the neck on every other row - see Knitting tip: 2 sts 3 times, 1 st 3 times = 12-12-12 sts remain on each shoulder. Then work Pattern, but work 1 st in each side in garter st. Cast off when piece measures 37-40-43 cm. Assembly: Sew tog straps on shoulder. Crochet around the armholes on hook size 3.5 mm with light pink: 1 row with dc - inside 1 edge st. Work 5 buttonholes evenly down along right band - work first buttonhole at the top, work the last before flower squares beg. Work - inside 2 edge sts - beg at the top as follows: ROW 1: 5 ch (= 1 buttonhole), skip 1 cm, work dc until next buttonhole. ROW 2: Work 4 dc around ch-space (= buttonhole) and work sl sts between buttonholes. After 2nd row: Continue to work dc around the neck line, down along left front piece and around the entire flower row. Sew on buttons. |
|
 |
|
Have you finished this pattern?Tag your pictures with #dropspattern #beachsidegardentop or submit them to the #dropsfan gallery. Do you need help with this pattern?You'll find 28 tutorial videos, a Comments/Questions area and more by visiting the pattern on garnstudio.com. © 1982-2026 DROPS Design A/S. We reserve all rights. This document, including all its sub-sections, has copyrights. Read more about what you can do with our patterns at the bottom of each pattern on our site. |
|


With over 40 years in knitting and crochet design, DROPS Design offers one of the most extensive collections of free patterns on the internet - translated to 17 languages. As of today we count 324 catalogues and 12239 patterns translated into English (UK/cm). 12239
We work hard to bring you the best knitting and crochet have to offer, inspiration and advice as well as great quality yarns at incredible prices! Would you like to use our patterns for other than personal use? You can read what you are allowed to do in the Copyright text at the bottom of all our patterns. Happy crafting!
Post a comment to pattern DROPS 64-8
We would love to hear what you have to say about this pattern!
If you want to leave a question, please make sure you select the correct category in the form below, to speed up the answering process. Required fields are marked *.