
Popular categories
Looking for a yarn?


Comments / Questions (39)
![]() Silvana wrote:
Silvana wrote:
Perdonatemi, questo l'ho letto....la domanda era:" gli aumenti centrali avanti /dietro tra i diagrammi A1 , dopo la separazione , non si devono più fare? insomma gli unici aumenti sono quelli del sotto braccio? grazie mille
21.09.2017 - 11:44DROPS Design answered:
Buongiorno Silvana. Non aumenta più prima/dopo i diagrammi A.1. Buon lavoro!
21.09.2017 - 11:53
![]() Silvana wrote:
Silvana wrote:
Eccomi di nuovo con un altro quesito! ho separato il corpo dalle maniche, a questo punto gli aumenti sono SOLO quelli del sottobraccio (4). Quelli centrali tra gli A1 non si devono più fare?
21.09.2017 - 10:40DROPS Design answered:
Buongiorno Silvana. Quando il corpo misura 3 cm da dove è stato separato dalle maniche, aumenta 1 maglia da ciascun lato dei segni ai lati(= 4 aumenti); aumenta ogni 4 cm 7 volte in tutto. Sulle maniche invece dovrà diminuire prima/dopo il segno come indicato per la sua taglia. Buon lavoro!
21.09.2017 - 11:34
![]() Silvana wrote:
Silvana wrote:
Scusatemi di nuovo, ma nelle spiegazioni, dopo (manica sinistra) c'è scritto :"1 maglia rasata, A1, 1 maglia rasata , 1 gettato...." non c'è il gettato all'inizio di A1 !!!! scusatemi ma sono in totale confusione.....
13.09.2017 - 10:02DROPS Design answered:
Buongiorno Silvana. Il gettato lo trova prima della maglia rasata:..1 gettato (= manica sinistra), 1 maglia a maglia rasata, A.1 (= 19 maglie), 1 maglia a maglia rasata, 1 gettato... Il gettato prima della manica sinistra è un aumento sulla manica, il gettato dopo A.1 e la maglia rasata è un aumento sul davanti. Buon lavoro!
13.09.2017 - 10:31Silvana wrote:
Grazie.... quindi aumento 4 maglie ogni volta? due per ogni diagramma?
13.09.2017 - 09:49DROPS Design answered:
Buongiorno Silvana. Se deve aumentare sia sul davanti/dietro che sulle maniche, gli aumenti saranno 8 e aumenta sia prima che dopo le 21 maglie. Se deve aumentare solo sul davanti /dietro, gli aumenti sono 4 e aumenterà solo dal lato delle 21 maglie sul davanti/dietro. Buon lavoro!
13.09.2017 - 11:00
![]() Silvana wrote:
Silvana wrote:
Buona sera, non mi è chiaro l aumento del dietro e del davanti. Dopo il marcapunti che indica la fine della manica destra debbo fare un dritto , un gettato, e poi comincio il diagramma A1? Se devo aumentare 4 maglie (2 per il davanti e 2 per il dietro) il gettato di aumento lo devo ripetere alla fine , vicino al m.p. del raglan prima della manica sinistra? Insomma gli aumenti maniche dietro e davanti, sono sempre prima e dopo i 4 m.punti? Grazie di cuore
13.09.2017 - 00:10DROPS Design answered:
Buongiorno Silvana. Deve prendere come riferimento le maglie del diagramma A.1 + la maglia rasata che precede + la maglia rasata che segue A.1 (21 maglie in tutto). Quindi: gettato, 1 maglia rasata, A.1, 1 maglia rasata, gettato. Non si aumenta sempre sia sul davanti/dietro che sulle spalle. Buon lavoro!
13.09.2017 - 08:26
![]() Loredana wrote:
Loredana wrote:
Buonasera, gli aumenti per le maniche vanno fatti ad inizio giro? Grazie Loredana
25.05.2017 - 14:15DROPS Design answered:
Buongiorno Loredana. Gli aumenti per il raglan sulle maniche vanno fatti prima/dopo le maglie di A1 (19 m) + la maglia rasata che precede e segue queste maglie (quindi in tutto 21 maglie). Buon lavoro!
25.05.2017 - 14:30
![]() Marise wrote:
Marise wrote:
Me revoilà avec mon tricot que j'avais mis de côté. Quand vous écrivez : augmenter 4 m 0 fois au total tous les tours, est-ce que cela veut dire que je n'augmente pas pour un rang et qu'au rang suivant j'augmente 18 fois tous les deux rangs, puis 4 fois tous les 4 tours. Je fais grandeur petit. Merci de me guider dans ces augmentations de 0 fois. :-)
20.04.2017 - 03:54DROPS Design answered:
Bonjour Marise, en taille S, vous augmentez simplement pour le devant et le dos: 18 fois tous les 2 tours et 4 fois tous les 4 tours et pour les manches 20 fois tous les 2 tours et 3 fois tous les 4 tours. Bon tricot!
20.04.2017 - 10:21
![]() Leila Ojala wrote:
Leila Ojala wrote:
Hei! Vielä yksi kysymys mallin 176-26 ohjeesta. Hihan osuus pitäisi aloittaa ja päättää langankierrolla. Toisaalta pitäisi koristeraita päättää yhdellä oikealla ja sen jälkeen yksi langankierto. Tällöin joka toisella kerroksella pitäisi tehdä kaksi langankiertoa peräkkäin??? Jotakin olen varmaan ymmärtänyt väärin. Ystävällisin terveisin Leila
26.03.2017 - 15:41DROPS Design answered:
Kun katson ohjetta, en näe tuossa kohtaa, jossa langankiertoja tulisi 2 peräkkäin, jokaisen langankierron (raglanlisäyksen) vieressä on aina joko oikea tai nurja silmukka. Piirroksen A.1 reunoissahan on aina nurja silmukka.
29.03.2017 - 16:56
![]() Leila Ojala wrote:
Leila Ojala wrote:
Malli 176/27 raglanlisäykset. Ohjeessa kehotetaan lisäämään aluksi joka kerroksella 21:n silmukan koristeraidan molemmin puolin ja todetaan, että silmukat lisääntyvät 4/kerros. Mielestäni silmukat lisääntyvät 8:lla, koska koristeraitoja on neljä, siis kaksi etukappaleessa ja kaksi takakappaleessa. Olen varmaan ymmärtänyt jotakin väärin. Ystävllisin terveisin Leila
26.03.2017 - 12:53DROPS Design answered:
Silmukoita lisätään aluksi jokaisella kerroksella yhteensä 8, mutta lisäykset tehdään eri tavoin miehustassa ja hihoissa, joten nämä kohdat on selitetty erikseen ohjeessa.
29.03.2017 - 16:50
![]() Monika Steinbach wrote:
Monika Steinbach wrote:
Liebes Drops-Team. genau so hatte ich mir das gedacht, nur leider steht es nicht so in der Anleitung. Jetzt kann ich ja fröhlich weiterstricken. Ganz herzlichen Dank und liebe Grüße!
20.02.2017 - 14:12
|
|||||||||||||||||||
Maren#marensweater |
|||||||||||||||||||
 |
 |
||||||||||||||||||
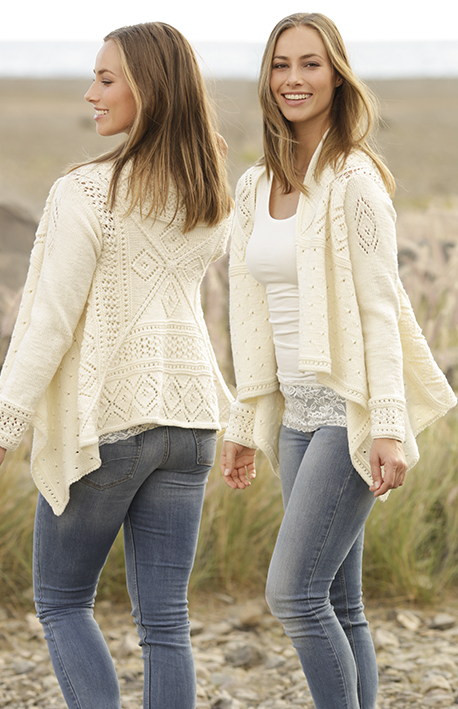
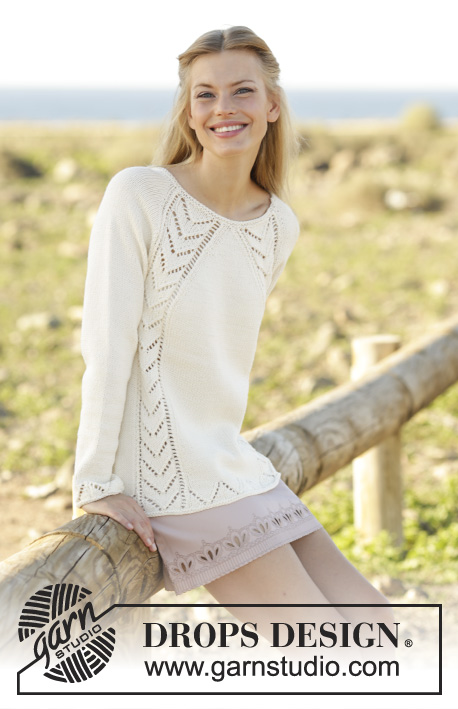
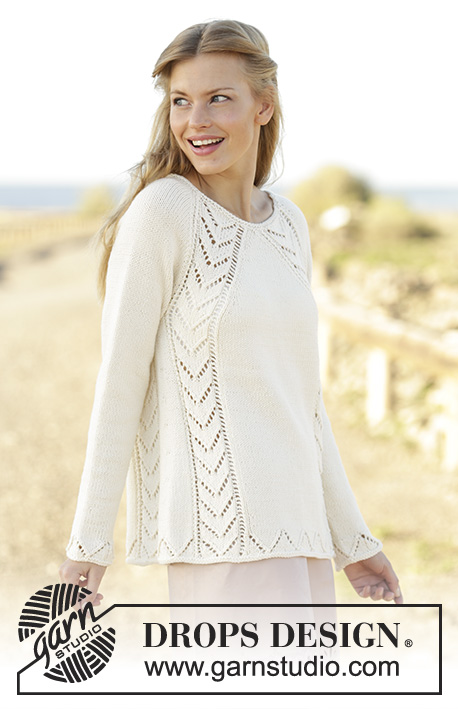
Knitted jumper with lace pattern and raglan, worked top down in DROPS Cotton Merino. Size: S - XXXL
DROPS 176-27 |
|||||||||||||||||||
|
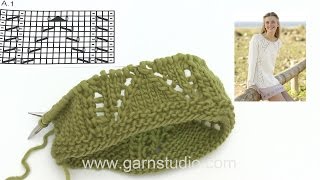
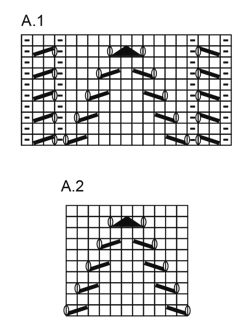
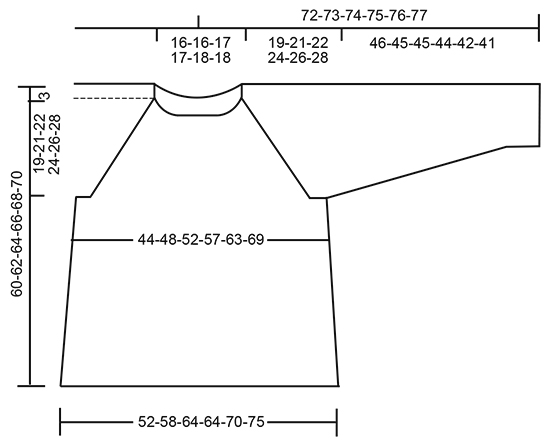
GARTER STITCH (worked in the round): 1 ridge = 2 rounds. Knit 1 round and purl 1 round. GARTER STITCH (back and forth): 1 ridge = knit 2 rows. PATTERN: See diagrams A.1 and A.2. Diagrams show all rows in pattern seen from the right side. RAGLAN: Increase for raglan on each side of A.1 + 1 stitch in stocking stitch in each side (on each side of 21 stitches). Increase 1 stitch by making 1 yarn over, on next round work yarn over twisted to avoid holes. Work the increased stitches in stocking stitch. NOTE: Increase differently on body and sleeves as explained in pattern. DECREASE TIP: Decrease mid under sleeve as follows: Begin 3 stitches before marker thread and knit 2 together, knit 1 (= stitch with marker thread), slip 1 stitch knitwise, knit 1, pass slipped stitch over stitch worked (= 2 stitches decreased). INCREASE TIP (applies to increase in the sides of body): Begin 1 stitch before stitch with marker thread, 1 yarn over, knit 3 (marker thread is in the middle stitch), 1 yarn over (= 2 stitches increased). On next round knit yarn over twisted to avoid holes. ---------------------------------------------------------- JUMPER: Worked in the round on circular needle from top down. YOKE: Cast on 102-102-102-102-106-106 stitches on circular needle size 4 mm with Cotton Merino. Work 2 ridges in GARTER STITCH - see explanation above. Knit 1 round while increasing 14 stitches evenly in all sizes = 116-116-116-116-120-120 stitches. REMEMBER THE KNITTING TENSION Work next round as follows: 1 yarn over, 15 stitches in stocking stitch, 1 yarn over (= sleeve), 1 stitch in stocking stitch, A.1 (= 19 stitches), 1 stitch in stocking stitch, 1 yarn over, 1-1-1-1-3-3 stitches in stocking stitch, 1 yarn over, 1 stitch in stocking stitch, A.1, 1 stitch in stocking stitch (= front piece), 1 yarn over, 15 stitches in stocking stitch, 1 yarn over (= sleeve), 1 stitch in stocking stitch, A.1, 1 stitch in stocking stitch, 1 yarn over, 1-1-1-1-3-3 stitches in stocking stitch, 1 yarn over, 1 stitch in stocking stitch, A.1, 1 stitch in stocking stitch (= back piece). First increase for RAGLAN is now done. Continue upwards with this division with pattern and stocking stitch. Increase for raglan as explained above. NOTE: Increase differently on yoke and sleeves as follows: FRONT AND BACK PIECE: Increase 4 stitches every round 0-0-0-5-10-16 times in total, then every other round 18-22-30-30-30-30 times in total and finally every 4th round 4-4-0-0-0-0 times in total. SLEEVES: Increase 4 stitches every round 0-0-2-1-0-0 times in total, then every other round 20-24-29-32-35-35 in total and finally every 4th round 3-3-0-0-0-2 times in total. After all increases are done there are 296-328-360-388-420-452 stitches on round. Piece measures approx. 22-24-25-27-29-31 cm from shoulder (19-21-22-24-26-28 cm from cast-on edge). Now work as follows: Cast on 7 new stitch on needle (insert 1 marker thread in the middle stitch), slip the first 61-69-77-81-85-89 stitches on a stitch holder (= sleeve), work pattern and in stocking stitch as before over the next 87-95-103-113-125-137 stitches (= front piece), slip the next 61-69-77-81-85-89 stitches on a stitch holder, cast on 7 new stitches under sleeve, (insert 1 marker thread in the middle stitch), work pattern and in stocking stitch as before over the remaining 87-95-103-113-125-137 stitches (= back piece). NOW MEASURE THE PIECE FROM HERE. BODY: = 188-204-220-240-264-288 stitches. Continue with A.1 and in stocking stitch as before. When piece measures 3 cm, increase 1 stitch on each side of both marker threads - READ INCREASE TIP (= 4 stitches increased), work the increased stitches in stocking stitch. Increase every 4 cm 7 times in total = 216-232-248-268-292-316 stitches. Continue stocking stitch and A.1 until piece measures 34-34-35-35-35-35 cm, adjust so that next round worked is last round in A.1. Work last round in A.1, AT THE SAME TIME adjust number of stitches between A.1 and A.1 in the middle of front piece and in the middle of back piece to 47-59-71-71-83-95 stitches (= 220-240-264-264-288-312 stitches in total). Then work as follows - from beginning of round: A.2 (= 11 stitches), purl 1, A.2, A.1 as before, *A.2, purl 1 *, work from *-* 3-4-5-5-6-7 times in total, A.2, A.1 as before, A.2, purl 1, A.2, A.1 as before, *A.2, purl 1 *, work from *-* 3-4-5-5-6-7 times in total, A.2, A.1 as before. Work A.1/A.2 1 time vertically, then work 1 ridge before casting off. SLEEVE: Slip stitches from sleeve back on a short circular needle/double pointed needles size 4 mm, pick up 1 stitch in each of the 7 stitches cast on under sleeve = 68-76-84-88-92-96 stitches. Insert 1 marker thread in the middle stitch under sleeve – NOW MEASURE PIECE FROM HERE. Work in stocking stitch in the round on circular needle/double pointed needles. When piece measures 3 cm, decrease 1 stitch on each side of marker threads - READ DECREASE TIP. Repeat decrease every 3-2-2-1½-1½-1½ cm 13-16-19-20-21-22 times in total. After all decreases are done, 42-44-46-48-50-52 stitches remain on round. When sleeve measures 42-41-41-40-38-37 cm, adjust number of stitches to 48 in all sizes. Then work as follows: * A.2, purl 1 *, work from *-* 4 times in total. When A.1 has been worked 1 time vertically, work 1 ridge and then cast off. Sleeve measures approx. 46-45-45-44-42-41 cm in total. Work the other sleeve the same way. |
|||||||||||||||||||
Diagram explanations |
|||||||||||||||||||
|
|||||||||||||||||||
 |
|||||||||||||||||||
 |
|||||||||||||||||||
Have you finished this pattern?Tag your pictures with #dropspattern #marensweater or submit them to the #dropsfan gallery. Do you need help with this pattern?You'll find 30 tutorial videos, a Comments/Questions area and more by visiting the pattern on garnstudio.com. © 1982-2026 DROPS Design A/S. We reserve all rights. This document, including all its sub-sections, has copyrights. Read more about what you can do with our patterns at the bottom of each pattern on our site. |
|||||||||||||||||||


With over 40 years in knitting and crochet design, DROPS Design offers one of the most extensive collections of free patterns on the internet - translated to 17 languages. As of today we count 324 catalogues and 12290 patterns translated into English (UK/cm). 12290
We work hard to bring you the best knitting and crochet have to offer, inspiration and advice as well as great quality yarns at incredible prices! Would you like to use our patterns for other than personal use? You can read what you are allowed to do in the Copyright text at the bottom of all our patterns. Happy crafting!
Post a comment to pattern DROPS 176-27
We would love to hear what you have to say about this pattern!
If you want to leave a question, please make sure you select the correct category in the form below, to speed up the answering process. Required fields are marked *.