
Popular categories
Looking for a yarn?


Comments / Questions (28)
![]() Arnhild Klokkertrøen wrote:
Arnhild Klokkertrøen wrote:
Hei! Skjønner ikke hva som menes med ‘stikk høyre pinne gjennom masken fra forrige rad m, strikk 1 rett og slipp maskene av ‘. Jeg har bare en maske å slippe av liksom. Mulig jeg gjør det feil.
25.03.2020 - 22:03DROPS Design answered:
Hej I denna video ser du hur man ska göra. Mvh DROPS Design
26.03.2020 - 08:28
![]() Ulla Ærbo wrote:
Ulla Ærbo wrote:
Skal der strikkes frem og tilbage på rundpind ?
21.07.2019 - 17:00
![]() Nathalie wrote:
Nathalie wrote:
Je pense qu’il y a une erreur dans la hauteur à laquelle il faut commencer l’encolure devant. Dans les explications on nous demande de les commencer au même niveau que celles du dos ce qui ne correspond pas au dessin technique.
08.05.2019 - 15:50DROPS Design answered:
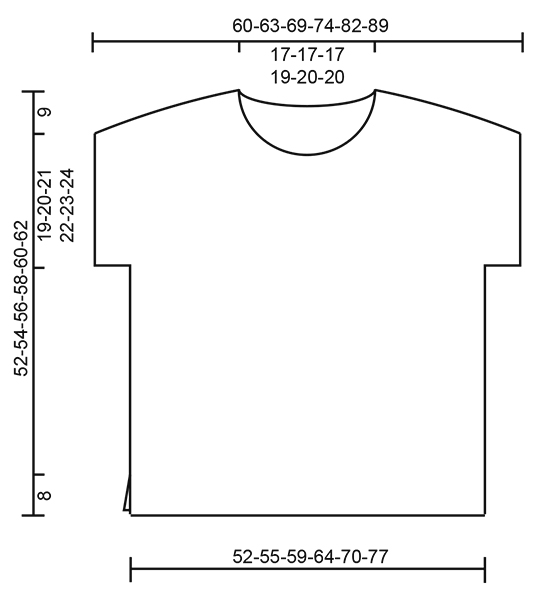
Bonjour Nathalie, l'encolure dos se forme à 50-52-54-56-58-60 cm en rabattant les 33-33-33-37-41-41 mailles centrales et l'encolure devant se forme à 44-46-48-49-51-53 cm en glissant en attente les 19-19-19-23-27-27 mailles centrales sur 1 arrêt de mailles, la hauteur de l'encolure est donc différente sur le devant et sur le dos, comme le montre le schéma. Bon tricot!
08.05.2019 - 15:58
![]() Giulia wrote:
Giulia wrote:
Buonasera! Ho appena iniziato questo modello ed ho un dubbio: Negli schemi A.2A e A.2B il punto in rilievo (quello con il quadretto nero) nel giro seguente viene lavorato a diritto (quadretto con la linea) ma nel vostro video tutorial viene lavorato a rovescio. Quale è da eseguire? Spero di essere stata chiara Giulia
28.04.2019 - 21:01DROPS Design answered:
Buonasera Giulia, deve seguire le indicazioni riportate nel modello. Buon lavoro!
28.04.2019 - 21:51
![]() Bernadette Van Duijvenbode wrote:
Bernadette Van Duijvenbode wrote:
Het voorpand moet ik breien als het achterpand tot 46 cm hoog. Bij het achterpand moest ik bij 45 cm steken op een hulpdraad gaan zetten voor de schouderschuining. Dat moet bij het voorpand dus ook bij 45 cm? Bij het achterpand moet ik 33 steken afkanten voor de hals, bij het voorpand moet ik 19 steken op een hulpdraad zetten voor de hals ? Klopt dat?
30.08.2018 - 16:44DROPS Design answered:
Dag Bernadette, De afkantingen voor de schuine schouder kun je op het voorpand op dezelfde manier en bij dezelfde hoogte doen als op het achterpand. Op het voorpand is de hals dieper, vandaar dat je eerder begint met steken op een hulpnaad zetten. En omdat je in de naalden daarna nog gaat afkanten aan beide zijden van de hals aan de voorkanten, zet je in eerste instantie minder steken op de hulpnaald. Ter hoogte van de schouder kom je weer op een gelijk aantal steken uit als op het achterpand.
31.08.2018 - 11:56Taylor wrote:
Hi, I'm a beginner in knitting a full adult size garment. I just about nearly done with the back piece but got stuck after slipping the last 10 stitches on the holder (making a small size). How many stitches do i need to slip on holder after I binde off the 33 stitches in the middle?
20.03.2018 - 00:42DROPS Design answered:
Hi Taylor, After you bind off the 33 stitches for the neck, you bind off the first 2 stitches on the next row from the neck (you are now working the first shoulder only) and continue slipping 4 stitches onto the stitch holder every other row (on the sleeve side of the shoulder) until you have 46 stitches left on the needle. Then continue as described in the text. I hope this helps and happy knitting!
20.03.2018 - 08:06
![]() Geke wrote:
Geke wrote:
Bij de beschrijving bij de video staat dat je bij de teruggaande naald de dubbele steek averecht moet breien. Dit staat zo niet in het telpatroon. Wat is nu juist?
08.09.2017 - 19:31DROPS Design answered:
Hallo Geke, Zoals het in het patroon staat is het juist. Je kunt die dubbele steken op de achterkant recht breien. Doordat je vervolgens op de voorkant weer in de steek van de vorige naald steekt, gaat a.h.w. het lusje van die dubbele steek weer naar achteren. Probeer het maar, al breiende zul je zien dat het goed komt met het patroon.
13.09.2017 - 14:51
![]() Geke wrote:
Geke wrote:
Moet het insteken in de vorige naald van de achterkant van het werk naar de voorkant of anders om?
08.09.2017 - 17:37DROPS Design answered:
Hallo Geke, Deze steek je aan de voorkant van de steek in, zoals je de steek normaal ook zo breien, maar dan dus de steek van de vorige naald.
13.09.2017 - 13:48
![]() Geke Kunst wrote:
Geke Kunst wrote:
Wat wordt er bedoeld met: Denk om de stekenverhouding?
08.09.2017 - 12:37DROPS Design answered:
Hallo Geke,' Daarmee wordt bedoeld dat je af en toe even controleert of de stekenverhouding nog klopt. Bij dit patroon is de steken verhouding 22 steken en 26 naalden in structuurpatroon is 10 cm breed en 10 cm hoog. Meer informatie over de stekenverhouding vind je via deze link
13.09.2017 - 13:44
![]() Birgit wrote:
Birgit wrote:
Hallo liebes Drops-Team! Bitte beantwortet mir doch meine Frage.
26.08.2017 - 23:38
|
||||||||||
After Swim#afterswimtop |
||||||||||
|
|
||||||||||
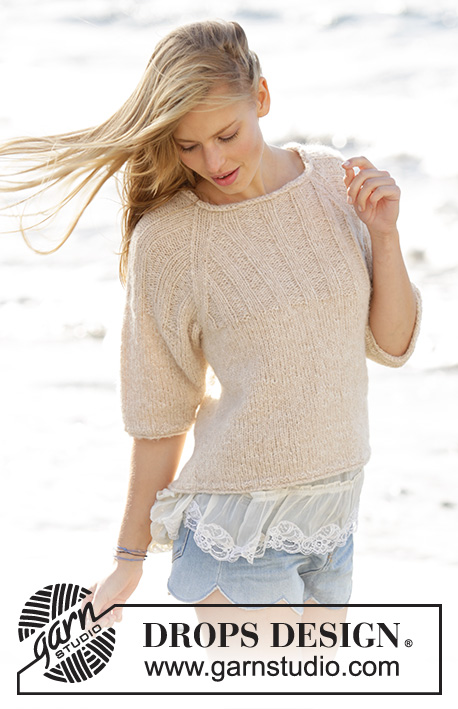
Knitted top with false fisherman’s rib variation in DROPS Belle. Size: S - XXXL
DROPS 176-13 |
||||||||||
|
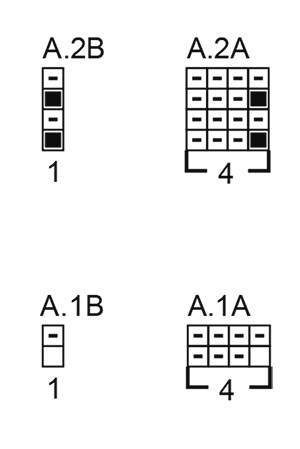
GARTER STITCH (back and forth): 1 ridge = knit 2 rows. PATTERN: See diagrams A.1 and A.2. Diagrams show all rows in pattern seen from the right side. INCREASE TIP: To calculate how to increase evenly, use the total number of stitches on row (e.g. 104 stitches), minus edge stitches (e.g. 4 stitches in each side) and divide the remaining stitches by number of increases to be done (e.g. 9) = 10.6. In this example increase after alternately approx. every 10th and 11th stitch. Do not increase over edge stitches. ---------------------------------------------------------- TOP: Work front and back piece back and forth on circular needle separately. BACK PIECE: Cast on 104-110-118-128-140-154 stitches on circular needle size 3.5 mm with Belle. Work 4 ridges in GARTER STITCH - see explanation above. AT THE SAME TIME on 7th row (= right side) increase 9-11-11-13-13-15 stitches evenly – READ INCREASE TIP = 113-121-129-141-153-169 stitches. Switch to circular needle size 4.5 mm and work next row from right side as follows: 4 edge stitches in garter stitch, work A.1A until 5 stitches remain on row (= 26-28-30-33-36-40 repetitions of 4 stitches), work A.1B (= 1 stitch) and finish with 4 edge stitches in garter stitch. Work back as shown in A.1 with 4 edge stitches in garter stitch in each side. Work next row as follows from right side: 4 edge stitches in garter stitch, work A.2A until 5 stitches remain on row, work A.2B (= 1 stitch) and finish with 4 edge stitches in garter stitch. Continue A.2 upwards with 4 edge stitches in garter stitch in each side. REMEMBER THE KNITTING TENSION When piece measures 25-26-27-28-29-30 cm, cast on 8-8-10-10-12-12 new stitches at the end of the next 2 rows for sleeve edges = 129-137-149-161-177-193 stitches. Continue A.2 as before with 12-12-14-14-16-16 edge stitches in garter stitch in each side. When piece measures 43-45-47-49-51-53 cm, slip stitches on 1 stitch holder for diagonal shoulder (to avoid cutting the yarn work stitches before slipping them on stitch holder for diagonal shoulder). Slip the first 4-5-5-6-6-7 stitches at beginning of row on 1 stitch holder, work the rest of row and slip the first 4-5-5-6-6-7 stitches at beginning of next row on 1 stitch holder. Continue like this by slipping 4-5-5-6-6-7 stitches on stitch holders 9 times in total in each side, then slip the last 10-5-11-6-12-11 stitches on stitch holder for diagonal shoulder in each side. AT THE SAME TIME when piece measures 50-52-54-56-58-60 cm, cast off the middle 33-33-33-37-41-41 stitches for neck and finish each shoulder separately. Continue to slip stitches on stitch holder for diagonal shoulder and cast off 2 stitches on next row from neck. When all stitches have been cast off for neck/slipped on a stitch holder, there are 46-50-56-60-66-74 stitches on stitch holder for shoulder and piece measures approx. 52-54-56-58-60-62 cm from the highest point on shoulder and down. Slip stitches from stitch holder on circular needle size 3.5 mm. Begin from right side and knit 1 row over all stitches, but to avoid holes in transitions where stitches were slipped on stitch holder pick up loop between 2 stitches and knit it twisted together with first stitch on needle. Knit 1 row from wrong side and cast off by knitting from right side (it is important to avoid a tight cast-off edge). Work the other shoulder the same way. FRONT PIECE: Cast on the same way as on back piece and work as back piece until piece measures 44-46-48-49-51-53 cm. Now slip the middle 19-19-19-23-27-27 stitches on 1 stitch holder for neck and finish each shoulder separately. Continue to slip stitches on stitch holder for diagonal shoulder and cast off for neck at beginning of every row from neck as follows: 2 stitches 3 times and 1 stitch 3 times. When all stitches have been cast off for neck/slipped on a stitch holder, there are 46-50-56-60-66-74 stitches on stitch holder for shoulder and piece measures approx. 52-54-56-58-60-62 cm from the highest point on shoulder and down. Slip stitches from stitch holder on circular needle size 3.5 mm and work the same way as on back piece. Cast off knitting from right side. Work the other shoulder the same way. ASSEMBLY: Sew shoulder seams inside cast-off edge to get 2 purled rows against each other on shoulder (seen from right side). Sew seam under armhole and down the side on front and back piece - sew in outer loops of edge stitch to get a flat seam but stop when approx. 8 cm remain in each side (= vents). Fold the edge in garter stitch along armhole double towards right side and fasten sleeve edge with a couple of small stitches in the middle of shoulder and mid under sleeve. Repeat on the other sleeve edge. NECK: Pick up from right side approx. 90 to 108 stitches around the neck (including stitches on stitch holder at the front) on a short circular needle size 3.5 mm. Purl 1 round, knit 1 round and purl 1 round. Then loosely cast off by knitting. |
||||||||||
Diagram explanations |
||||||||||
|
||||||||||
 |
||||||||||
 |
||||||||||
Have you finished this pattern?Tag your pictures with #dropspattern #afterswimtop or submit them to the #dropsfan gallery. Do you need help with this pattern?You'll find 23 tutorial videos, a Comments/Questions area and more by visiting the pattern on garnstudio.com. © 1982-2026 DROPS Design A/S. We reserve all rights. This document, including all its sub-sections, has copyrights. Read more about what you can do with our patterns at the bottom of each pattern on our site. |
||||||||||


With over 40 years in knitting and crochet design, DROPS Design offers one of the most extensive collections of free patterns on the internet - translated to 17 languages. As of today we count 324 catalogues and 12290 patterns translated into English (UK/cm). 12290
We work hard to bring you the best knitting and crochet have to offer, inspiration and advice as well as great quality yarns at incredible prices! Would you like to use our patterns for other than personal use? You can read what you are allowed to do in the Copyright text at the bottom of all our patterns. Happy crafting!
Post a comment to pattern DROPS 176-13
We would love to hear what you have to say about this pattern!
If you want to leave a question, please make sure you select the correct category in the form below, to speed up the answering process. Required fields are marked *.