
Popular categories
Looking for a yarn?


Comments / Questions (47)
![]() Vini wrote:
Vini wrote:
Liebes Drops-Design-Team, vielen Dank für die tolle Anleitung. Bin gerade fertig mit der schönen Jacke. Ich verstehe nur nicht, warum man die Maschen des Zopfmusters für den Halsausschnitt nicht einfach stilllegt, um so nahtlos den Übergang des Zopfes in die Kapuze zu gestalten. Die übrigen Maschen kann man ja trotzdem normal aufnehmen. Auch mit Naht ist das Strickstück einfach wunderbar. Vielen Dank nochmal. Viele Grüße Vini-Socke
20.02.2026 - 13:28DROPS Design answered:
Liebe Vini, wenn Sie erst abketten und dann die Maschen auffassen, wird der Übergang zur Kapuze etwas stabiler. Aber es ist grundsätzlich auch so möglich, wie Sie es beschrieben haben, wenn Sie mehr Wert auf den unsichtbaren Übergang legen. Schön jedenfalls, dass Sie so viel Freude an Ihrer Jacke haben, weiterhin viel Spaß beim Tragen und bei Ihrem nächsten Projekt! :-)
24.02.2026 - 10:48
![]() Inga wrote:
Inga wrote:
Jeg vil gerne strikke Melody of Snow i tre tråde Drops Baby Merini, men jeg kan ikke finde ud af at beregne mængden...til str. xl. Vil I hjælpe mig? :)
23.11.2025 - 12:56DROPS Design answered:
Hei Inga. Til denne jakken trengs det 550 gram / 11 nøster DROPS Melody. 1 nøste har en løpelengde på 140 meter. Gang løpelengde med antall nøster = 140 x 11 = 1540 meter garn. 1 nøste DROPS Baby Merino har en løpelengde på 175 meter. Ta antall meter til Melody = 1540 og dele på Baby Merinos løpelengde = 1540 / 175 = 8,8. Og ettersom man skal strikke med 3 tråder, må det ganges med 3 = 8,8 x 3 = 26,4 = 27. Du trenger da 27 nøster med Baby Merino. mvh DROPS Design
24.11.2025 - 09:53
![]() Linda Mortensen wrote:
Linda Mortensen wrote:
Meget stram på ærmerne
20.11.2024 - 12:34
![]() LELIEVRE Brigitte wrote:
LELIEVRE Brigitte wrote:
Merci, je n'avais pas vu
22.03.2023 - 11:30
![]() LELIEVRE Brigitte wrote:
LELIEVRE Brigitte wrote:
Bonjour, Serait-il possible d\'avoir les explications en français ?
21.03.2023 - 17:31DROPS Design answered:
Bonjour Mme Lelievre, bien volontiers, cliquez sur le menu déroulant sous la photo et sélectionnez "français" pour basculer les explications en français. Bon tricot!
22.03.2023 - 08:38
![]() Annicka Andréasson wrote:
Annicka Andréasson wrote:
Om jag väljer 2 trådigt i grupp B ska jag alltså ha 2 nystan? och stickor nr 8?
08.12.2021 - 15:07DROPS Design answered:
Hej Annicka, Ja du skall ha 2 nystan från garngrupp B och du skall få 12 maskor på 10 cm, testa med sticka 7 eller 8 :)
09.12.2021 - 09:22
![]() Annicka Andréasson wrote:
Annicka Andréasson wrote:
Hej, vilket annat garn kan jag använda istället för Melody, jag vill inte ha något mohair i garnet.
08.12.2021 - 12:16DROPS Design answered:
Hej Annicka. Du kan antingen sticka den i 3 trådar av ett garn som tillhör garngrupp A eller 2 trådar av ett garn som tillhör garngrupp B. Se bara till att få den stickfasthet som uppges i mönstret. Mvh DROPS Design
08.12.2021 - 14:18
![]() Grace Williams wrote:
Grace Williams wrote:
Can i use ordinary needles instead of circular
12.04.2021 - 16:04DROPS Design answered:
Dear Grace, while it is possible to knit the body of this sweater on straight needles, the number of stitches might make it somewhat uncomfortable. If you are willing to deal with a lot of stitches on a relatively short needle then go ahead. Happy Knitting!
12.04.2021 - 16:14
![]() Thea wrote:
Thea wrote:
Is het niet handiger om eerst de capuchon te maken en dan pas de mouwen erin te naaien? Scheelt nogal wat gewicht met breien
23.01.2021 - 11:52
![]() Maillet wrote:
Maillet wrote:
Bonjour je n arrive pas a comprendre le dessin de la capuche du numéro 172
22.01.2021 - 01:48DROPS Design answered:
Bonjour Mme Maillet, pour la capuche, vous allez relever les mailles tout autour de l'encolure et tricoter (= continuer) les torsades A.7 et A.10 de chaque côté, avec 2 mailles point mousse de chaque côté et les mailles restantes en jersey. À la hauteur requise, vous diminuerez les mailles des torsades (pour conserver la bonne largeur) et rabattrez toutes les mailles. Cette vidéo montre l'assemblage de la capuche. Bon tricot!
22.01.2021 - 08:19
|
|||||||||||||||||||||||||||||||
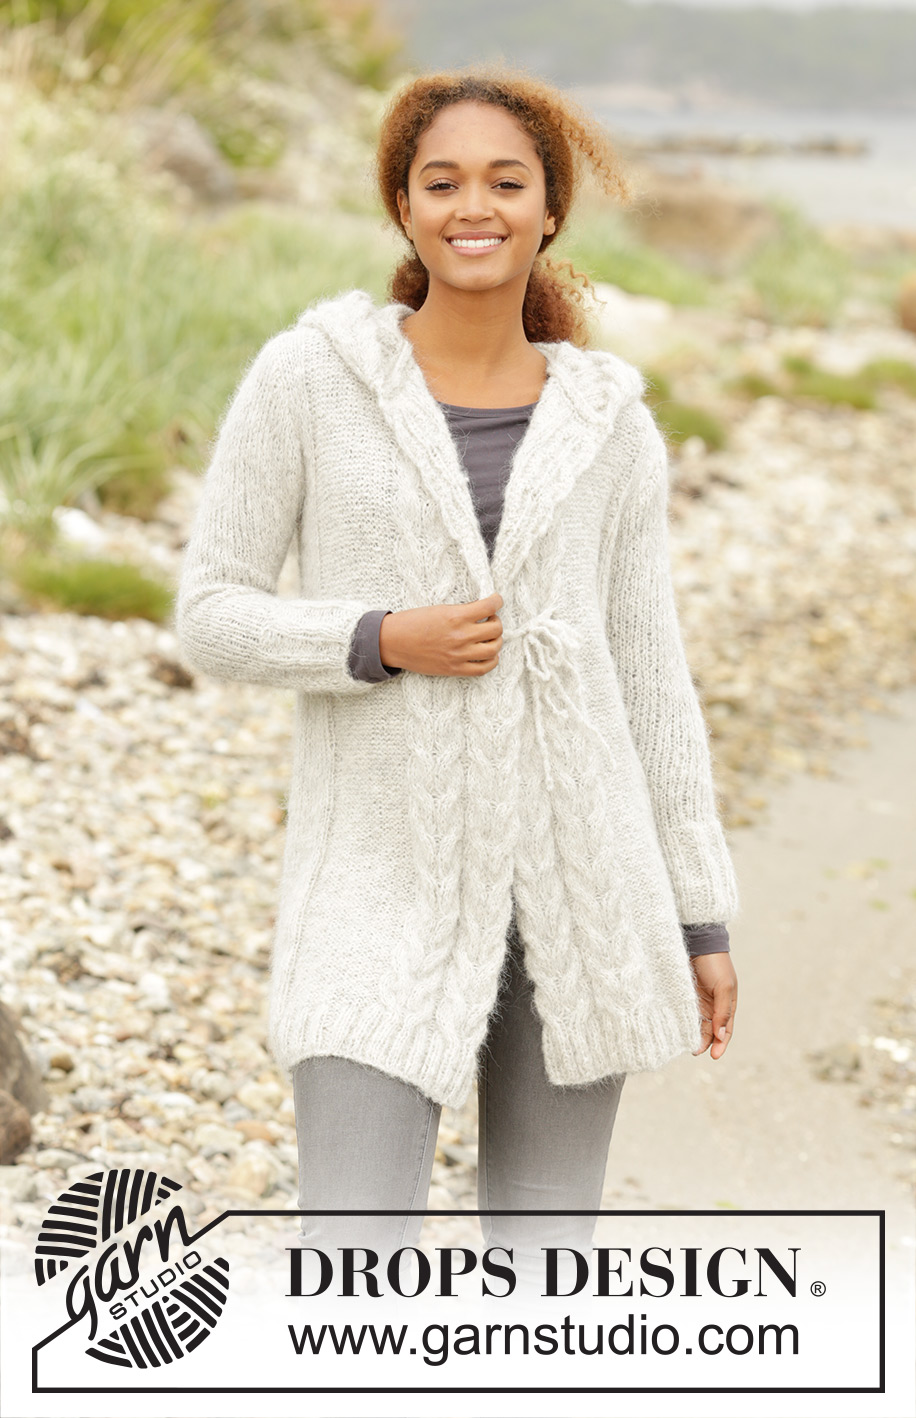
Melody of Snow#melodyofsnowcardigan |
|||||||||||||||||||||||||||||||
 |
 |
||||||||||||||||||||||||||||||
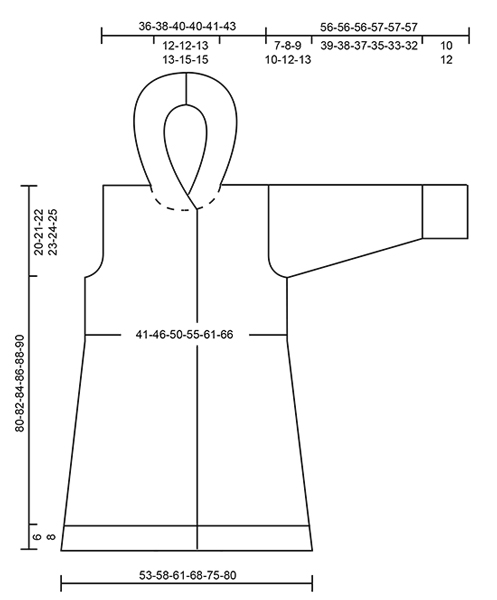
Knitted DROPS jacket with cables and hood in ”Melody”. Size XS/S - XXXL.
DROPS 172-4 |
|||||||||||||||||||||||||||||||
|
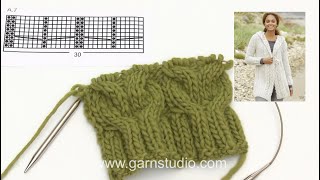
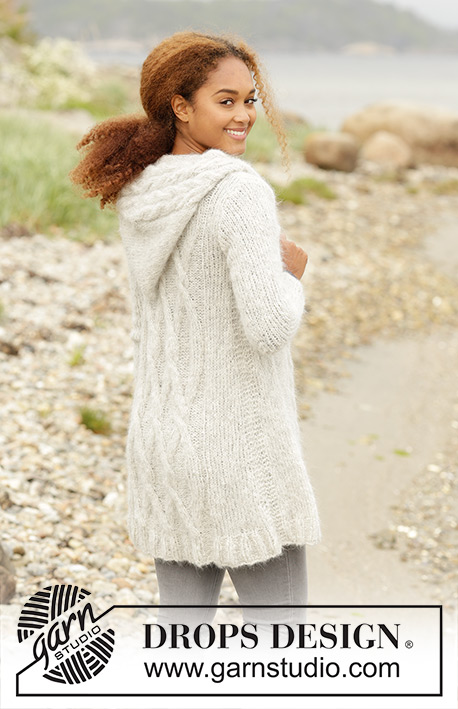
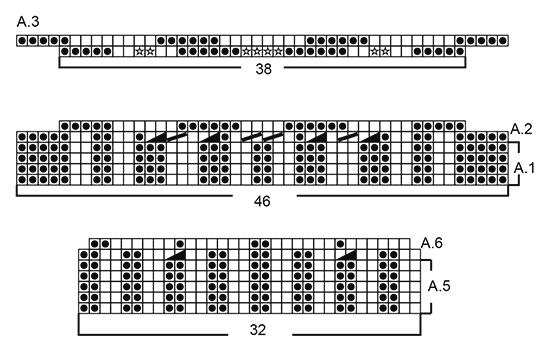
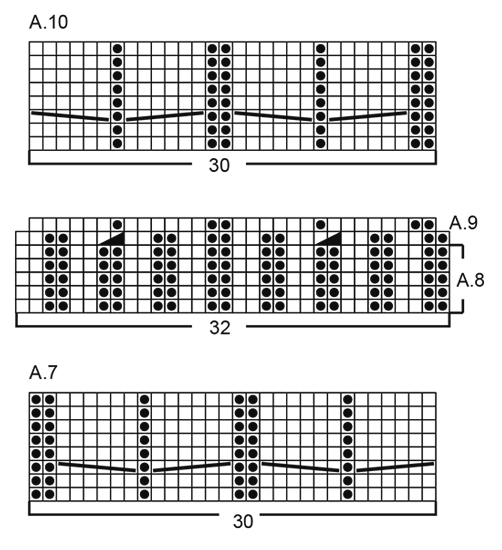
GARTER ST (back and forth): K all rows. 1 ridge = 2 rows K. PATTERN: See diagrams A.1 to A.10. The diagrams show all rows in pattern seen from RS. DECREASE TIP (applies to in the sides on front and back piece): Dec 1 st inside 3 edge sts in garter st. All dec are done from RS! Dec as follows after 3 edge sts: Slip 1 st as if to K, K 1, psso. Dec as follows before 3 edge st: Beg 2 sts before the 3 edge sts and K 2 tog. INCREASE TIP (applies to sleeves): Beg 1 st before marker, make 1 YO, K 2 and make 1 YO. On next round K YOs twisted to avoid holes. ---------------------------------------------------------- JACKET: Work front and back piece back and forth on circular needle in sections. Work sleeves in the round on double pointed needles/short circular needle. BACK PIECE: Cast on 86-96-96-106-116-126 sts on circular needle size 7 mm with Melody. P 1 row from WS. Work next row as follows from RS: 3 edge sts in GARTER ST – see explanation above, * K 2, P 3 *, repeat from *-* 3-4-4-5-6-7 times in total, K 2, work rib according to diagram A.1 (= 46 sts), * K 2, P 3 *, repeat from *-* 3-4-4-5-6-7 times in total and finish with K 2 and 3 edge sts in garter st. Continue rib like this. When piece measures 6-6-6-8-8-8 cm, work next row as follows from RS: 3 edge sts in garter st, K over the next 17-22-22-27-32-37 sts AT THE SAME TIME dec 5-7-5-6-7-9 sts evenly over these sts, work and dec according to diagram A.2 (= 46 sts dec to 38 sts), K the next 17-22-22-27-32-37 sts AT THE SAME TIME dec 5-7-5-6-7-9 sts evenly over these sts and finish with 3 edge sts in garter st = 68-74-78-86-94-100 sts. Switch to circular needle size 8 mm and work back from WS with K over K, P over P and garter st over garter st but sts in A.2 are worked as shown in diagram A.2. Work next row as follows from RS: 3 edge sts in garter st, 12-15-17-21-25-28 sts in stocking st, work and inc according to diagram A.3 (= 38 sts inc to 46 sts), 12-15-17-21-25-28 sts in stocking st and 3 edge sts in garter st = 76-82-86-94-102-108 sts. Work back from WS with K over K, P over P and garter st over garter st but sts in A.3 are worked as shown in diagram A.3. Work next row as follows from RS: 3 edge sts in garter st, 12-15-17-21-25-28 sts in stocking st, A.4 (= 46 sts), 12-15-17-21-25-28 sts in stocking st, 3 edge sts in garter st. Continue pattern like this. REMEMBER THE KNITTING TENSION When piece measures 10-10-10-11-11-11 cm, dec 1 st in each side - READ DECREASE TIP. Dec like this every 6-6-6-5-5-5 cm a total of 7-7-7-8-8-8 times in each side = 62-68-72-78-86-92 sts. When piece measures 60-61-62-63-64-65 cm, cast off for armholes at the beg of every row in each side as follows: Cast off 3 sts 0-0-1-1-2-2 times, 2 sts 1-1-1-1-2-2 times and 1 st 1-3-1-4-2-4 times = 56-58-60-60-62-64 sts remain on needle. Continue with pattern, stocking st with 1 edge st in garter st in each side until 1 row remains before piece measures 78-80-82-84-86-88 cm. On next row work sts in each cable K tog 2 by 2 (from RS = 12 sts dec) = 44-46-48-48-50-52 sts remain on needle. Then cast off the middle 12-12-14-14-16-16 sts for neck and finish each shoulder separately. Continue pattern and cast off 1 st on next row from neck = 15-16-16-16-16-17 sts remain on the shoulder. Continue with K over K, P over P and garter st over garter st until piece measures 80-82-84-86-88-90 cm and cast off (make sure to avoid a tight cast-off edge). Repeat on the other shoulder. RIGHT FRONT PIECE: Cast on 72-77-77-82-87-92 sts on circular needle size 7 mm and P 1 row from WS. Work next row as follows from RS: Work rib according to diagram A.5 (= 32 sts), * K 2, P 3 *, repeat from *-* until 5 sts remain on needle, finish with K 2 and 3 edge sts in garter st. Continue rib like this. When piece measures 6-6-6-8-8-8 cm, work next row as follows from RS: Work and dec according to diagram A.6 (= 32 sts dec to 30 sts), P the next 20 sts and dec AT THE SAME TIME 3 sts evenly over these sts, K the next 17-22-22-27-32-37 sts and dec AT THE SAME TIME 5-7-5-6-7-9 sts evenly over these sts and finish with 3 edge sts in garter st = 62-65-67-71-75-78 sts. Switch to circular needle size 8 mm and work back from WS with K over K, P over P and garter st over garter st, but sts in A.6 are worked as shown in diagram A.6. Work next row as follows from RS: Work A.7 (= 30 sts), P 17, K 12-15-17-21-25-28 and 3 edge sts in garter st. Continue pattern like this. When piece measures 10-10-10-11-11-11 cm, beg dec in the side and dec as on back piece = 55-58-60-63-67-70 sts. When piece measures 60-61-62-63-64-65 cm, beg cast off for armhole and cast off in the side as on back piece = 52-53-54-54-55-56 sts remain on needle. Continue pattern with 1 edge sts in garter st towards armhole until piece measures 74-76-77-79-80-82 cm. Now cast off the outermost 32-32-33-33-34-34 sts at beg of row from mid front for neck. Continue to cast off for neck at the beg of every row from mid front as follows: Cast off 2 sts 1 time and 1 st 3 times = 15-16-16-16-16-17 sts remain on needle. Continue with K over K, P over P and garter st over garter st until piece measures 80-82-84-86-88-90 cm and cast off (make sure to avoid a tight cast-off edge). LEFT FRONT PIECE: Cast on as on right front piece and work as right front piece but reversed. I.e. at beg of piece P 1 row from WS. Work next row as follows from RS: 3 edge sts in garter st, * K 2, P 3 *, repeat from *-* 7-8-8-9-10-11 times in total, K 2 and finish with rib according to diagram A.8 (= 32 sts). When piece measures 6-6-6-8-8-8 cm, work next row as follows from RS: 3 edge sts in garter st, K the next 17-22-22-27-32-37 and dec AT THE SAME TIME 5-7-5-6-7-9 sts evenly over these sts, P the next 20 sts and dec AT THE SAME TIME 3 sts evenly over these sts and work and dec according to diagram A.9 (= 32 sts dec to 30 sts) = 62-65-67-71-75-78 sts. Switch to circular needle size 8 mm and work back from WS with K over K, P over P and garter st over garter st but sts in A.9 are worked as shown in diagram A.9. Work next row as follows from RS: 3 edge sts in garter st, K 12-15-17-21-25-28, P 17 and A.10 over the last 30 sts. Then work as right front piece. SLEEVE: Work in the round on double pointed needles, switch to a short circular needle when needed. Cast on 35-35-35-35-40-40 sts on double pointed needles size 7 mm with Melody. K 1 round, then work rib in the round = K 2/P 3. When rib measures 10-10-10-12-12-12 cm, K 1 round while dec 11-9-7-7-10-8 sts evenly = 24-26-28-28-30-32 sts. Switch to double pointed needles size 8 mm and work in stocking st in the round. When piece measures 13 cm, inc 2 sts mid under sleeve - READ INCREASE TIP. Inc like this every 4-3½-3½-3-2½-2½ cm 9-10-10-12-13-13 times in total = 42-46-48-52-56-58 sts. When piece measures 49-48-47-47-45-44 cm, cast off the middle 6 sts mid under sleeve and work sleeve cap back and forth until finished measurements on circular needle. Continue with stocking st and cast off at beg of every row in each side as follows: Cast off 2 sts 1-2-2-2-3-3 times and 1 st 1 time, then cast off 2 sts in each side until piece measures 55-55-55-56-56-56 cm before casting off 3 sts 1 time in each side. Cast off the remaining sts, piece measures approx. 56-56-56-57-57-57 cm. Knit another sleeve. ASSEMBLY: Sew the shoulder seams. Sew in the sleeves inside 1 edge st. HOOD: Pick up from RS approx. 90 to 100 sts around the neck on circular needle size 8 mm. P 1 row from WS while inc evenly to 120-122-124-126-128-130 sts – NOTE: K the 2 outermost sts in each side and do not inc over these sts. Work next row as follows from RS: Work pattern according to diagram A.7 (= 30 sts - continue repetition where it ended after neck dec), work in stocking st until 30 sts remain and finish with pattern according to diagram A.10 (= 30 sts – continue where it ended after neck dec). Continue back and forth like this until hood measures 34-35-36-37-38-39 cm. On next row from RS work sts in cables K tog two by two (= 12 sts dec in each side = 96-98-100-102-104-106 sts remain on needle). On next row cast off all sts (make sure to avoid a tight cast-off edge). Fold the hood double and sew tog at the top with grafting/kitchener sts. TIES: Cut 1 strand Melody of 1 meter, twine strand until it resist, fold strand double and it will twine again. Make a knot at each end. Thread tie through cable at the edge on right front piece approx. 34-36-38-40-42-44 cm from shoulder and down (or desired length). Make another tie and fasten it the same way on left front piece. Close the jacket by tying the two ties tog. |
|||||||||||||||||||||||||||||||
Diagram explanations |
|||||||||||||||||||||||||||||||
|
|||||||||||||||||||||||||||||||
 |
|||||||||||||||||||||||||||||||
 |
|||||||||||||||||||||||||||||||
 |
|||||||||||||||||||||||||||||||
 |
|||||||||||||||||||||||||||||||
Have you finished this pattern?Tag your pictures with #dropspattern #melodyofsnowcardigan or submit them to the #dropsfan gallery. Do you need help with this pattern?You'll find 32 tutorial videos, a Comments/Questions area and more by visiting the pattern on garnstudio.com. © 1982-2026 DROPS Design A/S. We reserve all rights. This document, including all its sub-sections, has copyrights. Read more about what you can do with our patterns at the bottom of each pattern on our site. |
|||||||||||||||||||||||||||||||


With over 40 years in knitting and crochet design, DROPS Design offers one of the most extensive collections of free patterns on the internet - translated to 17 languages. As of today we count 324 catalogues and 12290 patterns translated into English (UK/cm). 12290
We work hard to bring you the best knitting and crochet have to offer, inspiration and advice as well as great quality yarns at incredible prices! Would you like to use our patterns for other than personal use? You can read what you are allowed to do in the Copyright text at the bottom of all our patterns. Happy crafting!
Post a comment to pattern DROPS 172-4
We would love to hear what you have to say about this pattern!
If you want to leave a question, please make sure you select the correct category in the form below, to speed up the answering process. Required fields are marked *.