
Popular categories
Looking for a yarn?


Comments / Questions (91)
![]() Elin wrote:
Elin wrote:
Önskar få en förtydligan av raglan ökningen. Förstår den inte riktigt.
25.11.2025 - 21:01DROPS Design answered:
Hei Elin. Ta gjerne en titt på de ulike hjelpe videoene som er linket til denne oppskriften, se Videor til høyre/under bildet. Der finner du video på: Hur man stickar en tröja uppifrån och ner, Öka - sticka 2 m i 1 m och Hur man ökar med ett omslag. Under Tips & Hjelp finner du også videoer på hvordan man strikker vridd. mvh DROPS Design
01.12.2025 - 12:05
![]() Sini wrote:
Sini wrote:
Hihan neulominen ja silmukoiden luominen. Miten keskelle hihan alle luodaan 8 silmukkaa?
16.10.2025 - 12:22
![]() Anita Bergund wrote:
Anita Bergund wrote:
Jeg vurderer å strikke genser winter wine og har lest oppskriften på forhånd. Denne genseren har ikke noe beskrivelse om den skal strikkes med forkortede pinner for å få en høyere nakke, slik at det blir en rundere hals. Ser sånn ut på bildet synes jeg. Er det en mangel i oppskriften?
16.02.2025 - 18:53DROPS Design answered:
Hej Anita, nej den her genser er ikke strikket med forkortede pinde :)
18.02.2025 - 12:08
![]() Esther wrote:
Esther wrote:
Beginnen met het lijf. Ga ik nu minderen en meerderen in de 8 steken (na 4st markeerder) die ik als nieuw onder de mouw heb opgezet? Het zijn dus 4 st voor en 4 st na de markeerder. Maar als ik daar totaal 3 x1 st wil minderen houd ik geen st over om te meerderen. Hoe nu verder, graag uitleg svp
13.11.2024 - 15:49DROPS Design answered:
Dag Esther,
De markeerder zit er alleen om het midden onder de mouw aan te geven en je mindert aan beide kanten van midden onder de mouw, dus aan beide kanten van de markeerder. Als je verder de mouw aan het breien bent, brei je steeds tricotsteek in de rondte en horen die 4 steken aan beide kanten gewoon bij de mouw. Dus gewoon minderen zoals beschreven.
13.11.2024 - 19:37
![]() Esther Van Dort wrote:
Esther Van Dort wrote:
Meerderen voor de raglan, voor de markeerder: Voor de laatste 2 st van de markeerder, meerder ik dan of 1 meerderen, 1 r, 1 meerderen, 1 r? En na de markeerder eerst 2 rbreien en dan meerderen 2x? Ik wil niet meerderen met omslag maar het tussen liggend draad tussen 2 steken gebruiken Alvast bedankt
15.10.2024 - 21:00DROPS Design answered:
Dag Esther,
4 steken voor de markeerder brei je als volgt: brei 2 recht in de volgende 2 steken. (dus in elk van de volgende 2 steken brei je 2 recht door in de voorste en achterste lus van de steek te breien), dan 2 steken recht. Nu ben je bij de markeerder. Direct na de markeerder brei je eerst 2 steken recht. Dan brei je weer 2 recht in de volgende 2 steken (dus in elk van de volgende 2 steken brei je 2 recht door in de voorste en achterste lus van de steek te breien).
19.10.2024 - 10:58
![]() Silke wrote:
Silke wrote:
Der Pullover ist wunderschön geworden. Ich habe die Originalwolle verwendet, es ging ganz fix und er passt wie angegossen.
21.09.2024 - 15:46
![]() Mrs Downs wrote:
Mrs Downs wrote:
I would like to know where I can find the step by step video of the Winter Wine jumper. I’m sure I’ve seen one
14.06.2024 - 18:55DROPS Design answered:
Dear Mrs Down, all the relevant videos for this pattren can be found if you click on teh "Videos" sign at the top op the pattern, just below the title line. Happy Knitting!
15.06.2024 - 00:36
![]() Nathalie ROQUES wrote:
Nathalie ROQUES wrote:
Je suis bien embêtée pour le début de ce pull car, en montant 64 m (taille S), ça me fait un tour de cou de 30 cm qui est bien sûr beaucoup trop petit pour passer ma tête ! Je vois pourtant que ça correspond aux mesures notées sur le patron (15cm à plat). Alors que, d'après les photos, le col a l'aire plutôt large. Il y a vraiment quelque chose que je n'ai pas compris ! Pouvez-vous m'aider ?
08.03.2023 - 15:14DROPS Design answered:
Bonjour Mme Rocques, pensez à bien vérifier votre tension, vous devez avoir 17 m x 22 rangs jersey = 10 x 10 cm avec les aiguilles les plus grosses, avec les plus petites, on compte en général 18 m = 10 cm de large, soit environ 36 cm de circonférence, ce qui doit suffire à passer la tête si votre rang de montage est suffisamment souple, vous pouvez utiliser une aiguille d'une taille au-dessus si besoin, soit juste pour le montage, soit pour le reste aussi (en fonction de votre tension). Bon tricot!
08.03.2023 - 15:28
![]() Alcalde wrote:
Alcalde wrote:
Pouvez vous m expliquer pour le modèle "winter wine" comment faire pour rabattre 4 m( 2 m endroit +2 m envers) 1 jeté rabattre 1 jeté
18.02.2023 - 08:47DROPS Design answered:
Bonjour Mme Alcade, vous devez procéder ainsi, rabattez les 4 mailles suivantes (autrement dit 2 mailles endroit et 2 mailles envers), puis faites 1 jeté, rabattez ce jeté comme une maille normale. Et répétez cette séquence, autrement dit, vous rabattez avec 1 jeté après chaque 4ème maille. Cette vidéo montre comment rabattre avec des jetés. Bon tricot!
20.02.2023 - 09:16
![]() Pia Liukku wrote:
Pia Liukku wrote:
Hei. Jos 4 merkin molemmin puolin kavennetaan/lisätään yksi silmukka eli 8 silmukkaa yhteensä 3 kertaa niin miksi lisättyjä silmukoita on yhteensä vain 12 vähemmän/enemmän vyötärö kavennuksen/lisäyksen jälkeen? T. Pia
04.09.2022 - 19:03
|
|
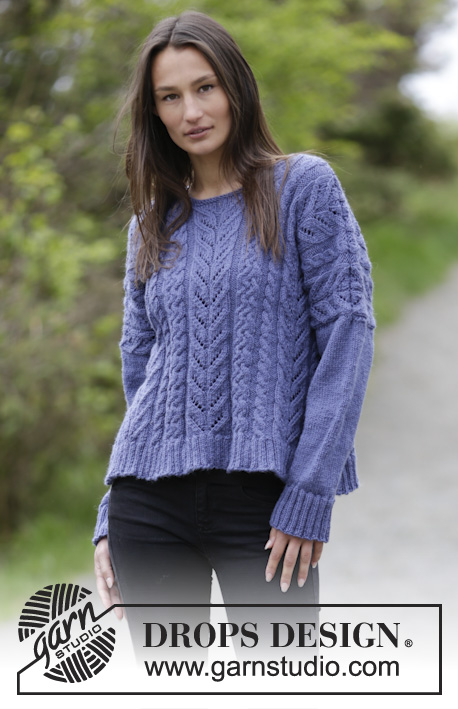
Winter Wine#winterwinesweater |
|
 |
 |
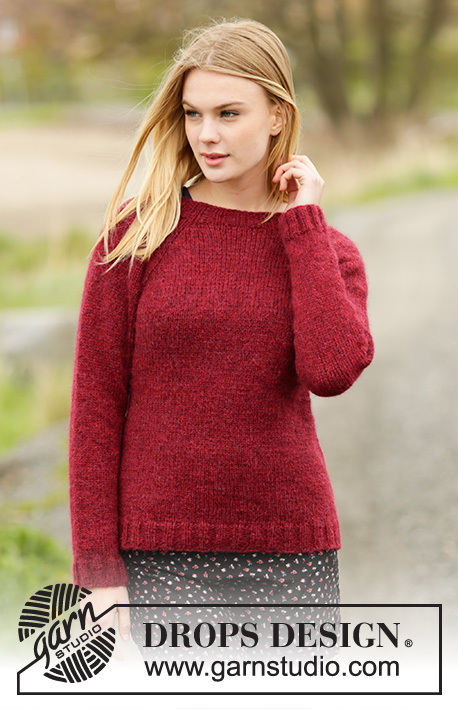
Knitted DROPS jumper with rib and raglan in ”Air”. Worked top down. Size: S - XXXL.
DROPS 164-20 |
|
|
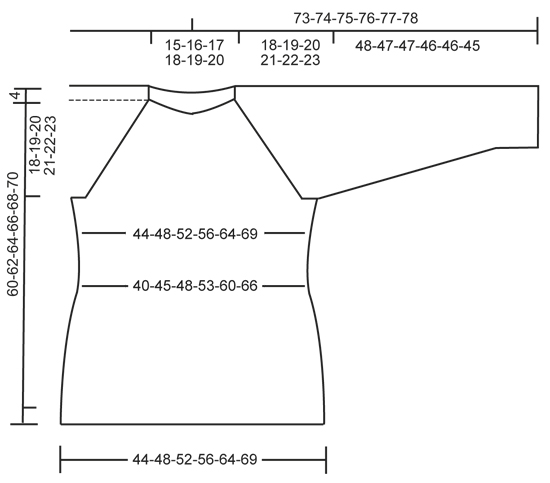
RAGLAN: Inc 2 st on each side of every raglan as follows (= 16 sts inc): Inc as follows before 4 sts in stocking st and marker: K 2 in the next 2 sts (i.e. work in front and back loop of st), 2 sts in stocking st = 2 sts inc. Inc as follows after marker and 2 sts in stocking st: K 2 in the next 2 sts (i.e. work in front and back loop of st) = 2 sts inc. Inc 1 st on each side of every raglan as follows (= 8 sts inc): Inc as follows before 2 sts in stocking st and marker: 1 YO, 2 sts in stocking st. Inc after marker as follows: 2 sts in stocking st, 1 YO. K YOs twisted on next round to avoid holes. INCREASE TIP: Inc as follows before 2 sts in stocking st and marker: 1 YO, 2 sts in stocking st. Inc after marker as follows: 2 sts in stocking st, 1 YO. K YOs twisted on next round to avoid holes. DECREASE TIP: Dec as follows before marker: Work until 3 sts remain before marker, K 2 tog, K 1. Dec as follows after marker: K 1, slip 1 st as if to K, K 1, psso ---------------------------------------------------------- JUMPER: Worked in the round, top down on circular needle. Work sleeve in the round on circular needle/double pointed needles. YOKE: Cast on 64-72-76-84-88-92 sts on circular needle size 4.5 mm with Air. K 1 round, then work rib = K 2/P 2. When rib measures 4 cm, K 1 round while inc 8-8-8-12-24-32 sts evenly = 72-80-84-96-112-124 sts. Switch to circular needle size 5 mm. Now work as follows (from mid back): K 11-13-14-17-21-24 (= half back piece), insert a marker, K 14 (= sleeve), insert a marker, K 22-26-28-34-42-48 (= front piece), insert a marker, K 14 (= sleeve), insert a marker, K 11-13-14-17-21-24 (= half back piece). REMEMBER THE KNITTING TENSION Continue in stocking st, AT THE SAME TIME on next round beg inc for RAGLAN – see explanation above! Inc 2 sts on each side of every marker on every other round 2-3-4-4-5-6 times in total. Then inc 1 st on each side of every marker on every other round 18-18-18-19-19-19 times in total = 248-272-292-312-344-372 sts. Piece measures 22-23-24-25-26-27 cm from shoulder. Now work as follows: Work the first 33-37-40-44-50-55 sts (= half back piece), slip the next 58-62-66-68-72-76 sts on a stitch holder (= sleeve), cast on 8 new sts under sleeve (insert a marker in the middle of these new sts), work the next 66-74-80-88-100-110 sts (= front piece), slip the next 58-62-66-68-72-76 sts on a stitch holder (= sleeve), cast on 8 new sts under sleeve (insert a marker in the middle of these new sts), work the remaining 33-37-40-44-50-55 sts (= half back piece). NOW MEASURE THE PIECE FROM HERE. BODY: There are now 148-164-176-192-216-236 sts on round. Continue in stocking st. When piece measures 4 cm, dec 1 st on each side of each marker - READ DECREASE TIP! Repeat dec every 4-4½-5-5½-6-6½ cm 2 more times = 136-152-164-180-204-224 sts. When piece measures 18-19-20-21-22-23 cm, inc 1 st on each side of every marker – see INCREASE TIP. Repeat inc every 8 cm 2 more times = 148-164-176-192-216-236 sts. When piece measures 37-38-39-40-41-42 cm, switch to circular needle size 4.5 mm. Work rib (= K 2/P 2). When piece measures 42-43-44-45-46-47 cm, loosely cast off as follows: * Cast off 4 sts (2 K + 2 P), 1 YO, cast off YO *, repeat from *-*. SLEEVE: Work sleeve in stocking st in the round on circular needle/double pointed needles. There are 58-62-66-68-72-76 sts for each sleeve. Slip sts from stitch holder back on circular needle/double pointed needles size 5 mm and cast on 8 new sts under sleeve = 66-70-74-76-80-84 sts. Work in stocking st in the round, AT THE SAME TIME insert a marker in the middle of the new sts under sleeve (i.e. 4 sts on each side of marker). NOW MEASURE THE PIECE FROM HERE. When piece measures 4 cm, dec 1 st on each side of marker - READ DECREASE TIP. Repeat dec approx. every 3-2½-2½-2½-2-2 cm 12-14-14-15-15-17 more times = 40-40-44-44-48-48 sts. When sleeve measures 44-43-43-42-42-41 cm, switch to double pointed needles size 4.5 mm and work rib (K 2/P 2) over all sts. When sleeve measures 48-47-47-46-46-45 cm, cast off with K over K and P over P. Work the other sleeve the same way. ASSEMBLY: Sew the openings under the sleeves. |
|
 |
|
Have you finished this pattern?Tag your pictures with #dropspattern #winterwinesweater or submit them to the #dropsfan gallery. Do you need help with this pattern?You'll find 23 tutorial videos, a Comments/Questions area and more by visiting the pattern on garnstudio.com. © 1982-2026 DROPS Design A/S. We reserve all rights. This document, including all its sub-sections, has copyrights. Read more about what you can do with our patterns at the bottom of each pattern on our site. |
|


With over 40 years in knitting and crochet design, DROPS Design offers one of the most extensive collections of free patterns on the internet - translated to 17 languages. As of today we count 324 catalogues and 12290 patterns translated into English (UK/cm). 12290
We work hard to bring you the best knitting and crochet have to offer, inspiration and advice as well as great quality yarns at incredible prices! Would you like to use our patterns for other than personal use? You can read what you are allowed to do in the Copyright text at the bottom of all our patterns. Happy crafting!
Post a comment to pattern DROPS 164-20
We would love to hear what you have to say about this pattern!
If you want to leave a question, please make sure you select the correct category in the form below, to speed up the answering process. Required fields are marked *.