
Popular categories
Looking for a yarn?


Comments / Questions (183)
![]() Basil wrote:
Basil wrote:
Hi, after I work the first round of A1 and 5dc before the increases, do I continue to have 5dc between each repetition of A1X in the following rounds or is it just consecutive repetitions of A1X for those rounds? Thank you!
18.07.2024 - 22:08DROPS Design answered:
Dear Basil, you need to continue the pattern as established in the first row. So continue with 5dc and the first repeat of A.1 (so the first row and the rows in A.1X). After completing A.1 once, skip the first row in A.1 and only repeat the rows indicated in A.1X, but the pattern is still as established (so 5dc between repeats). Happy crochetting!
21.07.2024 - 19:38
![]() Agneta wrote:
Agneta wrote:
Mittåt på min fråga, inser just att den andra 28 är 20 mitt bak + 8 sidökningar
01.07.2024 - 20:18
![]() Agneta wrote:
Agneta wrote:
Hej, jag virkar den minsta storleken. Då har jag 224 maskor när ökningarna börjar. Jag ska öka två gånger 28 maskor och en gång 20 maskor. Det blir 300 maskor. Men enligt mönstret ska det bara vara 280 maskor. Ska jag minska ökningarna eller ska jag fortsätta med 300 maskor?
01.07.2024 - 19:27
![]() Ana Vega wrote:
Ana Vega wrote:
Buenas tardes. Estoy realizando esta labor para la talla S y he llegado a esta parte que no entiendo : Continuar trabajando 1 vta de p.b. y AL MISMO TIEMPO aum 28-16-2 p.b. repartidos = 224-256-288 p.b. Lo que no comprendo es si este párrafo se refiere a que aumente a lo largo de esa vuelta 28 puntos bajos para la talla S , ya que al final no quedarían los 224 puntos iniciales, sino 224 +28 = 252 Les agradecería que me explicasen esa parte. Muchas gracias
30.06.2024 - 20:29DROPS Design answered:
Hola Ana, recuerda que, antes de las filas acortadas, habías saltado puntos y de los 224 puntos iniciales habías pasado a tener 196 pts. Después trabajas filas acortadas, pero sin disminuir puntos y, al terminar las filas acortadas, vuelves a trabajar sobre los 196 pts. En este momento, aumentas 28pts y pasas a tener 224 pts de nuevo.
07.07.2024 - 22:54
![]() Rosa Cabañas wrote:
Rosa Cabañas wrote:
Buenos días mi hija es muy delgado ta, he realizado el patrón de la talla S/M ¿Cómo tengo que hacer para poder hacer una talla XS? Lo he realizado con hilo Safran y ganchillo del 2,5. Le queda muy bonito; pero un poco grande. Gracias y un saludo
21.06.2024 - 07:16DROPS Design answered:
Hola Rosa, para esto tienes que calcular las medidas deseadas, mirando las medidas de tu hija, y ajustar el patrón de acorde a ellas. Puedes ver cómo calcular esto en la siguiente lección: https://www.garnstudio.com/lesson.php?id=25&cid=23.
23.06.2024 - 18:35
![]() Birgit wrote:
Birgit wrote:
Blir inte klok på detta mönster, har stickat o virka mycket, men detta mönster tar alla rekord! Flera har frågat om A1 och A1X. Jag har tittat på videon, men blir ändå inte klok på den. Hur virkar man första varvet efter de fasta maskorna? Förklara istället för att svara virka mönstret.
15.06.2024 - 14:13DROPS Design answered:
Hei Birgit. Første omgang etter 2 cm med fastmasker hekles slik: Hekle 4 luftmasker (3 av disse luftmasken = 1 stav), hopp over 1 fastmaske, deretter hekles det slik omgangen rundt * 1 stav i neste fastmaske, 1 luftmaske, hopp over 1 fastmaske *, gjenta det som står mellom stjernene (*-*) hele omgangen rundt, og avslutt med 1 kjedemaske i 3.luftmaske (av de 4 luftmaskene man startet med) på begynnelsen av omgangen = hullraden. Om du ønsker forklaring på hvordan A.1 og A.x1 skal hekles, skriv mer nøyaktig hvor du er i oppskriften og hvilken str. du hekler, så skal vi hjelpe så godt vi kan. mvh DROPS Design
24.06.2024 - 12:53
![]() Gael wrote:
Gael wrote:
I have used a different yarn and hook and based on my hip measurement I have start with 182 chains so for the rest of the pattern should I alter the number of stitches for the higher in the back number of stich or can I keep the same number. If I have to change how can I know how many I need to do?
10.06.2024 - 06:28DROPS Design answered:
Dear Gael, if your tension is different you will have to adjust all instructions with your own tension using the pattern as a basis. Happy crocheting!
10.06.2024 - 12:54
![]() Caroline wrote:
Caroline wrote:
Oui merci pour la réponse, je vais pouvoir continuer à crocheter sereinement 🙂
27.05.2024 - 08:54
![]() Caroline wrote:
Caroline wrote:
Bonjour, concernant le short Elly May, concernant le début quand on doit placer les marqueurs pour préparer le point fantaisie AX1, faut il démarrer le rang avec 3 brides (dont 3 ml en l'air compte comme 1 bride), ensuite encore 3 B ? (puisque vous mentionnez A1=3B) et à partir de là faire "5B, A1(3 brides). Donc au début du rang il y aurait 6 brides avant le point fantaisie ? Ou c'est 3 brides et après on fait "5B, A1" C'est pas très clair pour moi. Merci
26.05.2024 - 18:40DROPS Design answered:
Bonjour Caroline, est-ce que la réponse précédente a pu vous aider? Si ce n'est pas le cas, n'hésitez pas à nous le faire savoir. Merci, bon crochet!
27.05.2024 - 08:49
![]() Lermigeaux wrote:
Lermigeaux wrote:
Superbe pour filles et petites filles jeunes, celà change du sempiternel short. Vos modèles quelq qu'ils soient son superbes et bien expliqués Merci
25.05.2024 - 13:01
|
||||||||||||||||||||||||||||
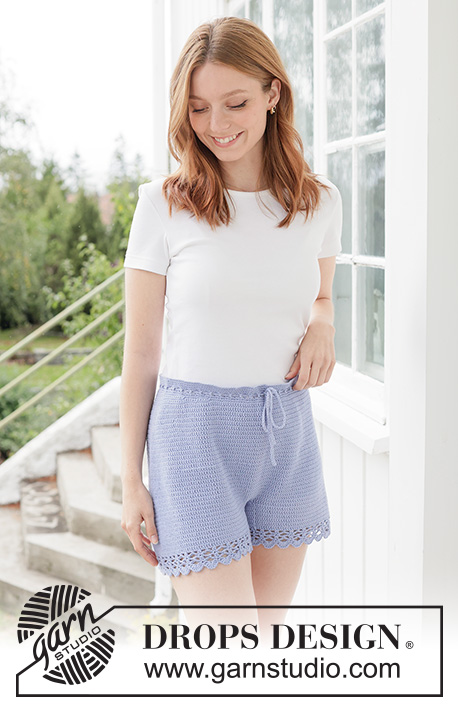
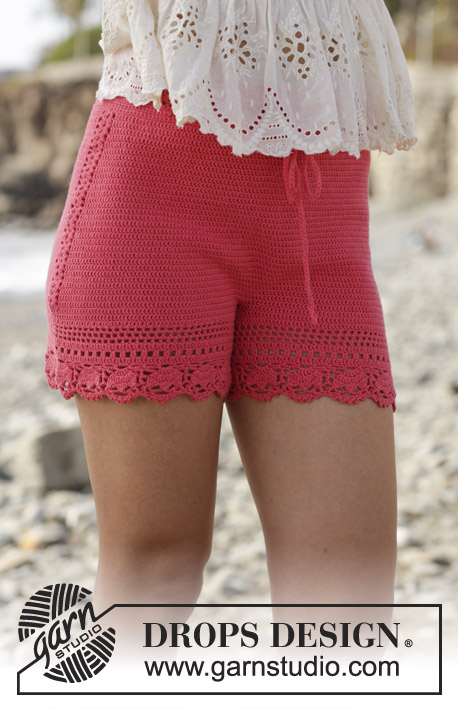
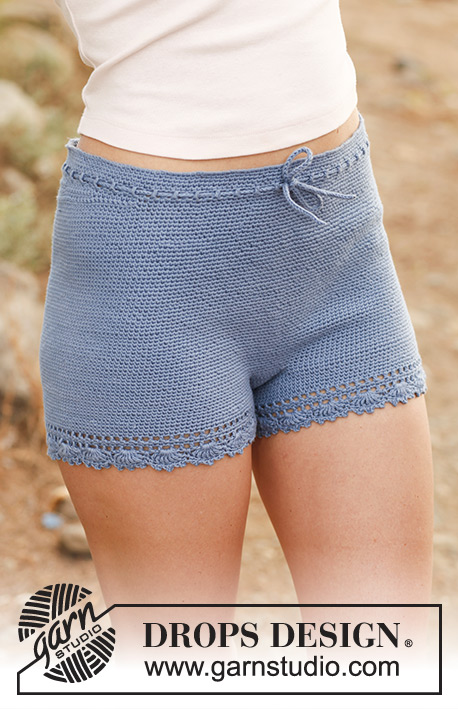
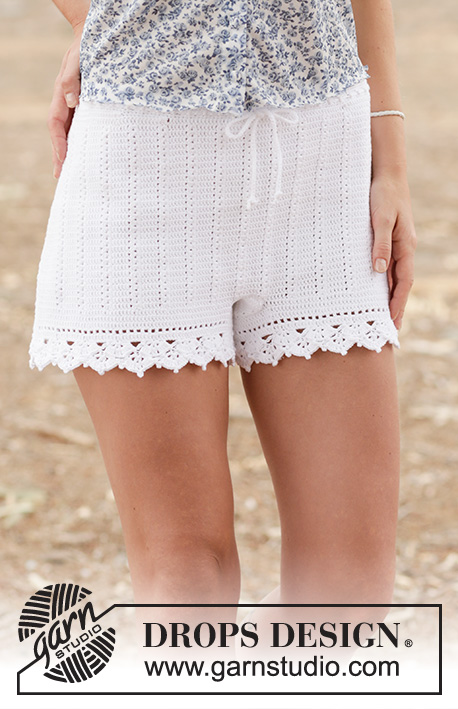
Elly May#ellymayshorts |
||||||||||||||||||||||||||||
 |
 |
|||||||||||||||||||||||||||
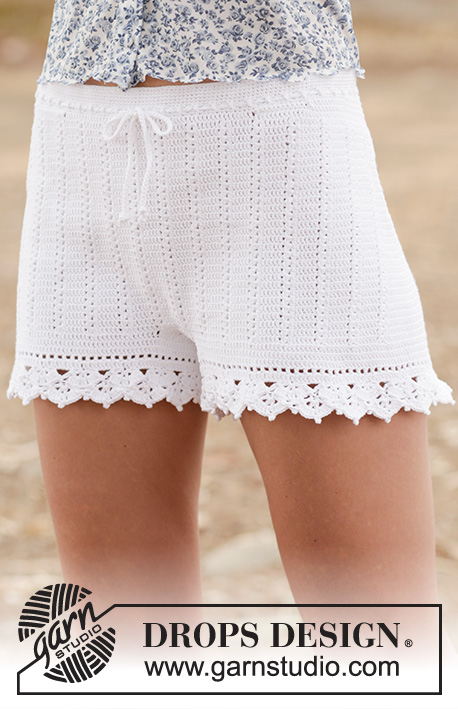
Crochet DROPS shorts with trebles and lace pattern in ”Safran”. Size: S - XXL.
DROPS 162-19 |
||||||||||||||||||||||||||||
|
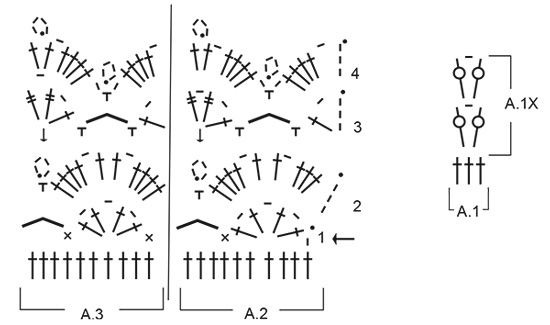
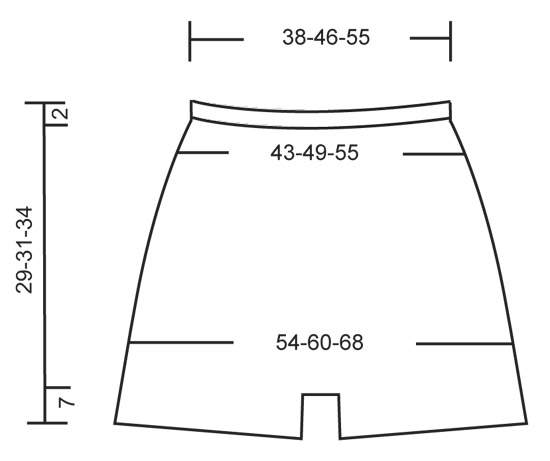
CROCHET INFO: Replace first dc at beg of every dc round with 1 ch. Finish round with 1 sl st in 1st ch at beg of round. Replace first tr at beg of every tr round with 3 ch. Finish round with 1 sl st in 3rd ch at beg of round. PATTERN: See diagrams A.1 to A.3. INCREASE TIP 1: Inc 2 tr mid back as follows: Work until 2 tr remain before marker mid back, work 2 tr in first tr, 1 tr in each of the next 2 tr (marker is between these) and 2 tr in next tr (= 2 tr inc). Inc 4 tr mid back as follows: Work until 4 tr remain before marker mid back, work 2 tr in first tr, 1 tr in next tr, 2 tr in next tr, 1 tr each of the next 2 tr (marker is between these) and 2 tr in next tr, 1 tr in next tr, 2 tr in next tr (= 4 tr inc). INCREASE TIP 2: Work until 1 tr remains before marker in the side, work 2 tr in first tr, 1 tr in next tr (marker is in this tr) and 2 tr in next tr (= 2 tr inc). Repeat the same inc in the other side = 4 sts inc on round. ---------------------------------------------------------- SHORTS: The piece is worked top down. Work 224-274-326 ch on hook size 2,5 mm with Safran and form a ring with 1 sl st in first ch. Insert 1 marker at beg of round = mid back. Work first round as follows: 1 ch, * skip 1 ch, 1 dc in each of the next 7 ch *, repeat from *-* until 0-2-6 ch remain, work 1 dc in each of these ch = 196-240-286 dc. READ CROCHET TIP! Continue working 1 dc in every dc until piece measures 2 cm. REMEMBER THE CROCHET TENSION! Now work an eyelet row as follows: 4 ch, skip 1 dc, * 1 tr in next dc, 1 ch, skip 1 dc *, repeat from *-* the entire round, finish with 1 sl st in 3rd ch from beg of round. On next round work 1 dc in every tr and every ch. Then work the shorts higher in the back as follows: Work 11-12-13 dc past the marker mid back, turn and work 1 sl st in first st, then 1 dc in each of the next 21-23-25 dc, turn and work 1 sl st in first st, then 1 dc in each of the next 32-35-38 sts (sl sts are also worked). Continue like this by working 11-12-13 sts more on every turn until a total of 154-192-208 sts have been worked. Turn again and work until marker mid back. Continue to work 1 round with dc while AT THE SAME TIME inc 28-16-2 dc evenly = 224-256-288 dc. Then work pattern (and insert markers) as follows from mid back: 3 tr, A.1 (= 3 tr), * 5 tr, A.1*, repeat from *-* until 2 tr remain, 2 tr, AT THE SAME TIME insert a marker in each side as follows: Insert a marker in the 3rd tr after 7th-8th-9th repetition A.1, and insert a marker in 3rd tr after 21th-24th-27th repetition with A.1 (i.e. 1 marker in each side). When A.1 has been worked 1 time vertically, continue pattern A.1X - AT THE SAME TIME inc mid back and in the sides as follows: SIDES: Inc on each side of tr with marker, in each side as follows - READ INCREASE TIP 2. Repeat inc every 4th round 7-7-8 times in total = 28-28-32 tr inc. MID BACK: AT THE SAME TIME when piece measures 15-17-19 cm (measured mid front), inc mid back as follows – Read INCREASE TIP-1. Repeat inc with 2 tr mid back every round 10 times in total, and repeat inc with 4 tr every round 2-2-3 times = 28-28-32 tr inc. There are now 280-312-352 tr on round. Now piece measures approx. 22-24-27 cm mid front and 27-29-32 cm mid back. Now divide for legs as follows: Work 1 sl st in each of the first 5-6-6 tr on round, turn and work 1 tr in each of the first 10-12-12 tr (i.e. 5-6-6 sts on each side of marker mid back). These 10-12-12 tr = gusset. Work tr back and forth over these tr. When piece measures 4-5-6 cm, dec 1 tr in each side, repeat dec when piece measures 8-9-10 cm = 6-8-8 tr. Continue with 1 tr in every tr until gusset measures 11-12-13 cm, cut the yarn. Fasten gusset edge to edge to the middle 6-8-8 sts towards mid front. Then work the legs. LEG: Work 1 tr in each of the 132-146-166 tr around one leg (i.e. work 1 tr in every tr in A.1X and 1 tr in ch-space = 3 tr), in addition work 28-31-34 tr along the gusset = 160-177-200 tr. Work 2 rounds with tr AT THE SAME TIME on last round inc 0-3-0 tr evenly by working 2 tr in 1 tr = 160-180-200 tr. Continue to work as follows: ROUND 1: 3 ch (= 1 tr), * 1 ch, skip 1 tr, 1 tr in next tr * , repeat from *-* until 1 tr remains, 1 ch, skip 1 tr, 1 sl st in 3rd ch at beg of round. ROUND 2: 3 ch (= 1 tr), * 1 tr in ch-space, 1 tr in next tr *, repeat from *-* the entire round until 1 ch-space remains, 1 tr in ch-space, finish with 1 sl st in 3rd ch on round. ROUND 3: Now work pattern as follows: Work pattern according to diagram A.2 over the first 10 tr, continue with A.3 the entire round. Finish every round with 1 sl st at beg of round. REMEMBER CROCHET INFO! Continue like this until pattern A.2-A.3 have been worked vertically. Fasten off. Work the other leg the same way. TIES: Work 130-140-150 cm with LOOSE ch, turn and work 1 sl st in every ch. Thread the tie in the row with eyelet holes at the top of shorts – start mid front |
||||||||||||||||||||||||||||
Diagram explanations |
||||||||||||||||||||||||||||
|
||||||||||||||||||||||||||||
 |
||||||||||||||||||||||||||||
 |
||||||||||||||||||||||||||||
Have you finished this pattern?Tag your pictures with #dropspattern #ellymayshorts or submit them to the #dropsfan gallery. Do you need help with this pattern?You'll find 13 tutorial videos, a Comments/Questions area and more by visiting the pattern on garnstudio.com. © 1982-2026 DROPS Design A/S. We reserve all rights. This document, including all its sub-sections, has copyrights. Read more about what you can do with our patterns at the bottom of each pattern on our site. |
||||||||||||||||||||||||||||


With over 40 years in knitting and crochet design, DROPS Design offers one of the most extensive collections of free patterns on the internet - translated to 17 languages. As of today we count 324 catalogues and 12291 patterns translated into English (UK/cm). 12291
We work hard to bring you the best knitting and crochet have to offer, inspiration and advice as well as great quality yarns at incredible prices! Would you like to use our patterns for other than personal use? You can read what you are allowed to do in the Copyright text at the bottom of all our patterns. Happy crafting!
Post a comment to pattern DROPS 162-19
We would love to hear what you have to say about this pattern!
If you want to leave a question, please make sure you select the correct category in the form below, to speed up the answering process. Required fields are marked *.