
Popular categories
Looking for a yarn?


Comments / Questions (35)
![]() RAVASSAT wrote:
RAVASSAT wrote:
Bonjour, est-ce qu'après avoir supprimé la qualité Cloud , vous allez supprimé AIR car chez le revendeur il est indiqué "en rupture" et qu'il n'y a pas de commande chez le fournisseur, cause inconnue ? Merci
17.10.2017 - 12:26DROPS Design answered:
Bonjour Mme Ravassat, DROPS Air n'est pas arrêtée, mais certaines couleurs sont momentanément en rupture de stock, n'hésitez pas à contacter votre magasin DROPS il pourra vous dire quand il devrait en recevoir à nouveau. Bon tricot!
26.10.2017 - 10:18
![]() Daniela Nabers wrote:
Daniela Nabers wrote:
Vielen lieben Dank für die schnelle Antwort, dann leg ich jetzt mal los. Ein tolle Jacke!!! Schönes Wochenende und liebe Grüße. Daniela
08.09.2017 - 16:34
![]() Daniela Nabers wrote:
Daniela Nabers wrote:
Liebes Drops-Team, ich fange gerade an, die Drops-Jacke by the lake 157-6 zu stricken. Meine Frage: beim Rückenteil bei der ersten Reihe auf Nadel 8 werden zwischen Muster A2 und A1 vier Maschen glatt rechts bei Größe XL gestrickt. Bleiben diese vier Maschen immer zwischen den Mustern und werden hin glatt re und rück glatt links gestrickt? Vielen Dank für Eure Nachricht und Gruß! Daniela
08.09.2017 - 13:36DROPS Design answered:
Liebe Frau Nabers, diese 4 M glatt rechts werden dann im Muster gestrickt, "Die Verschiebung der Links-M in A.1-A.2 in der Höhe so lange wdh, bis sich die Verschiebungen an der rückwärtigen Mitte treffen". Viel Spaß beim stricken!
08.09.2017 - 16:10
![]() Margit wrote:
Margit wrote:
Liebes Drops-Team, könnte man den Mantel auch mit Eskimo stricken? (Lauflänge natürlich umgerechnet). Danke und liebe Grüße Margit
10.03.2017 - 17:51DROPS Design answered:
Liebe Margit, 1 Faden Cloud = 1 Faden Eskimo (= selbe Garngruppe), hier können Sie die Lauflänge kalkulieren. Viel spaß beim stricken!
13.03.2017 - 09:34
![]() Anne Helene Herseth wrote:
Anne Helene Herseth wrote:
Jeg skjønner ikke mønsteret.skal jeg fortsette med A1og 2 etter første gang.mønsteret vil jo ikke treffes bak da det skal være 4masker mellom?sjelden jeg må stille som ved et mønster.dårlig forklart
04.01.2017 - 17:31DROPS Design answered:
Hej Anne. Ja, du skal fortsaette med mönstret i höjden - hvor det forskyder hver gang mod höjre eller venstre, saa mönstret til sidst vil mödes. Og du begynder saa hele tiden paa en ny "stribe" efter 4 m i höjden ogsaa
11.01.2017 - 12:48
![]() Willy Van Schouwen wrote:
Willy Van Schouwen wrote:
Dit vest heb ik in drie weken in de avonduren gebreid. Het resultaat is prachtig! De wol breit heel mooi op en ik krijg veel complimentjes over het resultaat. Dit vest ga ik nog 3 x breien voor mijn dochters en schoondochter!
14.10.2016 - 14:04Tanja Chopra wrote:
I love this coat! I have made it several times now - from brushed alpaca silk - and it is an amazingly looking coat, incredibly soft and 'feather' light.
19.06.2016 - 19:59
![]() Louise wrote:
Louise wrote:
Very disappointed with this pattern! Depending on which size you make, it may not look like the picture! Some of the sizes (mine!!!) have a 4-stitch band down the center back, and a 2-stitch band along the front button bands. This is NOT attractive. There is no photo of the sweater back so it was quite a surprise when I realized that not all sizes are made this way. So disappointed I feel like frogging the whole thing!
28.01.2016 - 18:22DROPS Design answered:
Dear Louise, for any individual assistance you are welcome to contact your DROPS Store they will provide you personnal help, tips & advices. Happy knitting!
29.01.2016 - 09:16
![]() Helle Christensen wrote:
Helle Christensen wrote:
Hvergang jeg vil printe en opskrift ud, kommer diagrammet ikke med, det vil sige den printer kun to/tre linier af diagrammet....er der nogen forklaring på dette???? Med venlig hilsen Helle
04.03.2015 - 11:15DROPS Design answered:
Hej Helle. Jeg printer her uden problemer, saa jeg tror det kan ligge i dine printerindstillinger. Og det kan jeg desvaerre ikke hjaelpe dig med.
04.03.2015 - 14:51
![]() Ineke Van Gurp wrote:
Ineke Van Gurp wrote:
Ik heb dit vest nu 2 x gebreid , 1 voor mijzelf en 1 voor mijn schoondochter, die er verrukt van was. De wol is prachtig, het patroon is heel goed, het vest draagt heerlijk, staat charmant en blijft mooi!!!
14.12.2014 - 19:40
|
|||||||
By The Lake Jacket#bythelakejacket |
|||||||
 |
 |
||||||
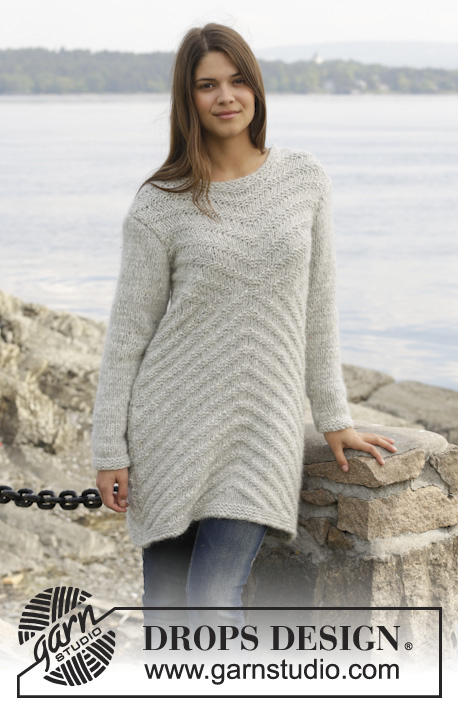
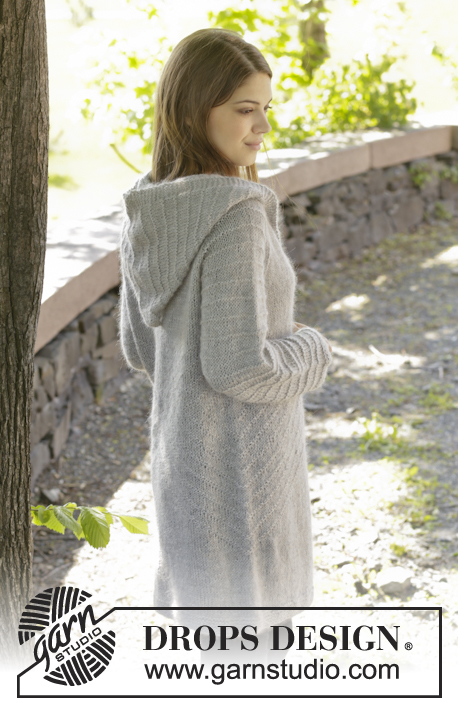
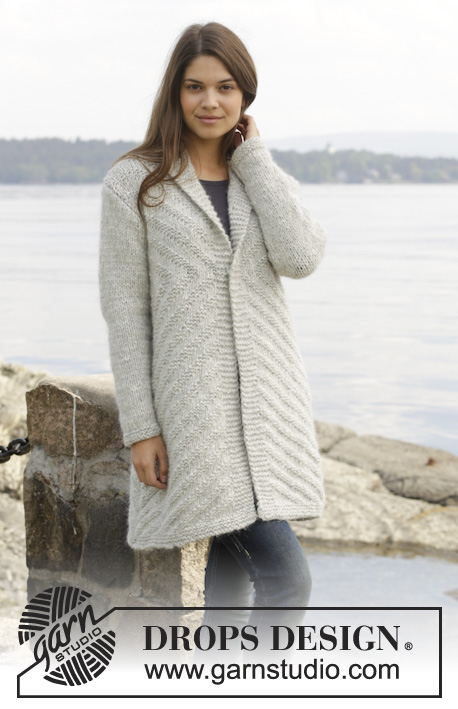
Knitted DROPS jacket with textured pattern and shawl collar in 1 strand ”Cloud” or 2 strands ”Brushed Alpaca Silk”. Size: S - XXXL.
DROPS 157-6 |
|||||||
|
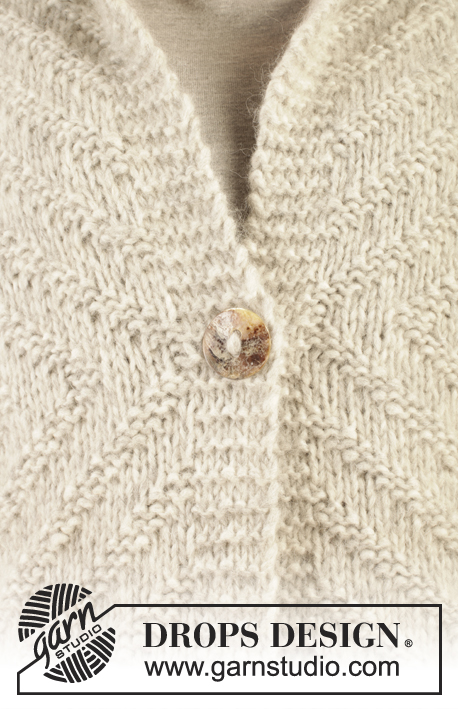
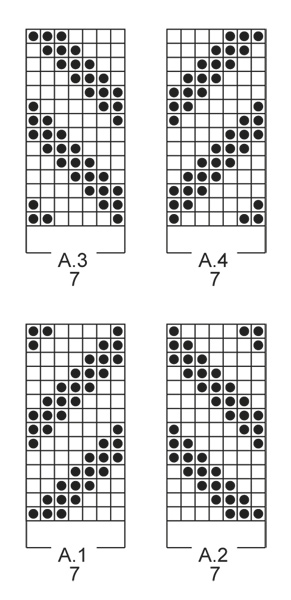
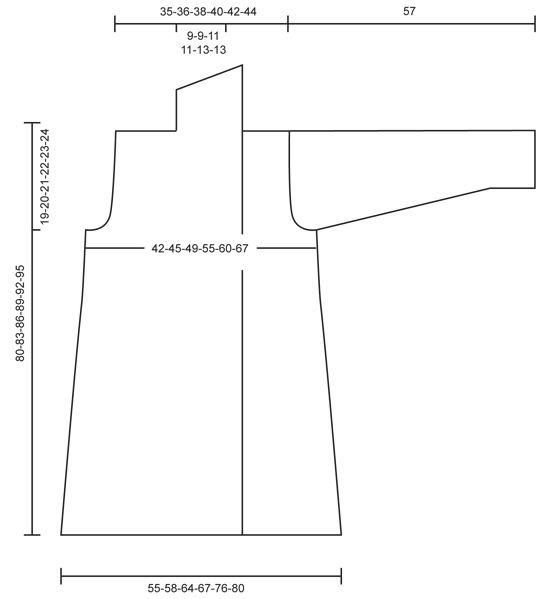
GARTER ST (back and forth on needle): K all rows. 1 ridge = 2 rows K DECREASE TIP: All dec are done from RS. Dec 1 st at beg of row as follows: 1 edge st in garter st, slip next st as if to K, K 1, psso. Dec 1 st at end of row as follows: Work until 3 sts remain on needle, K the next 2 sts tog, 1 edge st in garter st. PATTERN: See diagram A.1-A.4, diagrams show all rows in pattern seen from RS. INCREASE TIP: Inc 1 st by making 1 YO, on next row work YO twisted to avoid holes. BUTTONHOLE: Cast off for buttonhole on right band. 1 buttonhole = cast off 3rd st from mid front and cast on 1 new st on next row over this st. Cast off for buttonhole when piece measures: SIZE S: 50 cm SIZE M: 51 cm SIZE L: 52 cm SIZE XL: 53 cm SIZE XXL: 54 cm SIZE XXXL: 55 cm ---------------------------------------------------------- BACK PIECE: Worked back and forth on needle. Cast on 62-66-72-76-86-90 sts (incl 1 edge st in each side) on circular needle size 7 mm with 1 strand Cloud or 2 strands Brushed Alpaca Silk. Work 3 ridges in GARTER ST - see explanation above. Switch to circular needle size 8 mm. Work as follows from RS: 1 edge st in garter st, A.2 (= 7 sts) 4-4-5-5-6-6 times in width, stocking st over the next 4-8-0-4-0-4 sts, A.1 (= 7 sts) 4-4-5-5-6-6 times in width, 1 edge st in garter st. NOTE! Work edge sts in the sides in garter st until finished measurements. REMEMBER THE KNITTING TENSION! Repeat displacement in A.1-A.2 vertically until displacement meet mid back. When piece measures 12 cm, dec 1 st inside 1 edge st in each side - READ DECREASE TIP. Repeat dec every 7-7½-7-8½-6½-9 cm 6-6-7-6-8-6 more times = 48-52-56-62-68-76 sts. AT THE SAME TIME when piece measures 50-51-52-53-54-55 cm, adjust so that 1 whole or half repetition of A.1-A.2 has been worked, work A.4 over A.2 and A.3 over A.1 until finished measurements. When piece measures 61-63-65-67-69-71 cm, cast off for armholes at the beg of every row in each side as follows: Cast off 3 sts 0-0-1-1-1-1 time, 2 sts 1-1-1-1-2-3 times, and 1 st 2-3-1-3-3-4 times = 40-42-44-46-48-50 sts. When piece measures 78-81-84-87-90-93 cm, cast off the middle 8-8-10-10-12-12 sts for neck and finish each shoulder separately. On next row from the neck, cast off 1 st = 15-16-16-17-17-18 sts remain for shoulder. Loosely cast off all sts when piece measures 80-83-86-89-92-95 cm. RIGHT FRONT PIECE: Worked back and forth on needle. Cast on 44-46-49-51-56-58 sts (incl 6 band sts and 1 edge st) on circular needle size 7 mm with 1 strand Cloud or 2 strands Brushed Alpaca Silk. Work 3 ridges. Switch to circular needle size 8 mm. Then work as follows from RS: 6 sts in garter st (= band), 2-4-0-2-0-2 sts in stocking st, A.1 5-5-6-6-7-7 times in width, 1 edge st in garter st. NOTE! Work edge sts in the side and band in garter st until finished measurements. Repeat displacement in A.1 vertically until displacement meets band. When piece measures 12 cm, dec 1 st inside 1 edge st in the side - READ DECREASE TIP. Repeat dec every 7-7½-7-8½-6½-9 cm 6-6-7-6-8-6 more times = 37-39-41-44-47-51 sts. AT THE SAME TIME when piece measures 50-51-52-53-54-55 cm, adjust with back piece, – cast off for BUTTONHOLE – see explanation above, AT THE SAME TIME work A.3 over A.1 until finished measurements. When piece measures 61-63-65-67-69-71 cm, cast off for armhole at the beg of every row from WS as follows: Cast off 3 sts 0-0-1-1-1-1 time, 2 sts 1-1-1-1-2-3 times, and 1 st 2-3-1-3-3-4 times = 33-34-35-36-37-38 sts. When piece measures 80-83-86-89-92-95 cm, adjust so that next row is from WS, cast off the first 15-16-16-17-17-18 sts (= shoulder), work the rest of row = 18-18-19-19-20-20 sts. Work in garter st over these sts - AT THE SAME TIME work short rows, beg from the neck (1st row = RS) as follows: * Work 1 ridge over all sts. On next row from RS K 14-14-14-16-16-16, turn and K back *, repeat from *-* until piece measures approx. 10 cm from cast off for shoulder (short side). Loosely cast off all sts. LEFT FRONT PIECE: Cast on and work the same way as on right front piece but reversed - work A.2 and A.4 instead of A.1 and A.3. Do not cast off for buttonhole. Beg short rows from WS. SLEEVE: Worked back and forth on needle. Cast on 26-26-30-30-34-34 sts (incl 1 edge st in each side) on circular needle size 7 mm with 1 strand Cloud or 2 strands Brushed Alpaca Silk. Work 3 ridges. Switch to circular needle size 8 mm. Then work in stocking st with 1 edge st in garter st in each side. When piece measures 9 cm, inc 1 st - Read INCREASE TIP - inside 1 edge st in each side. Repeat inc every 6½-4½-5-4½-5-4 cm 5-7-6-7-6-7 more times = 38-42-44-46-48-50 sts. When piece measures 47-46-45-44-43-43 cm (shorter measurements in the larger sizes because of longer sleeve cap), cast off at beg of every row in each side for sleeve cap as follows: 3 sts 1 time, 2 sts 1 time and 1 st 3-3-4-5-6-5 times. Then cast off 2 sts in each side until piece measures approx. 56 cm, then cast off 3 sts 1 time in each side. Cast off the remaining sts, the piece measures approx. 57 cm. ASSEMBLY: Sew shoulder seams and sew in sleeves in outer loops of edge sts. Sew sleeve and side seams in one inside 1 edge st. Sew band tog mid back to collar - NOTE! Seam should be at the back so that is is not visible when collar is folded down. Sew collar to neck line. Sew the button on to left band. |
|||||||
Diagram explanations |
|||||||
|
|||||||
 |
|||||||
 |
|||||||
Have you finished this pattern?Tag your pictures with #dropspattern #bythelakejacket or submit them to the #dropsfan gallery. Do you need help with this pattern?You'll find 23 tutorial videos, a Comments/Questions area and more by visiting the pattern on garnstudio.com. © 1982-2026 DROPS Design A/S. We reserve all rights. This document, including all its sub-sections, has copyrights. Read more about what you can do with our patterns at the bottom of each pattern on our site. |
|||||||


With over 40 years in knitting and crochet design, DROPS Design offers one of the most extensive collections of free patterns on the internet - translated to 17 languages. As of today we count 324 catalogues and 12290 patterns translated into English (UK/cm). 12290
We work hard to bring you the best knitting and crochet have to offer, inspiration and advice as well as great quality yarns at incredible prices! Would you like to use our patterns for other than personal use? You can read what you are allowed to do in the Copyright text at the bottom of all our patterns. Happy crafting!
Post a comment to pattern DROPS 157-6
We would love to hear what you have to say about this pattern!
If you want to leave a question, please make sure you select the correct category in the form below, to speed up the answering process. Required fields are marked *.