
Popular categories
Looking for a yarn?


Comments / Questions (178)
![]() Mitsuko F wrote:
Mitsuko F wrote:
Start inc. for Raglan and incorporating in bamboo stitch; Do I start bamboo st. only at the first increase marker? That means 2st bamboo and also at the last increase marker. Your pattern indicate to "Work the first 8 inc. its on front piece in bamboo sts. " Does this mean I wait for 4 inc.sts before starting on bamboo its on each side? Thanks always for your prompt reply. Mitsuko
26.05.2019 - 23:26DROPS Design answered:
Dear Mitsuko, the 2 stitches at the edges should be knitted with garter stitch, and when you do the increases, you should work the new inc sts on back piece and sleeves in stocking st, and work the first 8 new inc sts on front piece in bamboo pattern (i.e. inc 2 sts before there is enough sts to work bamboo pattern), then work the remaining inc sts in stocking st. Happy Knitting!
27.05.2019 - 01:54
![]() Mitsuko Fredrickson wrote:
Mitsuko Fredrickson wrote:
I would really like to see the stitches in the back of the coat. How it looks like and how much bamboo stitch and stockinette stitch show.
23.05.2019 - 23:28DROPS Design answered:
Dear Mitsuko, we do not have the pictures you are asking for, however, I would suggest you look through the Ravelry page for this pattern, and see the many pieces that were knitted using this pattern. There you can see it on different sized and shaped bodies, and from different angles as well. Happy Knitting!
27.05.2019 - 02:04
![]() Mitsuko Fredrickson wrote:
Mitsuko Fredrickson wrote:
After you finish the elevation on back of a neck, do you end up with right side of the garment? That means I start the yoke row with wrong side, correct? If not I must be making something wrong with the elevation turn. But I cannot figure out ....
23.05.2019 - 23:16DROPS Design answered:
Dear Mrs Fredrickson, correct, last row worked on short rows for elevation is worked from RS, turn and work next row from WS over all stitches at the same time insert markers (see at the beg of YOKE). Happy knitting!
24.05.2019 - 08:00
![]() Mitsuko Fredrickson wrote:
Mitsuko Fredrickson wrote:
For the hood, after casting on do I knit garter stitch all the way across 116 stitches? Or do I start the bamboo stitch right after casting on with two ridge stitches on both side?
05.05.2019 - 02:08DROPS Design answered:
Hello Mitsuko. For the hood, after casting on sts, you work two rows in garter stitch and then you start with the bamboo stitch. Happy knitting!
05.05.2019 - 08:50
![]() Mitsuko wrote:
Mitsuko wrote:
The sizing on the finished bust measurement and th diagram with the sizes don't match. For instance the small 33" opposed to the diagram 42" Will someone clarify this?
24.04.2019 - 22:00DROPS Design answered:
Dear Mitsuko, measurements in chart are in cm - 42 cm measured flat are 84 cm circumference = 33 inches. Read more about sizing and convert into inches here. Happy knitting!
25.04.2019 - 09:03
![]() Martine wrote:
Martine wrote:
Bonjour ,petite question pour le raglan les points de bambous se construisent sur plusieurs lignes jusqu\\\'à ce qu\\\'on arrive à huit ?? N\\\'auriez vous pas une petite vidéo comme pour les augmentations et la rehausse ? À combien de dessins plus ou moins doit on arriver pour un modèle M Merci belle journée à vous
18.02.2019 - 09:03DROPS Design answered:
Bonjour Martine, cette vidéo montre comment tricoter la réhausse. qui se tricote au point mousse, pas au point de bambou. Les 2 mailles du raglan se tricotent en jersey, vous tricotez les augmentations au point de bambou quand vous en avez suffisamment (= il faut 2 mailles pour tricoter 1 motif entier). Bon tricot!
18.02.2019 - 10:51
![]() Lena Mörk wrote:
Lena Mörk wrote:
Mönster 156-1 Kanten längst ner rullar sig.. Vad göra??? Lena
11.02.2019 - 18:57DROPS Design answered:
Hei Lena. Siden du har 2 kantmasker i riller og så strukturstrikk skal det ikke rulle seg så mye. Du kan prøve å dampe plagget lett når du er ferdig, hvis det likevel har rullet seg. God fornøyelse
13.02.2019 - 13:27
![]() Jada wrote:
Jada wrote:
Can you share the measurements of Medium vs Large, etc.? I'm unsure which would fit right.
02.02.2019 - 22:50DROPS Design answered:
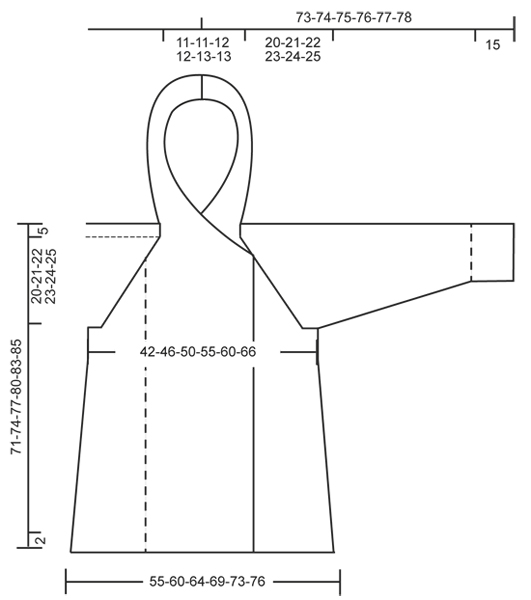
Hi Jada, The measurements for the different sizes are given on a sketch at the bottom of the pattern. Happy knitting!
03.02.2019 - 12:08
![]() Jada wrote:
Jada wrote:
How many skeins of yarn does this pattern require?
30.01.2019 - 03:33DROPS Design answered:
Dear Jada, You will find the required amount of yarn under the header, ie in size S you need 1100 g DROPS Nepal at 50 g a ball - see shadecard here = 22 balls DROPS Nepal in size S. Happy knitting!
30.01.2019 - 07:45
![]() Carolina wrote:
Carolina wrote:
Puedo encargar una para mí???
14.01.2019 - 23:06DROPS Design answered:
Hola Carolina. Esta es la pagina de patrones gratuitos, no vendemos ni las prendas y ni las lanas.
28.01.2019 - 20:35
|
|
Snow Princess#snowprincessjacket |
|
 |
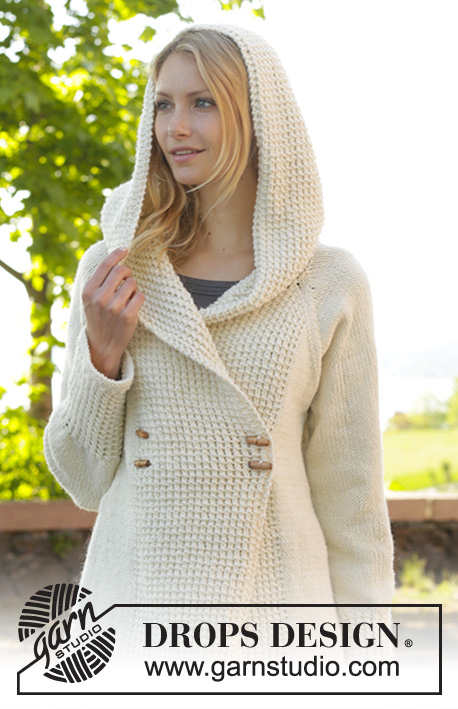 |
Knitted DROPS jacket with raglan, hood and bamboo pattern, worked top down in ”Nepal”. Size: S - XXXL.
DROPS 156-1 |
|
|
GARTER ST (back and forth on needle): K all rows. 1 ridge = 2 rows K. GARTER ST (in the round on double pointed needles): * K 1 round and P 1 round *, repeat from *-*. 1 ridge = 2 rounds. BAMBOO PATTERN (back and forth on needle): Row 1 (= RS): * 1 YO, K 2, pass YO over 2 K sts *, repeat from *-*. Row 2 (= WS): P all sts. Repeat rows 1 and 2. BAMBOO PATTERN (in the round on double pointed needles): Round 1: * 1 YO, K 2, pass YO over 2 K sts *, repeat from *-*. Round 2: K all sts. Repeat rounds 1 and 2. DECREASE TIP: Dec 1 st before marker as follows: Work until 2 sts remain before marker, slip 1 st as if to K, K 1, psso. Dec 1 st after marker as follows: K 2 tog. RAGLAN: Inc as follows at every marker: Work until 1 st remains before marker, 1 YO, K 2, 1 YO = 2 sts inc. Repeat at the remaining markers in piece = 8 sts inc on needle. On next row work YOs twisted (i.e. work in back loop of st instead of front) to avoid holes. ---------------------------------------------------------- JACKET: Worked back and forth, top down on circular needle/double pointed needles. HOOD: Cast on 116 sts in all sizes (incl 2 edge sts in GARTER ST – see explanation above, in each side of piece) on circular needle size 5 mm with Nepal. Work 1 ridge in garter st. Then work BAMBOO PATTERN back and forth – see explanation above, with 2 edge sts in garter st in each side (continue the 2 edge sts in garter st in each side until finished measurements). REMEMBER THE KNITTING TENSION! When piece measures 38 cm, work as follows from RS: Pattern as before over the first 30-32-36-40-44-48 sts, garter st over the next 56-52-44-36-28-20 sts AT THE SAME TIME dec 12-11-10-6-4-0 sts evenly, pattern over the remaining 30-32-36-40-44-48 sts = 104-105-106-110-112-116 sts. Continue back and forth until 3 ridges have been worked over the middle sts, AT THE SAME TIME on 2nd row from RS inc 4-8-14-19-25-32 sts evenly over sts in garter st, and on 3rd row from RS inc 4-7-13-18-25-31 sts evenly over sts in garter st = 112-120-133-147-162-179 sts. Now work an elevation in back of neck in garter st as follows from RS: Work until 30-32-36-40-44-48 sts remain, turn, work until 30-32-36-40-44-48 sts remain, turn, work until 40-42-46-50-55-58 sts remain, turn, work until 40-42-46-50-55-58 sts remain, turn, work until 50-52-56-60-65-68 sts remain, turn, work until 50-52-56-60-65-68 sts remain, turn, work until 55-57-61-65-70-73 sts remain, turn, work until 55-57-61-65-70-73 sts remain, turn and work the rest of row (pattern over the last 30-32-36-40-44-48 sts). YOKE: Now work pattern as before over the first 30-32-36-40-44-48 sts, 1 st in stocking st, insert 1st marker here, stocking st over the next 15 sts, insert 2nd marker here, stocking st over the next 20-24-29-35-42-51 sts, insert 3rd marker here, stocking st over the next 15 sts, insert 4th marker here, 1 st in stocking st, pattern as before over the remaining 30-32-36-40-44-48 sts. Now start inc for RAGLAN – see explanation above! Repeat inc every row 1-1-4-6-8-10 times (i.e. from RS and WS), and every row from RS 21-22-20-19-18-17 times = 288-304-325-347-370-395 sts. NOTE: Work the new inc sts on back piece and sleeves in stocking st, and work the first 8 new inc sts on front piece in bamboo pattern (i.e. inc 2 sts before there is enough sts to work bamboo pattern), then work the remaining inc sts in stocking st. Piece now measures 20-21-22-23-24-25 cm (measure from 1st row after edge in garter st at the back). Now work next row as follows: Work the first 52-55-60-65-70-75 sts, slip the next 61-63-65-67-69-71 sts on a stitch holder for sleeve, cast on 10 new sts under sleeve (insert a marker in the middle of the new sts), work the next 62-68-75-83-92-103 sts, slip the next 61-63-65-67-69-71 sts on a stitch holder for sleeve, cast on 10 new sts under sleeve (insert a marker in the middle of the new sts), work the remaining 52-55-60-65-70-75 sts. There are now 186-198-215-233-252-273 sts for body. NOW MEASURE PIECE FROM HERE! BODY: Continue back and forth with pattern as before. Work the new sts under sleeve in stocking st. When piece measures 4 cm from marker under sleeves, inc 1 st on each side of each marker as follows: Work until 1 st before first marker, 1 YO, 2 sts in stocking st, 1 YO, repeat at the other marker = 190-202-219-237-256-277 sts. Repeat inc every 3½-3½-3½-4-4½-6 cm 11-12-12-12-11-8 more times = 234-250-267-285-300-309 sts. When piece measures 46-48-50-52-54-55 cm from marker under sleeves, work 3 ridges. Loosely cast off. SLEEVE: Worked in the round on double pointed needles. Slip sts from stitch holder back on double pointed needles size 5 mm. Work 1 row from RS and cast on 10 new sts under sleeve (insert a marker in the middle of the new sts) = 71-73-75-77-79-81 sts. NOW MEASURE THE PIECE FROM HERE. When piece measures 4 cm, beg dec on each side of marker - READ DECREASE TIP. Repeat dec every 2-2-2-1½-1½-1½ cm 12-13-13-14-14-15 more times = 45-45-47-47-49-49 sts. When piece measures 32-32-32-32-31-31 cm, inc 3 sts evenly in all sizes = 48-48-50-50-52-52 sts. Now work BAMBOO PATTERN in the round on double pointed needles - see explanation above. When piece measures 47-47-47-47-48-48 cm, dec 4 sts in all sizes = 44-44-46-46-48-48 sts. Work 3 ridges in GARTER ST in the round on double pointed needles - see explanation above. Cast off. ASSEMBLY: Sew the holes under the sleeves. Sew tog hood st by st in cast-on edge. Sew on buttons on section with bamboo pattern on left front piece as follows: Sew 1 button approx. 2 cm in from edge and 43-45-47-49-51-53 cm from cast-off edge and 1 button 47-49-51-53-55-57 cm from cast-off edge. Repeat in the other side of section with bamboo pattern. Button through a hole in bamboo pattern. |
|
 |
|
Have you finished this pattern?Tag your pictures with #dropspattern #snowprincessjacket or submit them to the #dropsfan gallery. Do you need help with this pattern?You'll find 27 tutorial videos, a Comments/Questions area and more by visiting the pattern on garnstudio.com. © 1982-2026 DROPS Design A/S. We reserve all rights. This document, including all its sub-sections, has copyrights. Read more about what you can do with our patterns at the bottom of each pattern on our site. |
|


With over 40 years in knitting and crochet design, DROPS Design offers one of the most extensive collections of free patterns on the internet - translated to 17 languages. As of today we count 324 catalogues and 12239 patterns translated into English (UK/cm). 12239
We work hard to bring you the best knitting and crochet have to offer, inspiration and advice as well as great quality yarns at incredible prices! Would you like to use our patterns for other than personal use? You can read what you are allowed to do in the Copyright text at the bottom of all our patterns. Happy crafting!
Post a comment to pattern DROPS 156-1
We would love to hear what you have to say about this pattern!
If you want to leave a question, please make sure you select the correct category in the form below, to speed up the answering process. Required fields are marked *.