
Popular categories
Looking for a yarn?


Comments / Questions (178)
![]() Maria Saggese wrote:
Maria Saggese wrote:
Buonasera sono una appassionata dei vostri modelli e sto cercando di realizzare il cappotto bianco n.156 ma non tirso a capire gli aumenti prima delle maniche gentilmente potrebbe spiegarmelo grazie
03.11.2014 - 19:30DROPS Design answered:
Buongiorno Maria. Per il raglan deve aumentare inizialmente sia sul diritto che sul rovescio per il n° di volte indicato per la sua taglia. Poi aumenta solo nel corso dei ferri sul diritto. Le m aumentate sul dietro e sulle maniche vanno lavorate a maglia rasata; le prime 8 m aumentate sul davanti vanno inserite nel punto bamboo; quelle successive vanno lavorate a maglia rasata. Successivamente, per le maniche, deve riprendere le m messe in attesa, le lavora a dir, avvia 10 nuove m e procede in tondo. Metta un segno tra la 5a e la 6a nuova m. Servirà per le diminuzioni. Ci riscriva se ancora in difficoltà. Buon lavoro!
04.11.2014 - 16:53
![]() Ivy wrote:
Ivy wrote:
Hallo, Ik maak nu voor het eerst een vest en lees dus ook voor de eerste keer een patroon. Ik ben nog maar net begonnen en snap het al niet. Wat bedoelen ze met onderstaand stuk? Brei in patroon als hiervoor over de eerste 30-32-36-40-44-48 st, ribbelst over de volgende 56-52-44-36-28-20 st en minder TEGELIJKERTIJD 12-11-10-6-4-0 st gelijkmatig en in patroon over de overgebleven 30-32-36-40-44-48 st = 104-105-106-110-112-116 st. Alvast bedankt!
31.10.2014 - 16:06DROPS Design answered:
Hoi Ivy. Brei je bijv maat S (kleinste maat) brei je 30 st in patroon als hiervoor, ribbelst over de volgende 56 st en minder hier (dus in de ribbelst) tegelijkertijd 12 st met een gelijkmatige afstand - dus de 56 st worden 44 st, en brei patroon over de resterende 30 st = 30+44+30 = 104 st
06.11.2014 - 14:12
![]() Yvelise wrote:
Yvelise wrote:
Bonjour, Je viens de terminer la ré-hausse et le prochain rang est sur l'envers. C'est donc sur l'envers que je commence l'empiècement (avec la pose des marqueurs) ? Merci d'avance.
24.10.2014 - 19:16DROPS Design answered:
Bonjour Yvelise, c'est exact, placez vos marqueurs au rang suivant sur l'envers après la ré-hausse, puis, au rang suivant sur l'endroit, vous commencez les augmentations pour le raglan. Bon tricot!
25.10.2014 - 09:39
![]() Nicole wrote:
Nicole wrote:
Salve volevo qualche chiarimento per quanto riguarda la cucitura del cappuccio, dallo schema in fondo mi sembra che la cucitura rimanga sopra la testa...vanno cucite insieme quindi le maglie vigagno dei primi 38 cm? Grazie mille
20.10.2014 - 10:07DROPS Design answered:
Buongiorno Nicole. Per la cucitura del cappuccio, deve piegare in due il ferro di avvio delle m e cucire tra loro le m. Buon lavoro!
20.10.2014 - 11:22
![]() Yvelise Martin wrote:
Yvelise Martin wrote:
Bonjour, A 38cm, on fait 12 dim. sur les mailles centrales, mais on fait des augmentations sur ces mêmes mailles centrales 2 et 4 rangs plus haut, est-ce que je me trompe ? A quoi servent les diminutions suivies aussitôt d'augmentation ?? Merci d'avance.
18.10.2014 - 14:02DROPS Design answered:
Bonjour Mme Martin, ces diminutions vont permettre de resserrer le bas de la capuche avant l'encolure, les augmentations sont ensuite pour l'encolure dos. On augmente moins de mailles que l'on en a diminué. Bon tricot!
20.10.2014 - 09:56
![]() Marie-louise wrote:
Marie-louise wrote:
Hej. hur många maskor ska det ökas på huvan i stl xxxl? 325 måste va fel??? ytterst tacksam för snabb hjälp... Med vänlig hälsning marie-louise
13.10.2014 - 08:31DROPS Design answered:
Hej Marie-Louise, du ökar 32 m, det är nu ändrat i den svenska beskrivningen. Tack för info!
17.10.2014 - 16:01
![]() Carla Van Heugten wrote:
Carla Van Heugten wrote:
* Hoeveel bollen wol heb ik nodig voor maat M? * Hoe lees ik maat M in het breipatroon? (Ik zie blijkbaar iets over het hoofd, maar wat??
06.10.2014 - 11:11DROPS Design answered:
Hoi Carla. Dit staat bovenaan het patroon: Maat: S - M - L - XL - XXL - XXXL Materiaal: DROPS NEPAL van Garnstudio 1100-1200-1350-1450-1600-1750 gr. kleur nr. 0100, naturel. Dus voor maat M heb je 1200 gr of te wel 24 bollen nodig (1 bol Nepal = 50 gr). Veel breiplezier.
06.10.2014 - 14:29
![]() Birgit E. wrote:
Birgit E. wrote:
Hammer Teil, würde es gerne für meine Enkelin stricken(2 Jahre- Gr. 92)? Wäre schön, wenn Ihr eine passende Anleitung für die Kleinen bringt. Danke für Eure tollen Modelle.
04.10.2014 - 21:54DROPS Design answered:
Liebe Birgit, danke für Ihr Lob! Leider können wir nicht mit einer Kleinkindgröße dienen, aber ich kann Ihre Anregung mal an die Designerinnen weiterleiten.
06.10.2014 - 08:56
![]() Eva wrote:
Eva wrote:
Hallo!Ich verstehe bei der Kapuze nicht genau wie mann die verkürzten Reihen beginnt. Werden in der ersten verkürzten Reihe die ersten 30 Maschen im Bambusmuster oder kraus rechts gestrickt? Vielen Dank und viele Grüße!Eva
23.09.2014 - 15:26DROPS Design answered:
Die verkürzten R werden komplett kraus re gestrickt, also auch schon die ersten 30 M. Weiterhin gutes Gelingen!
23.09.2014 - 16:04
![]() Maria wrote:
Maria wrote:
Hi, Ich versteh das bei der Passe (Raglanzunahmen) nicht: wie soll das Bambusmuster weitergestrickt werden? Soll das vorne oder hinten sein?
20.09.2014 - 09:41DROPS Design answered:
Liebe Maria, das Bambusmuster befindet sich nur an den Vorderteilen, nicht am Rückenteil. Die ersten 8 Maschen, die Sie jeweils an einem Vorderteil zunehmen (d.h. in 8 Zunahme-Reihen plus Zwischenreihen), stricken Sie im Bambusmuster, alle anderen zugenommenen M werden glatt re gestrickt. Das Muster soll eine breite "Borte" bilden wie auf dem Foto, daher stricken Sie nach diesen je 8 Zunahme-M die zugenommenen M nur noch glatt re.
20.09.2014 - 10:04
|
|
Snow Princess#snowprincessjacket |
|
 |
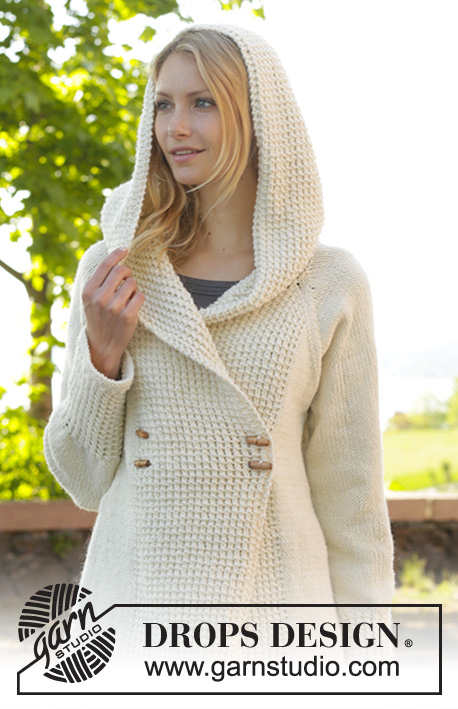 |
Knitted DROPS jacket with raglan, hood and bamboo pattern, worked top down in ”Nepal”. Size: S - XXXL.
DROPS 156-1 |
|
|
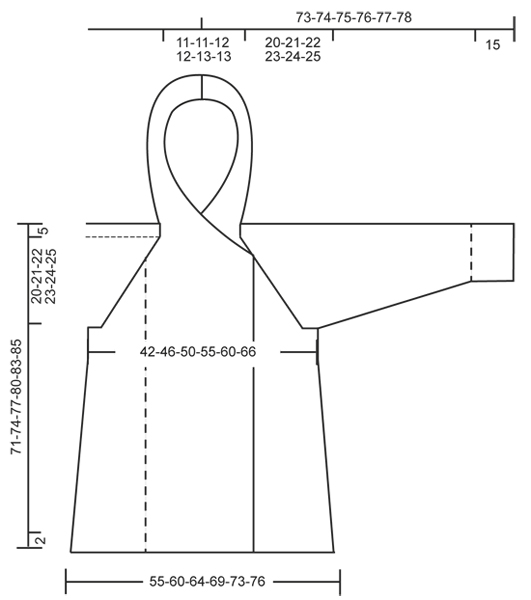
GARTER ST (back and forth on needle): K all rows. 1 ridge = 2 rows K. GARTER ST (in the round on double pointed needles): * K 1 round and P 1 round *, repeat from *-*. 1 ridge = 2 rounds. BAMBOO PATTERN (back and forth on needle): Row 1 (= RS): * 1 YO, K 2, pass YO over 2 K sts *, repeat from *-*. Row 2 (= WS): P all sts. Repeat rows 1 and 2. BAMBOO PATTERN (in the round on double pointed needles): Round 1: * 1 YO, K 2, pass YO over 2 K sts *, repeat from *-*. Round 2: K all sts. Repeat rounds 1 and 2. DECREASE TIP: Dec 1 st before marker as follows: Work until 2 sts remain before marker, slip 1 st as if to K, K 1, psso. Dec 1 st after marker as follows: K 2 tog. RAGLAN: Inc as follows at every marker: Work until 1 st remains before marker, 1 YO, K 2, 1 YO = 2 sts inc. Repeat at the remaining markers in piece = 8 sts inc on needle. On next row work YOs twisted (i.e. work in back loop of st instead of front) to avoid holes. ---------------------------------------------------------- JACKET: Worked back and forth, top down on circular needle/double pointed needles. HOOD: Cast on 116 sts in all sizes (incl 2 edge sts in GARTER ST – see explanation above, in each side of piece) on circular needle size 5 mm with Nepal. Work 1 ridge in garter st. Then work BAMBOO PATTERN back and forth – see explanation above, with 2 edge sts in garter st in each side (continue the 2 edge sts in garter st in each side until finished measurements). REMEMBER THE KNITTING TENSION! When piece measures 38 cm, work as follows from RS: Pattern as before over the first 30-32-36-40-44-48 sts, garter st over the next 56-52-44-36-28-20 sts AT THE SAME TIME dec 12-11-10-6-4-0 sts evenly, pattern over the remaining 30-32-36-40-44-48 sts = 104-105-106-110-112-116 sts. Continue back and forth until 3 ridges have been worked over the middle sts, AT THE SAME TIME on 2nd row from RS inc 4-8-14-19-25-32 sts evenly over sts in garter st, and on 3rd row from RS inc 4-7-13-18-25-31 sts evenly over sts in garter st = 112-120-133-147-162-179 sts. Now work an elevation in back of neck in garter st as follows from RS: Work until 30-32-36-40-44-48 sts remain, turn, work until 30-32-36-40-44-48 sts remain, turn, work until 40-42-46-50-55-58 sts remain, turn, work until 40-42-46-50-55-58 sts remain, turn, work until 50-52-56-60-65-68 sts remain, turn, work until 50-52-56-60-65-68 sts remain, turn, work until 55-57-61-65-70-73 sts remain, turn, work until 55-57-61-65-70-73 sts remain, turn and work the rest of row (pattern over the last 30-32-36-40-44-48 sts). YOKE: Now work pattern as before over the first 30-32-36-40-44-48 sts, 1 st in stocking st, insert 1st marker here, stocking st over the next 15 sts, insert 2nd marker here, stocking st over the next 20-24-29-35-42-51 sts, insert 3rd marker here, stocking st over the next 15 sts, insert 4th marker here, 1 st in stocking st, pattern as before over the remaining 30-32-36-40-44-48 sts. Now start inc for RAGLAN – see explanation above! Repeat inc every row 1-1-4-6-8-10 times (i.e. from RS and WS), and every row from RS 21-22-20-19-18-17 times = 288-304-325-347-370-395 sts. NOTE: Work the new inc sts on back piece and sleeves in stocking st, and work the first 8 new inc sts on front piece in bamboo pattern (i.e. inc 2 sts before there is enough sts to work bamboo pattern), then work the remaining inc sts in stocking st. Piece now measures 20-21-22-23-24-25 cm (measure from 1st row after edge in garter st at the back). Now work next row as follows: Work the first 52-55-60-65-70-75 sts, slip the next 61-63-65-67-69-71 sts on a stitch holder for sleeve, cast on 10 new sts under sleeve (insert a marker in the middle of the new sts), work the next 62-68-75-83-92-103 sts, slip the next 61-63-65-67-69-71 sts on a stitch holder for sleeve, cast on 10 new sts under sleeve (insert a marker in the middle of the new sts), work the remaining 52-55-60-65-70-75 sts. There are now 186-198-215-233-252-273 sts for body. NOW MEASURE PIECE FROM HERE! BODY: Continue back and forth with pattern as before. Work the new sts under sleeve in stocking st. When piece measures 4 cm from marker under sleeves, inc 1 st on each side of each marker as follows: Work until 1 st before first marker, 1 YO, 2 sts in stocking st, 1 YO, repeat at the other marker = 190-202-219-237-256-277 sts. Repeat inc every 3½-3½-3½-4-4½-6 cm 11-12-12-12-11-8 more times = 234-250-267-285-300-309 sts. When piece measures 46-48-50-52-54-55 cm from marker under sleeves, work 3 ridges. Loosely cast off. SLEEVE: Worked in the round on double pointed needles. Slip sts from stitch holder back on double pointed needles size 5 mm. Work 1 row from RS and cast on 10 new sts under sleeve (insert a marker in the middle of the new sts) = 71-73-75-77-79-81 sts. NOW MEASURE THE PIECE FROM HERE. When piece measures 4 cm, beg dec on each side of marker - READ DECREASE TIP. Repeat dec every 2-2-2-1½-1½-1½ cm 12-13-13-14-14-15 more times = 45-45-47-47-49-49 sts. When piece measures 32-32-32-32-31-31 cm, inc 3 sts evenly in all sizes = 48-48-50-50-52-52 sts. Now work BAMBOO PATTERN in the round on double pointed needles - see explanation above. When piece measures 47-47-47-47-48-48 cm, dec 4 sts in all sizes = 44-44-46-46-48-48 sts. Work 3 ridges in GARTER ST in the round on double pointed needles - see explanation above. Cast off. ASSEMBLY: Sew the holes under the sleeves. Sew tog hood st by st in cast-on edge. Sew on buttons on section with bamboo pattern on left front piece as follows: Sew 1 button approx. 2 cm in from edge and 43-45-47-49-51-53 cm from cast-off edge and 1 button 47-49-51-53-55-57 cm from cast-off edge. Repeat in the other side of section with bamboo pattern. Button through a hole in bamboo pattern. |
|
 |
|
Have you finished this pattern?Tag your pictures with #dropspattern #snowprincessjacket or submit them to the #dropsfan gallery. Do you need help with this pattern?You'll find 27 tutorial videos, a Comments/Questions area and more by visiting the pattern on garnstudio.com. © 1982-2026 DROPS Design A/S. We reserve all rights. This document, including all its sub-sections, has copyrights. Read more about what you can do with our patterns at the bottom of each pattern on our site. |
|


With over 40 years in knitting and crochet design, DROPS Design offers one of the most extensive collections of free patterns on the internet - translated to 17 languages. As of today we count 324 catalogues and 12239 patterns translated into English (UK/cm). 12239
We work hard to bring you the best knitting and crochet have to offer, inspiration and advice as well as great quality yarns at incredible prices! Would you like to use our patterns for other than personal use? You can read what you are allowed to do in the Copyright text at the bottom of all our patterns. Happy crafting!
Post a comment to pattern DROPS 156-1
We would love to hear what you have to say about this pattern!
If you want to leave a question, please make sure you select the correct category in the form below, to speed up the answering process. Required fields are marked *.