
Popular categories
Looking for a yarn?


Comments / Questions (126)
![]() Ruth Young wrote:
Ruth Young wrote:
Hello, I am struggling to understand the instructions for the top of the sleeve. Would it be possible for you to provide more detailed instructions and how th top of the sleeve construction fits with the decreased stitches on the front and back. Clearly others have figured it out, but I am afraid that I need more help. Thank you! Ruth
18.09.2024 - 19:37DROPS Design answered:
Dear Mrs Young, when sleeves measures 61-54 cm from cast on edge (see size), divide sleeve mid under sleeve, ie from where the rounds were beginning and work now back and forth casting on 1 stitch on each side (seam allowance); when sleeve measures 63 cm cast off all stitches. Then the sides of sleeve top worked back and forth will be sewn together to the bottom of armholes (the stitches cast off for armhole on body). Happy knitting!
19.09.2024 - 09:26
![]() Laura wrote:
Laura wrote:
Hallo, wird beim Halsausschnitt in der Hin- und Rückreihe abgekettet oder in jeder 2. Reihe also zB nur in jeder Hinreihe? Danke für eure Hilfe!
11.09.2024 - 09:41DROPS Design answered:
Liebe Laura, beim Halsausschnitt wird es in jeder 2. Reihe abgekettet, dh am Anfang jeder Reihe ab Halsausschnitt = Hin-Reihe beim rechten Schulter/Rückreihe beim linken Schulter (Vorderteil). Viel Spaß beim Stricken!
12.09.2024 - 09:02
![]() Laura wrote:
Laura wrote:
Hallo, ich stricke den Pullover in Größe M und könnte jetzt mit dem Muster M1 anfangen. In der Beschreibung steht, dass man mit M1 nach 43 cm anfängt. Sind die 43 cm mit dem Bündchen oder ohne? Vielen Danke für Eure Hilfe!
08.08.2024 - 11:03DROPS Design answered:
Liebe Laura, messen Sie diese 43 cm ab der Anschlagskante. Viel Spaß beim Stricken!
08.08.2024 - 13:03
![]() Stacia Jenkins wrote:
Stacia Jenkins wrote:
Hello, the 4th photo of this pattern on Ravelry shows a flower design in place of the X’s. Is a chart available for that design for the men’s sweater? I’d love to make this for a gardener friend!
30.05.2024 - 04:27DROPS Design answered:
Dear Mrs Jenkins, you can browse all our nordic patterns here (with same tension as this jumper, but feel free to add/remove filters), one of them might inspire you. Happy knitting!
30.05.2024 - 08:11
![]() Joan Mikkelsen wrote:
Joan Mikkelsen wrote:
Hejsa Når man læser opskriften og kommer til mønsteret, så står der at man skal starte med M.1. Men ser man på billedet af trøjen er det ikke denne mønster man starter med. Der ser det ud til at det er noget af M.3. også måske ikke, da det første mønster på ærmet og trøjer ikke ser ens ud på billedet. Så spørgsmålet er hvad skal man starte med??
11.10.2023 - 21:44DROPS Design answered:
Hej Joan, du skal faktisk starte med M.1 både på ryg & forstykke og på ærmerne så de bliver ens. M.3 bruger du først når du kommer op til skulderen :)
17.10.2023 - 13:55
![]() Olga wrote:
Olga wrote:
Ik heb de mouw af en ik snap niet helemaal hoe ik hem vast moet maken aan de mouwkop. Welke vorm hoort de mouw te hebben? Het lijkt me dat de bovenkant van de mouw langer moet zijn dan de onderkant, maar ik kant geen steken af? Waarom moet ik heen en weer breiden als ik de naden toch aan elkaar moet naaien?
20.09.2023 - 16:02DROPS Design answered:
Dag Olga,
De mouw heeft geen ronding (mouwkop) aan de bovenkant. Je breit het laatste stukje heen en weer omdat de mouw als het waar een stukje in het pand wordt geschoven. Dus een klein stukje van de onderarmnaad wordt aan het voorpand/achterpand genaaid. Zie ook de maattekening onderaan. Hier kun je zien dat er een kleine inham bij de oksel zit.
20.09.2023 - 19:50
![]() Eva Wikman wrote:
Eva Wikman wrote:
Vill ha svar på min fråga så jag kan fortsätta sticka, varför ska jag minska maskor efter resåren och inte öka som man brukar. Resåren blir ju större om mag gör så. Tacksam för svar snarast
31.07.2023 - 16:19DROPS Design answered:
Hej Eva, om du inte minskar blir tröjan för bred. Resåren stickar du på mindre stickor och resåren drar ihop arbetet om du inte har ökat för resår.
07.08.2023 - 11:57
![]() Eva Wikman wrote:
Eva Wikman wrote:
Är det fel på mönstret ?? Ska man minska maskor efter resåren ? Har aldrig varit med om det på alla tröjor jag har stickat
28.07.2023 - 15:59DROPS Design answered:
Hej Eva, ja, eller så vil bolen bli for smal (du behöver flere masker i resåren, da den ellers trækker arbejdet sammen) :)
04.08.2023 - 14:42
![]() CHALANI FONSEKA JENSEN wrote:
CHALANI FONSEKA JENSEN wrote:
Hi I knitted the sweater with the smallest size but its bit bigger than I want. How I go to the next smaller size which XS ?
21.02.2023 - 20:24DROPS Design answered:
Dar Mrs Fonseka Jensen, you will find all finished measurements for each size in the chart at the bottom of the pattern - this might help you to adjust to the required measurments/size. This lesson might help you. Happy knitting!
22.02.2023 - 08:35
![]() Catrin Håkansson wrote:
Catrin Håkansson wrote:
Fattar inte hur man gör under armen när det står att jag ska sticka fram och tillbaka, och lägga upp en maska , jag stickar ju med rundstickar , ska man inte maska av för ärmhålen som fram och bak stycket ?
20.01.2023 - 21:16DROPS Design answered:
Hei Catrin. Du strikker rundt til ermet måler 61-60-59-58-56-54 cm, legg opp 1 ny maske og snu arbeidet. Strikk fra vrangen pinnen ut og legg opp 1 ny maske. Strikk frem og tilbake (på rundpinne) til ermet måler 63 cm. Det felles ikke av masker på ermet, slik det gjøres på for-bakstykket. mvh DROPS Design
23.01.2023 - 10:44
|
||||||||||
Nordic Midnight#nordicmidnightsweater |
||||||||||
 |
 |
|||||||||
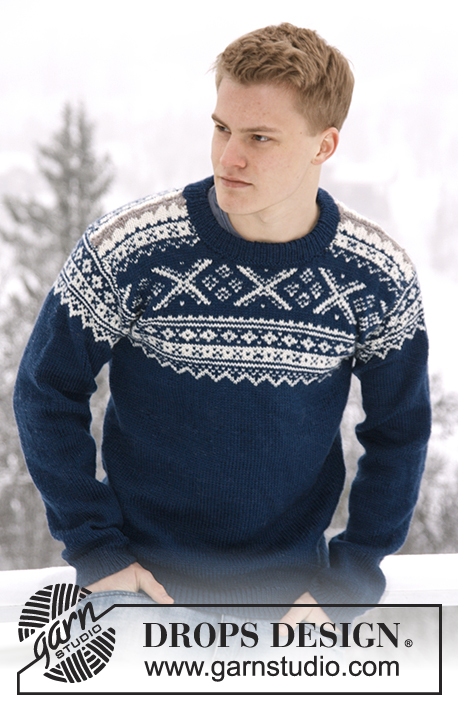
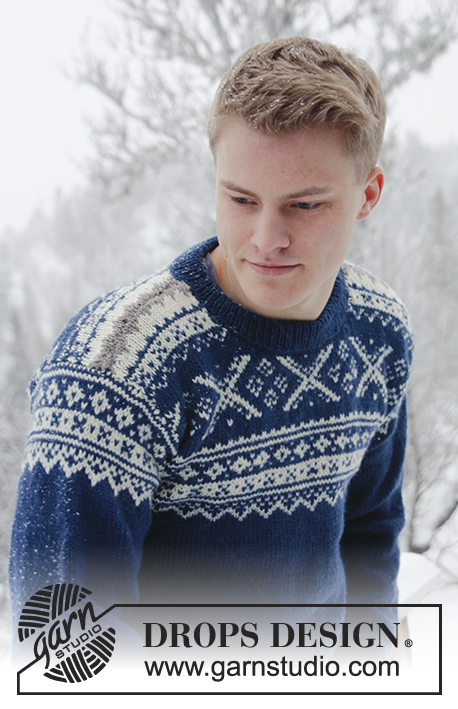
Knitted jumper for men with Norwegian pattern, in DROPS Karisma. Size: S - XXXL.
DROPS Extra 0-809 |
||||||||||
|
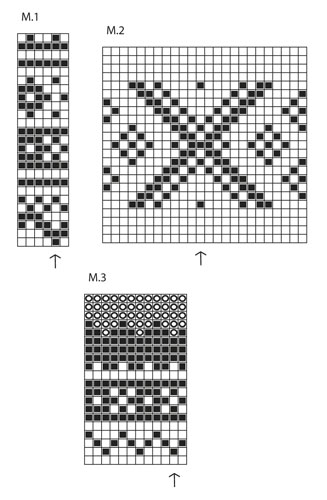
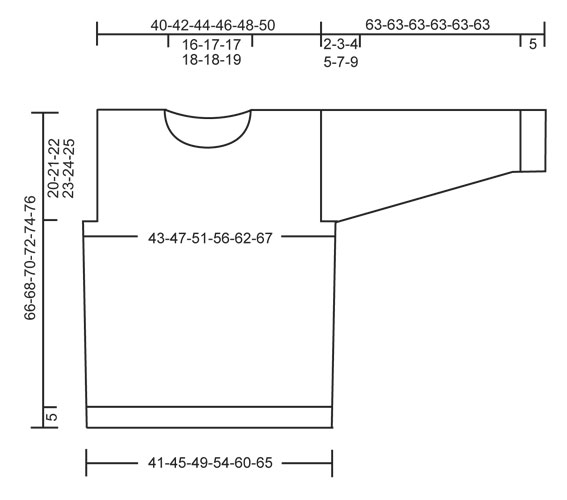
PATTERN: See diagrams M.1 to M.3 – diagrams are worked in stocking st and show 1 repetition of pattern. -------------------------------------------------------- BODY: Worked in the round on circular needle. Cast on 210-228-246-270-306-330 sts on circular needle size 3 mm with dark grey blue Karisma. Work rib = K 1/P 1 for 5 cm. Switch to circular needle size 4 mm and K 1 round while AT THE SAME TIME dec 36-38-40-44-52-56 sts evenly = 174-190-206-226-254-274 sts. Insert a marker at beg of round and a marker after 87-95-103-113-127-137 sts (these marks the sides). Continue in stocking st. REMEMBER THE KNITTING TENSION! When piece measures 15 cm, inc 1 st on each side of both markers. Repeat inc when piece measures 30 cm = 182-198-214-234-262-282 sts. When piece measures 41-43-45-46-48-50 cm, insert 2 markers in the piece; 1 in the middle st at the front and 1 in the middle st at the back. Then work diagram M.1 – st marked with arrow in diagram should be sts with marker mid front/back - count out towards the side. Count out again when at the marker in the side so that pattern is the same on the front and on the back. AT THE SAME TIME when piece measures 46-47-48-49-50-51 cm, cast off 6-10-14-20-30-36 sts for armholes in each side (i.e. 3-5-7-10-15-18 sts on each side of both markers in the sides). Finish front and back piece separately, back and forth on needle. FRONT PIECE: = 85-89-93-97-101-105 sts. Finish diagram M.1, then work diagram M.2 and finally M.3 before continuing with light beige brown until finished measurements (st with arrow in diagram should be st with marker mid front/back – count out towards the side). When piece measures 58-60-62-64-66-68 cm, slip the middle 15-17-17-19-19-21 sts on a stitch holder for neck and finish each shoulder separately. AT THE SAME TIME cast off at beg of every row from neck: 2 sts 3 times and 1 st 3 times = 26-27-29-30-32-33 sts remain on shoulder. Cast off when piece measures 66-68-70-72-74-76 cm. BACK PIECE: = 85-89-93-97-101-105 sts. Work as on front piece but do not cast off for neck until piece measures 64-66-68-70-72-74 cm. Now cast off the middle 29-31-31-33-33-35 sts for neck and finish each shoulder separately - AT THE SAME TIME cast off 2 sts on next row from neck = 26-27-29-30-32-33 sts remain on each shoulder. Cast off when piece measures approx. 66-68-70-72-74-76 cm – cast off on same row in pattern as on front piece. SLEEVE: Worked in the round on double pointed needles, switch to circular needle when needed. Cast on 62-64-66-66-68-68 sts on double pointed needles size 3 mm with dark grey blue. Work rib = K 1/P 1 for 5 cm. Switch to double pointed needles size 4 mm and K 1 round while AT THE SAME TIME dec 11 sts evenly = 51-53-55-55-57-57 sts. Insert a marker at beg of round (= mid under sleeve) and continue in stocking st. When piece measures 6 cm, inc 1 st on each side of marker. Repeat inc a total of 17-18-19-21-22-24 times in Size S: On every 9th round, Size M: Alternately on every 8th and 9th round, Size L: Every 8th round, Size XL: On every 7th round, Size XXL: Alternately on every 6th and 7th round and Size XXXL: Alternately on every 5th and 6th round = 85-89-93-97-101-105 sts. AT THE SAME TIME when piece measures 53 cm in all sizes, work diagram M.1 (st with arrow in diagram = mid on top of sleeve – count out towards the side). After diagram M.1, continue with dark grey blue until finished measurements. AT THE SAME TIME when piece measures 61-60-59-58-56-54 cm (shorter measurements in the larger sizes because of longer sleeve cap and broader shoulder width), finish the piece back and forth on needle from mid under sleeve. Cast on 1 new st in each side (= edge st for assembly) and work until sleeve measures 63 cm in all sizes, cast off. ASSEMBLY: Sew shoulder seams and sew in sleeves (section worked back and forth at the top of sleeve should fit the cast off for armhole). NECK: Knit up from RS approx. 82 to 98 sts around the neck (incl sts on stitch holder at the front) on a short circular needle size 3 mm with dark grey blue. P 1 round, then K 1 round while AT THE SAME TIME inc evenly to 102-108-110-116-118-122 sts. Then work rib = K 1/P 1 for approx. 7 cm, cast off with K over K and P over P. Fold the rib double towards WS and fasten it to the back of neck edge with neat little loose stitches. |
||||||||||
Diagram explanations |
||||||||||
|
||||||||||
 |
||||||||||
 |
||||||||||
Have you finished this pattern?Tag your pictures with #dropspattern #nordicmidnightsweater or submit them to the #dropsfan gallery. Do you need help with this pattern?You'll find 26 tutorial videos, a Comments/Questions area and more by visiting the pattern on garnstudio.com. © 1982-2026 DROPS Design A/S. We reserve all rights. This document, including all its sub-sections, has copyrights. Read more about what you can do with our patterns at the bottom of each pattern on our site. |
||||||||||


With over 40 years in knitting and crochet design, DROPS Design offers one of the most extensive collections of free patterns on the internet - translated to 17 languages. As of today we count 324 catalogues and 12290 patterns translated into English (UK/cm). 12290
We work hard to bring you the best knitting and crochet have to offer, inspiration and advice as well as great quality yarns at incredible prices! Would you like to use our patterns for other than personal use? You can read what you are allowed to do in the Copyright text at the bottom of all our patterns. Happy crafting!
Post a comment to pattern DROPS Extra 0-809
We would love to hear what you have to say about this pattern!
If you want to leave a question, please make sure you select the correct category in the form below, to speed up the answering process. Required fields are marked *.