
Popular categories
Looking for a yarn?


Comments / Questions (82)
![]() Francis wrote:
Francis wrote:
J ai une petite question j adore le motif de se pull il indique qu il a été tricoté avec la laine Alaska j ai envie de le tricoté avec la laine Nepal j adore ses couleur pastel dois - je suivre les même indication qu indiquer sur le diagrame merci a vous bone journée
16.01.2019 - 19:04DROPS Design answered:
Bonjour Francis, Alaska et Nepal font toutes les deux partie du groupe de fils C, vous pouvez donc utilisez Nepal au lieu d'Alaska pour ce modèle, pensez à bien vérifier votre tension (comme d'habitude) - utilisez notre convertisseur pour connaître la quantité nécessaire en Nepal. Bon tricot!
17.01.2019 - 09:03
![]() Priscilla Naidoo wrote:
Priscilla Naidoo wrote:
I love the pattern, very pretty. Thank you for the pattern.
29.10.2018 - 20:30
![]() Orysia wrote:
Orysia wrote:
I’m unable to go to the LYS where I bought this wool, as its too far away, in Southern England. I know how to knit cables from socks, I just prefer written instructions.
15.09.2018 - 21:03
![]() Charts wrote:
Charts wrote:
I am unable to go to a LYs, store where I bought this wool is far away in Southern England, I live in Yorkshire. I know how to knit cables from charts, I just prefer written instructions.
15.09.2018 - 21:00
![]() Kniterella wrote:
Kniterella wrote:
I prefer written patterns don’t like charts, can you give written instructions?
04.03.2018 - 19:40DROPS Design answered:
Dear Kniterella, most of the DROPS patterns have charted diagrams because it represents the pattern better visually. Unfortunately we cannot give written out pattern explanations in each of the pieces. However, you can always ask for help making sense of a pattern in person in the store you bought your DROPS yarn from. Happy Knitting!
04.03.2018 - 21:54
![]() Bev Mellor wrote:
Bev Mellor wrote:
I’m back knitting after many years and am struggling here right at the beginning. You refer to Pattern 1,2 and 3 but neither of the diagrams are labelled as this - please can you clarify for me. I’ve got the rib done and I’m really excited to push on but can’t get any further because of this. Hope you can help Many thanks Bev
26.01.2018 - 20:07DROPS Design answered:
Dear Mrs Mellor, the patterns refers to diagrams called M.1, M.2 and M.3, ie pattern 1 = M.1, pattern 2 = M.2 and pattern 3 = M.3. Happy knitting!
29.01.2018 - 08:39
![]() Brigitte wrote:
Brigitte wrote:
Bonjour Quand on commence le raglan,faut-il diminuer à CHAQUE rang?Il est plus habituel de diminuer tous les deux rangs pour le raglan avec des aig. circulaires. Hors : 38 rangs représente suivant l'échantillon donné plus haut dans les exp. 17,7 cm de haut. Si on commence le raglan à 33cm de hauteur totale et que le pull mesure 60cm de haut,(60-33=27) ,cela voudrait dire que le haut devrait faire 27cm... Je suis un peu perdue....
15.01.2018 - 17:20DROPS Design answered:
Bonjour Brigitte, c'est tout à fait ainsi que l'on fait, vous retrouvez d'ailleurs ces mesures dans le schéma. Bon tricot!
16.01.2018 - 09:01Florence Percival wrote:
Florence (from Australia), re 52-7 (women's). Where are all the pattern charts? I can only see the central pattern.
21.11.2017 - 15:02DROPS Design answered:
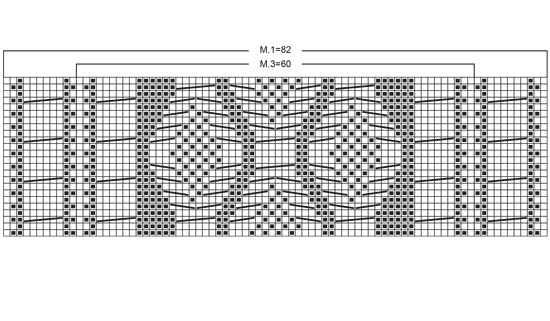
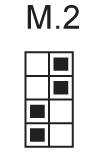
Dear Mrs Percival, You will find M1 and M3 (almost same diagram but M.3 has less sts then M.1) under measurement chart and M.2 (= over 2 sts and 4 rows) under sleeve on measurement chart. Happy knitting!
21.11.2017 - 16:28Jean wrote:
Please explain increase on Ladies Large Size for sleeves -- Alternatively every 3rd row and 4th
28.03.2017 - 17:39DROPS Design answered:
Dear Jean, please read here how to inc alternately every 3rd and 4th row. Happy knitting!
29.03.2017 - 10:02
![]() Sandrine wrote:
Sandrine wrote:
Bonjour, est-il possible de le faire uniquement avec des aiguilles droites et non circulaires ? si oui pouvez-vous expliquer ? Pour les manches peut-on éviter de les faire avec les aiguilles doubles pointes ? si oui pouvez-vous expliquer ? Merci
04.11.2016 - 07:04DROPS Design answered:
Bonjour Sandrine, vous trouverez ici toutes les explications concernant l'adaptation d'un modèle sur aiguilles droites. N'hésitez pas à demander une assistance individuelle à votre magasin si besoin, ou osez les circulaires à l'aide de nos vidéos. Bon tricot!
04.11.2016 - 09:35
|
||||||||||||||||
Comforting Cables |
||||||||||||||||
 |
 |
|||||||||||||||
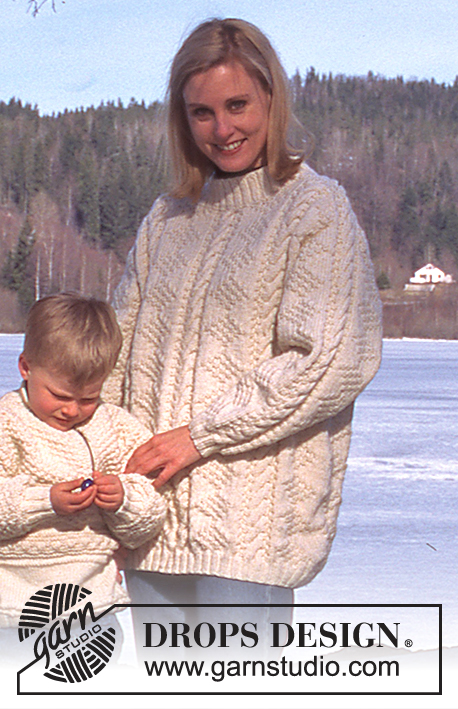
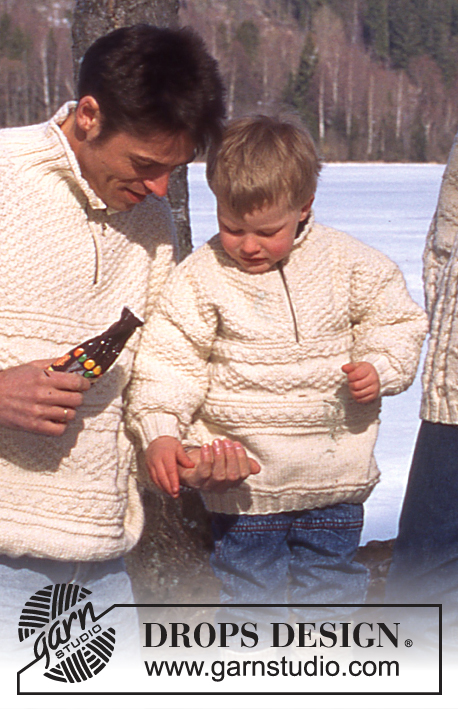
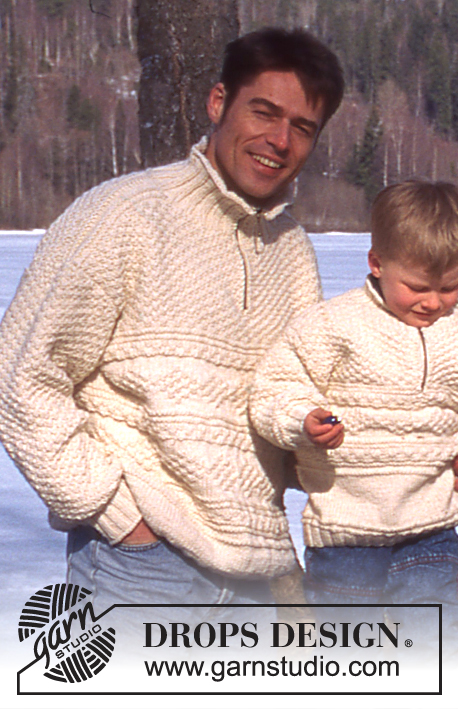
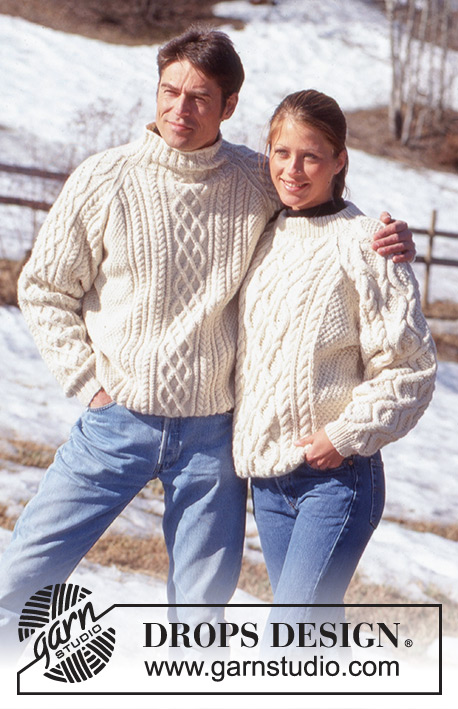
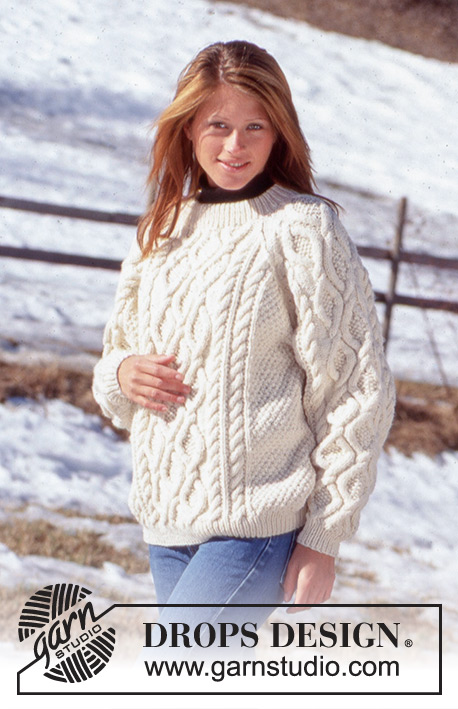
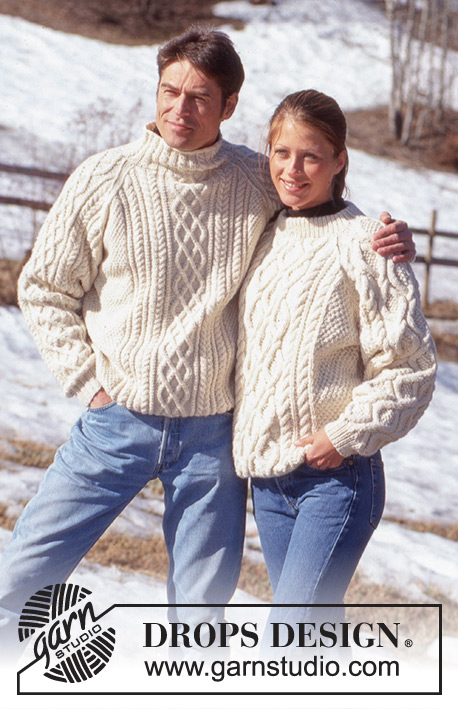
DROPS Sweater in Alaska with raglan sleeves
DROPS 52-8 |
||||||||||||||||
|
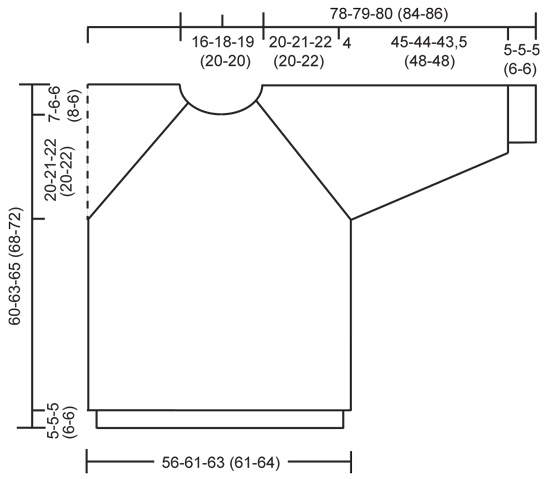
Gauge: 17 sts and 22 rows on larger needle in Pattern 2 = 10 x 10 cm Rib: *knit 1, purl 1*. Repeat from * - *. Pattern: See charts (1 chart = 1 repeat). The pattern is shown from the right side. The charts are identical for all sizes. Body: Numbers in ( ) = men's sizes. Cast on 188-204-212 (204-216) sts on smaller circular needles; join and place a marker at the join. Knit rib for 5-5-5 (6-6) cm - on the last row inc 44 sts evenly distributed on the row = 232-248-256 (248-260) sts. Change to larger circular needles and beginning at marker establish the pattern as follows: 17-21-23 (21-24) sts of Pattern 2, Pattern 1 (82 sts = center front panel), 17-21-23 (21-24) sts of Pattern 2, place marker, 17-21-23 (21-24) sts of Pattern 2, Pattern 1 (82 sts = center back panel), 17-21-23 (21-24) sts of Pattern 2. When the work measures 33-36-37 (40-44) cm bind off 2 sts on each side of each marker for armholes = 112-120-124 (120-126) sts for front and back. Put the work aside. Sleeves: Cast on 36-40-40 (40-40) on smaller double pointed needles; join and place a marker at the join. Knit rib for 5-5-5 (6-6) cm - on the last row inc 24-20-20 (20-20) sts evenly distributed on the row = 60-60-60 (60-60) sts. Change to larger double pointed needles and knit Pattern 3. Then inc 1 st each side of marker 23-23-25 (25-25) times: Sizes Women’s S + M: every 4th row Size Women’s L: alternately every 3rd and 4th row Men's S/M + M/L: every 4th row = 106-106-110 (110-110) sts - knit the increased sts into Pattern 2. When the work measures 50-49-48.5 (54-54) cm bind off 2 sts each side of marker and put the work aside = 102-102-106 (106-106) sts. Body: Put the sleeves in on the same circular needles as the body where 4 sts have been bound off = 428-444-460 (452-464) sts on needle. Put a marker in each transition between the sleeves and body = 4 markers. Continue the pattern but knit the first stitch on either side of the markers in stockinette stitch (= 2 sts stockinette stitch in each transition between body and sleeve). Knit 6-6-6 (4-6) rows then begin raglan shaping. Raglan shaping: Read the next section in its entirety before knitting! There are 8 decreases per row (1 stitch on each side of the 2 sts in stockinette stitch). Make the decreases as follows: Before the 2 sts stockinette stitch: Right side: K 2 tog. Wrong side: slip 2 sts, put them back on the left needle twisted (one by one), purl the 2 twisted sts together After the 2 sts stockinette stitch: Right side: slip 1, knit 1, pass the slipped stitch over (psso). Wrong side: purl 2 tog.. Dec 1 st each side of each marker every row 38-40-42 (40-42) times. At the same time, when 6 decreases remain, put the center front 26-30-30 (30-32) sts on a stitch holder for the neck and knit the rest of the work back and forth on the needle. Then bind off at each neck edge every other row: 2 sts 2 times, 1 st 1 time. After the last decrease row 88-84-84 (92-86) sts remain and the sweater's measurement up to the shoulder = 60-63-65 (68-72) cm. Put sts from the stitch holder back on the needle and pick up 8 sts on either side of the neck shaping = 130-130-130 (138-134) sts on needle. Change to smaller circular needles, knit 1 row, purl 1 row, knit 1 row, and at the same time dec 30-30-30 (34-28) sts evenly distributed on the row = 100-100-100 (104-106) sts. Knit rib for 9 cm, bind off elastically with the rib, fold neck over against the wrong side and sew. Assembly: Sew together the sts under each arm. |
||||||||||||||||
Diagram explanations |
||||||||||||||||
|
||||||||||||||||
 |
||||||||||||||||
 |
||||||||||||||||
 |
||||||||||||||||
Have you finished this pattern?Tag your pictures with #dropspattern or submit them to the #dropsfan gallery. Do you need help with this pattern?You'll find 26 tutorial videos, a Comments/Questions area and more by visiting the pattern on garnstudio.com. © 1982-2026 DROPS Design A/S. We reserve all rights. This document, including all its sub-sections, has copyrights. Read more about what you can do with our patterns at the bottom of each pattern on our site. |
||||||||||||||||


With over 40 years in knitting and crochet design, DROPS Design offers one of the most extensive collections of free patterns on the internet - translated to 17 languages. As of today we count 324 catalogues and 12290 patterns translated into English (UK/cm). 12290
We work hard to bring you the best knitting and crochet have to offer, inspiration and advice as well as great quality yarns at incredible prices! Would you like to use our patterns for other than personal use? You can read what you are allowed to do in the Copyright text at the bottom of all our patterns. Happy crafting!
Post a comment to pattern DROPS 52-8
We would love to hear what you have to say about this pattern!
If you want to leave a question, please make sure you select the correct category in the form below, to speed up the answering process. Required fields are marked *.