
Popular categories
Looking for a yarn?


Comments / Questions (23)
![]() Anke wrote:
Anke wrote:
Erstmal Vielen lieben Dank so langsam komm ich voran Aber jetzt eine weitere Frage, zum V Ausschnitt 2 M am Anfang nehme ich da eine rechts geneigte Masche eine Masche vor dem markierer zu und am Ende 1 m nach dem markierer eine links geneigte Masche
06.03.2025 - 19:04DROPS Design answered:
Liebe Anke, ja genau, für den Halsausschnitt nehmen Sie so, dh auch wie unter V-AUSSCHNITT > LINKES VORDERTEIL > RECHTES VORDERTEIL beschrieben. Beachten Sie, daß diese Zunahmen beim linken Vorderteil nach den 2 ersten Maschen und beim rechten Vorderteil vor den 2 letzten Maschen bearbeitet werden. Viel Spaß beim Stricken!
07.03.2025 - 08:54
![]() Anke wrote:
Anke wrote:
Hi das heißt also vor dem markierer nehme ich eine rechts geneigte Masche zu und nach dem markierer eine links geneigte Masche oder sind am Anfang alle maschen rechts geneigt. Sorry aber ich habe echt Probleme eure Anleitungen zu verstehen, ich finde aber ihr habt so schöne Sachen und ich hoffe das es mit der Zeit besser wird
28.02.2025 - 17:39DROPS Design answered:
Liebe Anke, ja genau, wie erklärt unter RAGLAN werden die Zunahmen vor den Markieren rechts geneigt und nach den Markieren links geneigt, genauso für den Halsausschnitt-Zunahmen. Viel Spaß beim Stricken!
03.03.2025 - 08:20
![]() Anke wrote:
Anke wrote:
Vielen Dank für die Hilfe jetzt habe ich noch ne Frage zu den Raglanzunahme, ich nehme die immer 2 M vor dem Markierer und 2 M nach dem Markierer zu
28.02.2025 - 13:14DROPS Design answered:
Liebe Anke, es wird nur 1 Masche vor und/oder nach dem Markierer zugenommen. Man wird vor/nach jeder Raglanmaschen zunehmen; die Raglanmaschen sind die 2 Maschen mit je einem Markierer dazwischen. Die Halszunahmen werden innerhalb die 2 ersten/letzen Maschen zugenommen. Viel Spaß beim Stricken!
28.02.2025 - 14:37
![]() Anke wrote:
Anke wrote:
Verstehe ich das richtig, ich muss 2 teile stricken einmal das Vorderteil und dann die Rückseite
27.02.2025 - 20:18DROPS Design answered:
Liebe Anke, der Pullover wird von oben nach unten gestrickt, zuerst schlagen Sie die Maschen für den Halsausschnitt an und stricken Sie 1 Reihe links, dann stricken Sie die Passe und gleichzeitig nehmen Sie für den Raglan + für den Halsausschnitt zu. Wenn V-Hausschnitt-Zunahmen fertig sind, stricken Sie in der Runde und nehmen Sie auch wie zuvor für den Raglan. Dann wird die Arbeit für die Ärmel und das Rumpfteil aufgeteilt und Rumpfteil und Ärmel werden dann separat in Runden fertig gestrickt. Kann das Ihnen helfen? Viel Spaß beim Stricken!
28.02.2025 - 09:33
![]() Anke wrote:
Anke wrote:
Hallo ich habe da mal ne frage zu den Raglan zunahmen ich habe jeweils wie beschrieben nach der 2, 3, 22, 34, 22, 3 und die letzten 2 mit maskieren gekennzeichnet u jetzt soll ich in den Hinreihen jeweils 8 Maschen in den Raglan zunehmen. Mir ist leider nicht klar wo ich die zunehmen soll
25.02.2025 - 12:27DROPS Design answered:
Liebe Anke, die Zunahmen sind durch 1 Umschlag bei einer Hin-Reihe bearbeitet, bei der nächsteen Reihe stricken Sie den Umschlag wie unter RAGLANZUNAHMEN beschrieben; Sie sollen aber nur 4 Markierer haben: nach der 3. Masche, nach dann 22 Masche, dann nach 34 M und nach 22 M (es sind noch 3 M übrig nach dem letzten Markierer). Die Zunahmen für den Halsausschnitt stricken Sie innerhalb die 2 ersten/letzten Maschen, so haben Sie immer noch 4 Markierer. Viel Spaß beim Stricken!
25.02.2025 - 16:40
![]() Verena wrote:
Verena wrote:
Hallo. Jeg har for mange masker i ærmet (XL); Start med 22 masker. Udtagning 21 gange = 42 masker, i alt 62 masker. Derefter hver 4. pind 8 gange = 16 masker. Totalt 78 masker og ikke 62 masker som angivet. Har jeg overset noget? På forhånd tak for svar Kh Verena
17.02.2025 - 22:00DROPS Design answered:
Hej Verena, du starter med 22 masker, tager ud 2m ud 21 gange = 42m, tager 2 m ud 4 gange =8m (22+42+8=72m). 62 af disse 72 masker bruger du til ærme, de andre skal bruges til for og rygstykke :)
18.02.2025 - 14:55
![]() Graziella wrote:
Graziella wrote:
Bonjour. Sur le diagramme, je ne comprends pas d'où viennent les 5-6 cm du haut, sensés se tricoter avant les augmentations des devants et dos.
16.02.2025 - 10:48DROPS Design answered:
Bonjour Graziella, ces 5-6 cm correspondent à la hauteur des épaules, autrement dit la largeur des manches au début de l'ouvrage (lorsque l'on monte les mailles). Vous avez 18 ou 22 mailles pour chacune des manches soit 10-12 cm de large, quand le pull est posé, ces mailles sont pliées en double soit 5-6 cm pour les épaules. Bon tricot!
17.02.2025 - 09:33
![]() Theresa wrote:
Theresa wrote:
Liebes Drops Team, Ich habe eine Frage zu den Raglanzunahmen. Muss ich bei "Am Vorderteil und am Rückenteil weiter in jeder 2. Reihe zunehmen, aber an den Ärmeln nur noch in jeder 4. Reihe" in der 4. Reihe nur vor dem 1. & 3. und nach dem 2. & 4. Markierer zunehmen?
15.02.2025 - 23:39DROPS Design answered:
Liebe Theresa, ja genau :) Viel Spaß beim Stricken!
17.02.2025 - 09:07
![]() Mari Luz wrote:
Mari Luz wrote:
En el raglán no hay ningún punto entre cada aumento? No entiendo muy bien cómo se hacen los aumentos si no hay por lo menos un punto que separa. Espero me aclaren esta duda un saludo
14.02.2025 - 11:49DROPS Design answered:
Hola Mari Luz, los aumentos del raglán se trabajan a cada lado de los puntos raglán. Es decir, tendrías: 1º aumento, 1 punto raglán, marcapuntos, 1 punto raglán, 2º aumento. Así que las hebras están separadas por los 2 puntos raglán (uno a cada lado del marcapuntos).
16.02.2025 - 23:14
![]() Anna wrote:
Anna wrote:
Dobry den, Jsem levacka a kdyz pridavam pro raglanove zkoseni (tedy pridavam obracene, nejprve doleva, pak napravo), vznika na licove strane proužek nitě. Vypada to spatne. Muzu to nejak opravit? Dekuji a Hezky den
12.02.2025 - 14:16
|
||||||||||||||||
Sweet Harmony#sweetharmonysweater |
||||||||||||||||
 |
 |
|||||||||||||||
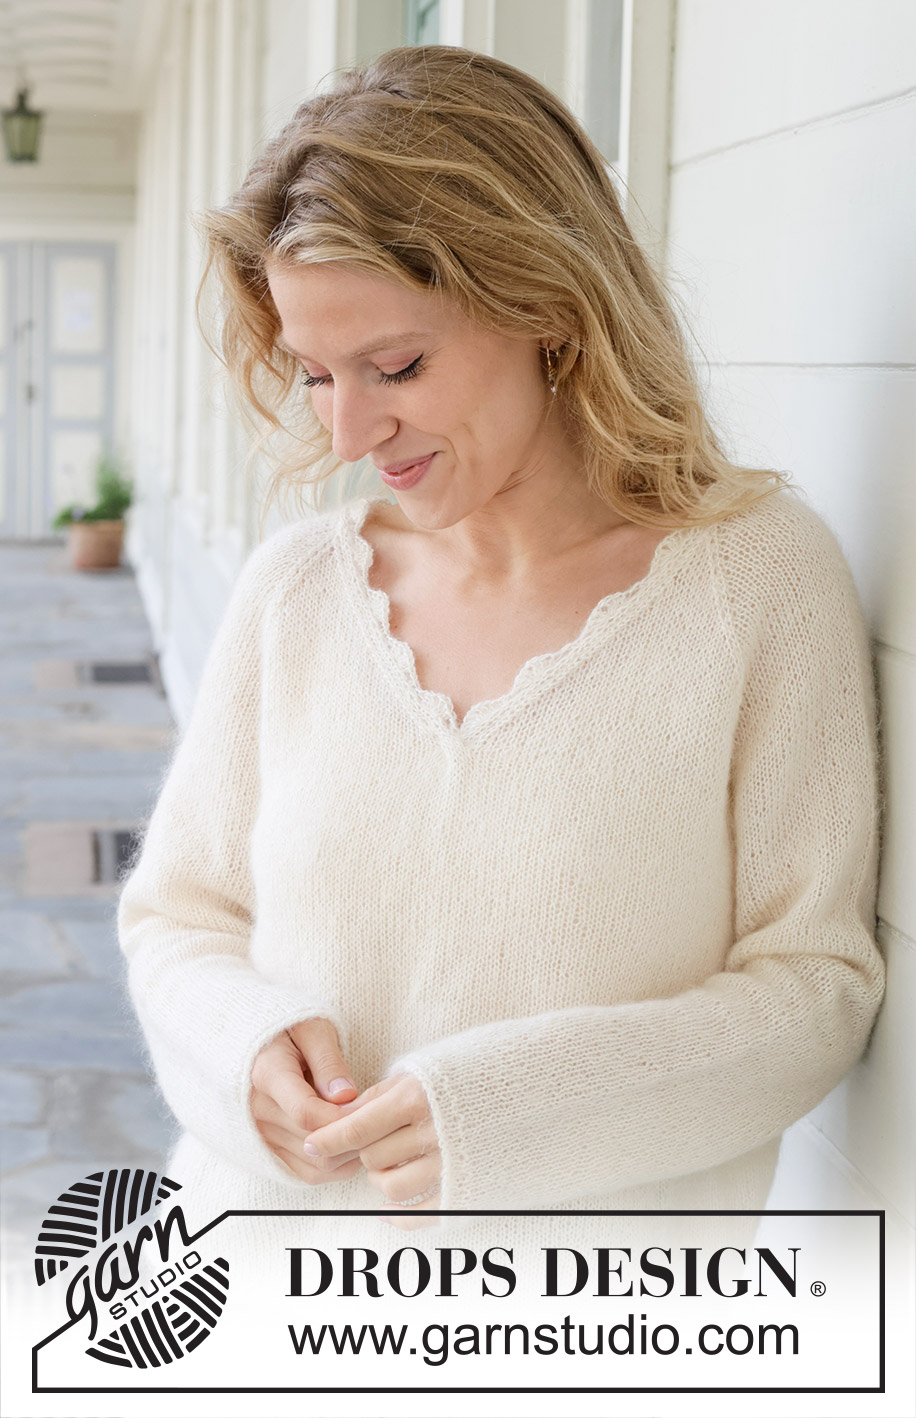
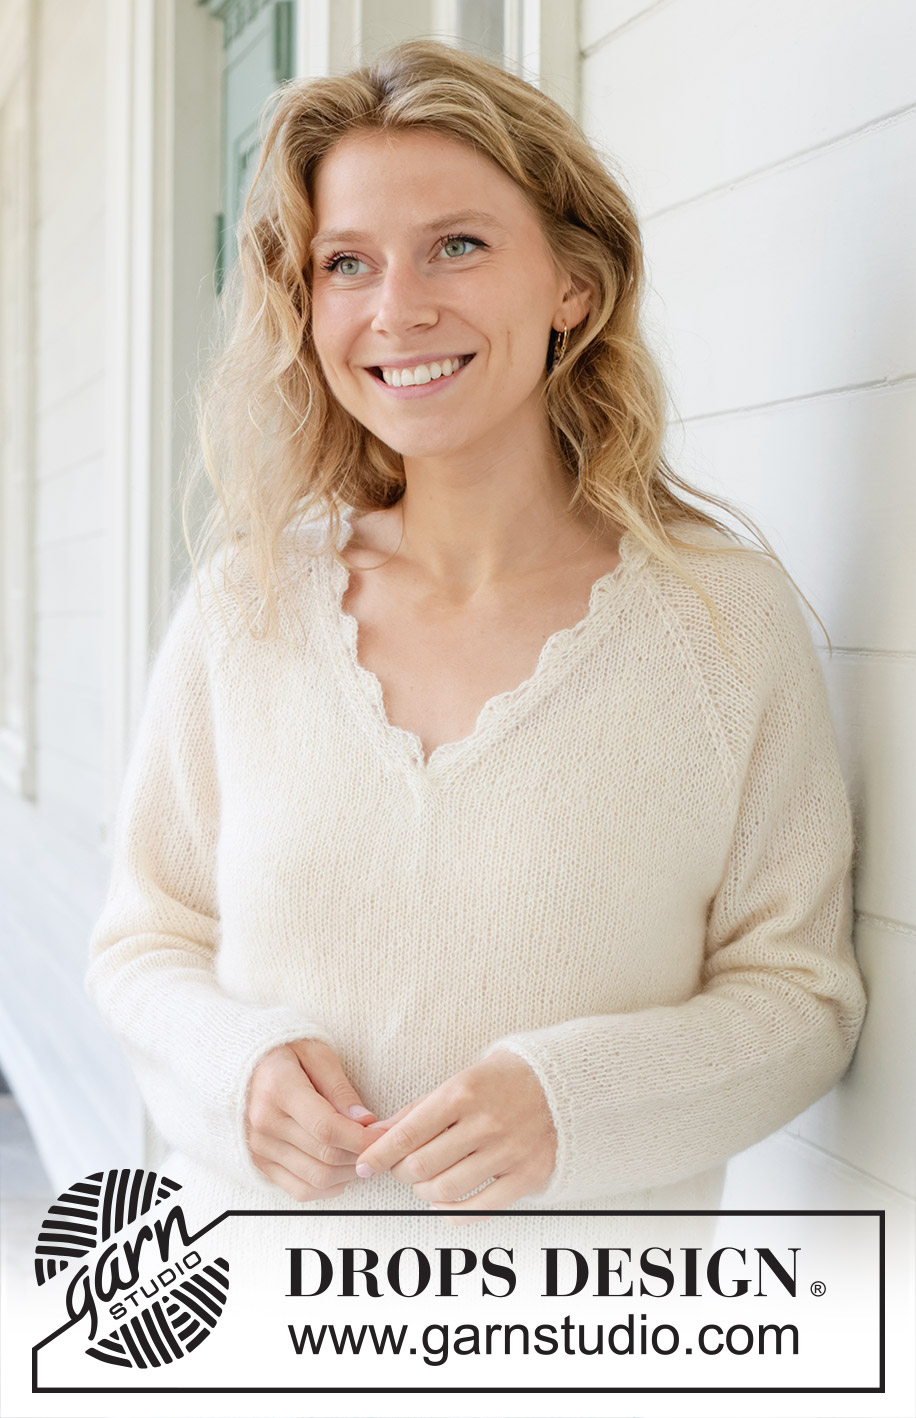
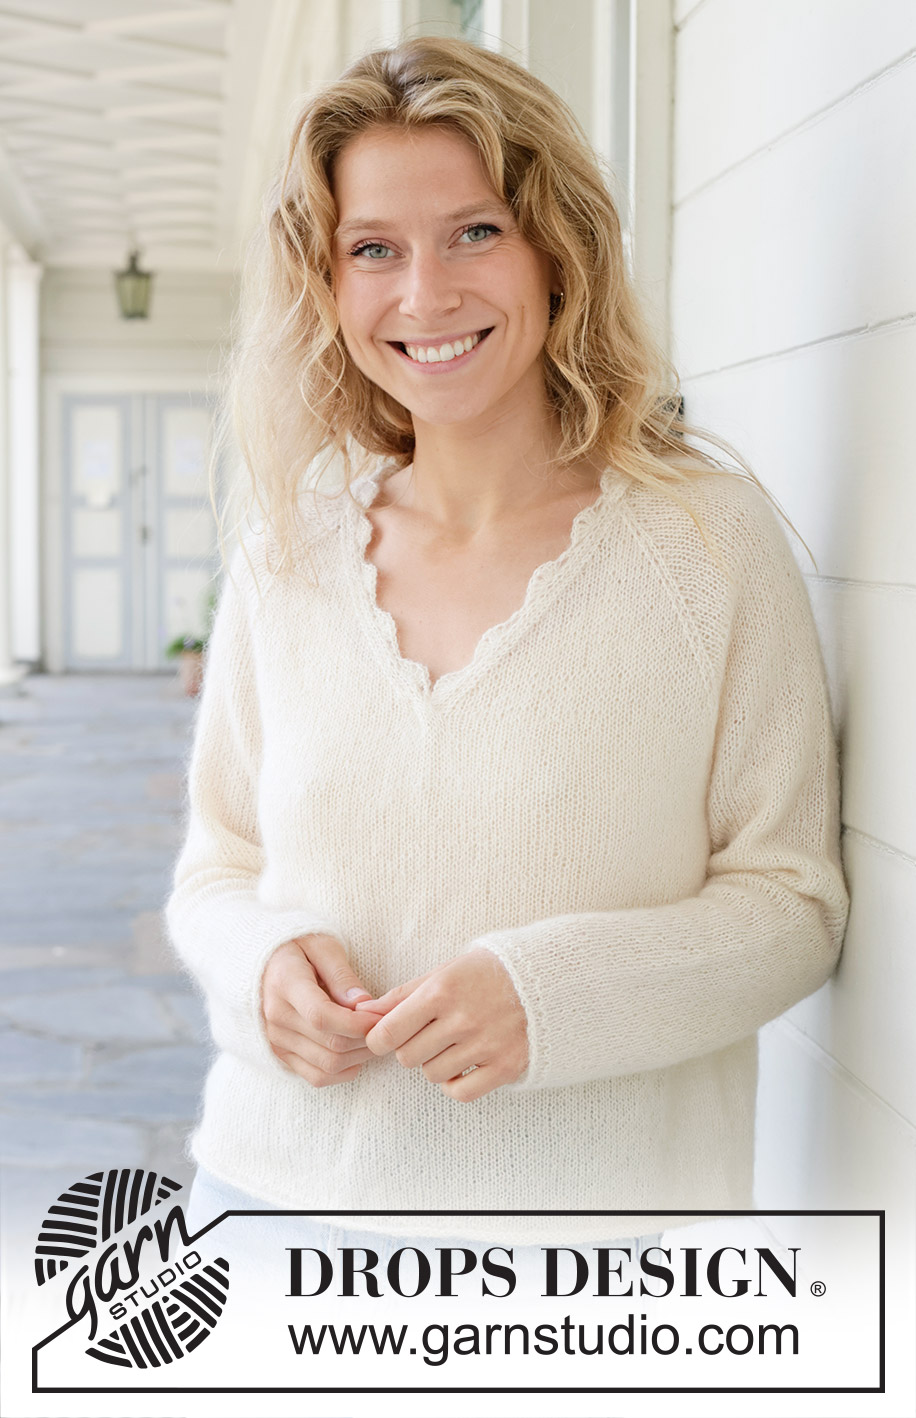
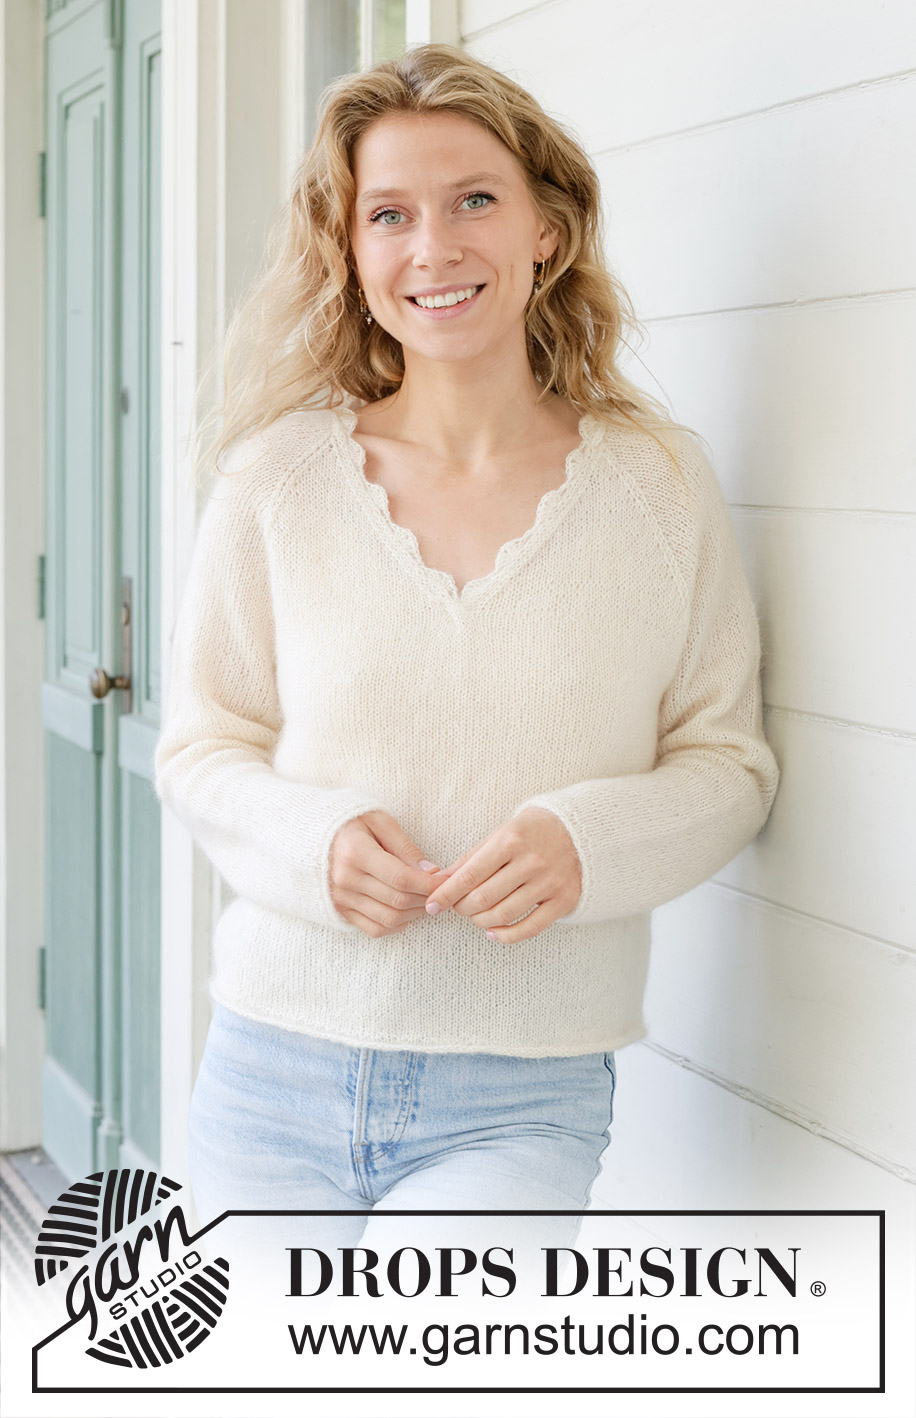
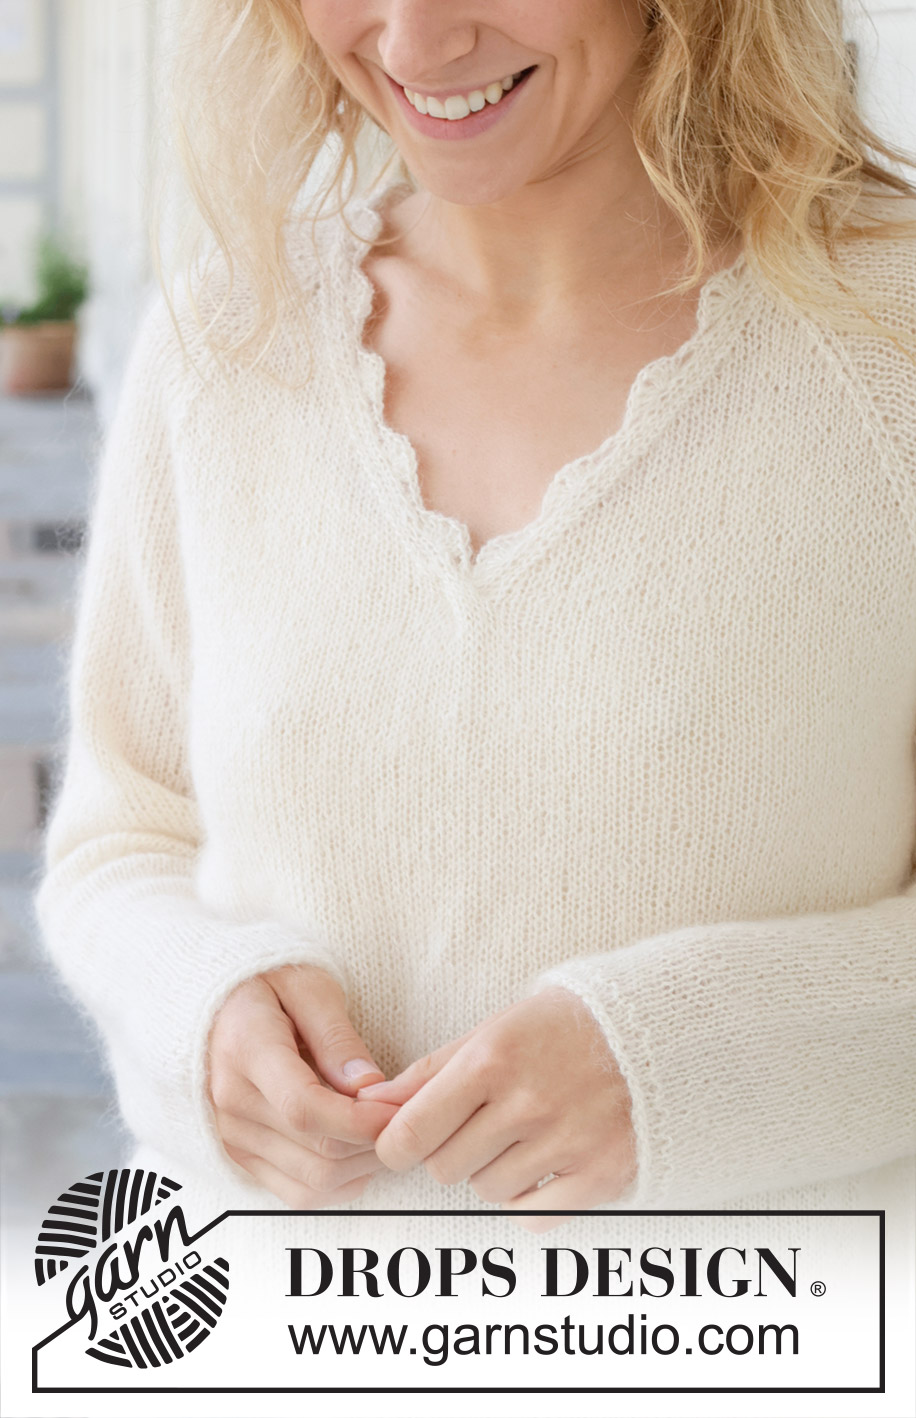
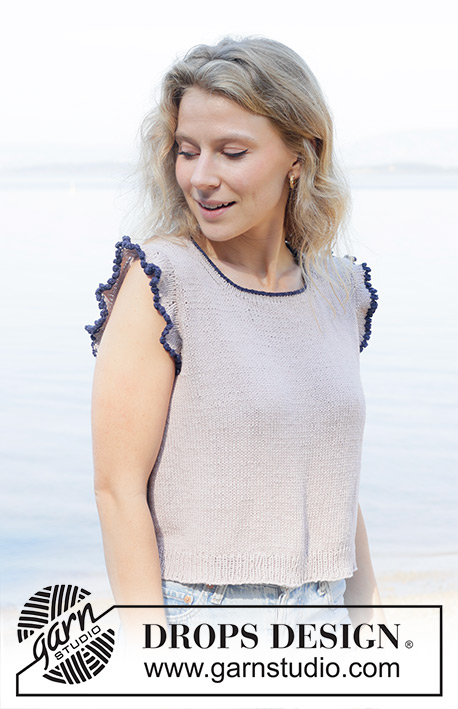
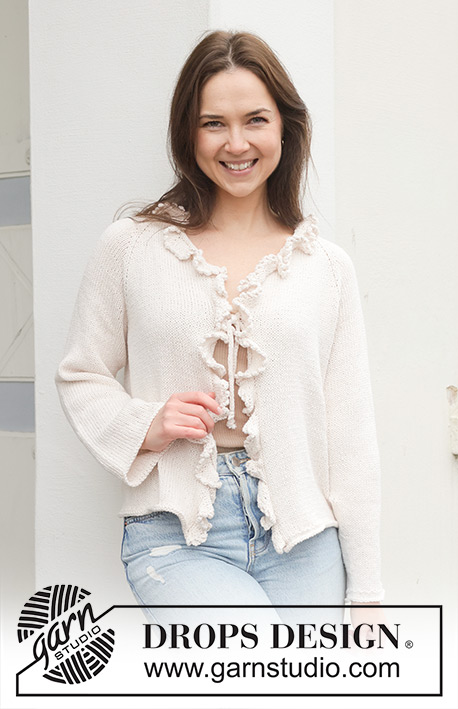
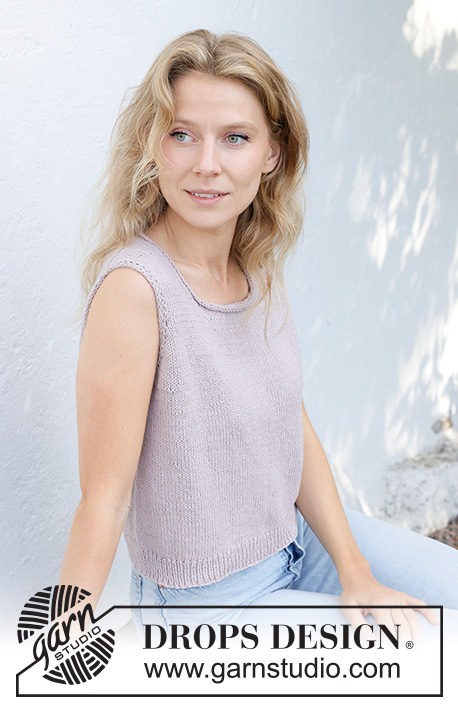
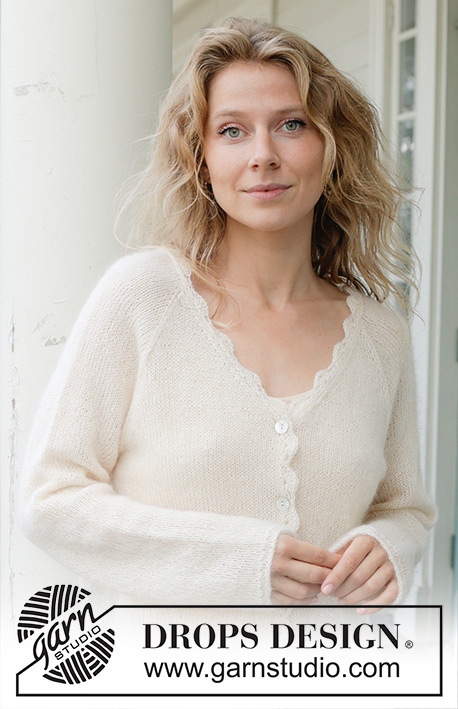
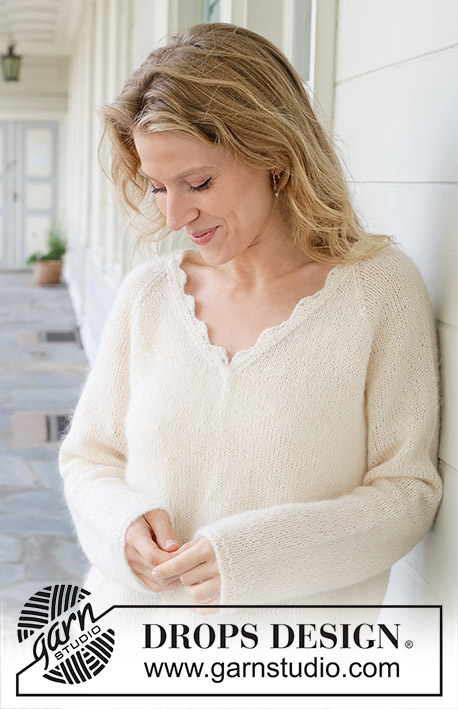
Knitted jumper in 1 strand DROPS Flora or DROPS Alpaca and 1 strand DROPS Kid-Silk. The piece is worked top down, with stocking stitch, raglan, V-neck, rolled edges and crocheted edges. Sizes S - XXXL.
DROPS 257-1 |
||||||||||||||||
|
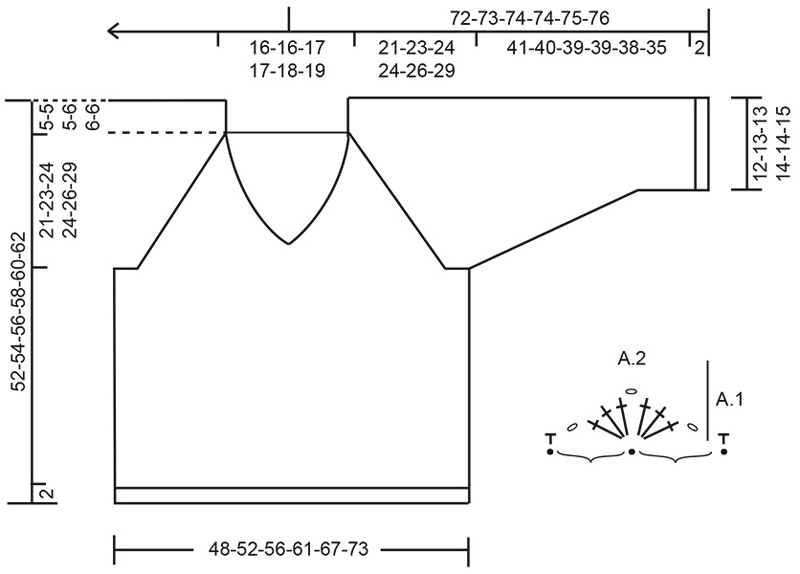
------------------------------------------------------- EXPLANATIONS FOR THE PATTERN: ------------------------------------------------------- 2 EDGE STITCHES: FROM RIGHT SIDE, BEGINNING OF ROW: Slip 1 stitch knit-wise, knit 1. FROM RIGHT SIDE, END OF ROW: Work until there are 2 stitches left on row, knit 2. FROM WRONG SIDE, BEGINNING OF ROW: Slip 1 stitch purl-wise, purl 1. FROM WRONG SIDE, END OF ROW: Work until there are 2 stitches left on row, purl 2. RAGLAN: All increases are worked from the right side! Increase 1 stitch as described below: INCREASE 1 STITCH TOWARDS THE RIGHT BEFORE MARKER: Make 1 yarn over by taking the strand from the back, over the right needle to the front. On the next row, purl the front loop of the yarn over. NOTE: When working in the round, knit the front loop. Then work the new stitches in stocking stitch. INCREASE 1 STITCH TOWARDS THE LEFT AFTER MARKER: Make 1 yarn over by taking the strand in front of the needle, then back. On the next row, purl the back loop of the yarn over, NOTE: When working in the round, knit twisted through the back loop. Then work the new stitches in stocking stitch. V-NECK: All increases are worked from the right side. Increase 1 stitch as described below: LEFT FRONT PIECE: Work 2 edge stitches as before, make 1 yarn over by taking the strand in front of the needle, then back. On the next row, purl the back loop of the yarn over, then work the new stitch in stocking stitch. RIGHT FRONT PIECE: Work until there are 2 stitches left on the row, make 1 yarn over by taking the strand from the back, over the right needle to the front, work the 2 edge stitches. On the next row, purl the front loop of the yarn over, then work the new stitch in stocking stitch. DECREASE TIP: Decrease 1 stitch on each side of the marker-thread as follows: Work until there are 3 stitches left before the marker-thread, knit 2 together, knit 2 (marker-thread sits between these 2 stitches), slip 1 stitch knit-wise, knit 1 and pass the slipped stitch over the knitted stitch (2 stitches decreased). KNITTING TIP: When knitting up stitches under the sleeve, small holes can be left in the transitions between body and sleeve. These holes can be closed by picking up the strand between 2 stitches and working it twisted together with the next stitch. PATTERN: See diagrams A.1 and A.2 (crocheted edge). ------------------------------------------------------- START THE PIECE HERE: ------------------------------------------------------- JUMPER – SHORT OVERVIEW OF THE PIECE: The pattern uses both long and short needles; start with the length which fits the number of stitches and change when necessary. The yoke is worked back and forth from mid-front and top down. When the V-neck is finished the yoke is joined and continued in the round. When the yoke is finished, it is divided for the body and sleeves and the body continued in the round, while the sleeves wait. The sleeves are worked top down, in the round. A crocheted edge is worked around the neckline to finish. NECKLINE: Cast on 70-70-72-80-82-84 stitches with circular needle size 4.5, 1 strand DROPS Flora or 1 strand DROPS Alpaca and 1 strand DROPS Kid-Silk (2 strands). Purl 1 row from the wrong side. Insert 1 marker inside 2 edge stitches on one side; the piece is measured from here. YOKE: Insert 4 marker-threads, without working the stitches, each marker-thread inserted between 2 stitches (these 2 stitches are called raglan-stitches and are worked in stocking stitch): Count 3 stitches (= left front piece), insert marker-thread 1 before the next stitch, count 18-18-18-22-22-22 stitches (= sleeve), insert marker-thread 2 before the next stitch, count 28-28-30-30-32-34 stitches (= back piece), insert marker-thread 3 before the next stitch, count 18-18-18-22-22-22 stitches (= sleeve), insert marker-thread 4 before the next stitch, there are 3 stitches left after the last marker-thread (= right front piece). Change to circular needle size 4.5 mm. You now work stocking stitch back and forth with 2 EDGE STITCHES on each side, increasing AT THE SAME TIME for RAGLAN and V-NECK – read all descriptions above. Read both paragraphs below before continuing. Remember to maintain the knitting tension. RAGLAN: Increase for raglan on each side of the 2 raglan-stitches by each marker-thread (= 8 increased stitches) every 2nd row, 9-8-15-21-23-21 times. Then increase for raglan every 2nd row on the front and back pieces but only every 4th row on the sleeves (alternately 4 and 8 increased stitches). Repeat these increases a total of 16-20-14-8-8-14 times on the front and back pieces (8-10-7-4-4-7 times on the sleeves). You have increased a total of 25-28-29-29-31-35 times on the front and back pieces and 17-18-22-25-27-28 times on the sleeves. V-NECK: After you have increased 2 times for raglan, begin to increase for the V-neck. Increase from the right side on both front pieces, inside the 2 edge stitches (1 stitch increased each side), every 4th row 5-6-6-6-6-6 times, then every 2nd row 6-5-6-6-7-8 times. A total of 11-11-12-12-13-14 increases for the V-neck on each side. When the increases for the V-neck are finished and you have worked back from the wrong side, join the piece mid-front from the right side as follows: Knit until there are 4 stitches left on the row, place these 4 stitches on a cable needle in front of the piece, knit the first 4 stitches from the other front piece, insert 1 marker (round now starts here) knit the stitches from the cable needle. Continue in the round and finish increasing for raglan as described above. After the last increase for raglan, there are 260-276-300-320-340-364 stitches. Continue working without further increases, until the yoke measures 21-23-24-24-26-29 cm, measured straight down from the marker (not along the V-neck). Now divide for the body and sleeves. DIVIDE FOR BODY AND SLEEVES: Start mid-front, knit 40-43-46-49-53-58 (= half front piece), place the next 50-52-58-62-64-66 stitches on 1 thread for the sleeve, cast on 6-8-8-12-14-16 stitches (under sleeve), knit 80-86-92-98-106-116 (= back piece), place the next 50-52-58-62-64-66 stitches on 1 thread for the sleeve, cast on 6-8-8-12-14-16 stitches (under sleeve), knit the last 40-43-46-49-53-58 stitches (= half front piece). The body and sleeves are finished separately. BODY: = 172-188-200-220-240-264 stitches. Insert 1 marker in the middle of the 6-8-8-12-14-16 cast-on stitches under one sleeve Work to the marker; the round now begins here. Work stocking stitch in the round until the piece measures 45-47-49-50-52-54 cm from the marker mid-front. Change to circular needle size 3.5 mm. Work 1 round of rib (knit 1, purl 1), then knit 4 rounds. Change to circular needle size 4.5 mm. Cast off a little loosely with knit. The jumper measures approx. 47-49-51-52-54-56 cm from the marker and 52-54-56-58-60-62 cm from top of shoulder. SLEEVES: Place the 50-52-58-62-64-66 sleeve-stitches from one thread on circular needle size 4.5 mm and knit up 1 stitch in each of the 6-8-8-12-14-16 stitches cast on under the sleeve – read SLEEVE TIP = 56-60-66-74-78-82 stitches. Insert a marker-thread in the middle of the 6-8-8-12-14-16 stitches under the sleeve. Start at the marker-thread and work stocking stitch in the round. When the sleeve measures 3-3-3-2-2-2 cm, decrease 2 stitches under the sleeve – read DECREASE TIP. Decrease like this every 6-5-3½-2½-2½-2 cm a total of 6-7-9-12-13-14 times = 44-46-48-50-52-54 stitches. Continue working until the sleeve measures 41-40-39-39-38-35 cm from the division. Change to double pointed needles size 3.5 mm. Work 1 round of rib (knit 1, purl 1). Then knit 4 rounds. Change to double pointed needles size 4.5 mm and cast off a little loosely with knit. The sleeve measures approx. 43-42-41-41-40-37 cm. CROCHETED EDGE: Use crochet hook size 3.5 mm and 1 strand of each quality (2 strands). Start from the right side at the bottom of the V-neck, mid-front. Work diagram A.1 in the first stitch, then diagram A.2 up the V-neck, around the neckline and down the other side of the V-neck. Finish with 1 slip stitch in the double crochet at the beginning of the round. Cut and fasten the strand. |
||||||||||||||||
Diagram explanations |
||||||||||||||||
|
||||||||||||||||
 |
||||||||||||||||
 |
||||||||||||||||
Have you finished this pattern?Tag your pictures with #dropspattern #sweetharmonysweater or submit them to the #dropsfan gallery. Do you need help with this pattern?You'll find 33 tutorial videos, a Comments/Questions area and more by visiting the pattern on garnstudio.com. © 1982-2026 DROPS Design A/S. We reserve all rights. This document, including all its sub-sections, has copyrights. Read more about what you can do with our patterns at the bottom of each pattern on our site. |
||||||||||||||||


With over 40 years in knitting and crochet design, DROPS Design offers one of the most extensive collections of free patterns on the internet - translated to 17 languages. As of today we count 324 catalogues and 12290 patterns translated into English (UK/cm). 12290
We work hard to bring you the best knitting and crochet have to offer, inspiration and advice as well as great quality yarns at incredible prices! Would you like to use our patterns for other than personal use? You can read what you are allowed to do in the Copyright text at the bottom of all our patterns. Happy crafting!
Post a comment to pattern DROPS 257-1
We would love to hear what you have to say about this pattern!
If you want to leave a question, please make sure you select the correct category in the form below, to speed up the answering process. Required fields are marked *.