
Popular categories
Looking for a yarn?


Comments / Questions (33)
![]() Lena Arvidsson wrote:
Lena Arvidsson wrote:
Hej. Hur ska jag tänka om jag vill ha lång ärm? Finns det något mönster jag kan titta ? Hälsningar Lena
19.06.2025 - 13:47
![]() Susi wrote:
Susi wrote:
Könnte ich bei diesem Modell die Ärmel auch anstricken anstatt sie einzunähen? Gibt es auch eine Version mit langen Ärmeln?
01.06.2025 - 16:11DROPS Design answered:
Liebe Susi, hier wird man für die Armkugel Maschen beidseitig abketten, wenn Sie die Ärmel von oben nach hinten stricken sollen Sie das anpassen; am besten stricken Sie die Ärmel wie beschrieben, so bekommen Sie die richtige Form. Es gibt für dieses Modell nur kurze Ärmel, keine langen Ärmel Version, aber Pullover mit langen Ärmel und Zöpfe finden Sie auch mal hier. Viel Spaß beim Stricken!
02.06.2025 - 08:26
![]() Joanna wrote:
Joanna wrote:
How easy would it be to lengthen the arms on this pattern so that they are full length? And how could I do this?
16.05.2025 - 10:41DROPS Design answered:
Dear Joanna, you can take inspiration from a similar garment with same tension and long sleeves - see for example all jumpers worked bottom up with tension 22-20 sts here. Happy knitting!
16.05.2025 - 17:31
![]() Britta wrote:
Britta wrote:
Fin og enkel model
22.04.2025 - 14:58
![]() Isabelle Pellegrin wrote:
Isabelle Pellegrin wrote:
Dans l'attente de la réponse à ma question sur le haut du dos, je suis dans ka même incompréhension sur le haut du devant : le nombre de mailles ne convient pas, ainsi que l'histoire des torsades à tricoter 2 par 2 ??? Pouvez m'éclairer ? Je suis bloquée dans mon ouvrage !
16.04.2025 - 17:42DROPS Design answered:
Bonjour Mme Pellegrin, dans la réponse précédente, je vous ai mis le lien pour diminuer des mailles en même temps que l'on rabat, pour le devant, on les met en attente seulement (ainsi on conserve la bonne largeur car il faut plus de mailles pour les torsades que pour le jersey). Pour le devant, vous avez 90 mailles, vous tricotez les 38 m centrales (en diminuant 8 m) et vous les mettez en attente = (90-38)/2=26 m pour chaque épaule que vous terminez séparément. Vous rabattez ensuite pour l'encolure 2x 1 m et 4x 1 m= 26-2-4=20 m pour l'épaule. Boon tricot!
22.04.2025 - 10:31
![]() Isabelle Pellegrin wrote:
Isabelle Pellegrin wrote:
Bonjour Je rencotre un problème avec le nombre de mailles en HAUT du dos: On a 90 mailles pour taille S. On doit rabattre 42m centrales ET 4 mailles de côtes de chaque côté EN MÊME TEMPS ( reste alors 20m pour tricoter chaque épaule. Hors, on doit encore rabattre 2x2m par épaule. Dans ce cas, il devrait rester seulement 16m à chaque épaule au moment de rabattre. On nous dit de rabattre les 20m !?! Ou est l'erreur ? Merci pour votre retour. Isabelle
15.04.2025 - 17:51DROPS Design answered:
Bonjour Mme Pellegrin, vous avez 90 mailles et vous rabattez les 42 mailles centrales pour l'encolure (en même temps, vous diminuez 8 mailles dans les torsades - cf vidéo) = il vous reste (90-42)/2=24 mailles pour chaque épaule que vous terminez séparément. Vous rabattez maintenant pour l'encolure 2 x 2 m= 24 m -4 m = il reste 20 mailles pour l'épaule. Bon tricot!
22.04.2025 - 09:43
![]() Katherine Leue wrote:
Katherine Leue wrote:
Hallo,ibtei maat small er bij de shouders en hals begin ik met 90st.,..wanneer ik de middelste 42st. afkant +4×2st. boven de kabels dan heb ik al 50st geminderd en dan moet ik nog 2×2st. Minderen aan halsband....dan houd ik maar 32st.over...dus 16st op de schouders waar ik er volgens de uitleg 20st.moet overhouden....waar loopt het verkeerd?
09.04.2025 - 20:38DROPS Design answered:
Dag Katherine,
Je hebt 90 steken en je kant de middelste 42 steken af. Daardoor heb je 48 steken over, dus 24 steken aan elke kant van de schouder. Wanneer je daar 2 x 2 steken afkant heb je dus 20 steken over. De steken die je samen breit boven de kabels staan daar dus los van en je rekent het oorspronkelijk aantal steken, toen je de kabels nog niet had samen gebreid.
13.04.2025 - 09:48
![]() Sandrine wrote:
Sandrine wrote:
Il y a un problème pour les diminutions du dos en taille M. D’après mes calculs vous demandez de diminuer au total 48 mailles pour arriver à 92 mailles mais je n’ai que 106 mailles, c’est un problème.
01.04.2025 - 22:51DROPS Design answered:
Bonjour Sandrine, lorsque vous continuez le dos séparément, vous avez 106 mailles et vous devez diminuer pour les emmanchures: 1 m de chaque côté soit 2 mailles: 1 x tous les 2 rangs et 6 x tous les 4 rangs: vous allez diminuer au total (2x1)+(2x6)=14 m; soit 106-14=92 mailles. Ou bien en êtes-vous à un autre niveau? N'hésitez pas à m'en dire plus, merci d'avance pour votre compréhension. Bon tricot!
02.04.2025 - 08:00
![]() Kina wrote:
Kina wrote:
Håller på med avmaskning axlar på bakstycket, stickar i S. Får inte ihop antalet maskor. Har 90 maskor, maska av 42 mittersta och har då 48 maskor delat på 2= 24 maskor på varje sida. Maska av 8 maskor totalt över flätor och då har jag 20 maskor kvar. Nu maskas det av maskor till hals på vartannat varv så här: Maska av 2 maskor 2 gånger = 20 maskor igen på varje axel. Maska av när arbetet mäter 48 cm. Jag har 16 maskor kvar, stämmer det på varje sida?
30.03.2025 - 12:52DROPS Design answered:
Hej Kina. De 8 maskorna du ska minska är på de mittersta 42 maskorna som du ska avmaska. Så du minskar dessa samtidigt som du avmaskar. Du har alltså 24 maskor på varje axel efter du avmaskat (och minskat) de mittersta maskorna. Sedan maskar du av 2 maskor 2 gånger till hals och har efter det 20 maskor kvar på varje axel. Mvh DROPS Design
01.04.2025 - 10:56
![]() Karine wrote:
Karine wrote:
Koo skeemi A.4 (=22-22-22-28-28-28 silmust), jätka skeemiga A.2 kokku 3 korda (= 30 silmust), koo skeemi A.3 Kas ei peaks olema A1- A3
30.03.2025 - 11:38DROPS Design answered:
Aitah Karine! Peab jah olema esimene A.1 mitte A.4. Tänan teatamast!Head kudumist!
18.07.2025 - 16:59
|
||||||||||||||||||||||
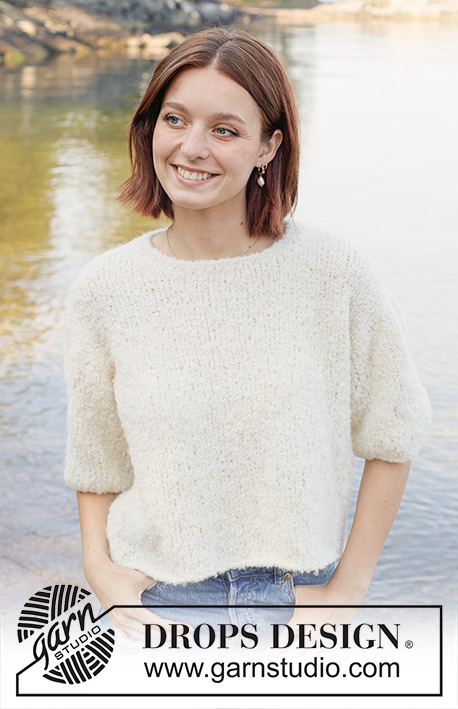
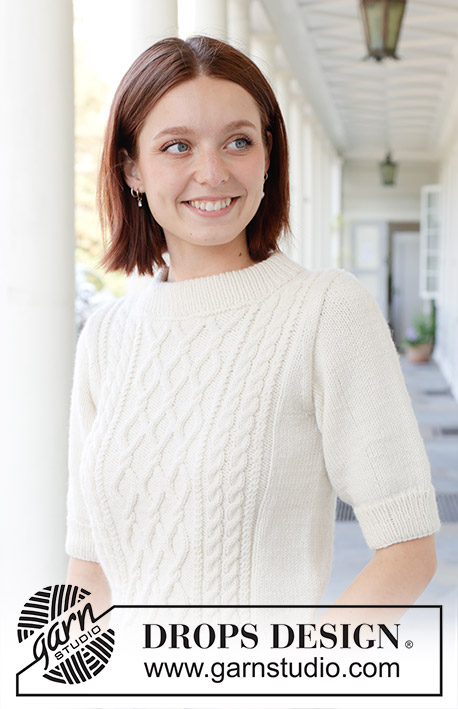
April Snow#aprilsnowsweater |
||||||||||||||||||||||
 |
 |
|||||||||||||||||||||
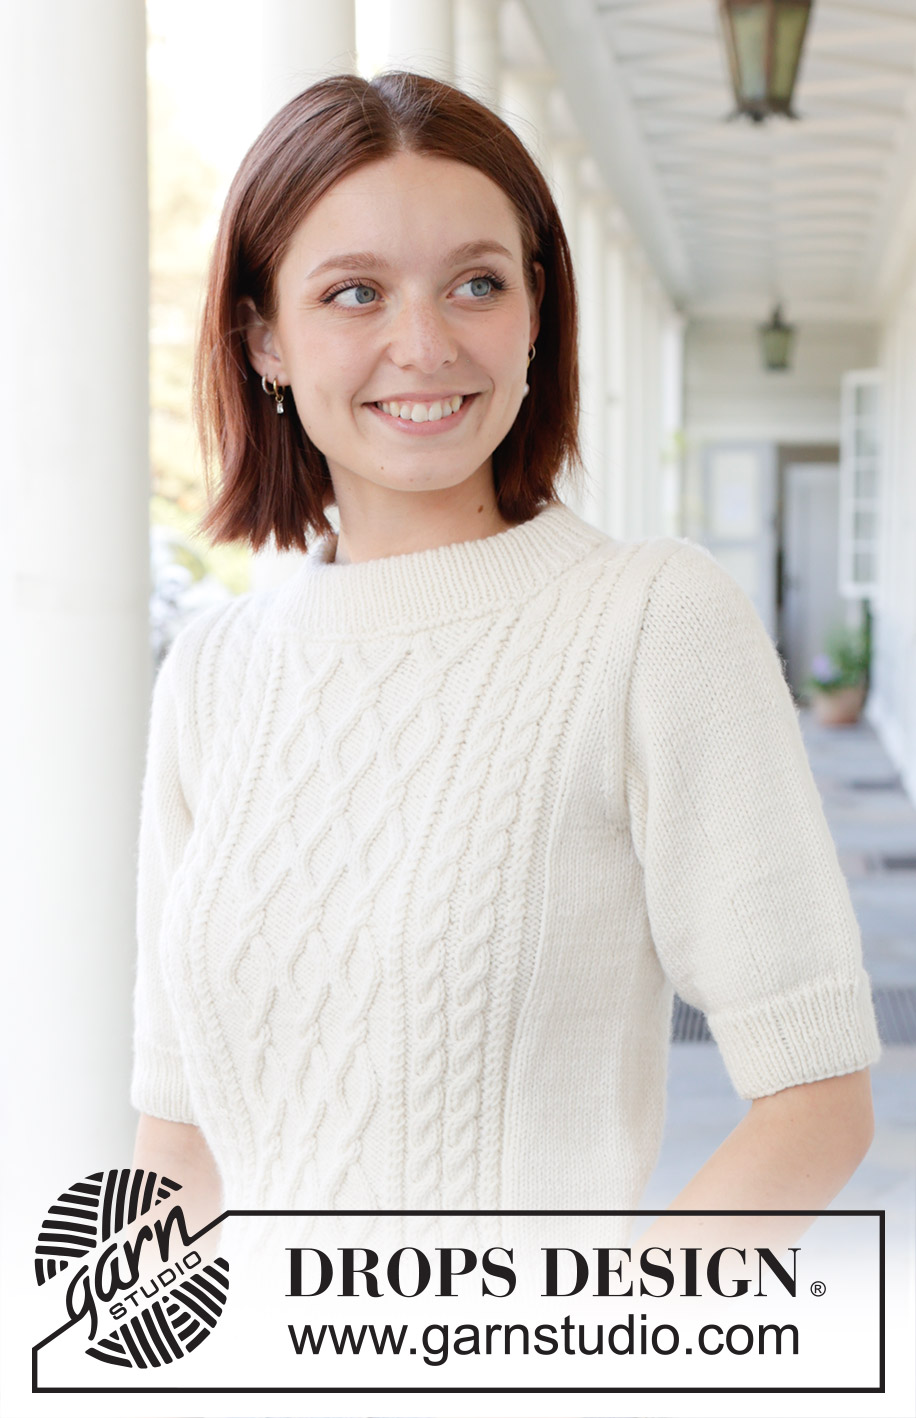
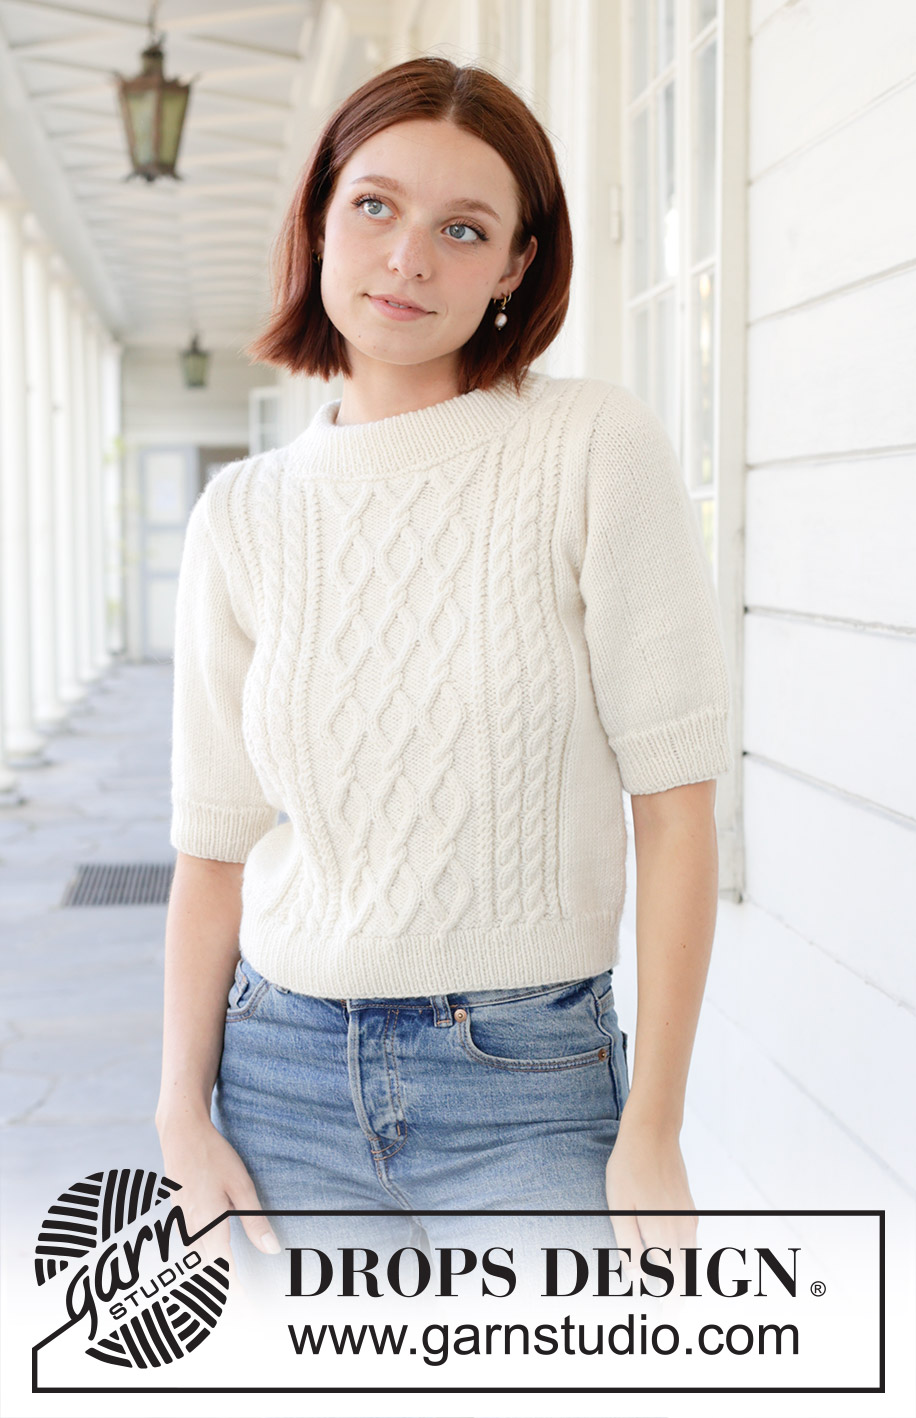
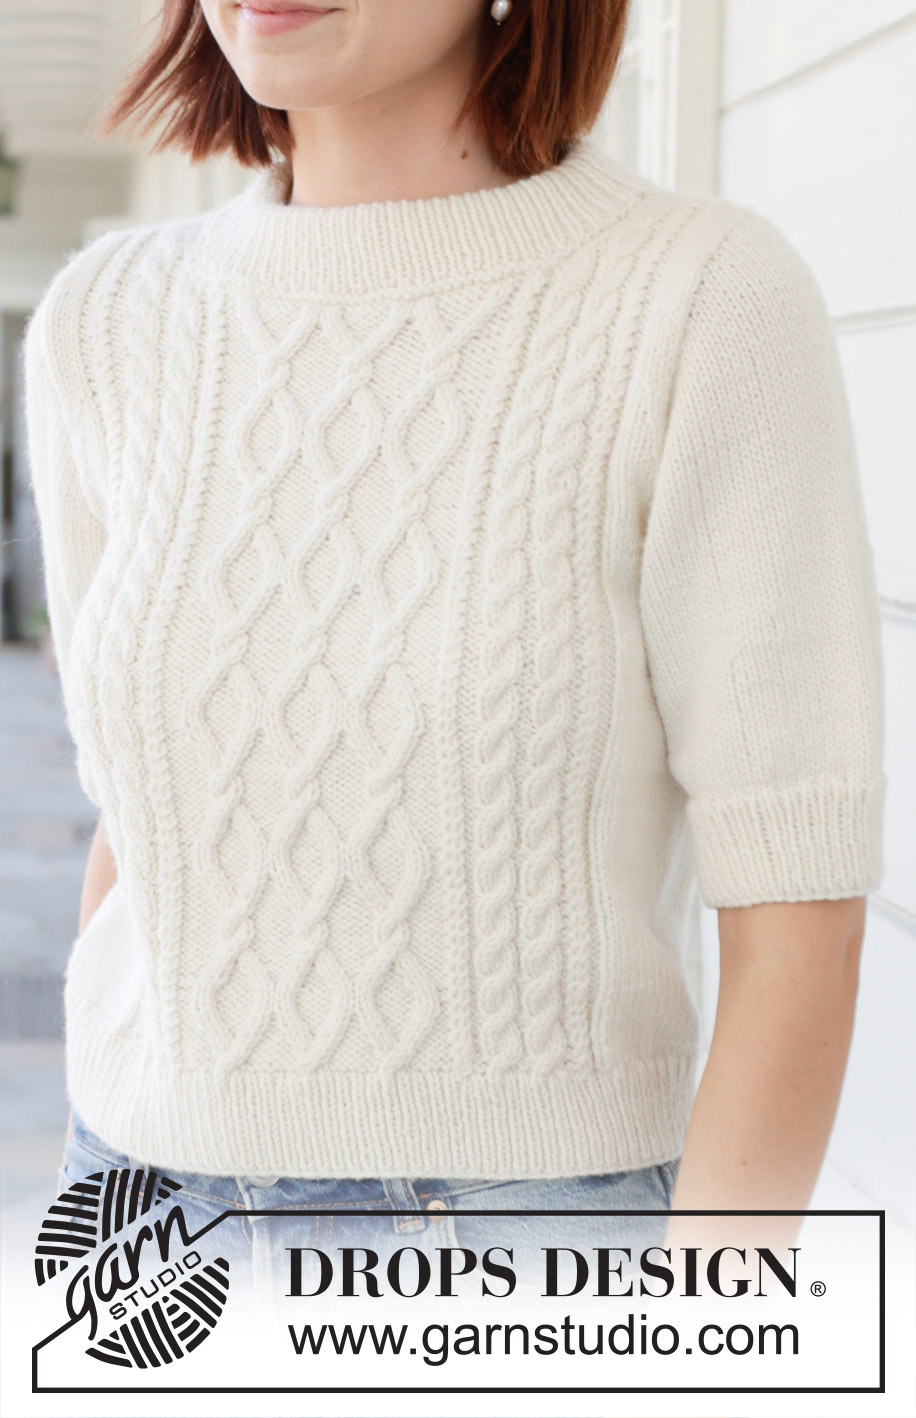
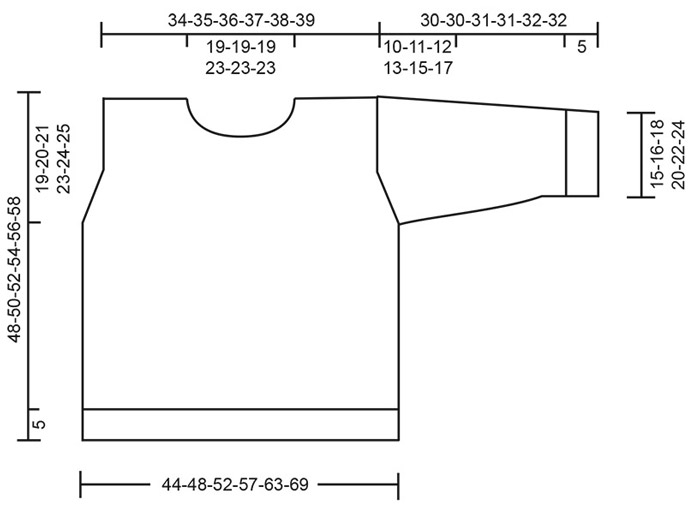
Knitted jumper in DROPS Daisy or DROPS Merino Extra Fine. Piece is knitted bottom up with cables, short sleeves and double neck edge. Size: S - XXXL.
DROPS 259-1 |
||||||||||||||||||||||
|
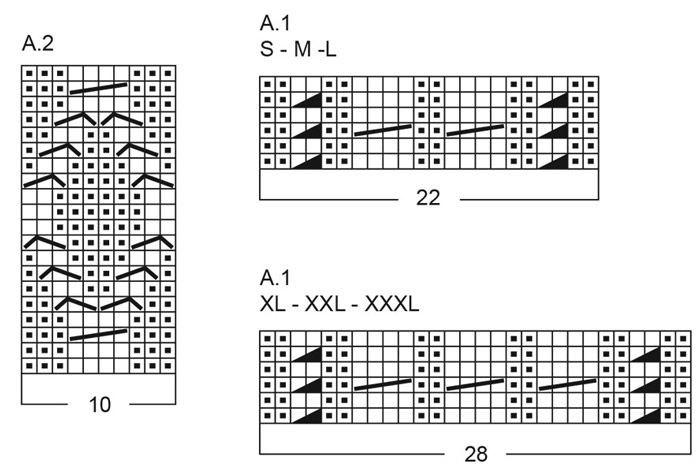
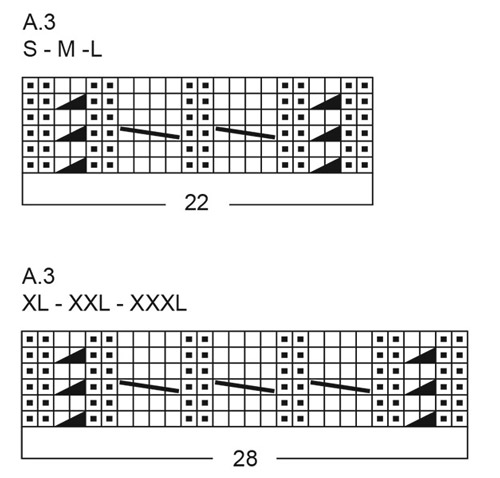
---------------------------------------------------------- EXPLANATION FOR THE PATTERN: ---------------------------------------------------------- GARTER STITCH (when working back and forth): Knit on all rows, i.e. knit from right side and knit from wrong side. 1 ridge vertically = knit 2 rows. PATTERN: See diagrams A.1 to A.3. Choose diagram for desired size – applies to A.1 and A.3 . Diagrams show all rows in pattern seen from the right side. DECREASE TIP: All decreases are done from the right side! Work 1 stitch in garter stitch, knit 2, slip 1 stitch knitwise, knit 1, pass slipped stitch over stitch worked (= 1 stitch decreased), work until 5 stitches remain, knit 2 together (= 1 stitch decreased), finish with knit 2 and 1 stitch in garter stitch. INCREASE TIP: Increase 1 stitch on each side of marker thread as follows: Work until 1 stitch remains before marker thread, make 1 yarn over, knit 2 (marker thread is in the middle of these 2 stitches), make 1 yarn over (= 2 stitches increased). On next round knit yarn over twisted to avoid holes. Then work the new stitches in stocking stitch. ---------------------------------------------------------- START THE PIECE HERE: ---------------------------------------------------------- JUMPER - SHORT OVERVIEW OF THE PIECE: In this pattern needles of different length have been used, begin with fitting length for number of stitches and switch as needed. Piece is worked in the round on circular needle, from the bottom and up to armholes. Then divide the piece for front piece and back piece, and finish each part separately back and forth. Work pattern both on the front and back. Work sleeves bottom up, and work in the round on needle until armhole, then work sleeve back and forth on needle. Sew parts together. Finish by picking up stitches around the neck and work a neck edge in the round. If 0 stitches is given for the chosen size, it means that you skip the information and jump to next information. BODY: Cast on 222-242-264-288-318-350 stitches on circular needle size 3 mm with DROPS Daisy or DROPS Merino Extra Fine. Work rib (= knit 1/purl 1) for 5 cm. Knit 1 round while AT THE SAME TIME decreasing 2-6-8-4-10-18 stitches evenly = 220-236-256-284-308-332 stitches. Insert 1 marker thread at beginning of round, and 1 marker thread after 110-118-128-142-154-166 stitches = in the sides on body. Switch to circular needle size 4 mm and work pattern from beginning of round as follows: *Work 18-22-27-28-34-40 stitches in stocking stitch, work A.1 (= 22-22-22-28-28-28 stitches), work A.2 3 times in total (= 30 stitches), work A.3 (= 22-22-22-28-28-28 stitches), work 18-22-27-28-34-40 stitches in stocking stitch *, work from *-* 1 more time. Continue the pattern like this. Remember to follow the knitting tension! Work until piece measures 29-30-31-31-32-33 cm from cast-on edge - adjust so that next round is an uneven numbered round in pattern (the cable needles will then be from right side when working back and forth afterwards). Now divide the piece for front piece and back piece. DIVIDING FOR ARMHOLES: Work next round as follows: Begin 4-6-8-10-11-12 stitches before the beginning of round, cast off the next 8-12-16-20-22-24 stitches on round for armhole, work 102-106-112-122-132-142 stitches (= front piece), cast off the next 8-12-16-20-22-24 stitches for armhole, work 102-106-112-122-132-142 stitches as before (= back piece). Now work front piece and back piece back and forth on needle until finished measurements. BACK PIECE: = 102-106-112-122-132-142 stitches. Continue pattern and stocking stitch back and froth as before with 1 edge stitch in GARTER STITCH in each side – read explanation above – AT THE SAME TIME on next row from right side decrease for armhole inside 3 stitches – read DECREASE TIP. Decrease like this every other row 1-1-2-4-11-18 times in total, then every 4th row 5-6-7-7-4-1 times in total = 90-92-94-100-102-104 stitches remain. When piece measures 44-46-48-50-52-54 cm, cast off the middle 42-42-42-54-54-54 stitches for neck while AT THE SAME TIME knitting the knit stitches in cables together 2 by 2 (= 8-8-8-12-12-12 stitches decreased) and finish each shoulder separately. SHOULDERS: Now cast off stitches for neck on every other row as follows: Cast off 2 stitches 2 times = 20-21-22-19-20-21 stitches remain on each shoulder. Cast off when piece measures 48-50-52-54-56-58 cm. FRONT PIECE: = 102-106-112-122-132-142 stitches. Continue pattern and stocking stitch back and forth as before with 1 edge stitch in GARTER STITCH in each side – read explanation above – AT THE SAME TIME on next row from right side decrease for armhole inside 3 stitches – read DECREASE TIP. Decrease like this every other row 1-1-2-4-11-18 times in total, then every 4th row 5-6-7-7-4-1 times in total = 90-92-94-100-102-104 stitches remain. When piece measures 42-44-45-46-47-48 cm, work next row from wrong side as follows: Work as before over the first 26-27-28-25-26-27 stitches, knit over knit and purl over purl over the next 38-38-38-50-50-50 stitches while AT THE SAME TIME knitting the knit stitches in cables together 2 by 2 (= 8-8-8-12-12-12 stitches decreased), slip these 30-30-30-38-38-38 middle stitches on a thread for neck, work the remaining 26-27-28-25-26-27 stitches as before. Now finish each shoulder separately. SHOULDERS: 1st row is from wrong side as before. Then cast off stitches for neck on every row from neck as follows: Cast off 2 stitches 1 time, then 1 stitch 4 times = 20-21-22-19-20-21 stitches remain on each shoulder. Cast off when piece measures 48-50-52-54-56-58 cm. SLEEVES: Work sleeve in the round on needle, then finish sleeve cap back and forth on needle. Cast on 76-80-90-102-112-122 stitches on double pointed needles size 3 mm. Work rib (= knit 1/purl 1) for 5 cm. On next round switch to double pointed needles size 4 mm and knit 1 round while AT THE SAME TIME decreasing 12-12-14-18-20-22 stitches evenly on row = 64-68-76-84-92-100 stitches. Insert 1 marker thread mid under sleeve, this is used when increasing stitches under sleeve. Work in stocking stitch in the round. When sleeve measures 8-9-10-8-10-10 cm from cast-on edge, increase 2 stitches mid under sleeve - read INCREASE TIP. Increase like this every 5-4-5-4-5-0 cm 3-3-2-3-2-1 times in total = 70-74-80-90-96-102 stitches. Work in stocking stitch until sleeve measures 20-19-19-18-17-15 cm from cast-on edge. Now work sleeve cap as explained below. SLEEVE CAP: On next round cast off 8-12-16-20-22-24 stitches mid under sleeve but to avoid cutting the yarn at begin round 4-6-8-10-11-12 stitches before stitch with marker thread mid under sleeve, cast off and then work in stocking stitch the rest of round = 62-62-64-70-74-78 stitches. Then finish the piece back and forth on needle while AT THE SAME TIME casting off for sleeve cap the beginning of every row as follows: Cast off 2 stitches 3 times in each side, 1 stitch 4-6-8-10-14-18 times in each side = 42-38-36-38-34-30 stitches remain, then cast off 2 stitches at the beginning of every row until sleeve measures 30-30-31-31-32-32 cm. Cast off the remaining stitches. ASSEMBLY: Sew the shoulder seams. Sew sleeve in armhole. NECK EDGE: Use circular needle size 3 mm, pick up stitches around the neck from right side as follows: Begin at one shoulder seam and pick up approx. 116-116-118-140-144-146 stitches including stitches on thread mid front – number of stitches must be divisible by 2. Purl 1 round and knit 1 round. Work rib (= knit 1/purl 1) in the round for 10-10-10-11-11-11 cm. Cast off somewhat loosely and fold neck edge double towards the wrong side and fasten with a couple of stitches. |
||||||||||||||||||||||
Diagram explanations |
||||||||||||||||||||||
|
||||||||||||||||||||||
 |
||||||||||||||||||||||
 |
||||||||||||||||||||||
 |
||||||||||||||||||||||
Have you finished this pattern?Tag your pictures with #dropspattern #aprilsnowsweater or submit them to the #dropsfan gallery. Do you need help with this pattern?You'll find 34 tutorial videos, a Comments/Questions area and more by visiting the pattern on garnstudio.com. © 1982-2026 DROPS Design A/S. We reserve all rights. This document, including all its sub-sections, has copyrights. Read more about what you can do with our patterns at the bottom of each pattern on our site. |
||||||||||||||||||||||


With over 40 years in knitting and crochet design, DROPS Design offers one of the most extensive collections of free patterns on the internet - translated to 17 languages. As of today we count 324 catalogues and 12290 patterns translated into English (UK/cm). 12290
We work hard to bring you the best knitting and crochet have to offer, inspiration and advice as well as great quality yarns at incredible prices! Would you like to use our patterns for other than personal use? You can read what you are allowed to do in the Copyright text at the bottom of all our patterns. Happy crafting!
Post a comment to pattern DROPS 259-1
We would love to hear what you have to say about this pattern!
If you want to leave a question, please make sure you select the correct category in the form below, to speed up the answering process. Required fields are marked *.